Lesson 1 Logging On and Logging Off
The SAP software and its database are installed in large centralized computers called servers that are dedicated solely to this system and that have the memory and processing speeds to support it. The servers are linked by cable and satellite networks to remote or peripheral client computers, where end users like you interact with the system.
Large corporate operators of SAP often maintain several classes of servers, such as production, development, and training servers.
Production servers house a live SAP system; that is, the software and database used by a business to manage its affairs and by all users to do their work with the system. We use several production servers to house the SAP software and its database in our organization, although they all provide the same access to the entire system. These servers are assigned functional names such as Warehouse Management and Purchasing in order to direct different types of users (warehouse managers and purchasing agents, in this example) to different production servers. This distributes the workload more evenly among all these servers (a process called “automatic load balancing”) and speeds the overall operating and response times of the system for all users.
Development servers are used only by computer programmers and SAP specialists to develop and test customized versions of the software.
Training servers contain copies of a live database and are used as training “sandboxes” where new users can “play” with and learn the system without harm to the live database. Most end users do not usually have access to these servers except in training classes.
To log on to SAP, you must first select a logon server and then identify yourself to the system with a user ID and password (and sometimes client and language codes). Once the system verifies that you have an account with the SAP administrator, the SAP application window appears and displays the SAP Easy Access screen. This screen is your gateway to the application and its database.
This first lesson provides instructions on logging on to the SAP system through the available servers in your network, dealing with problems during logons, and logging off the system.
There are two procedures for logging on SAP. This first procedure calls up the SAP Logon pad, where you select your logon server, and then the SAP screen, where you enter identification codes of various types. This procedure gives you the option of logging on a server of a specific class (production, development, or training) or functional type (for example, a production server for purchasing agents).
Procedure
Logging On With the SAP Logon Pad
Step 1. Click the Start button (A) of the Windows desktop, then follow a menu path to the SAP logon command. The exact menu path depends on the setup of your computer. For our organization, it is
Start > Programs > SAP Front End > SAPlogon (Figure 1.1).

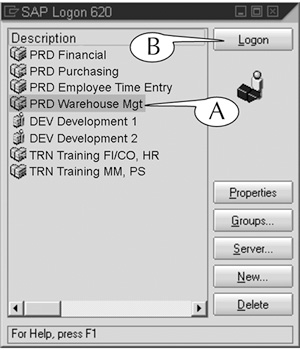
Step 2. The SAP Logon pad appears (Figure 1.2). It displays a list of the available servers in your network.
![]() Double-click the name of a server, or
Double-click the name of a server, or
Click the name of a server to select and highlight it (A), then click the Logon button (B).
Figure 1.2 The SAP Logon pad. This sample pad displays the names of several production, development, and training servers. The live SAP system can be accessed through any one of the production (PRD) servers.
Step 3. The SAP application window opens to display the SAP screen (Figure 1.3). This screen contains four fields: Client, User, Password, and Language. The Client and Language fields are often prefilled, or prepopulated, with codes when this screen appears.1
![]() Enter your user ID in the User field (A).
Enter your user ID in the User field (A).
![]() Enter your password in the Password field (B).
Enter your password in the Password field (B).
![]() Option: Change your logon password. (See Lesson 4 for instructions.)
Option: Change your logon password. (See Lesson 4 for instructions.)
![]() Hit the Enter key on your keyboard.
Hit the Enter key on your keyboard.
Figure 1.3 The SAP screen, where you enter your user ID and password (and any other required codes).

Step 4. The SAP Easy Access screen appears inside the application window. You are now ready to work with the system.
End Procedure
The second logon procedure uses a desktop shortcut (Figure 1.4) to bypass the SAP Logon 620 pad and the SAP screen and rapidly log on with just your password.

You can create one or more desktop shortcuts for logging on to the system. (See the instructions in Lesson 4.) Each desktop shortcut has the following convenient features:
![]() It is rigged to log on to a specific server, so you do not need to select a server with the SAP Logon pad.
It is rigged to log on to a specific server, so you do not need to select a server with the SAP Logon pad.
![]() It is rigged to know your user ID, client number, and language code, so you do not need to enter these data on the SAP screen. Rather, you simply provide your password on a small popup screen.
It is rigged to know your user ID, client number, and language code, so you do not need to enter these data on the SAP screen. Rather, you simply provide your password on a small popup screen.
![]() It is rigged to display a specific target screen once you log on. The SAP Easy Access screen, which is the home page of the system, is the usual preferred destination (and the target of the desktop shortcut in Figure 1.4), but you can also create desktop shortcuts that call up other screens when you log on.
It is rigged to display a specific target screen once you log on. The SAP Easy Access screen, which is the home page of the system, is the usual preferred destination (and the target of the desktop shortcut in Figure 1.4), but you can also create desktop shortcuts that call up other screens when you log on.
Procedure
Logging On With a Desktop Shortcut
Step 1. Double-click the icon for the desktop shortcut (Figure 1.4).
Step 2. The SAP Easy Access popup screen appears (Figure 1.5). It contains only the User Name and Password fields.
![]() Confirm your user ID in the User name field (A).
Confirm your user ID in the User name field (A).
![]() Enter your password in the Password field (B).
Enter your password in the Password field (B).
![]() Hit the Enter key on your keyboard.
Hit the Enter key on your keyboard.

Step 3. The SAP application window appears and displays your target screen (the SAP Easy Access screen, in this case). You are now ready to work with the system.
End Procedure
The most common problem you will probably encounter during logon is the failure of the system to recognize a code that you might have entered in one of the four fields of the SAP screen. When you enter wrong codes, the system responds with a message in the status bar of the screen (Figure 1.6) that something is not correct.
Figure 1.6 The system posts a message in the status bar if you enter the wrong code on the SAP screen.
This error is most often due to typing errors. Check that the Caps Lock key on your computer keyboard is disengaged, then reenter your codes more carefully.
For security purposes, some SAP administrators program their system to erase the SAP screen and freeze you out of the logon process when you fail to log on with the correct codes several times in a row. When this occurs, you must contact your SAP administrator to regain authorization to use the system.
You can log off from any screen in the SAP system. There are three alternative procedures for this action, depending on whether you have one or several open sessions on your desktop.
Procedure
Logging Off
Step 1. If you have only one open session (application window), click the third control button (A) in the menu bar (Figure 1.7).
Figure 1.7 You can log off by clicking the third control button, using the System menu, or entering /nex in the command field.

If you have several open sessions, you can either
![]() Follow the menu path System > Log off (B), or
Follow the menu path System > Log off (B), or
Enter /nex in the command field2 (C), and hit the Enter key on your keyboard.
Step 2. The Log Off screen appears, and you are asked to confirm the action (Figure 1.8).
![]() Click the Yes button, or
Click the Yes button, or
Hit the Enter key on your keyboard.
Figure 1.8 Confirm the log-off with this screen by clicking the Yes button or hitting the Enter key on your keyboard.

End Procedure
1. Most business enterprises use a single SAP database for all their divisions and functions. This database is identified by a single client code. Business enterprises with several subsidiary companies might maintain separate databases for each of these companies. In this case, you must specify, with the correct client code, the database you want to access. And if you work for a multinational business, you must specify your language in the Language field.
2. We describe this and other uses of the command field in Lesson 7.