Lesson 10 Searching for Codes
The previous lesson provided some basic instructions on entering the codes for objects, dates, and units of measure in the data entry fields of initial screens. This next lesson answers the question: What do I do if I don’t know the codes?
There are so many codes for so many objects in the SAP database that it is impossible to remember them all and impractical to list them all on job aids, cheat sheets, and the like. For instance, any good-sized company might well own tens of thousands of pieces of equipment, each with its own unique code, which it houses in its plants, which have their own codes. It may also stock the same number of consumable materials, each with its own code, in its warehouses, which also have their own codes.
Fortunately, SAP provides four easy-to-use popup tools for searching for codes:
![]() Short hit list screens
Short hit list screens
![]() Multiple-tab search screens
Multiple-tab search screens
![]() Structure search trees
Structure search trees
![]() List-display search screens
List-display search screens
To start the process of searching for an unknown code, you simply click inside a data entry field. This action highlights that field and displays a search button (A) to its immediate right (Figure 10.1). Click it, and you are ready to search.
Figure 10.1 Click inside a field to call up its search button (A), and click it to start a search for the correct code for that field.
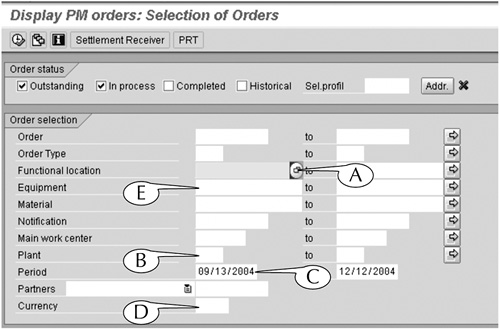
(If you are keyboard-oriented, you can alternatively click inside a data entry field to highlight it, then hit the F4 function key on your keyboard.)
This lesson describes the design and operation of the four search screens in the SAP system and concludes with some tips for using them effectively.
Some data entry fields can accept only a limited number of codes. When you call up and click the search buttons for these fields, a short hit list screen appears over the initial screen with a list of all the available codes and their descriptions. Scroll down this hit list, locate the desired code, and double-click it; the code is automatically entered in the field for you.
For instance, the Plant field is common to many initial screens, including the initial screen of the IW39 transaction (Figure 10.1B). Generally, the number of plants operated by any one company is relatively small, on the order of several to several tens. Consequently, when you click the search button for this field, you see immediately a short hit list screen with the names and codes of all the plants (Figure 10.2).
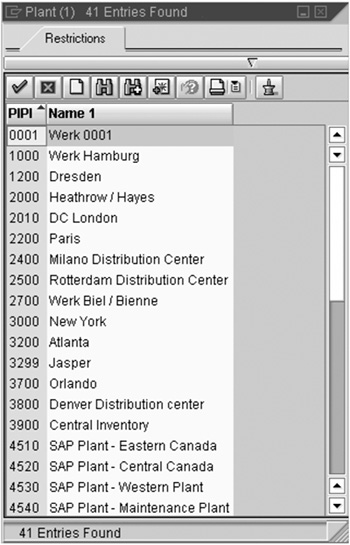
For this example, the short hit list screen shows the names and codes of 41 plants; this number is displayed in both the title bar at the top of this screen and the status bar at its base. Once you see this screen, scroll through the list, locate the desired plant, and double-click its name; the plant’s code is automatically entered in the Plant field of the initial screen.
Short hit list screens appear when you search for the correct code for many objects, including bin numbers, material and movement types, priority codes, purchasing groups, and order types. They are especially common to the data entry fields of units of measure and dates.
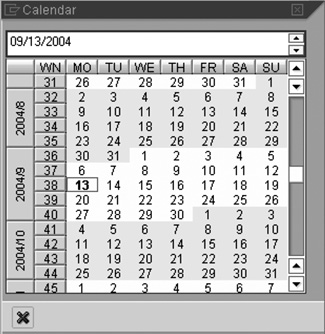
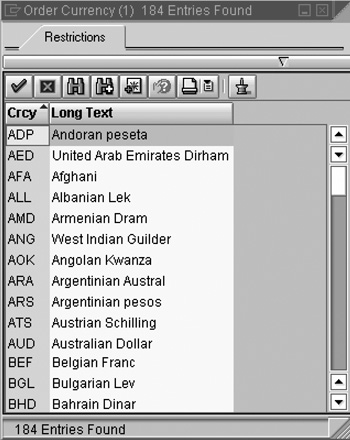
For example, a search for the correct code for the Period field on the initial screen of the IW39 transaction (Figure 10.1C) yields a short hit list screen with several monthly calendars (Figure 10.3). Similarly, a search for the correct code for the Currency field on this same screen (Figure 10.1D) yields a short hit list screen with the codes for 184 currency types (Figure 10.4).
Many data entry fields, such as the Equipment and Material fields on the initial screen of the IW39 transaction (Figure 10.1), could accept many hundreds or thousands of codes for objects of many different stripes and colors. When you are searching for the correct codes for these fields, the short hit list search screen is not a practical tool.
Consider the case of searching for the correct code for the Equipment field on the initial screen of the IW39 transaction (Figure 10.1E). When you click the search button for this field, a multiple-tab search screen appears over this initial screen (Figure 10.5).
Figure 10.5 The multiple-tab search screen for the Equipment field. This screen is set to search for all pieces of equipment with the word pump in their descriptions.

The critical design elements on this search screen are its many data entry fields, which allow you to enter multiple criteria for searching for an object code. There are usually so many fields on the screens, in fact, that they are distributed throughout several subscreens, which can be displayed in one of three ways.
![]() Click one of the tabs (A) at the top of the screen.
Click one of the tabs (A) at the top of the screen.
![]() Click the left or right control arrow (B) to the right of the tabs to move to the next or previous subscreen in the series.
Click the left or right control arrow (B) to the right of the tabs to move to the next or previous subscreen in the series.
![]() Click the list icon (C) to the right of the control arrows to display a list of subscreens (D), then scroll down and click the desired one.
Click the list icon (C) to the right of the control arrows to display a list of subscreens (D), then scroll down and click the desired one.
You can enter one or more search criteria on any one subscreen of a multiple-tab search screen. For an example, we searched for the codes for all the pumps that are owned by a company by following this next procedure, which makes use of a single search criterion.
Procedure
Searching for a Code With a Single Search Criterion
Step 1. Locate any subscreen that contains the Equipment descript field (Figure 10.5E), and enter the phrase *pump*. (We explain the significance of the asterisks in the next part of this lesson.)
Step 2. Hit the Enter key on your keyboard, or
Click the Enter button (F) in the lower-left corner.
Step 3. The system responds with a hit list of equipment that matches the single search criterion (Figure 10.6). Each line of this list displays the name and the object code for one piece of equipment that has the word pump in its description.

We scrolled through this list, located the desired pumps, and double-clicked its line to enter its code in the Equipment field of the initial screen.
Note: If you do not find the desired object code on the hit list, you may want to return to the multiple-tab search screen and enter a new set of search criteria. To return to that search screen, click the bar (A) directly below the tabs on the hit list.
End Procedure
But what if you wanted to search for pumps that were stored at one specific plant in a company? You would follow this next procedure to search for them with these two criteria.
Procedure
Searching for a Code With Multiple Search Criteria
Step 1. Locate a subscreen that contains the Maintenance plant and Equipment descript fields (Figure 10.7).
Figure 10.7 The multiple-tab search screen for the Equipment field. This screen is set to search for all pieces of equipment at maintenance plant 1000 with the word pump in their descriptions.

Step 2. Enter the plant code in the Maintenance plant field (A).
Step 3. Enter the phrase *pump* in the Equipment descript field (B).
Step 4. Hit the Enter key on your keyboard, or
Click the Enter button (C) in the lower-left corner.
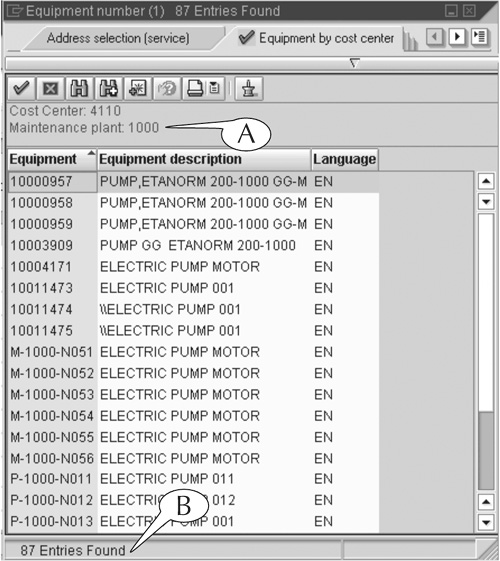
Step 5. The system responds with a hit list of every piece of equipment that meets the two search criteria (Figure 10.8). Once again, each line of this hit list displays the description and code of one piece of equipment with the word pump in its description. The header of the screen shows that all these pumps are located in the specified plant (A).
Figure 10.8 The hit list for a two-criteria search for an equipment code. The header shows that all the pumps are housed at maintenance plant 1000 (A).
Scroll through this hit list to locate the desired vehicle and double-click its line to enter its code in the Equipment field of the initial screen.
End Procedure
We are going to draw upon these examples of searches for equipment codes to discuss some general tips for using multiple-tab search screens.
Tip #1: When you click the search button for any data entry field to call up its multiple-tab search screen, the subscreen that appears will be the last one you used when you searched for this same datatype code.
The system has a good memory for your preferences in search screens (and other things). You can always change the subscreen by clicking another tab, however.
Tip #2: Entry fields for the most useful search criteria appear on nearly every subscreen.
The most commonly used search criterion for equipment codes is their description. (This is also true for many other objects.) Consequently, you will find the Equipment descript field on every subscreen of the equipment multiple-tab search screen.
Tip #3: Enter a few characters or partial words or phrases, preceded and followed by asterisks (*), in object description fields.
Asterisks serve as wildcards in a search: They represent any characters, words, or phrases in the description of an object other than the exact content between them. In the previous two examples, they trigger a search for any equipment with the word pump and anything else in its description.
Tip #4: The greater the number of search criteria, the shorter the hit list.
When we searched for all the pumps in our company, the hit list displayed data for 1,245 pumps (Figure 10.6B). When we restricted this search to pumps in one maintenance plant, the hit list displayed data for 87 pumps (Figure 10.8B).
The same rule applies for an entry in an object description field: the longer it is, the shorter the hit list. For instance, if we had entered *pump, etanorm* in the Equipment descript field during our two searches, the hit lists would have been considerably shorter, for very few pumps have that phrase in their description.
But too short an entry in an object description field is not a good thing either. For instance, if we had entered *p* in the Equipment descript field during our example searches, the hit lists would have been ridiculously long, because they would have displayed the data for every piece of equipment with the letter p in its description.
Tip #5: Don’t assume that descriptions are spelled out, or spelled correctly.
Suppose you want to search for the code for an electrical transformer. You may be inclined to enter *transformer* in the Equipment descript field, but you would be making a mistake: Utility workers use the jargon xformer to describe this sort of equipment.
Similarly, suppose you want to search for the code for electrical conductor (that is, wire). You may be inclined to enter *conductor* in the Equipment descript field. You are assuming that everyone (including the folks who configured SAP for your company) knows how to spell this word correctly (they might misspell it conducter).
And of course, you must watch out for regional differences in spelling. The most obvious example is the spelling of colour by British speakers of the English language versus its spelling as color by American speakers of English. When you are dealing with two people separated by a common tongue, such discrepancies can happen frequently.
Tip #6: Consider the possible number of hits you might get in a search, and set up the search screen accordingly.
Every subscreen of every multiple-tab search screen contains a field called Maximum no of hits (see Figure 10.7D). This field contains a default value—in our case, 100—that restricts the contents of the hit list to the first 100 objects that meet your selection criteria. If the search finds more than 100 objects that match your criteria, it displays only these first 100 matches and posts a message in its status bar that reads More than 100 input options (Figure 10.9A).
Figure 10.9 The hit list tells you with a message in its status bar (A) that more than 100 objects matched your search criteria.

When this happens, you must return to the search screen, delete the entry in the Maximum no of hits field and execute the search again. Save yourself the extra work and delete this entry before you conduct a search if you suspect there might be more than 100 hits.
Tip #7: You can attach operational conditions (called selection options) such as greater than (>) or less than (<) to any data entry field by double-clicking inside it and selecting the condition from a popup screen.
See Lesson 12 for more instructions on using selection options.
Tip #8: Search hit lists display their output in the order of the object code by default. For example, a hit list for equipment displays the matching objects in the order of the equipment code (Figure 10.10). This makes it difficult to locate a specific piece of equipment on the hit list by its description, because the column for the equipment code datatype (with the header Equipment description) is randomly ordered.
Figure 10.10 This hit list for an equipment search displays its output in the order of the equipment code.

However, you can sort a hit list according to the contents of any column by clicking that column’s header. For instance, one click of the header of the Equipment description column (Figure 10.10A) sorts the hit list in alphabetical order (Figure 10.11), and a second click sorts it in reverse order.

There may be circumstances in which you are searching for the correct code for an object that is part of a larger hierarchy of objects. Some objects that fall into this category include the following.
![]() Personnel in a company or an organization: for example, personnel organized in a hierarchy of president, vice presidents, managers, assistant managers, administrative assistants, and so on down
Personnel in a company or an organization: for example, personnel organized in a hierarchy of president, vice presidents, managers, assistant managers, administrative assistants, and so on down
![]() Equipment in an assemblage of functionally related equipment: for example, a transformer that is part of a neighborhood power substation, which is part of a regional electrical generation and distribution system
Equipment in an assemblage of functionally related equipment: for example, a transformer that is part of a neighborhood power substation, which is part of a regional electrical generation and distribution system
![]() Organizational units in a business: for example, a department within a business unit within a regional office of a global corporation
Organizational units in a business: for example, a department within a business unit within a regional office of a global corporation
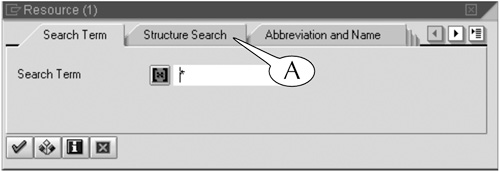
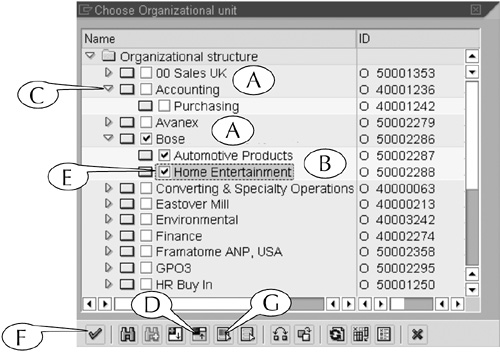
When this case arises, you might find a Structure search tab (Figure 10.12A) on the multiple-tab search screen for the object. Click it, and the search screen is replaced by a multilevel structure tree (Figure 10.13).
Figure 10.12 Click the Structure Search tab (A) on a multiple-tab search screen to display a structure search tree for organizational units.
Structure search trees are very similar in their design and operation to menu folders and Favorites folders (see Lessons 5 and 6). For example:
![]() First-level “branches” in a structure tree identify the major classes of the object. For example, the first-level branches in Figure 10.13 identify the key business groups in a corporation, including Sales UK, Accounting, Avanex, and Bose (A).
First-level “branches” in a structure tree identify the major classes of the object. For example, the first-level branches in Figure 10.13 identify the key business groups in a corporation, including Sales UK, Accounting, Avanex, and Bose (A).
![]() Second-level branches identify subdivisions of the major classes. For example, the second-level branches in Figure 10.13 identify departments Automotive Products and Home Entertainment (B) within the Bose business group.
Second-level branches identify subdivisions of the major classes. For example, the second-level branches in Figure 10.13 identify departments Automotive Products and Home Entertainment (B) within the Bose business group.
You can expand the branches in a structure tree to display their upper-level branches in one of three ways.
![]() Click the control arrow (C) to the left of a specific branch name to reveal the next set of branches beneath it, or
Click the control arrow (C) to the left of a specific branch name to reveal the next set of branches beneath it, or
Double-click a branch name to reveal the next set of branches beneath it, or
Click the Expand all button (D) to expand all the branches in the structure tree. This is the least optimal method, because it takes some time for the system to display all the branches in the structure tree.
You can select one or more objects in the structure tree by clicking their selection boxes to place checks inside them (E), then clicking the Enter button (F) to enter them in a data entry field. If you select multiple objects, they are automatically entered on the multiple selection screen for a field.
You can also select all the objects in one level of the structure tree—for example, both departments in the Bose business group—by selecting the lower-level branch above it (Bose), then clicking the Select all button (G).
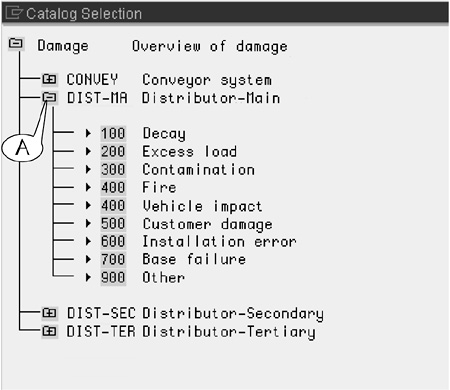
You may also encounter a simpler structure search tree when you search for the correct codes for certain objects. For example, when you trigger a search for the correct code to describe structural damages to equipment, the system automatically displays a structure search tree with folder icons (A) in place of the control arrows (Figure 10.14). You would then open its folders and subfolders to locate the correct code by clicking the icons once, then double-click the desired code to enter it in the data field in question.
When you click some tabs on a multiple-tab search screen, this screen is erased and replaced by a full-sized screen with many entry fields for your search criteria. This screen is actually identical to the initial screens of list-display transactions (which we discuss at the end of this book), but it can be used for searches in the exact same manner as the smaller subscreens of a multiple-tab search screen.
For example, the multiple-tab search screen for equipment codes contains a tab called Equipment by equipment list. When you click it, this search screen is replaced by the Display Equipment: Equipment Selection screen, a much larger search screen with many data entry fields (Figure 10.15). Despite its size, however, you can use this list-display search screen as you would any subscreen of the multiple-tab search screen: Enter one or more search criteria in the available fields, and then click the Execute button (A) to execute the search and display a hit list.
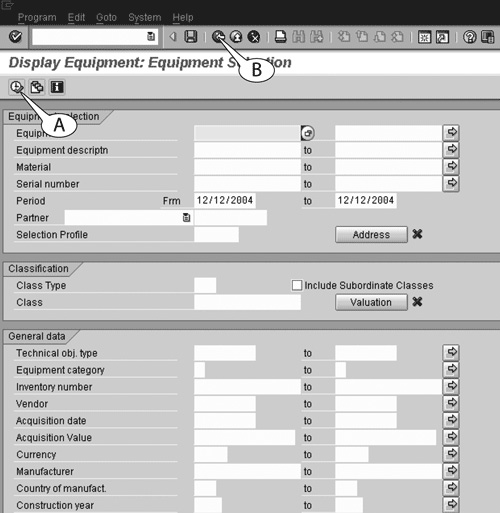
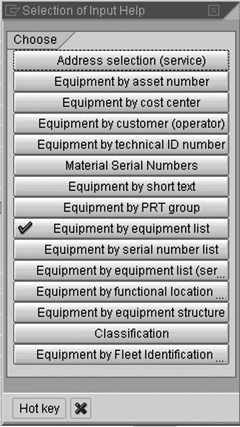
Suppose you call up this list-display search screen and then decide to use another subscreen of the multiple-tab search screen. How do you get back to that search screen?
Simple: Click the Back button (B) in the standard toolbar of the list-display search screen to call up the Selection of Input Help popup screen (Figure 10.16). This screen contains a list of the other available subscreens of that multiple-tab search screen. Double-click the desired one, and it appears.