Lesson 2 Working With SAP Sessions
The SAP application window (technically called a session) is a graphical user interface or GUI with which you communicate and interact with the SAP system. This interaction occurs on three types of screens that are displayed within the frame of the application window:
![]() The SAP Easy Access screen, which is the default home page of the system and the starting point for most transactions
The SAP Easy Access screen, which is the default home page of the system and the starting point for most transactions
![]() The initial screens of transactions, where you set up and execute transactions
The initial screens of transactions, where you set up and execute transactions
![]() The output screens of transactions, where the system displays the results of transactions to you
The output screens of transactions, where the system displays the results of transactions to you
This second lesson provides instructions on managing the properties of the SAP application window and its screens. Six topics are discussed:
![]() Controlling the session geometry and location
Controlling the session geometry and location
![]() Creating multiple sessions
Creating multiple sessions
![]() Killing a session
Killing a session
![]() Customizing the layouts of sessions and screens
Customizing the layouts of sessions and screens
![]() Customizing the SAP Easy Access screen
Customizing the SAP Easy Access screen
![]() Creating desktop shortcuts
Creating desktop shortcuts
You can change the size, shape and location of the SAP application window with several screen elements.
The size and shape of a window can be changed with the control buttons (A) in its upper-right corner (Figure 2.1). The functions of these buttons should be very familiar to you, for they are a common design feature in the application windows of most software.
Figure 2.1 The size, shape, and location of an application window can be changed with the control buttons (A), frame grabber (B), and menu bar.

![]() Click the first button to hide a window. This action reduces it to a bar in the application toolbar at the bottom of your Windows desktop (Figure 2.2A). You can redisplay the window by clicking this bar.
Click the first button to hide a window. This action reduces it to a bar in the application toolbar at the bottom of your Windows desktop (Figure 2.2A). You can redisplay the window by clicking this bar.
Figure 2.2 Clicking the first control button reduces an application window to a bar with the screen name (A) in the application toolbar of your Windows desktop.
![]() Click the second button to maximize the window to fill your desktop, and again to reduce it to a fraction of your desktop.
Click the second button to maximize the window to fill your desktop, and again to reduce it to a fraction of your desktop.
![]() Click the third button to close a window and remove it from your screen.1
Click the third button to close a window and remove it from your screen.1
You can also change the size and shape of an application window with the frame grabber (Figure 2.1B) in its lower-right corner. Simply click-and-drag it across the desktop to resize and reshape the window.
Finally, you can change the location of a window on your desktop by clicking-and-dragging it by its menu bar.
Once you log on to SAP, it is a good practice to create several application windows and stow the extra ones in the application toolbar of your Windows desktop.
Why? Some transactions require fairly long execution times (on the order of several tens of seconds to a few minutes) because they must comb through large volumes of the database to locate and collect data. While they are running, an hourglass replaces your screen cursor and the window is “frozen” from any further use until the transaction is completed. When this happens, you can either sit and wait for the transaction to run, or you can call up another window and work there.
You can create multiple application windows by following this procedure.
Procedure
Creating Multiple Application Windows
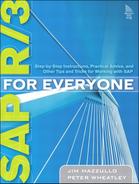
Step 1. Click the Create session button (A) in the standard toolbar (Figure 2.3) or
Follow the menu path System > Create Session (B).
Figure 2.3 You can create a new application window with the Create session button or the System menu.
Step 2. The new window appears. Click the first control button (Figure 2.1A) to hide it in the application toolbar (Figure 2.2).
Step 3. Repeat as necessary.
End Procedure
Once you set up the initial screen of a transaction and execute it, a small stopwatch (A) appears at the left end of the status bar of that screen and remains there until the transaction is finished (Figure 2.4). During this time, you can cancel the transaction, or kill the session, through the system control menu.
Figure 2.4 You can cancel a transaction with the system control menu, which is displayed in the upper-left corner of the application window.

There are two common situations in which you might decide to cancel a transaction. Both occur during reporting transactions, which search through the database for the records of one or more objects.2 (See the Coda at the end of this book for a discussion of the basic transaction types.)
The first situation: You are running a display transaction, which displays the database record for a single object, but you entered the wrong code for that object. For instance, you may have wanted to display the data record for purchase requisition #123456, but you mistakenly entered the code for purchase requisition #654321 on the initial screen of the transaction.
The second situation: You are running a list-display transaction, which displays a list of all objects that are related in some fashion. However, you define the search so broadly that the system must search a large volume of the database, and so the transaction takes a very long time to execute. For instance, you may have wanted to display a list of all the purchase requisitions that you created for your department during the last six months, but you neglected to enter this time period on the initial screen of the transaction. This forces the system to search the database for every requisition that you ever created for your department since you started working there.
To kill any transaction (reporting or process), follow this next procedure.
Procedure
Cancelling a Transaction
Step 1. Click the system control menu icon (B) in the upper left-hand corner to display the system control menu (Figure 2.4).
Step 2. Scroll down to the Stop transaction command, and click it to select it.
Step 3. The transaction is cancelled, and the initial screen of the transaction is replaced by the SAP Easy Access screen.
End Procedure
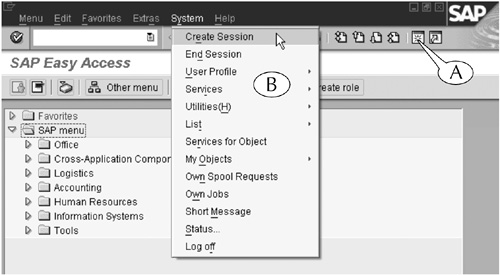
The design and operation of SAP application windows and screens are, for the most part, firmly established by the designers of the software. However, you can customize a few layout features with the Customizing of local layout menu. You can display this menu by clicking the Customize local layout button (A), which lies at the right end of the standard toolbar (Figure 2.5).
Figure 2.5 The Customize local layout button reveals a long menu of commands, including two commands for customizing the design and operation of SAP windows and screens: Options and New Visual Design.
The Customizing menu (Figure 2.5B) contains a long list of commands, many of which do not affect the layouts of application windows and screens. We explore the use of some of these commands in later parts in this book. You may also want to experiment with them to determine their functions on your own.
You can customize the layout with the first two commands in this menu: Options and New Visual Design. Simply follow the next two procedures.
Procedure
Customizing With the Options Command
Step 1. Click the Customizing of local layout button (A) to display its menu, then follow the menu path
Customizing of local options > Options (Figure 2.5).
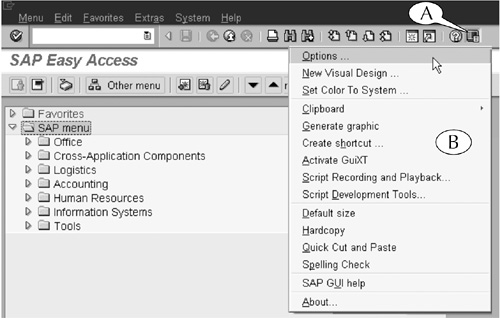
Step 2. The Options popup screen appears (Figure 2.6). It displays one of six scenes or subscreens, which can be selected with the tabs and tab controls (A) at its top. The Options subscreen is displayed by default when this screen appears.
![]() Select the Quick option on the Options subscreen (B).
Select the Quick option on the Options subscreen (B).
Why do this? Whenever your cursor lands on a button on a screen, the system flashes a label that identifies its function. This selection causes that label to appear rapidly.
![]() Optional: Select or deselect the Beep at message option in the Messages field area (C).
Optional: Select or deselect the Beep at message option in the Messages field area (C).
Why do this? The system occasionally sends messages and warnings to you. This option either sets the system to announce such messages with a beep or disables that sound effect. (We chose to disable it because beeps annoy us.)
![]() Optional: Select any or all of the four Dialog box at [message type] options in the Messages field area (C).
Optional: Select any or all of the four Dialog box at [message type] options in the Messages field area (C).
Why do this? SAP usually displays confirmation, warning, error, and abort messages in the status bar at the bottom of the screen by default. By selecting these options, the system instead displays such messages in a popup screen in the central work area.
Figure 2.6 The Options and Extras screens enable you to change some of the layout features of sessions and screens.
Step 3. Click the Expert tab.
![]() Select the Show keys in all dropdown lists option (D).
Select the Show keys in all dropdown lists option (D).
Why do this? This action displays alternative keystrokes for many commands in the menu bar and toolbars of the screens and in the labels of command buttons.
Step 4. Click the other tabs, examine and test the other available options, and set them to your liking. You will probably find (as we have) that they are either obscure in purpose or set at acceptable default values.
Step 5. Click the Apply button, followed by the OK button, at the bottom of the screen (E) to save your changes and erase it from your desktop.
End Procedure
Procedure
Customizing With the New Visual Design Command
Step 1. Click the Customizing of local layout button (Figure 2.5A) to display its menu, then follow the menu path
Customizing of local options > New Visual Design.
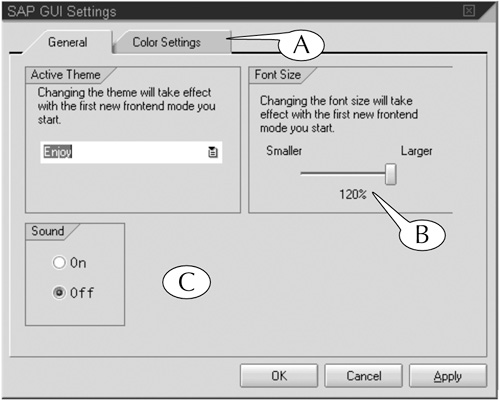
Step 2. The SAP GUI Settings popup screen appears (Figure 2.7). It has two tabs (A) at its top for displaying two separate subscreens. The General tab is selected by default when the screen appears.
![]() Change the font size to a more practical size by adjusting the setting in the Font size field area (B). This author has set his font size to its maximum of 120% to accommodate his terminal myopia.
Change the font size to a more practical size by adjusting the setting in the Font size field area (B). This author has set his font size to its maximum of 120% to accommodate his terminal myopia.
![]() The system often displays messages and warnings to the user on its screens, and it can be set to announce them with a beep. Select one of the two options in the Sound field area (C) to turn this alert sound on or off. (We chose to disable this function.)
The system often displays messages and warnings to the user on its screens, and it can be set to announce them with a beep. Select one of the two options in the Sound field area (C) to turn this alert sound on or off. (We chose to disable this function.)
Figure 2.7 You can control font sizes and sound effects with the General subscreen of the SAP GUI Settings screen.
Step 3. Click the Color setting tab to display the Color settings subscreen. A menu of available color schemes (Figure 2.8A) and a small representative display of the selected colors (B) appear on this subscreen.
Figure 2.8 The Color Settings subscreen allows you to change the color scheme of application windows and screens and save or delete customized schemes.
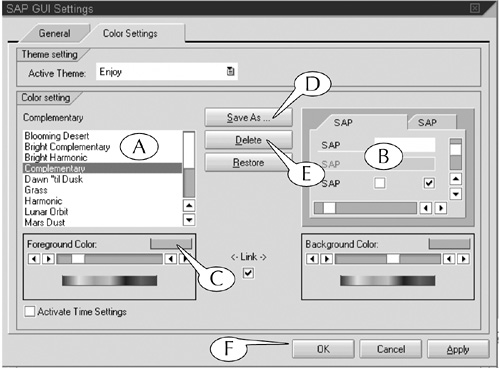
(Note: Some SAP administrators disable this screen so that users cannot alter the color scheme of their screens.)
![]() To change the color scheme, click its name once to select and highlight it.
To change the color scheme, click its name once to select and highlight it.
The Complementary option is selected and highlighted in this example.
![]() To modify the foreground or background color, click the colored rectangle in the Foreground color or Background color field area (Figure 2.8C) to call up the Color Picker popup screen (Figure 2.9).
To modify the foreground or background color, click the colored rectangle in the Foreground color or Background color field area (Figure 2.8C) to call up the Color Picker popup screen (Figure 2.9).
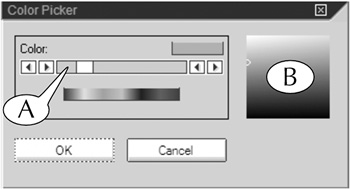
![]() To modify the foreground or background color, slide the color control bar (Figure 2.9A) or click a new color in the color tone field (B).
To modify the foreground or background color, slide the color control bar (Figure 2.9A) or click a new color in the color tone field (B).
![]() Hit the Enter key on your keyboard to record the change and erase the popup screen.
Hit the Enter key on your keyboard to record the change and erase the popup screen.
Step 4. To save a modified color scheme, click the Save as button (Figure 2.8D).
![]() The Save As popup screen appears (Figure 2.10). Enter a name for the new color scheme (A).
The Save As popup screen appears (Figure 2.10). Enter a name for the new color scheme (A).

![]() Hit the Enter key on your keyboard to save the new color scheme and erase the popup screen.
Hit the Enter key on your keyboard to save the new color scheme and erase the popup screen.
Step 5. To delete a color scheme, click its name to select and highlight it (Figure 2.8A), then click the Delete button (E).
Step 6. Click the Apply button, followed by the OK button, at the bottom of the SAP GUI Settings popup screen (Figure 2.8F) to save your changes and erase this screen.
End Procedure
The SAP Easy Access screen (Figure 2.11) is the default home page of the system. You can move or navigate to the initial screens of transactions from this screen by either entering transaction codes in the command field of the standard toolbar or clicking the transaction links in the SAP menu and Favorites folders, which appear in the left panel of its central work area. (See Part II for further discussion of navigation.)

You can also customize the layout and contents of the SAP Easy Access screen by following this next procedure.
Procedure
Customizing the SAP Easy Access Screen
Step 1. Follow the menu path Extras > Settings (Figure 2.11A).
Step 2. The Settings popup screen appears (Figure 2.12). It provides four options for customizing the central work area.
![]() You can place the Favorites folders (Figure 2.11B) in the lower part of the central work area by selecting the Display favorites at end of list option. This is a good choice if you do not use the Favorites folders to navigate.
You can place the Favorites folders (Figure 2.11B) in the lower part of the central work area by selecting the Display favorites at end of list option. This is a good choice if you do not use the Favorites folders to navigate.
![]() You can display only the Favorites folders and hide the SAP menu folders (Figure 2.11C) by selecting the Do not display menu, only display favorites option. This is a good choice if you do not use the SAP menu folders to navigate.
You can display only the Favorites folders and hide the SAP menu folders (Figure 2.11C) by selecting the Do not display menu, only display favorites option. This is a good choice if you do not use the SAP menu folders to navigate.
![]() You can hide the picture in the right panel (D) by selecting the Do not display screen option. (This action shortens the display time for the screen.) You can also widen or narrow the two panels by clicking-and-dragging the pane (E) between them.
You can hide the picture in the right panel (D) by selecting the Do not display screen option. (This action shortens the display time for the screen.) You can also widen or narrow the two panels by clicking-and-dragging the pane (E) between them.
![]() You can display the transaction codes along with the names of transactions in the Favorites and SAP menu folders by selecting the Display technical names option. (We describe transaction codes in Lesson 7.)
You can display the transaction codes along with the names of transactions in the Favorites and SAP menu folders by selecting the Display technical names option. (We describe transaction codes in Lesson 7.)
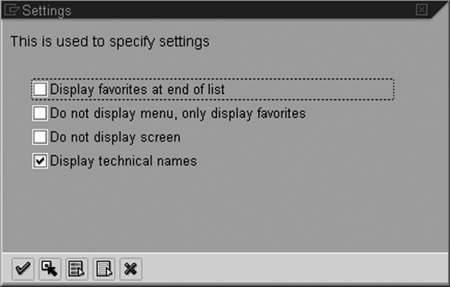
Step 3. Select the desired options, then hit the Enter key on your keyboard to record your changes and erase the Settings popup screen.
End Procedure
Desktop shortcuts provide a fast way to log on to SAP (see Lesson 1). You can create shortcuts for logging on to one or more servers in your network. You can design the shortcuts to display either the SAP Easy Access screen, which is the home page of the system, or any other “target screens” that you might use regularly, when you log on.
For example, suppose that you are the administrative clerk in your company and you use SAP for many different purposes. However, your most common task is to enter employees’ work hours in the database, which requires the frequent execution of the Create Time Entry transaction. You may want to create two desktop shortcuts: one that calls up the SAP Easy Access screen, which gives you general access to all transactions, and a second that calls up the initial screen for the Create Time Entry transaction.
Procedure
Creating Desktop Shortcuts
Step 1. Navigate to a screen that will be the target of the desktop shortcut. For this example, we create a shortcut to the SAP Easy Access screen, which is the most convenient starting point for working with the system.
Step 2. Click the Create shortcut button (A) in the standard toolbar of the screen (Figure 2.13).

Step 3. The New SAP GUI Shortcut popup screen appears (Figure 2.14). It contains several fields that are prepopulated with codes for the server (A), client (B), language (C) and target screen (D) among others. (Note: Session Manager is another name for the SAP Easy Access screen.)
![]() Enter a label for the new icon in the Title field (E). This label will appear beneath the icon on your desktop.
Enter a label for the new icon in the Title field (E). This label will appear beneath the icon on your desktop.
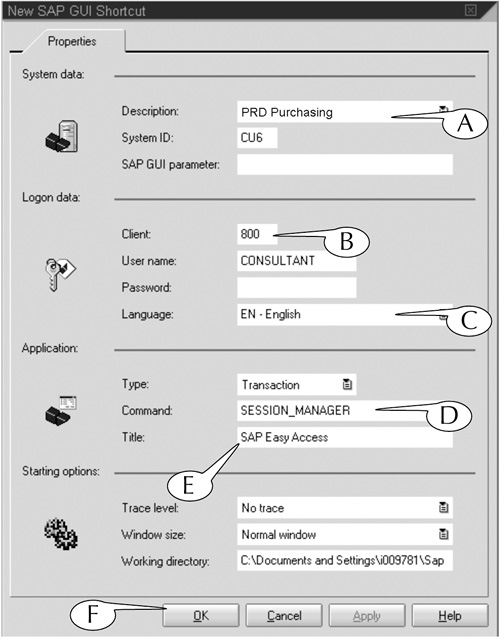
Step 4. Click the Apply button, followed by the OK button, at the bottom of the popup screen (F).
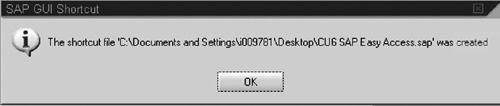
Step 5. A second SAP GUI Shortcut popup screen appears to confirm that the desktop shortcut is created (Figure 2.15).
![]() Hit the Enter key on your keyboard to erase this screen. The icon for the new shortcut appears on your desktop.
Hit the Enter key on your keyboard to erase this screen. The icon for the new shortcut appears on your desktop.
End Procedure
1. This same button is found alone in the upper-right corners of SAP popup screens; you can use it to close the popup screens and to remove them from your desktop.
2. An object is anything that is assigned a code in SAP.