This lesson describes the creation, management, and use of the Favorites folders for navigating to the initial screens of transactions.
The default version of the SAP Easy Access screen displays two sets of navigation folders in its central work area: the SAP or User menu folders (see Lesson 5) and the Favorites folders (Figure 6.1). Both folder sets contain links to the initial screens of transactions and are organized in a multilevel or hierarchical structure of folders and subfolders. You can expand the folders to display their contents by either clicking their control arrows or double-clicking their names.
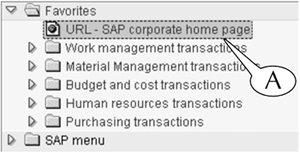
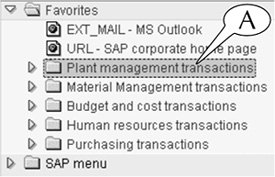
Figure 6.1 Favorite transactions are close at hand when their links are put in the Favorites folders.

You have no control over the structure and contents of the SAP and User menu folders on your SAP Easy Access screen. The SAP menu folders are generic components of the software: They contain links to the initial screens of every transaction in the modules in your system. And the User menu folders are created by your SAP administrator to hold links to the initial screens of only those transactions that you are authorized to execute, and no others.
However, you have total control over your Favorites folders. You can create their structure of folders and subfolders, and you can control their contents, which can include links to any of your favorite or frequently run transactions as well as links to your favorite Web pages and e-mail system.
Figure 6.1 is an example of the Favorites folders that was created by a physical plant manager in a shipping company. Notice its structure and contents:
![]() There are four folders for the manager’s favorite work management, material management, finance (budget and cost), and purchasing transaction links (A). Because he uses a small number of transactions in his work, most of these links are displayed with one double-click of a folder’s name. This is a good design philosophy for your favorites: The links should be only one or two clicks of a folder away.
There are four folders for the manager’s favorite work management, material management, finance (budget and cost), and purchasing transaction links (A). Because he uses a small number of transactions in his work, most of these links are displayed with one double-click of a folder’s name. This is a good design philosophy for your favorites: The links should be only one or two clicks of a folder away.
![]() He created two subfolders, Notifications and PM orders, to hold links for two distinct groups of work management transactions (B).
He created two subfolders, Notifications and PM orders, to hold links for two distinct groups of work management transactions (B).
![]() He created a link to a Web site (C), where he can search for and download SAP job aids, cheat sheets, and other support materials.
He created a link to a Web site (C), where he can search for and download SAP job aids, cheat sheets, and other support materials.
The Favorites folders provide quick “point and click” or mouse-directed navigation from the SAP Easy Access screen to the initial screens of transactions (and other places). This lesson describes the tools and procedures for creating and managing them and their contents.
Following are the five tools for creating and managing your Favorites folders and their links:
![]() Favorites menu
Favorites menu
![]() Favorites shortcut menus
Favorites shortcut menus
![]() Command buttons of the application toolbar
Command buttons of the application toolbar
![]() Keystrokes
Keystrokes
![]() Mouse
Mouse
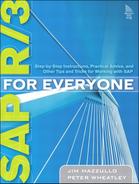
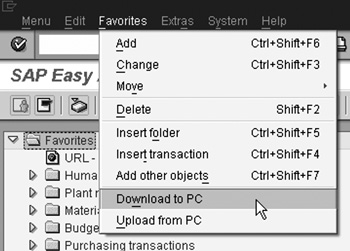
The Favorites menu of the main menu bar contains all the available commands for creating and managing the Favorites folders and their links (Figure 6.2).
![]() Add: adds transaction links to folders.
Add: adds transaction links to folders.
![]() Change: renames folders and links.
Change: renames folders and links.
![]() Move up and Move down: rearrange the order of folders and links.
Move up and Move down: rearrange the order of folders and links.
![]() Delete: deletes folders and links.
Delete: deletes folders and links.
![]() Insert folder: creates new folders.
Insert folder: creates new folders.
![]() Insert transaction: adds transaction links to folders by using their transaction codes.
Insert transaction: adds transaction links to folders by using their transaction codes.
![]() Add other objects: adds links to Web links, mail systems and other destinations to folders.
Add other objects: adds links to Web links, mail systems and other destinations to folders.
![]() Download to PC: downloads the Favorites folders to your personal computer or another external storage site.
Download to PC: downloads the Favorites folders to your personal computer or another external storage site.
![]() Upload from PC: uploads the Favorites folders from your personal computer or another external storage site.
Upload from PC: uploads the Favorites folders from your personal computer or another external storage site.
Figure 6.2 Select and highlight the object of the command, then select the command from the Favorites menu to execute it.
To use the Favorites menu to manage your folders and links, you will usually follow this simple procedure:
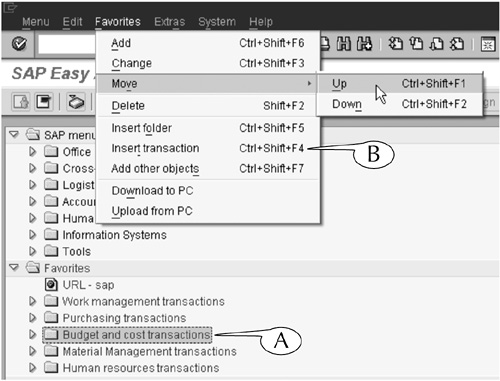
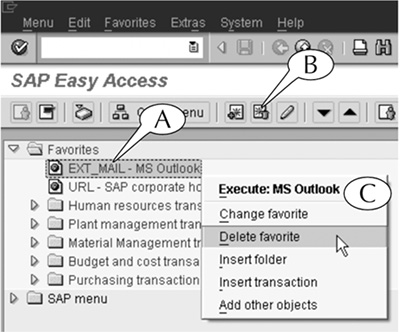
Three shortcut menus together contain all the available commands for creating and managing the Favorites folders and their links. You can display them by right-clicking the folders and links (Figure 6.3).
![]() Right-click the Favorites root folder for a menu of commands for adding and deleting folders, links, and other objects to this folder (A).
Right-click the Favorites root folder for a menu of commands for adding and deleting folders, links, and other objects to this folder (A).
![]() Right-click the higher-order folders for a menu of commands for managing them and their contents (B).
Right-click the higher-order folders for a menu of commands for managing them and their contents (B).
![]() Right-click the links for a menu of commands for working with them, along with commands for navigating to initial screens and adding shortcuts to your desktop (C).
Right-click the links for a menu of commands for working with them, along with commands for navigating to initial screens and adding shortcuts to your desktop (C).
To use the shortcut menus to manage your folders and links:
The last five buttons in the application toolbar of the SAP Easy Access screen (Figure 6.4) provide shortcuts for the Add, Delete, Change, Move down, and Move up commands of the Favorites menu. You can use them to manage your folders and links as you would that menu.

You can use keystrokes to execute commands on objects in your Favorites folders. The available keystrokes are identified on the right side of the Favorites menu (Figure 6.2B).
To use keystrokes to manage your folders and links:
![]() Click the object of the command to select and highlight it (Figure 6.2A).
Click the object of the command to select and highlight it (Figure 6.2A).
![]() Hit the keystrokes to execute the command on that object.
Hit the keystrokes to execute the command on that object.
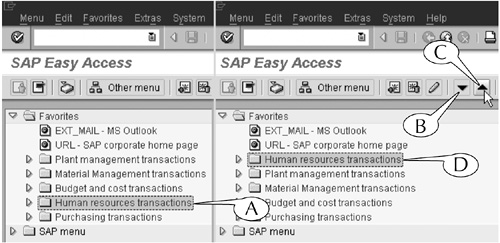
You can rearrange your Favorites folders and their links by clicking-and-dragging them with your mouse. For instance, you can insert folders inside one another, extract subfolders from folders, and move links from one folder to another with this tool.
For example, we can place the Purchasing transactions folder in Figure 6.5 inside the Material Management transactions folder (in other words, we can make it a subfolder of the MM folder) by following these steps:
Step 1. Click the object of the command to select and highlight it (A), and hold down the left button on the mouse.
Step 2. Drag the cursor towards the new “home” for the object. While it is moving toward its destination, a small box appears on the end of the cursor (B).
Step 3. When the cursor lands on its destination, the folder is outlined with a dashed box (C). Release the object there by releasing the mouse button.

We could reverse this process and put the Purchasing transactions folder on the same level as the MM folder by clicking-and-dragging the Purchasing transactions folder into the Favorites root folder.
SAP accommodates the varied preferences of its users by providing several keyboard- and mouse-directed methods for working in its application window. This is especially true with the Favorites folders: It provides three complete menus—the mouse-driven Favorites and shortcut menus, along with keystrokes—for creating and managing favorites, along with five shortcut buttons and a mousing technique.
With so many choices, which do you choose?
If you prefer to work with the mouse, the shortcut menus are the most efficient tools for working with your favorites.
![]() They contain every available command for working with the folders and links;
They contain every available command for working with the folders and links;
![]() They are displayed automatically when you select and highlight the object of a command; and
They are displayed automatically when you select and highlight the object of a command; and
![]() They appear right next to the object of a command, so they are easy to reach and select.
They appear right next to the object of a command, so they are easy to reach and select.
The Favorites menu also contains every command for working with the folders and links, but it does require more “mousing” across the SAP Easy Access screen to use: You must first select the object of a command in the central work area, then move up to the menu bar and scroll down the Favorites menu to execute that command. The usefulness of this menu is further diminished by the application toolbar, which contains handy shortcut buttons for five of the ten commands in the Favorites menu.
We do not want to impose our preferences on the readers. Consequently, we provide instructions for several possible methods of working with the Favorites folders in the following sets of procedures, and let you decide which of them to use.
The first step in working with the Favorites folders is to design and create its structure by adding folders and subfolders to the Favorites root folder. The basic design philosophy is to create the least number of levels in a structure so that your favorite links are just one or two clicks away—in other words, to keep the menu paths short.
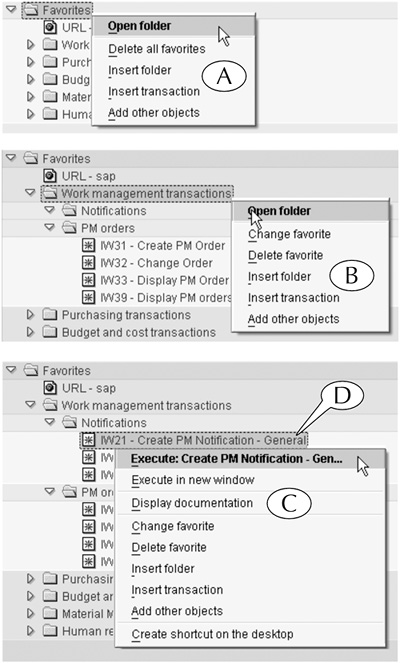
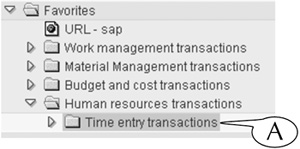
Figure 6.6 shows a set of Favorites folders with a second level of folders for four distinct classes of transactions. We can insert a new subfolder called Time entry transactions inside the Human resources folder by following this procedure.
Procedure
Creating a Favorites Folder
Step 1. Click the intended destination of the new folder to select and highlight it (Figure 6.6A), then follow the menu path Favorites > Insert folder, or
Right-click the destination of the new folder, then select the Insert folder command from the shortcut menu.
Step 2. The Creating a Folder in the Favorite List popup screen appears (Figure 6.7).
![]() Enter a name for the new folder in the Folder name field (A).
Enter a name for the new folder in the Folder name field (A).
![]() Hit the Enter key on your keyboard.
Hit the Enter key on your keyboard.

Step 3. The new folder appears in its selected spot (Figure 6.8A).
Once you create your folders and subfolders, you can add transaction links to them in one of two ways, depending on whether or not you know their transaction codes (see the next lesson for an explanation of transaction codes and how to display them on the SAP Easy Access screen).
For an example, we insert a link for the List-Display Purchase Requisitions transaction, which has the transaction code ME5A, into the Purchasing transactions folder in both of these ways.
Procedure
Adding a Transaction Link With Its Code to the Favorites Folder
Step 1. Click the intended destination of the link to select and highlight it (Figure 6.9A), then follow the menu path Favorites > Insert transaction, or
Right-click the destination of the link, then select the Insert transaction command from the shortcut menu.
Step 2. The Manual entry of a transaction popup screen appears (Figure 6.10).
![]() Enter the transaction code in the Transaction code field (A).
Enter the transaction code in the Transaction code field (A).
![]() Hit the Enter key on your keyboard.
Hit the Enter key on your keyboard.

Step 3. The new link appears in its selected spot (Figure 6.11A).

End Procedure
Procedure
Adding a Transaction Link Without Its Code to the Favorites Folder
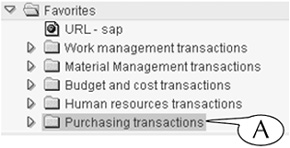
Step 1. Follow the menu path through the SAP menu folders or User menu folders to the link for the transaction (Figure 6.12A).
Figure 6.12 Click-and-drag a copy of a transaction link from the menu folders to your Favorites folders.
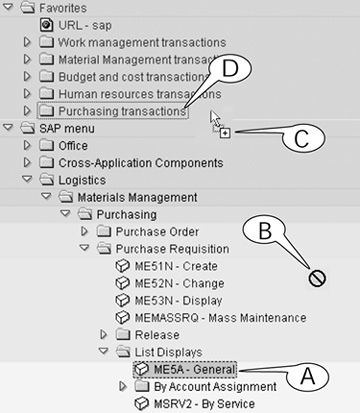
Step 2. Click-and-drag the link toward its destination in the Favorites folders.
As you slide the link through the menu folders, the cursor appears as a slashed circle (B). When it passes into the Favorites folders, the circle is replaced by an arrow with a small box attached to its end (C).
Step 3. Point the cursor on the destination folder, and its name is outlined by a dashed line (D). Release the link there by releasing your mouse button.
Step 4. A copy of the transaction link appears in the Favorites folders (Figure 6.13A); the original link still appears in the menu folders (B).

End Procedure
In addition to transaction links, you can add links to other objects, including Web and Intranet sites and e-mail applications such as MS Outlook and Eudora, to your Favorites folders. They can be handy tools for collecting and distributing information while you are working with SAP.
For instance, the users in a company might be advised to create a favorites link to the Intranet sites of their company’s SAP support groups, where they can download job aids and cheat sheets with instructions for working with the system. If the users run into a problem while they are working with the system—for example, if they don’t know how to set up a particular transaction or how to print the output of a transaction—they can just click this link to jump immediately to that Intranet site, where they will find the resources they need.
Users in a company might also be encouraged to create favorite links to useful Web sites such as America’s SAP Users Group (www.asug.com), an organization that provides resources, advice, and information to SAP users around the country, and SAP’s corporate Web site (www.sap.com), where users can find information about their products and links to other support and resource sites. We create a link to this second Web site in the following procedure.
Procedure
Adding a Web or an Intranet Link to the Favorites Folders
Step 1. Click the intended destination of the new link to select and highlight it (Figure 6.14A), then follow the menu path Favorites > Add other objects, or

Right-click the destination of the new link, then select the Add other objects command from the shortcut menu.
Step 2. The Add additional objects popup screen appears (Figure 6.15).
![]() Select the Web address or file option (A) if it is not already selected by default.
Select the Web address or file option (A) if it is not already selected by default.
![]() Hit the Enter key on your keyboard.
Hit the Enter key on your keyboard.

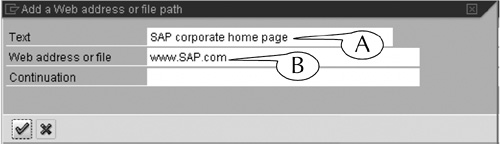
Step 3. The Add a Web address or file path popup screen appears (Figure 6.16).
![]() Enter a name for the link in the Text field (A).
Enter a name for the link in the Text field (A).
![]() Enter the URL—the Web or Intranet address—in the Web address or file field (B). For this example, we entered www.sap.com.
Enter the URL—the Web or Intranet address—in the Web address or file field (B). For this example, we entered www.sap.com.
Note: You can also highlight the address in the address field of your Web browser, copy it with the keystroke Ctrl + C, then paste it in the field with the keystroke Ctrl + V.
![]() Hit the Enter key on your keyboard.
Hit the Enter key on your keyboard.
Step 4. The Web link (A) appears in the selected spot in your Favorites folders (Figure 6.17).
End Procedure
Procedure
Adding a Link to Your External E-mail Application in the Favorites Folders
Step 1. Click the intended destination of the new link to select and highlight it (Figure 6.18A), then follow the menu path Favorites > Add other objects, or

Right-click the destination of the new link, then select the Add other objects command from the shortcut menu.
Step 2. The Add additional objects popup screen appears (Figure 6.19).
![]() Select the External mail system option (A).
Select the External mail system option (A).
![]() Hit the Enter key on your keyboard.
Hit the Enter key on your keyboard.

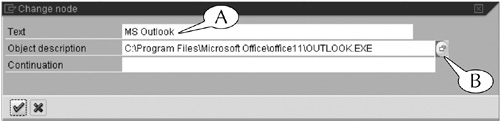
Step 3. The Change node popup screen appears (Figure 6.20).
![]() Enter a name for the link in the Text field (A).
Enter a name for the link in the Text field (A).
![]() Click inside the Object description field to call up its search button (B), then click that button.
Click inside the Object description field to call up its search button (B), then click that button.
Step 4. The Open screen of your computer’s operating system appears (Figure 6.21).
![]() Locate the Execute file of your e-mail application (it will probably be in the Programs folder of your computer). The file name usually consists of the application name (Outlook in this example) followed by .exe.
Locate the Execute file of your e-mail application (it will probably be in the Programs folder of your computer). The file name usually consists of the application name (Outlook in this example) followed by .exe.
![]() Click the Execute file to select and highlight it (A), then click the Open button (B).
Click the Execute file to select and highlight it (A), then click the Open button (B).

Step 5. The path to the Execute file is entered in the Object description field of the Change node screen (Figure 6.20).
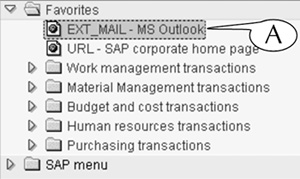
![]() Hit the Enter key on your keyboard, and the link appears in the selected spot in the Favorites folders (Figure 6.22A).
Hit the Enter key on your keyboard, and the link appears in the selected spot in the Favorites folders (Figure 6.22A).
End Procedure
You can change the names of folders and links in your Favorites folders at any time. For example, you may want to rearrange your folders and then rename them to reflect their new order, or you may want to rename a transaction link to something that is more distinctive or accurate.
It is, in fact, fairly common to change the names of favorite transaction links as soon as you create them. When you add links to the Favorites folders, they are given default names by the system, and sometimes these names are vague or too wordy.
For instance, there is a transaction in the Plant Maintenance module that creates a work order, technically called a Plant Maintenance or PM order, for installing and repairing equipment. When you create a favorite link for this transaction, it bears the name Create Order by default.
But this name is vague, because there are several other types of orders in other modules of SAP, including purchase orders, internal orders, and sales orders. More precision in its name would help distinguish this PM order transaction link from those of other types of orders.
Another example: there is a transaction in the Controlling module that displays planned expenses and actual costs—that is, a budget—for a group or department in a business enterprise. A favorite link for this transaction bears the default name Cost Center Actual/Plan/Variance, but Budget Report would be a better name, and a shorter one too.
Follow this next procedure for changing the names of Favorites folders and links.
Procedure
Changing the Name of a Folder or Link in the Favorites Folders
Step 1. Click the object of the command to select and highlight it (A), then click the Change button in the application toolbar (Figure 6.23), or
Click the object of the command, then follow the menu path Favorites > Change, or
Right-click the object of the command, then select the Change command from the shortcut menu.
Step 2. The Change a favorite popup screen appears (Figure 6.24).
![]() Enter a new name for the object in the Text field (A).
Enter a new name for the object in the Text field (A).
![]() Hit the Enter key on your keyboard.
Hit the Enter key on your keyboard.

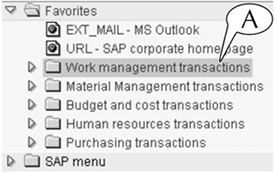
Step 3. The object’s new name appears in your Favorites folders (Figure 6.25A).
End Procedure
You can shuffle and organize the contents of your Favorites folders at any time with your mouse and the buttons of the application toolbar.
You can arrange your Favorites folders and their links easily by clicking-and-dragging them into new positions. For instance, you can click-and-drag folders into other folders, pull subfolders out of other folders, and move links in and out of folders, all with this tool.
You can change the list order of a folder or link by clicking it to select and highlight it (Figure 6.26A) and then clicking the Move down (B) or Move up (C) button in the application toolbar to move it down or up the folder list (D).
You can delete your Favorites folders (all but the root folder) and links in three ways:
![]() Click the object of the command to select and highlight it (A), then click the Delete button (B) in the application toolbar (Figure 6.27), or
Click the object of the command to select and highlight it (A), then click the Delete button (B) in the application toolbar (Figure 6.27), or
![]() Click the name of the object, then follow the menu command Favorites > Delete (C), or
Click the name of the object, then follow the menu command Favorites > Delete (C), or
![]() Right-click the name of the object, then select the Delete command from the shortcut menu.
Right-click the name of the object, then select the Delete command from the shortcut menu.
You can easily share your Favorites folders with other users. You can download its contents into your personal computer and store it in a file there. You can then e-mail it to your colleagues, who can upload it from their personal computer into the Favorites folders of their SAP Easy Access screen and then work with the same transactions that you use.
Follow these next two procedures for downloading and uploading favorites. For both procedures, we use the example of a favorites file that is downloaded into, and then uploaded from, the storage folders of a personal computer running the Windows operating system.
Procedure
Downloading Your Favorites Folders
Step 1. Follow the menu path Favorites > Download to PC to download your Favorites folders (Figure 6.28).
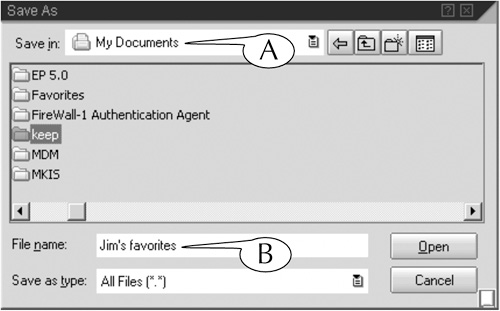
Step 2. The SAP Custom - Save File As screen appears (Figure 6.29).
![]() Select a storage location in the Save in field (A).
Select a storage location in the Save in field (A).
![]() Enter a file name in the File name field (B).
Enter a file name in the File name field (B).
![]() Hit the Enter key on your keyboard, and the file appears in the selected storage location in a plain text format that can be read by any personal computer. Send it to a colleague by e-mail or other means (e.g., disk).
Hit the Enter key on your keyboard, and the file appears in the selected storage location in a plain text format that can be read by any personal computer. Send it to a colleague by e-mail or other means (e.g., disk).
End Procedure
Procedure
Uploading Favorites Folders
Step 1. Follow the menu path Favorites > Upload from PC to upload a favorites file from your personal computer (Figure 6.30).

Step 2. The Open screen appears (Figure 6.31).
![]() Locate the favorites file in your personal computer’s storage folders (A) and double-click it to upload it into your Favorites folders.
Locate the favorites file in your personal computer’s storage folders (A) and double-click it to upload it into your Favorites folders.

End Procedure