Chapter 5
Building an Application
IN THIS CHAPTER
![]() Emphasizing top-down design
Emphasizing top-down design
![]() Engaging in bottom-up coding
Engaging in bottom-up coding
![]() Putting your work to the test
Putting your work to the test
![]() Fixing the bugs
Fixing the bugs
![]() Retesting everything
Retesting everything
In Book 5, Chapter 4, I take the idea of a database system for the Oregon Lunar Society (OLS) from an entity-relationship (ER) model to a relational model to a relational database. Just as important as the database itself is the user interface. If users can’t get the information they need out of the database, the database isn’t of much value. For a simple application such as the one that the OLS needs, after you’ve designed the user interface, for all intents and purposes you’ve designed the whole application. So because the database itself is done, all that’s left is designing the user interface and connecting it to the database.
To make sure that you don’t miss anything important, consider the project as a whole. Imagine that you’re looking down on the project from 20,000 feet. This way, you view not only the project itself, but also the context in which it operates. Taking this view often brings to the surface concerns that you may not have thought of otherwise.
Designing from the Top Down
When you take a top-down approach to design, you consider all the elements of the system and how they relate to one another. You also consider elements external to the system that interact with it. In the case of the OLS system, the primary external element is the users. The user interface should be designed with the users in mind. How familiar are they with computers in general and with the kinds of data stored in the OLS database? If they’re fairly sophisticated and comfortable with computers and with the OLS, you would design the user interface differently from the way you would if the users were computer novices who were largely unaware of the type of work that the OLS does. Placing considerations of the user interface aside for the moment, the first order of business is deciding what the application should include.
Determining what the application should include
At this point in the process, determining what the application should include is easy. Just look at the proposal that the client signed (refer to Book 5, Chapter 4), which specifies exactly what the deliverables are. Here’s a list of deliverables taken directly from a signed and agreed-on proposal:
- Entry/update/view form for members
- Membership list
- Entry/update/view form for authors
- Author list
- Entry/update/view form for research teams
- Research team roster
- Entry/update/view form for papers
- Complete papers report
- Query: Show all papers by a specified author
- Query: Show all papers by a specified research team
Designing the user interface
After you determine the forms, reports, and queries that you must support, you can decide how to arrange things so that users can quickly specify what they want and ask the application to deliver it. At this point, you should create some mock-ups of screens and present them to the users for feedback. Present two or three alternatives — perhaps one with a background image and a second without. The users feel a greater sense of ownership of the project if they get to choose what it looks like, which helps you tremendously in gaining user acceptance.
Figure 5-1 shows a mock-up of the main screen, using command buttons.

FIGURE 5-1: The OLS application main screen with command buttons.
 One key design criterion is to keep the screen simple. Sometimes, designers err by cluttering screens with too many confusing options.
After you show the alternatives for the main screen to the users and obtain their feedback, you can proceed to connect the user interface to the database.
Connecting the user interface to the database
Design a menu hierarchy that makes it easy for users to get to the functions they want to perform. Figure 5-2 shows an example of such a hierarchy for the OLS application.

FIGURE 5-2: The OLS application menu hierarchy.
The tools for building forms, reports, and queries vary from one database management system to another, so I won’t go into detail on how to do it here. As an example of what one of the forms on the second level of the hierarchy might look like, Figure 5-3 shows one possible form for selecting one of the four forms used to view, enter, modify, or delete records from the MEMBERS, AUTHORS, RESEARCHTEAMS, and PAPERS tables.
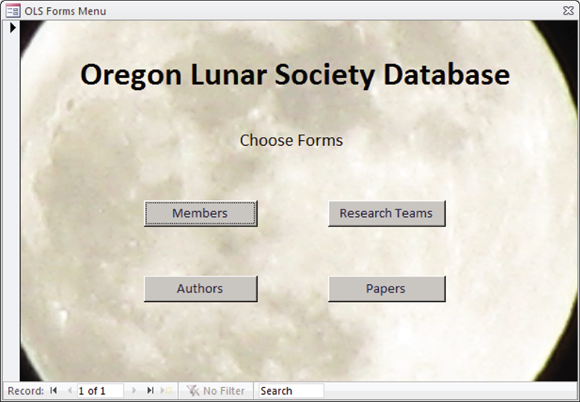
FIGURE 5-3: The OLS forms menu.
Similar forms for reports and queries would also be on the second level.
The third level consists of forms for viewing or editing table information. Figure 5-4 shows an example of such a form for the MEMBERS table. You’re free to lay out the form any way you want, put your company logo on it, or follow whatever stylistic conventions are standard in your organization.

FIGURE 5-4: The OLS Members form.
Coding from the Bottom Up
After you develop mock-ups of all the forms in the menu hierarchy, all the reports, and the query result sets, and you obtain approval from the stakeholders (refer to Book 5, Chapter 4), the real work can begin. You’ve created the appearance of an application. Now you must build the substance.
Preparing to build the application
The first thing you must do is build the database itself. The easiest and best way to do this varies from one database management system (DBMS) to another. Probably the easiest way will turn out not to use SQL. Now, SQL is the ultimate tool for creating and maintaining databases in that anything you can do with any other tool, you can do with SQL. And, there are things you can do with SQL that you can’t do with anything else. However, SQL is a computer language with no nice, user-friendly, graphical user interface (GUI). Popular DBMSs have GUI-based tools for the most common database tasks. SQL is always an alternative, however, and it’s the same across all platforms.
Creating the database
For larger databases, you may want to create catalogs and schemas. You certainly want to create tables, and you also may want to create views.
In Book 2, Chapter 4, I cover creating tables with SQL. You can apply what I discuss there to building tables for the Oregon Lunar Society.
CREATING TABLES
The primary tables of the OLS database are MEMBERS, AUTHORS, RESEARCHTEAMS, and PAPERS. I describe creating them (with the SQL CREATE
ADDING CONSTRAINTS TO PREVENT DATA-ENTRY ERRORS
When the MEMBERS table was defined in Book 5, Chapter 4, the MemberID attribute was assigned the INTEGER type, and the other attributes were assigned the CHAR type, with various maximum lengths. These assignments constrain the data entered in those fields to some extent but leave a lot of room for the entry of erroneous data. You can do a better job by applying some constraints to the attributes, as follows:
- At this time, OLS leadership cannot imagine a membership of more than 1,000 members, so MemberID could be capped at that level. Any larger number entered must be an error.
- Only five offices exist: president, vice president, secretary, treasurer, and archivist. Any entry in OfficeHeld other than one of those five must be an error.
- The State field may contain only the two-letter abbreviations for Oregon (OR) and the three adjacent states: Washington (WA), Idaho (ID), and California (CA). Membership is restricted to residents of those four states.
- All zip codes for Oregon, Washington, Idaho, and California start with either 8 or 9.
Applying these constraints to the MEMBERS table eliminates at least some, if not all, data-entry errors. If you had thought ahead, you could have applied these constraints when you created MEMBERS with the CREATE statement. If the table has already been created, but data hasn’t yet been entered in it, you can drop the existing empty table and then re-create it, this time applying the constraints. Here’s an example:
CREATE TABLE MEMBERS (
MemberID Integer PRIMARY KEY,
FirstName Char (15),
LastName Char (20) NOT NULL,
OfficeHeld Char (20),
Email Char (50),
Phone Char (20),
Street Char (25),
City Char (20),
State Char (2),
Zip Char (10),
CONSTRAINT max_size
CHECK (MemberID BETWEEN 1 AND 1000),
CONSTRAINT offices
CHECK (OfficeHeld IN ('President', 'Vice President',
'Secretary', 'Treasurer', 'Archivist')),
CONSTRAINT valid_states
CHECK (State IN ('OR','WA','ID','CA')),
CONSTRAINT valid_zip
CHECK (SUBSTRING (Zip FROM 1 FOR 1) = 8
OR SUBSTRING (Zip FROM 1 FOR 1) = 9)
);
If the table has already been created and data has already been added to it, you can’t add constraints after the fact, because they could conflict with data that’s already in the database.
By examining all the table designs before creating them, you can add appropriate constraints and thereby minimize the problems that inevitably arise when erroneous data enters the database.
Filling database tables with sample data
Every database table starts out empty. After you create a table, either by using SQL’s CREATE statement or a DBMS’s forms-based tools, that table is nothing but a structured shell containing no data. To make the table useful, you must put some data in it. You may or may not have that data already stored in digital form.
- If your data isn’t already in digital form, someone probably has to enter the data manually, one record at a time. You can also enter data by using optical scanners and voice recognition systems, but the use of such devices for data entry is still relatively rare and error-prone.
- If your data is already in digital form but perhaps not in the format of the database tables that you use, you need to translate the data into the appropriate format and then insert the data into the database.
- If your data is already in digital form and in the correct format, it’s ready to be transferred to a new database.
Depending on the current form of the data, you may be able to transfer it to your database in one operation by using a bulk loading utility (or by taking a series of steps before a bulk loading operation), or you may need to enter the data one record at a time. Each data record that you enter corresponds to a single row in a database table.
ADDING DATA WITH FORMS
Most DBMSs support form-based data entry. This feature enables you to create a screen form that has a field for every column in a database table. Field labels in the form enable you to determine easily what data goes into each field. The data-entry operator enters all the data for a single row in the form. After the DBMS accepts the new row, the system clears the form to accept another row. In this way, you can easily add data to a table one row at a time.
Form-based data entry is easy and less susceptible to data-entry errors than is a list of comma-delimited values. The main problem with form-based data entry is that it’s nonstandard; each DBMS has its own method of creating forms. This diversity, however, isn’t a problem for the data-entry operator. You can make the form look generally the same from one DBMS to another. Although this practice is great for the data-entry operator, the application developer must return to the bottom of the learning curve every time he changes development tools. Another possible problem with form-based data entry is that some implementations may not permit a full range of validity checks on the data that you enter.
 The best way to maintain a high level of data integrity in a database is to keep bad data out of the database in the first place. You can prevent the entry of some bad data by applying constraints to the fields on a data-entry form. This approach enables you to make sure that the database accepts only data values of the correct type, which fall within a predefined range. Applying such constraints can’t prevent all possible errors, but it does catch some of them.
If the form-design tool in your DBMS doesn’t enable you to apply all the validity checks that you need to ensure data integrity, you may want to build your own screen, accept data entries in variables, and check the entries by using application program code. After you’re sure that all the values entered for a table row are valid, you can add that row by using the SQL INSERT command.
ENTERING DATA WITH SQL
If you enter the data for a single row in a database table, the INSERT command uses the following syntax:
INSERT INTO table_1 [(column_1, column_2, …, column_n)]
VALUES (value_1, value_2, …, value_n) ;
As indicated by the square brackets ([ ]), the listing of column names is optional. The default column list order is the order of the columns in the table. If you put the VALUES in the same order as the columns in the table, these elements go in the correct columns — whether you explicitly specify those columns or not. If you want to specify the VALUES in some order other than the order of the columns in the table, you must list the column names, putting the columns in an order that corresponds to the order of the VALUES.
To enter a record in the MEMBERS table, for example, use the following syntax:
INSERT INTO MEMBERS (MemberID, FirstName, LastName, OfficeHeld, Email, Phone, Street, City, State, Zip)
VALUES (:vmemid, 'Linda', 'Nguyen', '235 Ion Drive',
'Titania', 'OR', '97110', '(503) 555-1963') ;
The first VALUE, vmemid, is a variable that you increment with your program code after you enter each new row of the table. This approach guarantees that you have no duplication of the MemberID, which is the primary key for this table and, therefore, must be unique.
The rest of the values are data items rather than variables that contain data items. You can hold the data for these columns in variables, too, if you want. The INSERT statement works equally well with variables or with an explicit copy of the data itself as arguments of the VALUES keyword.
ADDING DATA ONLY TO SELECTED COLUMNS
Sometimes, you want to note the existence of an object, even if you don’t have all the facts on it yet. If you have a database table for such objects, you can insert a row for the new object without filling in the data in all the columns. If you want the table to be in First Normal Form (1NF), you must insert enough data to distinguish the new row from all the other rows in the table. (For a discussion of 1NF, see Book 2, Chapter 2.) Inserting the new row’s primary key is sufficient for this purpose. In addition to the primary key, insert any other data that you have about the object. Columns in which you enter no data contain nulls.
The following example shows such a partial row entry:
INSERT INTO MEMBERS (MemberID, FirstName, LastName)
VALUES (:vmemid, 'Linda', 'Nguyen') ;
You insert only the customer’s unique identification number and name into the database table. The other columns in this row contain null values.
ADDING A BLOCK OF ROWS TO A TABLE
Loading a database table one row at a time by using INSERT statements can be tedious, particularly if that’s all you do. Even entering the data in a carefully human-engineered ergonomic screen form gets tiring after a while. Clearly, if you have a reliable way to enter the data automatically, you’ll find occasions in which automatic entry is better than having a person sit at a keyboard and type.
Automatic data entry is feasible, for example, if the data already exists in electronic form because somebody has already entered the data manually. If so, you have no reason to repeat history. The transfer of data from one data file to another is a task that a computer can perform with minimum human involvement. If you know the characteristics of the source data and the desired form of the destination table, a computer can (in principle) perform the data transfer automatically.
COPYING FROM A FOREIGN DATA FILE
Suppose that you’re building a database for a new application. Some data that you need already exists in a computer file. The file may be a flat file or a table in a database created by a DBMS different from the one you use. The data may be in ASCII or EBCDIC code or in some arcane proprietary format. What do you do?
The first thing you do is hope and pray that the data you want is in a widely used format. If the data is in a popular format, you have a good chance of finding a format conversion utility that can translate the data into one or more other popular formats. Your development environment probably can import at least one of these formats. If you’re really lucky, your development environment can handle the data’s current format directly. On personal computers, the Access, xBASE, and Paradox formats are probably the most widely used. If the data that you want is in one of these formats, conversion should be easy. If the format of the data is less common, you may need to go through a two-step conversion. Just about any environment you’re likely to encounter will support the comma-separated value (csv) format. Translating from your source format to csv and then from csv to your destination format should work in most cases.
As a last resort, you can turn to one of the professional data-translation services. These businesses specialize in translating computer data from one format to another. They have the capability of dealing with hundreds of formats — most of which nobody has ever heard of. Give one of these services a tape or disk containing the data in its original format, and you get back the same data translated into whatever format you specify.
TRANSFERRING ALL ROWS BETWEEN TABLES
A less severe problem than dealing with foreign data is taking data that already exists in one table in your database and combining that data with compatible data in another table. This process works great if the structure of the second table is identical to the structure of the first table — that is, if every column in the first table has a corresponding column in the second table, and the data types of the corresponding columns match. If so, you can combine the contents of the two tables by using the UNION relational operator. The result is a virtual table containing data from both source tables. I discuss the relational operators, including UNION, in Book 3, Chapter 4.
TRANSFERRING SELECTED COLUMNS AND ROWS BETWEEN TABLES
Generally, the structure of the data in the source table isn’t identical to the structure of the table into which you want to insert the data. Perhaps only some of the columns match — and these are the columns that you want to transfer. By combining SELECT statements with a UNION, you can specify which columns from the source tables to include in the virtual result table. By including WHERE clauses in the SELECT statements, you can restrict the rows that you place in the result table to those that satisfy specific conditions. I cover WHERE clauses extensively in Book 3, Chapter 2.
Suppose that you have two tables — MEMBERS and PROSPECTS — and you want to list everyone living in the state of Idaho who appears in either table. You can create a virtual result table with the desired information by using the following command:
SELECT FirstName, LastName
FROM MEMBERS
WHERE State = 'ID'
UNION
SELECT FirstName, LastName
FROM PROSPECTS
WHERE State = 'ID' ;
Here’s a closer look:
- The
SELECTstatements specify that the columns included in the result table are FirstName and LastName. - The
WHEREclauses restrict the rows included to those with the value'ID'in the State column. - The State column isn’t included in the results table but is present in both the MEMBERS and PROSPECTS tables.
- The
UNIONoperator combines the results from theSELECTon MEMBERS with the results of theSELECTon PROSPECTS, deletes any duplicate rows, and then displays the result.
Another way to copy data from one table in a database to another is to nest a SELECT statement within an INSERT statement. This method (a subselect) doesn’t create a virtual table but instead duplicates the selected data. You can take all the rows from the MEMBERS table, for example, and insert those rows into the PROSPECTS table. This method works only if the structures of the MEMBERS and PROSPECTS tables are identical, of course. If you want to place only those customers who live in Idaho in the PROSPECTS table, a simple SELECT with one condition in the WHERE clause does the trick, as shown in the following example:
INSERT INTO PROSPECTS
SELECT * FROM MEMBERS
WHERE State = 'ID' ;
 Even though this operation creates redundant data (now you’re storing member data in both the PROSPECTS and MEMBERS tables), you may want to do it anyway to improve the performance of retrievals. Be aware of the redundancy, however, and to maintain data consistency, make sure that you don’t insert, update, or delete rows in one table without inserting, updating, or deleting the corresponding rows in the other table. Another potential problem is the possibility that the
 INSERT might generate duplicate primary keys. If even one preexisting prospect has a primary key called ProspectID that matches the corresponding primary key, MemberID, of a member that you’re trying to insert into the PROSPECTS table, the insert operation will fail.
Creating the application’s building blocks
Although you may use SQL INSERT statements to enter a few rows of sample data to validate that your tables were created correctly, the application that your production people use must be easier to use and less error-prone. Similarly, although you can obtain meaningful results to questions about the data by using SQL SELECT statements, doing so isn’t particularly easy or error-resistant.
You need to build a user-friendly application that features screen forms for data entry, viewing, modification, and deletion. You also need predesigned reports that can be run at regular intervals or whenever desired.
Developing screen forms
Design your screen forms so that users can quickly and easily understand them. Here are a few tips:
- Make the placement of items in the forms logical and visible.
- Group related items.
- Make sure that the navigation from one form to another is easy and logical.
- Create a navigation map similar to Figure 5-3 (refer to “Connecting the user interface to the database,” earlier in this chapter) that shows how forms are linked.
- Because user communities can differ widely, have typical users try out your forms and give you feedback on how easy the forms are to use and whether they provide all the functionality needed.
Developing reports
The discipline required for generating reports is similar to that required for generating screen forms. SQL isn’t equipped to handle either function. You have to write code in Visual Basic, C, or some other procedural language to create the forms and reports, depending on the tools available in whatever DBMS environment you are operating in, or use a third-party report writer such as Crystal Reports from SAP. In any case, when you’ve completed all the forms and reports that your application needs to provide, the next step is placing them in an integrated structure that gives the users a unified tool that meets their needs in a convenient way.
Gluing everything together
Some development environments, such as Microsoft Access, give you the integrated structure you need, complete with navigation from one screen to another, without the need for any procedural programming. These applications have limited flexibility, however, and can’t handle requirements even slightly out of the ordinary. In most cases, you end up having to write some procedural code.
If you’re developing in the .NET environment, Visual Studio is the tool you use to write the needed procedural code. If you’re developing in another environment, you use other tools, but your task is essentially the same. Any analysis of the data beyond what SQL can do requires programming, as do responses to events such as button clicks or error conditions.
Testing, Testing, Testing
After you finish all your forms, reports, and queries, and write all the code needed to bind the application together, you’re still not done. In fact, you may be less than halfway to completion of the project. In most large projects, testing is the most time-consuming part of the entire task — more time-consuming than the design phase or the creation of all the forms, reports, queries, and program code. You need to test your application with the volume and diversity of data that it’s likely to encounter after it goes into production. This test typically reveals problems that didn’t show up when you were working with a few rows of sample data in each of your tables.
You need to deliberately try to break the application by making erroneous inputs, because you can be sure that after the system goes into production, someone will make data-entry mistakes sooner or later. If dates and times are involved, try entering some nonsensical ones to see how the system responds. See what happens if you say, for example, that a product has been delivered before it was ordered. How does the system handle that entry? How do you want the system to handle it?
In the more challenging world that we find ourselves in today, you need to make sure that your application is not only resistant to mistakes, but also resistant to deliberate attempts to penetrate it or even destroy it. In Book 4, Chapter 1, I mention SQL injection attacks as threats to databases that are exposed to the Internet. Such attacks can be harmful to any system, regardless of whether it’s connected to the Internet. Any database application that accepts input from the user is potentially vulnerable to an SQL injection attack. Your attempts to break an application that you’ve just created should include SQL injection attacks in your test mix.
Fixing the bugs
In the course of testing, you inevitably find things that aren’t as they should be, such as program bugs or inelegancies that, now that you look at them, you know that you can improve. Fix them all.
After you have fixed a group of bugs, go back and test the entire application again. If you discover more bugs in this second round of testing, fix them and then test everything again. Don’t just test whatever it was that you fixed; test everything. Bugs and fixes have a way of interacting in unanticipated ways. Often, what you do to fix one bug creates three or four other problems in what you would swear are unrelated areas. The only way to make sure that you haven’t created additional problems in the course of fixing one is to test everything again every time you fix anything. This discipline is called regression testing because you regress to square one every time you fix a bug.
Turning naive users loose
After you can go through your entire suite of tests without encountering a single problem, you’re ready to go to the next phase of testing, which is generally called beta testing. In a beta test, you give the application to users who are no more technically sophisticated than the end users you’re targeting. Actually, the less technically sophisticated your beta testers are, the better. They use your application in ways that you’d never think of in a million years. In the process, they uncover bugs that you never came close to finding.
Bringing on the hackers
Another good class of beta testers is made up of people with a hacker mentality. These people feel challenged to find the weak spots in your application. They try things that they know they’re not supposed to do, just to see what happens. In the process, they may find problems that neither you nor your unsophisticated beta testers encountered.
Fixing the newly found bugs
As new bugs crop up in the course of beta testing, fix them one by one as they appear. After each fix, run a regression test (refer to “Fixing the bugs,” earlier in this chapter). If you fix several bugs and then run the regression test, it’s hard to determine what caused the 17 new failures that appeared.
As the hare learned from the tortoise, slow and steady wins the race. Keep things as simple as possible. Fix one thing at a time and then retest everything.
Retesting everything one last time
Did I say retest everything? Yes. After you think that you’ve tested the application to death — after you’re sure that you’ve squashed all the bugs that could possibly exist, it’s time for one final test. This time, instead of running the test yourself, have someone else — someone who’s totally unrelated to the development effort — conduct the entire test suite one more time. If you get a clean run this final time, you can truly say that you’re finished. Break out the bubbly!