Salesforce Chatter is an enterprise social networking application that helps users connect to people and share business information. It can be accessed from the App Menu in the top-right corner of the Salesforce CRM screen. Chatter feeds can also be accessed from within the Salesforce CRM record pages. All users with a Salesforce license have access to Chatter, plus you can create new users who do not have Salesforce licenses but wish to have access to Chatter. These user licenses can access Chatter people, profiles, groups, and files. However, they cannot access any Salesforce object data.
Chatter Only user licenses can be created for users within your company, which are known as Chatter Free, plus employees not in your organization such as customers, known as Chatter External. These are shown in the following screenshot:
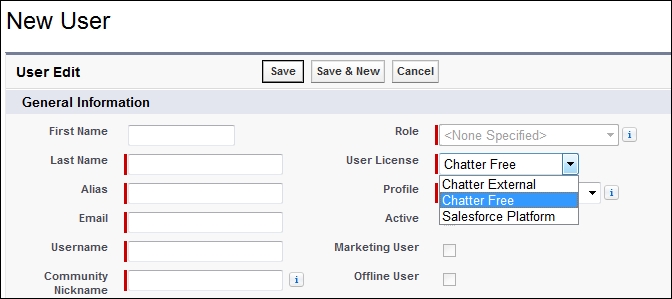
Another Chatter license (not shown in the preceding User License selection) is the Chatter Only license. This license is also known as Chatter Plus and is for users who do not have Salesforce licenses but require access to some Salesforce objects in addition to Chatter. This provides access to Chatter people, profiles, groups, and files, plus the viewing of Salesforce accounts and contacts and the ability to modify up to 10 custom objects.
As mentioned previously, Salesforce Chatter can be accessed from the App Menu by selecting the Salesforce Chatter option within which these tabs are available: Chatter, Profile, People, Groups, and Files, as shown in the following screenshot:

These tabs are available in the Chatter app by default; however, you can also add these tabs to other apps if required.
The primary features discussed in this section exist in Salesforce Chatter.
A Chatter feed is a list of recent activities in Salesforce and are displayed on:
- The Chatter tab and Home tab. Here, users can see their posts, posts from people they follow, updates to records they follow, and posts to groups they are a member of.
- Profiles, where users can see posts made by the person whose profile they are viewing.
- Records, where users can see updates to the record they are viewing.
- Chatter groups, where users can see posts to the group they are viewing.
Chatter settings provide options for feeds, posts, and invitations. We will first look at the setting to enable Chatter, and then, in the following sections, we will look through the various settings that you can apply for Salesforce Chatter.
Enabling Chatter also enables the new user interface theme, which updates the look and feel of Salesforce.
When Chatter is enabled, the global search feature which allows searching across Salesforce, including Chatter feeds, files, groups, and people is activated.
The selection of the Salesforce Chatter options can be carried out by navigating to Setup | Customize | Chatter | Settings, as shown in the following screenshot:

Let's look at each of the Salesforce Chatter setting options.
The Group option allows you to modify Chatter group settings. By selecting Allow Group Archiving, you will allow automatic and manual archiving of groups.
Select the Allow Rich Link Previews checkbox to display rich content in the Chatter feed. By enabling this option, links in posts are converted into embedded videos, images, and article previews.
Select the Allow Approvals checkbox to permit users to use Chatter posts within Salesforce Workflow approval processing. By enabling this option, users can approve any business process from within their Chatter feed.
Select the Allow Coworker Invitations checkbox to enable everyone in your company to access Chatter. This allows all colleagues, even those who do not have Salesforce licenses, to collaborate using Salesforce Chatter.
Invited users can access Chatter people, profiles, groups, and files but cannot access Salesforce records unless they have a Salesforce license. To make Chatter available for company colleagues, you can either manually add Chatter users or use the Invitations option.
Starting in June 2011, invitations are automatically turned on for new organizations and the the Company Email Domains field is populated based on the first user's e-mail address.
You must provide at least one e-mail domain, and you can add a maximum of 200 domains. The domains that you enter should be those used in e-mail addresses within your company.
Select the Allow Customer Invitations checkbox to permit users to invite people from outside your company network.
The File Sync option allows users to access files saved in their Salesforce Files folder on their desktops from the Synced filter on the Files tab in Chatter and in Salesforce Mobile (covered in Chapter 10, Mobile Administration).
Your users need to install a desktop client called Salesforce Files. They can then securely store, sync, and share files between Chatter, their desktops, and mobile devices.
Note
Limits apply when using the Salesforce Files client: 10 GB is the maximum amount of data that individual users can sync in their Salesforce Files folder. Should the folder reaches this limit, new files will not sync until other files are deleted from the folder. 500 MB is the maximum size of file that can be uploaded using the Salesforce Files folder.
The Publisher Actions (or simply Actions) option lets you create actions and add them to the Chatter publisher on the home page, on the Chatter tab, in Chatter groups, and on record detail pages. Actions also appear in the action tray in Salesforce1.
Actions can be set up to provide your users with the option to create or update records and log calls directly in the Chatter feed or from users' mobile devices. Actions can be regular actions, such as create and update, or you can configure and develop custom Actions based on your company's needs.
The following lists the various types of actions:
- Standard actions: These are automatically included when Chatter is enabled, for example, Post, File, Link, and Poll. Here, you can customize the order in which these appear, but you can not edit their properties.
- Create actions: These allow users to create records. You can choose the fields used in Create actions and when the record is saved, or when any validation rule or mandatory field is fired.
- Log a call actions: These permit users to enter the details of phone calls where these call logs are saved as completed tasks.
- Send email actions (only available on Case records): These provide a Case Feed E-mail action on Salesforce1 Mobile (albeit at the time of writing this, it's a simplified version of the Case Feed E-mail function).
- Update actions: These let users amend a record from the feed associated with the record.
- Question actions: These let users ask and search for questions about the record.
- Custom actions: These are an extended functionality developed with Visualforce pages or canvas apps.
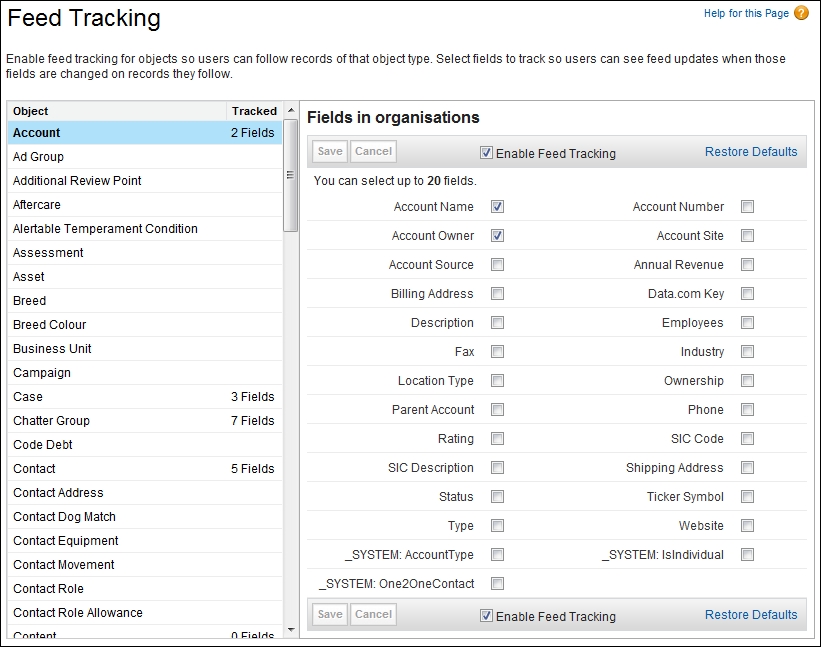
When you enable feed tracking, users will see updates for the objects and records that they follow in their Chatter feed. Many objects and fields are tracked by default, but you can further customize feed tracking to include or exclude specific objects and fields.
You can set feed tracking for users, Chatter groups, and these standard objects: accounts, assets, campaigns, cases, contacts, contracts, dashboards, events, leads, opportunities, products, reports, solutions, and tasks. You can also configure feed tracking for custom objects.
The selection of the Salesforce Feed Tracking options can be carried out by navigating to Setup | Customize | Chatter | Feed Tracking (as shown in the following screenshot).
The chat settings feature allows users to chat with people they follow in Chatter without having to use external chat clients.
The selection of the Salesforce Feed Tracking options can be carried out by navigating to Setup | Customize | Chatter | Chat Settings (as shown in the following screenshot).
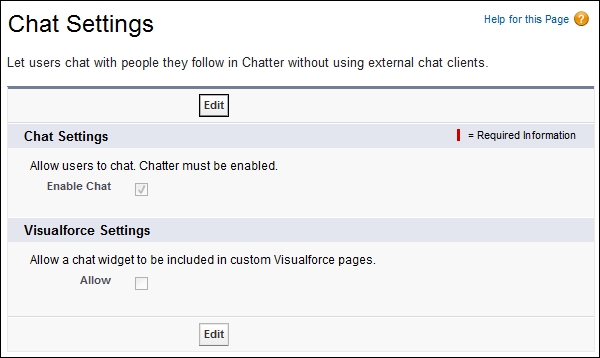
In the Chat Settings section, select the Enable Chat checkbox to permit users to use the chat facility directly in Salesforce CRM.
In the Visualforce Settings section, select the Allow checkbox to permit developers and administrators to include the chat widget within custom Visualforce pages.
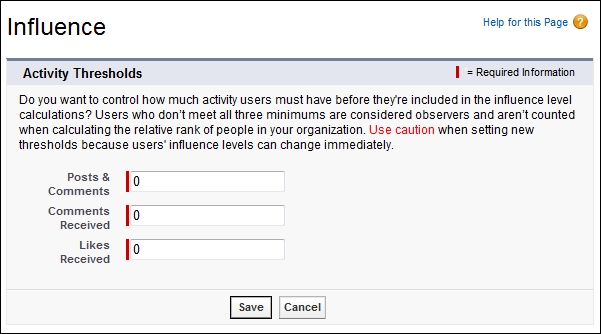
The Influence setting allows you to control how much activity users must have before they are included in influence-level calculations.
The selection of the Salesforce Feed Tracking options can be carried out by navigating to Setup | Customize | Chatter | Influence (as shown in the following screenshot).
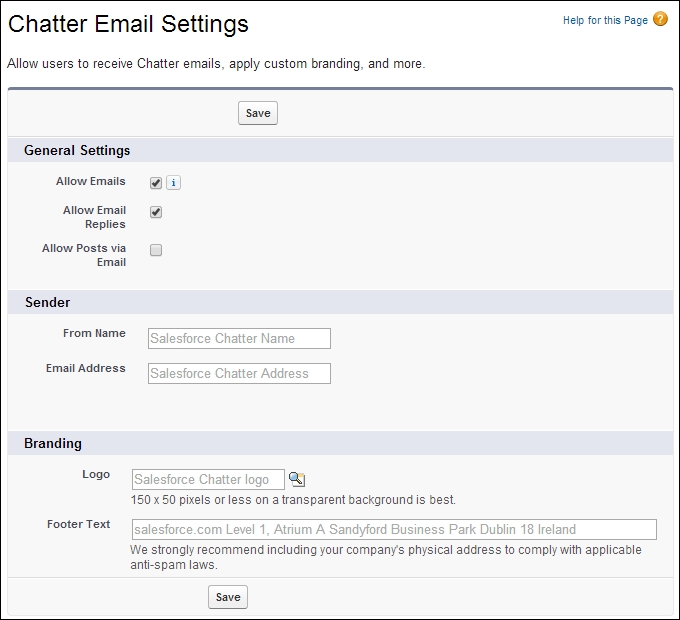
The Chatter e-mail setting allows you to apply custom e-mail branding for Chatter e-mails and control whether your users are able to receive e-mails and send posts using e-mail.
The options for the Chatter Email Settings can be set by navigating to Setup | Customize | Chatter | Email Settings, as shown in the following screenshot: