
Custom objects are database tables that allow you to store data specific to your organization in salesforce.com. You can use custom objects to extend Salesforce functionality or to build new application functionality.
Once you have created a custom object, you can create a custom tab, custom-related lists, reports, and dashboards for users to interact with the custom object data.
To create a custom object, follow the path Your Name | Setup | App Setup | Create | Objects. Now click New Custom Object, or click Edit to modify an existing custom object. The following screenshot shows the resulting screen:
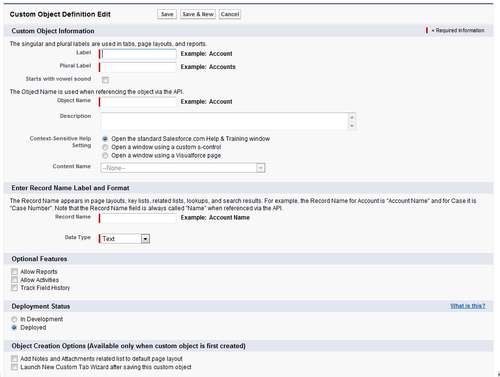
On the Custom Object Definition Edit page, you can enter the following:
- Label: This is the visible name that is displayed for the object within the Salesforce CRM user interface and shown on pages, views, and reports, for example.
- Plural Label: This is the plural name specified for the object which is used within the application in places such as reports and on tabs if you create a tab for the object.
- Gender (language dependent): This field appears if your organization-wide default language expects gender. This is used for organizations where the default language settings is for example, Spanish, French, Italian, German among many others. Your personal language preference setting does not affect whether the field appears or not. For example, if your organization's default language is English but your personal language is French, you will not be prompted for gender when creating a custom object.
- Starts with a vowel sound: Use of this setting depends on your organization's default language and is a linguistic check to allow you to specify whether your label is to be preceded by "an" instead of "a". For example, resulting in reference to the object as "an Order" instead of "a Order" as an example.
- Object Name: A unique name used to refer to the object. Here, the Object Name field must be unique and can only contain underscores and alphanumeric characters. It must also begin with a letter, not contain spaces, not contain two consecutive underscores, and not end with an underscore.
- Description: An optional description of the object. A meaningful description will help to explain the purpose for your custom objects when you are viewing them in a list.
- Context-Sensitive Help Setting: Defines what information is displayed when your users click the Help for this Page context-sensitive help link from the custom object record home (overview), edit, and detail pages, as well as list views and related lists. The Help & Training link at the top of any page is not affected by this setting. It always opens the SalesforceHelp & Training window.
- Record Name: This is the name that is used in areas such page layouts, search results, key lists, and related lists as shown next.
- Data Type: The type of field for the record name. Here the data type can be either text or auto-number. If the data type is set to be text, then when a record is created, users must enter a text value which does not need to be unique. If the data type is set to be Auto Number, it becomes a read-only field whereby new records are automatically assigned a unique number:

- Display Format: As in the preceding example, this option only appears when the Data Type is set to Auto Number. It allows you to specify the structure and appearance of the Auto Number field. For example: {YYYY}{MM}-{000} is a display format that produces a 4-digit year, 2-digit month prefix to a number with leading zeros padded to 3 digits. Example data output would include: 201203-001; 201203-066; 201203-999; 201203-1234.
It is worth noting that although you can specify the number to be 3 digits if the number of records created becomes over 999 the record will still be saved but the automatically incremented number becomes 1000, 1001, and so on.
- Starting Number: As described, Auto Number fields in Salesforce CRM are automatically incremented for each new record. Here you must enter the starting number for the incremental count (which does not have to be set to start from 1).
- Allow Reports: This setting is required if you want to include the record data from the custom object in any report or dashboard analytics.
Note
Such relationships can be either a lookup or a master-detail.
Lookup relationships create a relationship between two records so you can associate them with each other. Master-detail relationship creates a relationship between records where the master record controls certain behaviors of the detail record such as record deletion and security.
When the custom object has a master-detail relationship with a standard object or is a lookup object on a standard object, a new report type will appear in the standard report category. The new report type allows the user to create reports that relate the standard object to the custom object which is done by selecting the standard object for the report type category instead of the custom object.
- Allow Activities: Allows users to include tasks and events related to the custom object records which appear as a related list on the custom object page.
- Track Field History: Enables the tracking of data field changes on the custom object records, such as who changed the value of a field and when it was changed. Fields history tracking also stores the value of the field before and after the fields edit. This feature is useful for auditing and data quality measurement and is also available within the reporting tools.
- Deployment Status: Indicates whether the custom object is now visible and available for use by other users. This is useful as you can easily set the status to In Development until you are happy for users to start working with the new object.
- Add Notes & Attachments: This setting allows your users to record notes and attach files to the custom object records. When this is specified, a related list with New Note and Attach File buttons automatically appears on the custom object record page where your users can enter notes and attach documents.
- Launch the New Custom Tab Wizard: Starts the custom tab wizard after you save the custom object.
Considerations to be observed when creating object relationships:
- Create the object relationships as a first step before starting to build the custom fields, page layouts, and any related list
- The Related To entry cannot be modified after you have saved the object relationship
- When planning to create a master-detail relationship on an object be aware that it can only be created before the object contains record data
- Clicking Edit List Layout allows you to choose columns for the key views and lookups
- The Standard Name field is required on all custom object-related lists and also on any page layouts