
How to configure the URLconf file to allow web browsers to see the admin interface
How to activate a model in the admin interface
</objective> <objective>How to add, delete, view, and modify objects using the admin interface
</objective> <objective>How to add fields to data models
</objective> <objective>How to change the behavior of fields in a data model
</objective> <objective>How to create relationships between classes in data models
</objective> </feature>In Hour 2, “Creating Your First Website,” you went through the steps to create a basic Django website. As part of that process, you created a simple application and model. In this hour, you will activate and install Django’s admin interface so that you will be able to manage the data in the models from the web. This hour also provides more details on creating and managing models, including some of the different types of fields that you can add to a model and which options are available to control the behavior of those fields.
Django’s admin interface is actually a Django application. Therefore, it must be installed just like any other application you create. Installing Django’s admin interface is a simple process of adding the application to the list of installed applications in the settings.py file and then synching the database. This process creates new tables in the database to support the admin interface.
The Django admin interface must be added to the URLconf file so that you can access it from a web browser. Django automatically puts the following line in the urls.py file. However, it is initially commented out and therefore is inactive:
(r'^admin/', include('django.contrib.admin.urls'))
Did you Know?
You don’t have to use the default value of admin as the web location for the admin interface. You can specify any name you want. For example:
(r'^WebMaster/', include('django.contrib.admin.urls'))
Add Admin Access to the URLconf File
In this section, you enable access to the admin interface for a web browser by adding the default entry for the admin application to the urls.py file.
From a console prompt, change to the root directory of the iFriends project.
Open the
iFriendsurls.pyfile in an editor.Find the
urlpatternssetting, and uncomment the(r'^admin/', include('django.contrib.admin.urls')), pattern, as shown in the following snippet:urlpatterns = patterns('', (r'^People/$', 'iFriends.People.views.index') # Uncomment this for admin: (r'^admin/', include('django.contrib.admin.urls')), )Save the file.
Enter the following command to start the development server:
python manage.py runserver
Access the
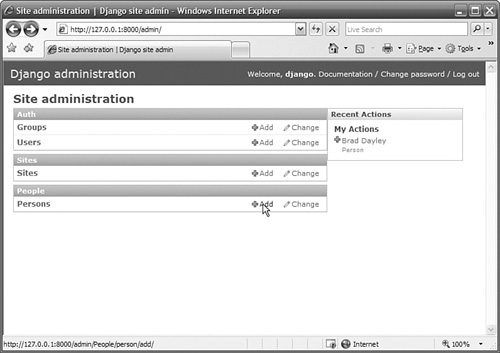
http://127.0.0.1:8000/adminURL. You should see a web page similar to the one shown in Figure 3.1.Log in to the admin site using the superuser name and password that you set up in Hour 2. You should see a web page similar to the one shown in Figure 3.2.


From the main page in Django’s admin interface, you can add users, groups, and sites and manage any objects that have had the admin interface activated.
Models are not visible in Django’s admin interface automatically. You must activate a model for it to be accessible from the admin interface. The admin interface provides an easy way to add and edit objects in the model. However, it is not necessary to activate all or any models for Django to function.
The Admin class must be added to the model to activate the model in the admin interface. Only a simple Admin class is required:
class Admin:
     pass
Specific items that can be defined in the Admin class will be discussed in Hour 17, “Customizing Models in the Admin Interface.”
Activate the People Model in the Admin Interface
In this section, you activate the People application you created in Hour 2 to make it accessible in the admin interface.
Open the
iFriendsPeoplemodels.pyfile in an editor.Add the
Adminclass to thePersonclass, as shown in Listing 3.1, to activate thePersonmodel in the admin interface.Example 3.1. Full Contents of the
iFriendsPeoplemodels.pyFile with the Admin Interface Activatedfrom django.db import models class Person(models.Model): name = models.CharField('name', max_length=200) desc = models.TextField('Desc', max_length=500) def __str__(self): return '%s' % (self.name) class Admin: passSave the file.
Refresh your web browser. The People application should be available, as shown in Figure 3.3
Django’s admin interface provides a versatile and dynamic method of administering objects on your website. You can add, modify, and delete objects from the admin interface.
Typically, most objects are added programmatically through a series of web forms and application code. However, often it is useful to be able to quickly view, add, or modify an object from the admin interface.
The admin interface contains a number of predefined views. The main page, shown in Figure 3.3, has three main parts: the title bar, the site administration table, and the Recent Actions list. The title bar at the top displays the site name, a login welcome message, and links to change the password and log out. The Recent Actions list is a history of events that have taken place on the admin interface.
The admin interface is easy to navigate. The Add link allows you to add objects, and the Change link allows you to modify existing objects.
Most of the work is done from the site administration table. In the Auth section, you can enter users and groups. These users are tied into Django’s authentication system. In the Sites section, you can enter domain names that the Django server will service. Applications that are enabled in the admin interface appear below Sites.
Add and Modify an Object Using the Admin Interface
In the preceding section, you enabled the People model in the admin interface, and it appeared on the main page of the admin interface. In this section, you will use the admin interface to add a Person object to the database.
Follow these steps to open the admin interface and add a Person object and then modify it:
Start the development server.
Log in to the admin interface using a web browser.
From the admin interface (refer to Figure 3.3), click the Add link next to Persons to bring up the add form, shown in Figure 3.4.
Enter a name and description, and click the Save button. The new object should appear in the Person list, as shown in Figure 3.5.
Click the name link under Person that you just created to bring up the edit form, as shown in Figure 3.6.
Change the description, and click the Save button.
Click the name link under Person again to bring up the edit form (see Figure 3.6). Click the History link to see the history of changes to the object, as shown in Figure 3.7.
Did you Know?
Notice the navigation links, Home > Persons > Brad Dayley > History, below the title bar in Figure 3.7. These are quick links back to previous pages that you navigated. These are almost always present in the admin interface and can speed up navigation.


Hour 2 mentioned that Django uses data models to define classes of data objects that belong to a particular application. Each application has its own models.py file that contains the Python code that defines that application’s data model.
Django has an extensive package, models.django.db, that contains several predefined class field types that help you define data objects as well as a set of options to manage the behavior of those fields.
Did you Know?
Django has a backend engine that runs SQL commands to create tables for each object and relationship.
You can add several different types of fields to your data model. The benefit of having different types of fields is that the Django engine can understand what type of data should be in the field. Django has built-in validation that simplifies the process of verifying that the right type of data is being added to an object in the model. Django also can use the field type to display the field properly in predefined and admin views.
The following sections describe some of the field types that you will use the most.
You will use two main field types for simple text fields.
The CharField type is designed for smaller strings with specific length limitations, such as names or titles. CharField tells Django that the field is expecting text data. It requires that a maximum length be specified using the max_length argument:
name = models.CharField('Name', max_length=100)
The TextField type is designed for larger strings of text, such as a description. TextField tells Django that the field is expecting a variable amount of text. You can specify a maximum size for TextField using the max_length argument, as shown here, but this is not required:
desc = models.TextField('Desc', max_length=1000)
You can use three different types of fields when adding date and time fields to your models. DateField, TimeField, and DateTimeField are designed to accept a date, time, and date with time of day value, respectively:
    bday = models.DateField('Birthday')
    alarm = models.TimeField('Alarm')
    appnt = models.DateTimeField('Appointment')
All three date and time field types accept the following two optional arguments:
auto_nowtells Django to automatically set the value of this field to the current time each time the object is saved. This is useful for last-saved time stamps.auto_now_addtells Django to automatically set the value of this field to the current time when it is initially created. This is useful for creation time stamps.
You will use two types of file fields. The first is the standard FileField, which is used to upload files to the website. FileField requires an upload_to argument that specifies a path, relative to MEDIA_ROOT, on the local file system of the web server to store the file, as shown here:
doc = models.FileField('File', upload_to='documents')
By the Way
The MEDIA_ROOT path is specified in the settings.py file. No path is defined by default, so you must define one.
Did you Know?
The path you specify in upload_to can contain Python’s strftime formatting, which is replaced by the data and time of the file upload. This can be useful if you want to control file uploads.
The second type of field is the ImageField. The ImageField is very similar to the FileField except that in validation, the ImageField will validate the file as a valid image file. The ImageField also includes two extra optional arguments, height_field and width_field that contain height and width of the image. These fields are autopopulated when the object is saved.
URLField is similar to TextField. It also accepts the max_length argument. URLField also accepts the verify_exists argument. If this argument is set to True (the default), Django checks the URL to verify that it exists before accepting it:
location = models.URLField('WebPage', verify_exists=True, max_length=100)
Add Fields to a Model
The previous sections have discussed several different types of fields that can be applied to a model for specific purposes. In this section, you apply that knowledge to extend the Person class by adding fields to it.
Follow these steps to add a DateField, EmailField, and URLField to the Person class in the iFriends database:
Make certain that the development server has stopped by pressing Ctrl+Break from the console.
Open the
iFriendsPeoplemodels.pyfile in an editor.Add the following code line to the
models.pyfile to import theUserclass from Django’s authentication model:from django.contrib.auth.models import User
Add the code shown in Listing 3.2 to the
Personclass to add a birthdayDateField, an emailEmailField, and a favorite URLURLField.Example 3.2. Full Contents of the
iFriendsPeoplemodels.pyFile Showing the New Fields in the Person Modelfrom django.db import models from django.contrib.auth.models import User class Person(models.Model): name = models.CharField('name', max_length=200) birthday = models.DateField('Birthday') email = models.EmailField('Email') favoriteURL = models.URLField('myURL') desc = models.TextField('Desc', max_length=500) def __str__(self): return '%s' % (self.name) class Admin: passSave the file.
Clear the old Person table in the database by using the following SQL command:
drop table people_person;
Sync the model to the database using the following command from the root directory of the iFriends project:
python manage.py syncdb
Enter the following command to start the development server:
python manage.py runserver
Access the Django admin interface at
http://127.0.0.1:8000/admin, and log in as the superuser.Click the Add button next to Persons in the People section, as shown in Figure 3.8.
Figure 3.9 shows that the new fields were added to the
Personobject.


Django provides several options that can be applied to fields to control their behavior in the SQL database as well as Django’s admin interface. The following sections discuss some of the most common options that can be passed as arguments to field definitions. These arguments are all optional and are available to all Django field types.
Django provides two different options that allow you to leave fields blank when adding new objects. The null option tells Django to store any fields left blank as the NULL in the database:
count = models.Integer('count', null=True)
The blank option tells Django’s validation engine to allow the field to be left blank:
count = models.Integer('count', blank=True)
There is a big difference between the null and blank options. The null option is strictly at the database level. The blank option is used by the validation engine on the Django admin site. This means that if you want to allow null values to be stored in the database and accessed in your code, you will need to set both the null and blank options to True.
The default option allows you to specify a value that will be applied to the field by default:
title = models.Integer('Title', default='<no title>')
The choices field option allows you to specify a list of two tuples to use as viable values in the field. Django’s model validation accepts only values specified in the choices field option when validating form entry. When this option is used, the Django admin interface provides a selection box for you to make your choice.
By the Way
The value of choices doesn’t necessarily need to be a list or tuple. It can be any Python iterable object.
This code snippet shows how to add a list of choices to a field definition:
gender_list = (('M', 'Male'), ('F', 'Female' ))
. . .
    gender = models.CharField(max_length=1, choices=gender_list)
The core field option is used when you relate objects to another object in the model. The Django admin interface lets you specify that multiple objects that are related to each other can be edited inline together.
Fields that have core=True set are treated as required fields in the object. When all the fields that have core=True set are cleared in the admin interface, the object is deleted.
The editable field can be useful if you have a field, such as the modified time stamp shown here, that you do not want to be edited by the admin interface or Django’s default forms. Fields are editable by default. However, if you specify editable=False, they cannot be changed in Django’s admin interface:
last_modified = models.DateTimeField('Last Modified', auto_now_add=True,
  editable=False)
The primary_key field option allows you to specify which field will be used for the primary key in the database. If you set primary_key=True for a field, blank=False, null=False, and unique=True are implied for the field. Only one primary key is allowed per object.
The unique field option allows you to specify if you want the field’s value to be unique throughout the table in the database. When unique=True is set, values are not allowed if they already exist for that field in another object in the database. The unique option is enforced at both the Django admin validation level and the database level.
Django also provides the following field options that allow you to specify uniqueness of objects based on date:
unique_for_date: When this option is set toTruefor aDateFieldorDateTimeField, Django enforces uniqueness in the date of that field.unique_for_month: When this option is set toTruefor aDateFieldorDateTimeField, Django enforces uniqueness in the month of that field.unique_for_year: When this option is set toTruefor aDateFieldorDateTimeField, Django enforces uniqueness in the year of that field.
By the Way
The unique_for_date, unique_for_month, and unique_for_year options are enforced only at the Django admin validation level.
Add Options to Fields in a Model
The previous sections have discussed several different options that can be applied to fields that control the behavior of the fields in the admin interface and also in the database. In this section, you apply that knowledge to modify the Person class by adding options to fields.
Follow these steps to force the email field to be unique, to allow the birthday and desc fields to be blank in the admin interface and the database, and to add a gender choice field to the class:
Make certain that the development server has stopped by pressing Ctrl+Break from the console.
Open the
iFriendsPeoplemodels.pyfile in an editor.Modify the
emailfield to make certain that it is unique in the table:email = models.EmailField('Email', max_length=100, unique=True)Modify the
birthdayanddescfields to allow them to be left blank in the admin interface andNULLin the database:birthday = models.DateField('Birthday', blank=True, null=True) desc = models.TextField('Desc', max_length=500, null=True)Add the following code snippet to add a gender choice field to the
Personclass:gender_list = (('M', 'Male'), ('F', 'Female' )) . . . gender = models.CharField(max_length=1, choices=gender_list)Save the file. Listing 3.3 shows the results.
Example 3.3. Full Contents of the
iFriendsPeoplemodels.pyFile with New Options in the Fieldsfrom django.db import models from django.contrib.auth.models import User gender_list = (('M', 'Male'), ('F', 'Female' )) class Person(models.Model): name = models.CharField('name', max_length=200) birthday = models.DateField('Birthday', blank=True, null=True) gender = models.CharField(max_length=1, choices=gender_list) email = models.EmailField('Email', max_length=100, unique=True) favoriteURL = models.URLField('myURL') desc = models.TextField('Desc', max_length=500, null=True) def __str__(self): return '%s' % (self.name) class Admin: passClear the old Person table in the database by using the following SQL command:
drop table people_person;
Sync the model to the database using the following command from the root directory of the iFriends project:
python manage.py syncdb
Enter the following command to start the development server:
python manage.py runserver
Access the Django admin interface at
http://127.0.0.1:8000/admin, and log in as the superuser.Click the Add button next to Persons in the People section (see Figure 3.8).
Figure 3.10 shows that the new fields were added to the
Personobject.

You should see the Gender field now available in the admin interface. Also, the Birthday field label is no longer bold, which means that this field may be left blank. The Desc field is bold because the blank option was not set to True. Remember that you don’t need to set the blank option for CharField, because Django allows a zero-length string.
As you begin to develop more complex websites using Django, you will find it necessary to link classes within models and also link classes in other models. Django provides a simple but effective means of accomplishing class relationships. The following sections discuss how to define class relationships within models.
Arguably the most common type of relationship you will deal with is the many-to-one relationship, in which one object can be related to several others.
Many-to-one relationships are defined by adding a ForeignKey field to a class and specifying a second class as the key. For example, our sample website currently has a Person class defined. If we were to add a Hometown class, several people might come from the same hometown. The code used to define the many-to-one relationship would be similar to the following:
class Hometown(models.model):
. . .
class Person(models.Model):
    hometown = models.ForeignKey(Hometown)
By the Way
If a module has not yet been defined, you can also specify the name of the object instead of the object itself as the argument to ForeignKey. For example:
class Person(models.Model):
    hometown = models.ForeignKey('Hometown')
. . .
class Hometown(models.model):
Did you Know?
You can create a recursive relationship within an object by specifying self as the argument to ForeignKey:
. . . models.ForeignKey('self')
The following are some of the more common optional arguments that you will use with ForeignKey:
edit_inlinedefines how the object will be edited in the admin interface. If it is set toFalse, the object is edited inline on the related object’s page. If it is set tomodels.TABULAR, the object is edited as a table. If it is set tomodels.STACKED, the fields for each object are displayed as stacked on top of each other.related_namecan be set to the name to be used from the related object back to this one.to_fieldspecifies the field in the related object this field relates to. This defaults to the primary key of the related object.
Many-to-many relationships are defined by adding a ManyToMany field to a class and specifying a second class as the key. For example, our sample website currently has a Person class defined. If we were to add a Blog class, we might have several persons who belong to several blogs and several blogs that have several people using them. The code used to define the many-to-many relationship would be similar to the following:
class Blog(models.model):
. . .
class Person(models.Model):
    blogs = models.ManyToManyField(Blog)
Did you Know?
You can create a recursive relationship within an object by specifying self as the argument to ManyToMany:
friends = models.ManyToManyField('self')
The following are some of the more common optional arguments you will use with ManyToManyField:
filter_interfacecan be set tomodels.VERTICALormodels.HORIZONTALto tell Django to use a built-in JavaScript interface to display the field in the admin form.related_namecan be set to the name to be used from the related object back to this one.symmetricalis used when you useselfas the object for the relationship. Settingsymmetrical=Truetells Django that the relationship between the two objects is reciprocal. In other words, if it exists in one, it also exists in the other.
Quoted from djangoproject.com: “The semantics of one-to-one relationships will be changing soon, so we don’t recommend that you use them.”
One-to-one relationships are defined by adding a OneToOne field to a class and specifying a second class as the key. For example, our sample website currently has a Person class defined. If we were to add an Alias class that limits each person to have only one Alias, the code used to define the one-to-one relationship would be similar to the following:
class Alias(models.model):
. . .
class Person(models.Model):
Add Many-to-One and Many-to-Many Relationships to a Model
The preceding section discussed the different types of relationships that you can add between objects. This section takes you through the steps of adding some relationships to the People model in your iFriends application.
In this section, you will add a many-to-one relationship between the Person class and the User class in Django’s authentication system. You also will create a recursive relationship between the Person class and itself, as well as a many-to-many relationship between the Person class and a new Blog class.
Make certain that the development server has stopped by pressing Ctrl+Break from the console.
Open the
iFriendsPeoplemodels.pyfile in an editor.Add the following code snippet to the
models.pyfile to import theUserclass from Django’s authentication model:from django.contrib.auth.models import User
Add the following code to the
Personclass to add a many-to-one relationship to theUserclass in Django’s authentication model:userID = models.ForeignKey(User, unique=True)
Add the following code to the
Personclass to add a many-to-many recursive relationship between thePersonclass and itself:friends = models.ManyToManyField('self', blank=True)Add the code shown in Listing 3.4 to the
Peoplemodel to add a many-to-many relationship between thePersonclass and a newBlogclass.Example 3.4. Full Contents of the
iFriendsPeoplemodels.pyFile Adding Many-to-One and Many-to-Many Relationships to a Modelfrom django.db import models from django.contrib.auth.models import User gender_list = (('M', 'Male'), ('F', 'Female' )) class Blog(models.Model): title = models.CharField('Title', maxlength=200) text = models.TextField('Text', maxlength=2048) class Person(models.Model): userID = models.ForeignKey(User, unique=True) name = models.CharField('name', maxlength=200) birthday = models.DateField('Birthday', blank=True, null=True) gender = models.CharField(maxlength=1, choices=gender_list) email = models.EmailField('Email', maxlength=100, unique=True) favoriteURL = models.URLField('myURL') desc = models.TextField('Desc', maxlength=500, null=True) friends = models.ManyToManyField('self', blank=True) blogs = models.ManyToManyField(Blog, blank=True) def __str__(self): return '%s' % (self.name) class Admin: passSave the file.
Clear the old Person table in the database by using the following SQL command:
drop table people_person;
Sync the model to the database using the following command from the root directory of the iFriends project:
python manage.py syncdb
Enter the following command to start the development server:
python manage.py runserver
Access the Django admin interface at
http://127.0.0.1:8000/admin, and log in as the superuser.Click the Add button next to Persons in the People section, as shown in Figure 3.11.
Figure 3.12 shows that the new fields were added to the
Personobject.


In this example, you imported the User class from django.contrib.auth.models so that you can use it as the ForeignKey field. Using the ForeignKey field in this way allows you to access the Django User object from a Person object. You will see this in action later in the book.
This hour introduced the admin interface and showed you how to use it to view, create, and modify objects in the database. We covered how to install the admin interface, how to activate it in a model, and how to navigate the admin interface to create and modify an object.
We also discussed creating models in more depth. You saw some of the different types of fields that you can add to a model and which options are available to control the behavior of those fields. We also covered the relationships between different classes both within the same model and in different models.
The workshop consists of a set of questions and answers designed to solidify your understanding of the material covered in this hour. Try answering the questions before looking at the answers.