
How to render Form objects as HTML code
How to render forms for models and objects
</objective> <objective>How to create custom forms by customizing Widgets and using custom templates
</objective> </feature>Forms are a basic element of any website. HTML forms are used to collect input from users. This input can be used to change data in the database, configure settings, send emails, and perform various other tasks.
Django provides a useful library to help you create and handle forms. The Django forms library is intended to handle HTML form display, data processing, and redisplay. In this hour, you will learn how to create forms and display them in your HTML views. We won’t actually gather any input from the forms in this hour; that topic is covered in the next hour.
Before starting this hour, you need to understand a few terms:
Model: We covered models earlier. You should remember that a model is an object-definition with several fields defined that define attributes of the object.
Form: In this hour, form refers to a Django
Formclass that is used to render HTML forms.Field: Both models and forms have
Fieldobjects. TheFieldobjects for models and forms are similar and are somewhat related, but they are not the same. Appendix B, “Django Form Field Objects,” contains a table that mapsModel Fields toForm Fields.Widget: A Widget is an object that renders to an HTML form element. Each
Form Fieldhas an associatedWidgetobject that is used when rendering theFormas HTML. For example, a CharField Widget renders to an HTML text input element. Appendix B lists theWidgetobjects.
Watch Out!
Currently, the two form libraries are forms and newforms. The forms library is old, so it isn’t covered in this book. The Django project suggests that you import the newforms library as forms to maintain backward compatibility. Perhaps the Django developers intend to remove the old forms library and replace it with newforms. In this book, however, I always import the newforms library using the following import statement:
from django import newforms as forms
When I refer to the forms library, I am really referring to the newforms library.
You can define forms in Django by creating a class that inherits the Form class and then defining Field objects as members of the form. For example, to create an address book form that includes name, address, and email fields, you would use the following class definition:
from django import newforms as forms
class AddressForm(forms.Form):
    name = forms.CharField()
    address = forms.CharField()
    email = forms.EmailField()
After the form has been created, you can create instances of the form by calling this constructor:
adr = AddressForm()
The following sections describe the different fields you can use when defining forms, how to create bound and unbound instances of the forms, and how to override built-in form methods.
You can add several different types of fields to forms. The advantage of different types of fields is that the form can more closely match the data types that will be put into it and validated.
Several Field objects are available in the forms package. The following is a list of the Field objects and their uses. For more information about each Field object, see Appendix B.
The
BooleanFieldobject is used to add true/false values. It renders a check box.The
CharFieldobject is used for most textual input. It renders a text box.The
ChoiceFieldobject is used to select an item from a list. It renders a select box.The
DateFieldobject is used to specify a date. It renders a text box.The
DateTimeFieldobject is used to specify a date/time. It renders a text box.The
DecimalFieldobject is used to specify numeric data in the form of a decimal value. It renders a text box.The
EmailFieldobject is used to specify an email address. It renders a text box.The
FileFieldobject is used to specify a file. It renders a file upload.The
ImageFieldobject is used to specify an image file. It renders a file upload.The
IntegerFieldobject is used to specify numeric data in the form of an integer value. It renders a text box.The
IPAddressFieldobject is used to specify an IPv4 address. It renders a text box.The
MultipleChoiceFieldobject is used to select multiple items from a list. It renders a multiple-select box.The
NullBooleanFieldobject is used to select a true/false/none value. It renders a null Boolean select.The
RegexFieldobject is used to specify that you want a specific regular expression as the input. It renders a text box.The
TimeFieldobject is used to specify a time. It renders a text box.The
URLFieldobject is used to specify a valid URL. It renders a text box.
Each Field object has the following core field arguments available when you define the form:
The
requiredargument can be set toTrueorFalse; it defaults toTrue. Ifrequiredis set toFalse, no value is required when creating or validating the form.The
labelargument allows you to specify a textual label that is displayed when the form is rendered. Iflabelis not specified, the name of the field is used.The
initialargument allows you to specify an initial value for the field.initialis used only with unbound forms.The
widgetargument allows you to specify aWidgetobject to use when rendering the field. TheWidgetobject determines what HTML element is used in the form when it is rendered. For more details about the types ofWidgetobjects you can assign to fields, see Appendix B.The
help_textargument allows you to specify a string that is displayed next to the field when the field is rendered.
The following example shows a simple Field definition that uses the core field arguments:
desc = forms.CharField(required=False, label='Description',
          widget=forms.Textarea(), help_text='Your description here.')
You can create two different types of form instances, depending on what you need from the form. You can create forms that are either bound or unbound to data. A bound form is a form that contains data bound to each element in the form. An unbound form is a blank form that contains no data values for the elements in the form.
A form that is unbound to data cannot do validation, but it can still render the form so that it can be displayed as HTML. To create an unbounded instance of a form, you simply need to call the Form constructor. The following example creates an unbound form:
adr = AddressForm()
A form that is bound to data can validate that data as well as render it to be displayed as HTML. To create a bound instance of a form, you need a dictionary. The dictionary’s keys need to match the names of the fields you specified when you defined the form. The values need to be valid for the Field object that the key specifies. The following example shows how to create a form that is bound to a dataset:
from django import newforms as forms
class AddressForm(forms.Form):
    name = forms.CharField()
    address = forms.CharField()
    email = forms.EmailField()
. . .
dset = {'name': 'Surfs Up',
        'address': 'Somewhere Wet',
        'email': '[email protected]'}
adr = AddressForm(dset)
When the AddressForm instance is created, it is bound to the data in dset.
An instance of a Form object can be rendered as HTML in a couple of ways. The first way is to render the form inside Python code—for example, inside a view function when building the text for the HttpResponse. The second way is to pass the form object as a variable to an HTML template file and then render the form inside the template itself.
Django provide three different versions of form rendering. The following sections discuss rendering forms as tables, lists, and paragraphs. The table version seems to be the most popular. Which one you use depends on how you want the form to be displayed.
Django provides the as_table() function to render forms as an HTML table. This method is also the default method if you simply use the print function to print the form.
When forms are rendered as an HTML table, each Field in the form is rendered as a two-column row. The first column displays the label in a <th> tag. The second column uses the HTML equivalent of the Widget object assigned to the Field to display the value in a <td> tag. For example, a CharField that is labeled Name and has a value of Tim renders to the following HTML:
<tr><th><label for"id_name"Name:</label><th>
<td><input type="text" name="name" value="Tim" /></td></tr>
By the Way
There are no <table> or <form> tags around the rendered table. This gives you much more flexibility in building the view.
The following line of code shows how to render a Form object as an HTML table in Python code:
html += myForm.as_table()
The following line of code shows how to render a Form object as an HTML table in an HTML template:
{{ myForm.as_table }}
Django provides the as_ul() function to render forms as an HTML list. When forms are rendered as an HTML list, each Field in the form is rendered as a list item with a <label> and <input> tag. The <label> tag displays the label of the Field. The <input> tag displays the HTML equivalent of the Widget object assigned to the Field. For example, a CharField that is labeled Name and has a value of Tim renders to the following HTML:
<li><label for"id_name"Name:</label>
<input type="text" name="name" value="Tim" /></li>
By the Way
There are no <form> tags around the rendered list. This gives you much more flexibility in building the view.
The following line of code shows how to render a Form object as an HTML list in Python code:
html += myForm.as_ul()
The following line of code shows how to render a Form object as an HTML list in an HTML template:
{{ myForm.as_ul }}
Django provides the as_p() function to render forms as HTML paragraphs. When forms are rendered as HTML paragraphs, each Field in the form is rendered inside <p> tags with <label> and <input> tags. The <label> tag displays the label of the Field. The <input> tag displays the HTML equivalent of the Widget object assigned to the Field. For example, a CharField that is labeled Name and has a value of Tim renders to the following HTML:
<p><label for"id_name"Name:</label>
<input type="text" name="name" value="Tim" /></p>
By the Way
There are no <form> tags around the rendered paragraph. This gives you much more flexibility in building the view.
The following line of code shows how to render a Form object as an HTML paragraph in Python code:
html += myForm.as_p()
The following line of code shows how to render a Form object as an HTML paragraph in an HTML template:
{{ myForm.as_p }}
Render a Form as HTML
In this section, you will add a contact_view() view to the iFriends website and create a basic form that will allow users to send emails to the site admin. You will create a new application called Home to store the contact_view() view in.
Did you Know?
When you add the Home application, you do not need to stop and then restart the server or add a line to the INSTALLED_APPS setting in the settings.py file. You will not be adding any model information that will need to be synchronized to the database.
Follow these steps to create the Home application, add a contact_view(), and create a contact form:
From the iFriends root directory, use the following command to create an application called Home:
python manage.py startapp Home
Open the
iFriends/Home/views.pyfile in an editor.Add the following code to the file, as shown in Listing 10.1, to import the
render_to_responseandformsobjects:from django.shortcuts import render_to_response from django import newforms as forms
Add the following code to the file, as shown in Listing 10.1, to define the
EmailFormform:class EmailForm(forms.Form): title = forms.CharField(max_length=50) sender = forms.EmailField() date = forms.DateTimeField() text = forms.CharField(max_length=200)Add the following
contact_view()function, as shown in Listing 10.1, to create an instance of theEmailFormand call thecontact_form.htmltemplate:def contact_view(request): eForm = EmailForm() return render_to_response('home/contact_form.html', { 'eForm' :eForm })
Save the
iFriends/Home/views.pyfile.Create a directory called iFriends/templates/Home.
Create and open an
iFriends/templates/Home/contact_form.htmlfile in an editor.Add the template code shown in Listing 10.2 to extend the base template and render the
eFormvariable as a table.Save the
iFriends/templates/Home/contract_form.htmlfile.Open the
iFriends/urls.pyfile in an editor.Add the following line to the URL patterns to provide the URL link to the
contact_view()view function:(r'^Home/contact/$', 'iFriends.Home.views.contact_view'),
Save the
iFriends/urls.pyfile.Access the following URL in a web browser to bring up the contact view, shown in Figure 10.1, and verify that the form renders correctly:
http://127.0.0.1:8000/Home/contact/

Example 10.1. Full Contents of iFriends/Home/views.py
from django.shortcuts import render_to_response, get_object_or_404
from datetime import datetime
from django import newforms as forms
class EmailForm(forms.Form):
        title = forms.CharField(max_length=50)
        sender = forms.EmailField()
        date = forms.DateTimeField()
        text = forms.CharField(max_length=200)
def contact_view(request):
    eForm = EmailForm()
    return render_to_response('home/contact_form.html', { 'eForm'
:eForm })
In the previous sections, you learned how to define new Form objects and render them as HTML. Django also allows you to create Form objects from a model or an instance of a model.
Creating forms from models is easy and limits coding errors. However, you do not have as much control over forms created from models as forms you create yourself.
The following sections describe the process of creating a form from a model class using the form_for_model() helper function and creating a form from a model instance using the form_for_instance() helper function.
The form_for_model() function accepts a model class and creates a Form class with a Field object that corresponds to each Field object in the model. You can then use the Form class to create Form instances that can be rendered as HTML. For a mapping of Form Fields to Model Fields, see Appendix B.
For example, let’s look at creating a Form object from this Blog model:
class Blog(models.Model):
    title = models.CharField('Title', max_length=200)
    text = models.TextField('Text', max_length=2048)
    date = models.DateTimeField('Last Modified')
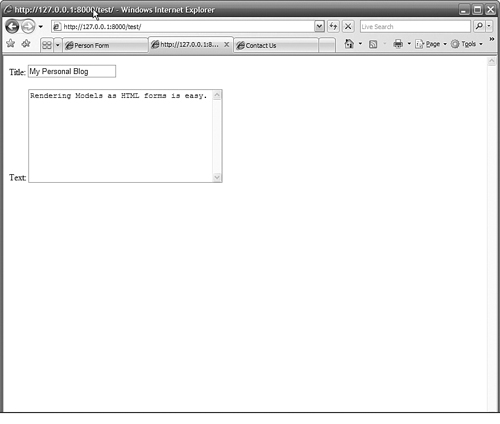
The following code snippet creates a Form class from the Blog model, creates a Form instance from the Form class, and renders it as HTML paragraphs, as shown in Figure 10.2:
from django.http import HttpResponse
from iFriends.People.models import Blog
from django import newforms as forms
. . .
BlogForm = forms.form_for_model(Blog)
bf = BlogForm()
return HttpResponse(bf.as_p())

You can use the form_for_instance() helper function to create a Form class from an object that is a model instance. The form_for_instance() function works basically the same way as the form_for_model() function. For each Field object in the model, a corresponding Field is created in the Form class.
The big difference is that the data values from the model instance are assigned as initial values of the form. When the Form is rendered as HTML, those values are placed as initial values in the form.
Another advantage of using the form_for_instance() function is that you don’t necessarily need to know what model is being rendered. This can be helpful if you want to write generic views that will render forms from different types of objects.
For an example, let’s use the Blog class defined in the preceding section. The following code snippet uses form_for_instance() to create a Form class from the Blog object instance, creates a Form instance from the Form class, and renders it as HTML paragraphs, as shown in Figure 10.3:
from django.http import HttpResponse
from django.shortcuts import get_object_or_404
from iFriends.People.models import Blog
from django import newforms as forms
. . .
blog = get_object_or_404(Blog, pk=1)
BlogForm = forms.form_for_instance(blog)
bf = BlogForm()
return HttpResponse(bf.as_p())

Notice that the form’s values are already filled in with the values in the Blog instance.
The form_for_model() and form_for_instance() functions accept a fields argument that allows you to specify which Field objects are added to the Form class. The fields argument is set to a list of Field names that exist in the model. Only the fields that are listed in the fields argument are added to the Form class.
The fields argument gives you more flexibility when creating forms for models. For example, consider the Blog class from the previous sections. The Last Modified field isn’t something that the user needs to modify. The following code snippet uses the fields argument in form_for_instance() to create a Form class that is a subset of the Blog object instance. The Form class includes only the title and text fields that are listed in the fields argument, as shown in Figure 10.4:
from django.http import HttpResponse
from django.shortcuts import get_object_or_404
from iFriends.People.models import Blog
from django import newforms as forms
. . .
blog = get_object_or_404(Blog, pk=1)
BlogForm = forms.form_for_instance(blog, fields=('title', 'text')
bf = BlogForm()
return HttpResponse(bf.as_p())
Notice that the Last Modified field is not present in the form because it is not listed in the fields argument.
Watch Out!
Fields that are omitted from the fields argument must not be required for validation. They need to be allowed to have a None value by setting Blank=True, contain a default value, or be filled in automatically.
Create and Render a Form for a Model
In this section, you will create a person_form() view that displays a Person object as a form. Follow these steps to add the person_form() that creates a form from a Person object, create an HTML template to display the form, and update the URLconf file to enable the view:
Open the
iFriends/People/views.pyfile in an editor.Add the following code to the file, as shown in Listing 10.3, to define a
person_form()function that accepts the argumentpIDand retrieves aPersonobject from the database:def person_form(request, pID='0'): p = get_object_or_404(Person, pk=pID)Add the following code to the function created in step 2 to create a
PersonFormclass from thePersonobject instance, and then create an instance of thePersonForm:PersonForm = forms.form_for_instance(p) pForm = PersonForm()
Add the following line of code to the
person_form()function, as shown in Listing 10.3, to render the form to a template calledperson_form.html:return render_to_response('People/person_form.html', {'pForm':pForm})Save the
iFriends/People/views.pyfile.Create and open a file named
iFriends/templates/People/person_form.htmlin an editor.Add the template code shown in Listing 10.4 to extend the base template and render the
pFormvariable as a table.Save the
iFriends/templates/Person/person_form.htmlfile.Open the
iFriends/People/urls.pyfile in an editor.Add the following line to the URL patterns to provide the URL link to the
person_form()view function:(r'^Form/(?P<pID>d+)/$', 'person_form'),
Save the
iFriends/People/urls.pyfile.Access the following URL in a web browser to bring up the person form view, as shown in Figure 10.5, and verify that the form renders correctly:
http://127.0.0.1:8000/People/Form/1/

Example 10.3. Full Contents of iFriends/People/views.py
from django.http import HttpResponse
from django.shortcuts import render_to_response, get_object_or_404
from iFriends.People.models import Person, Blog
from iFriends.Quotes.models import Quote
from datetime import datetime
from django import newforms as forms
def index(request):
pList = Person.objects.all()
return render_to_response('people/person_index.html',
{'pList': pList})
def details(request, pID='0', opts=()):
rDict = {}
p = get_object_or_404(Person, pk=pID)
rDict['p'] = p
quotes = Quote.objects.all()
rDict['quotes'] = quotes
return render_to_response('people/person_details.html', rDict)
def person_form(request, pID='0'):
    p = get_object_or_404(Person, pk=pID)
PersonForm = forms.form_for_instance(p)
pForm = PersonForm()
return render_to_response('People/person_form.html', {'pForm'
:pForm})
The HTML look and feel of the forms that Django renders seems a bit limited and plain. However, you can add code to both the Python view function and the HTML template to customize the form’s look and feel. The following sections discuss changing the look and feel of the HTML forms.
One of the biggest changes you can make to alter the look and feel of a Form Field object is to change the Widget object. All Field objects have an associated Widget object that is used to generate the HTML code for the Field. Appendix B has more information on Form Fields and Widgets.
Django allows you to specify attributes for the Widget as well as specify a totally different Widget to use for the form. Changing the Widget results in changing the HTML code that is generated when the form is rendered as HTML.
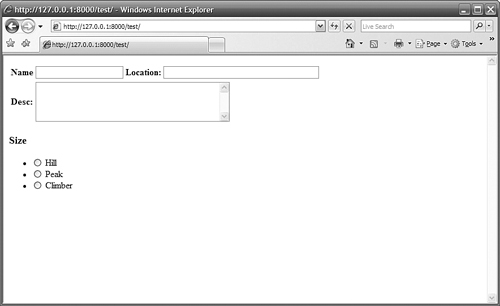
For example, consider the following Form code, which renders a form similar to the one shown in Figure 10.6:
class MForm(forms.Form):
    name = forms.CharField(max_length=50)
    location = forms.CharField(max_length=80)
    size = forms.CharField(max_lenght=20))
    desc = forms.CharField(max_length=200)

All the HTML elements are text inputs and are the same size even though the Fields are for different types of data. The following definition for the form sets the size attribute of the length field and changes the size field to a RadioSelect and the desc field to a Textarea, as shown in Figure 10.7:
sList = [('S', 'Hill'),('M','Peak'), ('L', 'Climber')]
class MForm(forms.Form):
    name = forms.CharField(max_length=50)
    location = forms.CharField(widget=
               forms.TextInput(attrs={'size':'40'}))
   size = forms.CharField(widget=
               forms.RadioSelect(choices=sList))
   desc = forms.CharField(widget=forms.Textarea(
               attrs={'rows':'4','cols':'40'}))

The form in Figure 10.7 would be much more useful, and it doesn’t take that much extra code.
Another way to customize your forms is using HTML templates. When you pass forms into a template, you can access the fields directly using the . (dot) syntax. This allows you to access not only the value of the field, but also the field attributes, such as label_tag and help_text.
The following code snippet from an HTML template shows how you can access an instance of the MForm from the preceding section and use your own HTML code to control how it is displayed, as shown in Figure 10.8:
<table>
<tr>
    <th>{{ MForm.name.label_tag }}</th>
    <td>{{ MForm.name }}</td>
    <th>{{ MForm.location.label_tag }}:</th>
    <td>{{ MForm.location }}</td>
</tr>
<tr>
    <th>{{ MForm.desc.label_tag }}:</th>
    <td colspan="3">{{ MForm.desc }}</td>
</tr>
</table>
<h3>{{ MForm.size.label_tag }}</h3>
{{ MForm.size }}
By the Way
You can also access the Form as a list in the template and use it in a for loop. This makes it easy to apply the same HTML code to several fields. For example:
{% for field in MForm %}
<h2>{{ field.label_tag }}</h2>
{{ field }}
{% endfor %}
Create and Generate a Customized Form
In this section, you will modify the contact form created earlier in this hour to display a better-looking form. Follow these steps to modify the Form definition and HTML template files:
Open the i
Friends/Home/views.pyfile in an editor.Modify the
titleandsenderfields of theEmailFormto the following code, as shown in Listing 10.5, so that the Widget size corresponds to the maximum length:title = forms.CharField(max_length=50, widget=forms.TextInput(attrs={'size':'50'})) sender = forms.EmailField(max_length=30, widget=forms.TextInput(attrs={'size':'30'}))Change the
textfield to the following code to use theTextareaWidget instead ofTextInput, as shown in Listing 10.5:text = forms.CharField(widget=forms.Textarea( attrs={'rows':'6','cols':'75'}))Save the
iFriends/Home/views.pyfile.Open the
iFriends/templates/Home/contact_form.htmlfile in an editor.Use the following code to change how the form is rendered as a table. Combine the
titleandsenderelements in the same row and place thetextelement on the next row, as shown in Listing 10.6:<tr> <th>{{ eForm.title.label_tag }}</th> <td>{{ eForm.title }}</td> <th>{{ eForm.sender.label_tag }}:</th> <td>{{ eForm.sender }}</td> </tr> <tr> <th>{{ eForm.text.label_tag }}:</th> <td colspan="3">{{ eForm.text }}</td> </tr>Save the
iFriends/templates/Home/contact_form.htmlfile.Access the following URL in a web browser to bring up the contact form view, shown in Figure 10.9, and verify that the form renders correctly:
http://127.0.0.1:8000/Home/contact/

Example 10.5. Full Contents of iFriends/Home/views.py
from django.shortcuts import render_to_response, get_object_or_404
from datetime import datetime
from django import newforms as forms
class EmailForm(forms.Form):
title = forms.CharField(max_length=50,
widget=forms.TextInput
(attrs={'size':'50'}))
sender = forms.EmailField(max_length=30,
widget=forms.TextInput
(attrs={'size':'30'}))
date = forms.DateTimeField()
text = forms.CharField(widget=forms.Textarea(
                        attrs={'rows':'6','cols':'75'}))
def contact_view(request):
eForm = EmailForm()
return render_to_response('home/contact_form.html', { 'eForm'
:eForm })
Example 10.6. Full Contents of iFriends/templates/Home/contact_form.html
{% extends "iFriends_base.html" %}
{% block title %}Contact Us{% endblock %}
{% block content %}
<table bgcolor="aaccdd">
<tr bgcolor="1111cc">
<td colspan="4"><font color="white" size="5">
Contact Us:
</font></td>
</tr>
<tr>
    <th>{{ eForm.title.label_tag }}</th>
    <td>{{ eForm.title }}</td>
    <th>{{ eForm.sender.label_tag }}:</th>
    <td>{{ eForm.sender }}</td>
</tr>
<tr>
    <th>{{ eForm.text.label_tag }}:</th>
    <td colspan="3">{{ eForm.text }}</td>
</tr>
</table>
{% endblock %}
This hour discussed how to create Form objects in Django by defining each field. It also discussed how to quickly create Form objects from models using the form_for_model() and form_for instance() functions. This hour discussed rendering forms to HTML as well.
In the final section of this hour, you learned how to customize the look and feel of the rendered form by customizing the Widget and using custom template code.
The workshop consists of a set of questions and answers designed to solidify your understanding of the material covered in this hour. Try answering the questions before looking at the answers.
1. | Create a view function in the |
2. | Create an HTML template in the iFriends/templates/People directory that displays the |
3. | Add an entry to the |