
How to start and stop the built-in web server
</objective> <objective>The steps to configure Django to access the database
</objective> <objective>How to create and install an application
</objective> <objective>The steps to apply a model to an application
</objective> <objective>The steps to activate a model in Django
</objective> <objective>How to configure Django to accept specific URL requests
</objective> <objective>How to create a simple view for a web browser
</objective> </feature>In Hour 1, “Understanding Django,” you learned some of the basics about the Django framework. This hour guides you through the steps of creating a functional website called iFriends. Although this website will be basic, it will be the basis for future hours to build on as you are guided through the various aspects of the Django framework.
Let’s begin the process of creating a working website by creating a Django project. A Django project is a collection of settings that define a specific instance of Django. These settings include things such as database configuration, URL configuration, and other options that you will learn about as the hours tick by.
After you have created the Django project, you should be able to start the development server to test it. The development server is a lightweight web server that is included with the Django project. It lets you develop and test your website without having to deal with all the configuration and management issues of a production web server.
Start the Development Server
In this section, you learn how to start the development server.
From a command prompt, change to the root directory for the iFriends project.
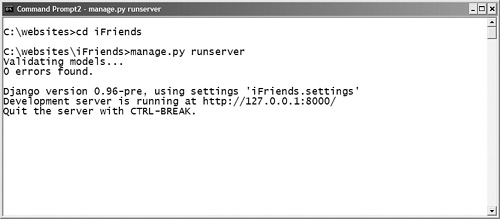
Enter the following command to start the development server, as shown in Figure 2.1:
python manage.py runserver
By the Way
The
manage.pyutility is copied into the root of your project by thecreateprojectcommand discussed earlier in this hour. Themanage.pyutility first validates the project and reports any errors. If no critical errors are encountered, you are notified that the development sever is running at http://127.0.0.1:8000/.Verify that the development server is working properly by opening a web browser and entering the following address:
http://127.0.0.1:8000/
If the development server starts properly (and you haven’t changed the debug setting), you should see a page similar to the one shown in Figure 2.2.

After you have verified that you can start and stop the development server, it is time to configure access to the database. This section takes you through the process of creating and configuring access to the database that will be used in the sample project.
By the Way
Django can dynamically serve web pages without using a database to store information. However, one of the best aspects of Django is its ability to implement database-backed websites.
Configuring the database involves three major steps. The first is to create the database and assign rights. The second is to modify the settings.py file to specify the database type, name, location, and access credentials. The third step is to synchronize the Django project with the database to create the initial tables necessary for the Django engine.
Django supports several different types of database engines. The project used in this book uses a MySQL database. This section assumes that you have already installed, configured, and started a database engine and that it is accessible from the development server.
Watch Out!
The MySQL database does not allow you to use case sensitive names when creating tables. If you want to define objects in your project that have uppercase characters, then you will need to turn off case sensitivity in the Django framework by using the following setting in the <django installation path>/django/db/backends/__init__.py file:
uses_case_insensitive_names = True
After the database has been created and a user account set up for Django, you need to configure the settings.py file in your Django project to access that database. Each Django project has its own settings.py file. The settings.py file is a Python script that configures various project settings.
Django uses the following settings in the settings.py file to control access to the database:
DATABASE_ENGINEis the type of database engine. Django acceptspostgresql_psycopg2,postgresql,mysql,mysql_old,sqlite3, andado_mssql.DATABASE_NAMEis the name of the database. For SQLite, you need to specify the full path.DATABASE_USERis the user account to use when connecting to the database. No user is used with SQLite.DATABASE_PASSWORDis the password forDATABASE_USER. No password is used with SQLite.DATABASE_HOSTis the host on which the database is stored. This can be left empty for localhost. No host is specified with SQLite.DATABASE_PORTis the port to use when connecting to the database. This can be left empty for the default port. No port is specified with SQLite.
After you have configured access to the database in the settings.py file, you can synchronize your project to the database. Django’s synchronization process creates the tables necessary in the database to support your project.
The tables are created based on what applications are specified in the INSTALLED_APPS setting of the settings.py file. The following are the default settings already specified in the INSTALLED_APPS setting:
INSTALLED_APPS = (
    'django.contrib.auth',
    'django.contrib.contenttypes',
    'django.contrib.sessions',
    'django.contrib.sites',
)
The following list describes the default applications that get installed in the Django project:
django.contrib.auth is the default authentication system included with Django.
django.contrib.contenttypes is the framework of types of content.
django.contrib.sessions is the framework used to manage sessions.
django.contrib.sites is the framework used to manage multiple sites using a single Django installation.
Synchronize the iFriends Project to the iFriends Database
This section guides you through the steps to synchronize the Django project to the database. During the process, Django creates the default tables and prompts you to input the name, email address, and password for a website administration account. The username and password you specify allow you to access the Django authentication system.
Make certain that the development server has stopped by pressing Ctrl+Break from the console prompt.
Change to the root directory of the iFriends project.
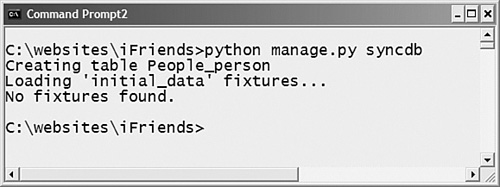
Enter the following command at the console prompt to begin the synchronization, as shown in Figure 2.3:
python manage.py syncdb
At the prompt, enter a username for the website administrator’s account.
At the prompt, enter a password for the website administrator’s account.

The database now has the appropriate tables configured to allow Django to use its authentication, content, session, and site frameworks correctly.
After you have configured and synchronized the database, you can begin installing applications in it. Installing applications is simply a matter of creating an application directory, defining a model, and then activating the application so that Django can access it in the database.
After the application has been created, you need to create a model for the data that will be stored in the application. A model is simply a definition of the classes, attributes, and relationships of objects in the application.
To create a model, you need to modify the models.py file located in the application directory. The models.py file is a Python script that is used to define the tables that will be added to the database to store objects in the model.
The models.py file initially has only one line, which imports the models object from the django.db package. To define the model, you need to define one or more classes. Each class represents an object type in the database.???
Activate the Person Model
This section takes you through the process of activating the Person model by adding it to the INSTALLED_APPS setting in the settings.py file and then synchronizing the database.
Open the
iFriendssettings.pyfile in an editor.Find the
INSTALLED_APPSsetting, and add the iFriends.People application to it, as shown in the following snippet:INSTALLED_APPS = ( 'django.contrib.auth', 'django.contrib.contenttypes', 'django.contrib.sessions', 'django.contrib.sites', 'iFriends.People', )Save the file.
Synchronize the People application into the iFriends database by using the following command from the root of the iFriends project, as shown in Figure 2.4:
python manage.py syncdb
The syncdb command creates the necessary tables in the iFriends database for the People application. The model is now active, and data can be added to and retrieved from the database using Django at this point.
This section briefly describes how to use the Django shell interface and database API to quickly add a single Person object to the People table. The Django shell is a Python shell that gives you access to the database API included with Django. The database API is a set of Python methods that allow you to access the project database from the data model.
Add a Person Object to the iFriends Database
Open the Django shell, and follow these steps to add yourself as a Person object in the People model of the iFriends database.
From a console prompt, change to the root directory of the iFriends project.
Enter the following command to invoke the Django shell:
python manage.py shell
From the shell prompt, enter the following to import the
Personclass from thePeoplepackage:from iFriends.People.models import Person
Enter the following command to create a
Personobject namedp:p = Person(name="<your name>", email="<your eMail>")
Save the
Personobject you just created using the following command:p.save()
Verify that the object was created by using the
Person.objects.all()function, which returns a list of allPersonobjects, and then print the list:lst = Person.objects.all() print lst
Figure 2.5 shows these commands.

A Person object has now been created in the iFriends database. We will discuss accessing the database and using the database API in more depth later.
This section discusses configuring the URLConf file to define how installed applications are accessed from the web. The URLConf file is a Python script that allows you to define specific views that are accessed based on the URL that is sent by the web browser. When the Django server receives an URL request, it parses the request based on the patterns that are contained in the URLConf file. The parsed request is translated into a specific Python function that is executed in the views.py file, discussed in a moment.
By the Way
The location of the URLConf file is defined by the ROOT_URLCONF setting in the settings.py file. The default location is the name of the project’s root directory. In the case of the iFriends project, the value of ROOT_URLCONF would be set to the following value, where 'iFriends.urls' equates to iFriends/urls.py:
ROOT_URLCONF = 'iFriends.urls'
After you have configured the URLConf file, you need to add the views to the application. The application’s views are stored as functions in the views.py file in the application directory. When the Django server receives an URL request, it parses the request based on the patterns that are contained in the URLConf file and determines which function to execute to generate the web view.
Create the Index View for the People Application
This section guides you through the steps of creating an index view stub for the People application in the iFriends project. After the view is created, you start the development server and view the web page that is generated.
Open the
iFriends/People/views.pyfile in an editor. Theviews.pyfile is empty at first.Use the editor to add the following code snippet to the file:
from django.shortcuts import HttpResponse
from iFriends.People.models import Person

def index(request):
    html = "<H1>People</H1><HR>"
    return HttpResponse(html)
Save the file.
From a command prompt, change to the root directory for the iFriends project.
Enter the following command to start the development server:
python manage.py runserver
Access the http://127.0.0.1:8000/People URL. You should see a web page similar to the one shown in Figure 2.6.

In this hour, you created a Django project called iFriends. You configured access to a MySQL database for the project. You created an application called People, added a Person class, and populated the database with one Person object. You then configured the URL behavior to support an index view and added the necessary code in that view to display a list of objects in the Person class.
The steps you took during this hour helped demonstrate how easy it is to set up a website using the Django framework. Subsequent hours will build on this framework to implement a full-featured website.
The workshop consists of a set of questions and answers designed to solidify your understanding of the material covered in this hour. Try answering the questions before looking at the answers.
Try your hand at creating and activating a simple application. Create an application called Comments. Add a class to the model called Note, with two CharField attributes called Title and Text. Then activate the model by adding it to the INSTALLED_APPS setting in the settings.py file. Synchronize the model to the database. Test your application by adding an object to the database using the Django shell.