
How to use if logic to add conditional HTML code to templates
</objective> <objective>How to add dynamic links to templates
</objective> <objective>How to reduce template code by using the with tag
How to add cycling behavior to enhance table views
</objective> </feature>Django has several tags that allow you to implement some basic logic in your templates that helps you reduce the amount of HTML code that you need to write. This hour covers using Django’s built-in template tags to create more complex and useful templates.
One of the most common tags that you will use will be the for tag to implement for loops inside your HTML documents. The for tag allows you to navigate through a list of strings or objects and generate HTML code for each item in the list.
For example, if you have a list of several URLs for which you want to write HTML links in a template, you could implement a for tag similar to the following code snippet, where links is a list object:
{% for lnk in links %}
    <li><a href="{{ lnk }}"> {{ lnk }}</a></li>
{% endfor %}
Using this code in your template renders the list of links in the HTTP response. It doesn’t matter how many links you need to put in the list. You do not need to add code to your HTML template to do so.
By the Way
You can add as many lines of code inside the for tag section as are needed and then add the {% endfor %} tag to close the section.
The for tag can also handle dictionary objects. Use the following syntax:
{% for key, value in dict %}
For example, if you have a dictionary containing people’s names as the key and phone numbers as the value, you could use the following code snippet in a template to render the list of names and phone numbers:
{% for name, phone in phoneList %}
    <h2>Name:  {{ name }} </h2>
    <li>Phone:  {{ phone }} </li>
{% endfor %}
Did you Know?
You can access the items in a list in reverse order by using the reversed tag in a for tag statement. For example, the following code displays the entries in the books list in reverse order:
{% for title in books reversed %}
Django also allows you to use for loops to process lists of lists as long as you can unpack the values in each sublist into a set of names. For example, if you have a list of GPS coordinates that are formatted as a [location, lat, long] list, you could use the following code snippet in a template to render the list of GPS locations:
{% for location, lat, long in gpsList %}
    <h2>Location:  {{ location }} </h2>
    <li>Coordinates:  {{ lat }}:{{ long }}</li>
{% endfor %}
Django provides the forloop variable in loop operations. It can provide you with information such as counters and parent loops. Table 8.1 lists the available fields in the forloop variable object.
Table 8.1. Fields Available in the forloop Variable
Description | |
|---|---|
| The loop’s current iteration (1-based index) |
| The loop’s current iteration (0-based index) |
| The number of iterations from the end of the loop (1-based index) |
| The number of iterations from the end of the loop (0-based index) |
| Is true if this is the first iteration through the loop |
| Is true if this is the last iteration through the loop |
| Accesses the |
Use a for Loop to Render a List of Objects
In this example, you will create a template that renders a list of Person objects for the index() function of the People application view.
Follow these steps to create an HTML document to display Person details and turn it into a Django template:
Using a text editor, create a file called
iFriends/templates/People/person_index.html.Add the following line of code to
person_index.htmlto extend theiFriends_base.htmlbase template, as shown in Listing 8.1:{% extends "iFriends_base.html" %}Add the following line of code to add a title block to be inserted into the
iFriends_base.htmltemplate, as shown in Listing 8.1:{% block title %}People{% endblock %}Add the following content block of code to generate a table that will contain the list of people, as shown in Listing 8.1:
{% block content %}
<table width=100%>
<tr bgcolor="aabbcc"><td colspan="3">
<font size="5" color="white">Personal List</font>
</td></tr>
<tr valign="top"><td width=30% bgcolor="aaaaaa"><font
color="white" size="5">
</font>
   </td></tr>
{% endblock %}
color="white" size="5">
</font>
</td></tr>
{% endblock %}
Add the following
forloop to navigate through the list of people and generate a numbered list of people in the view, as shown in Listing 8.1:{% for p in pList %} <p>{{ forloop.counter }}. {{ p.name }}</p> {% endfor %}Save the file.
Open the
iFriends/People/views.pyfile in an editor.Delete the current contents of the
index()function.Add the following line of code to the
index()function to generate a list ofPersonobjects, as shown in Listing 8.2:pList = Person.objects.all()
Add the following line of code to the
index()function to render the view using theperson_index.htmltemplate and adding the list of people generated in step 9 to the dictionary, as shown in Listing 8.2:return render_to_response('people/person_index.html', {'pList': pList})
Save the
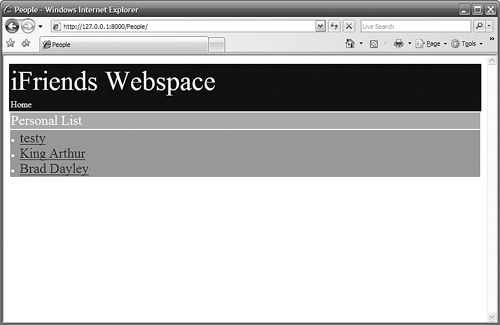
views.pyfile.Access the following URL in a web browser to verify that the view is working correctly, as shown in Figure 8.1:
http://127.0.0.1:8000/People/

Example 8.1. Full Contents of iFriends/templates/People/person_index.html
{% extends "iFriends_base.html" %}
{% block title %}People{% endblock %}
{% block content %}
<table width=100%>
<tr bgcolor="aabbcc"><td colspan="3">
<font size="5" color="white">Personal List</font>
</td></tr>
<tr valign="top"><td width=30% bgcolor="aaaaaa"><font
color="white" size="5">
{% for p in pList %}
    <p>{{ forloop.counter }}. {{ p.name }}</p>
{% endfor %}
</font></td></tr>
{% endblock %}
Example 8.2. Full Contents of iFriends/People/views.py
from django.http import HttpResponse
from iFriends.People.models import Person
from django.shortcuts import render_to_response, get_object_or_404
def index(request):
pList = Person.objects.all()
return render_to_response('people/person_index.html', {'pList':
 pList})
def details(request, pID='0', opts=()):
p = get_object_or_404(Person, pk=pID)
return render_to_response('people/person_details.html', {'p': p})
Django also provides rudimentary if logic to the template parser. You can use the if, ifchanged, ifequal, and ifnotequal tags to determine how and if content should be displayed. The following sections describe the different types of if tags and their uses.
The if tag evaluates a variable and determines if it is true. If the variable evaluates to true, the template engine renders the code inside the if block. You need to add an endif tag to end the block. You can also use the optional else tag with all the if tags to provide alternative template code.
For example, suppose your template is expecting a list of cars called carList. You could use the following code snippet to determine if the car list is empty and note that in the web page, instead of just having a blank section in the web page:
{% if carList %}
    {% for car in carList %}
        <li>{{ car.model }}</li>
    {% endfor %}
(% else %}
    No cars in list.
{% endif %}
You can use a not operator in the if tags to change the if logic. For example, the preceding code snippet could also be written as follows:
{% if not carList %}
   No cars in list.
 (% else %}
     {% for car in carList %}
        <li>{{ car.model }}</li>
    {% endfor %}
{% endif %}
You can also use or and and operators in the if tags to chain together logic. For example, if you want to display a list only if both teacherList and studentList have entries, you could use the following code snippet:
{% if studentList and teacherList %}
    <h2>Students</h2>
    {% for s in studentList %}
        <li>{{ student }}</li>
    {% endfor %}
    <h2>Students</h2>
    {% for s in studentList %}
        <li>{{ student }}</li>
    {% endfor %}
{% endif %}
The ifchanged tag is used inside for loops to determine if a variable value has changed since the last iteration. If the value has changed, the template engine renders the code inside the ifchanged block. You need to add an endifchanged tag to end the block.
For example, if your template is parsing blog entries that contain a date field, you could use the following code to note the change in dates:
{% for b in blogList %}
    {% ifchanged b.date.date %}
        <h2>Date: {{ b.date.date }} </h2>
    {% endifchanged %}
    <h1>{{ b.title }}</h1>
    {{ b.text }}
{% endfor %}
Did you Know?
The ifchanged tag can also determine if its own rendered contents have changed. Instead of specifying variable(s) inside the tag statement, you just need to add the variable(s) inside the ifchanged block. If they change, the content changes from the last state and is rendered again by the template engine. For example:
{% ifchanged %}<h3>{{ b.date }}</h3> {% endifchanged %}
The ifequal tag determines if two arguments are equal. The arguments can be either variables or hard-coded strings. If the arguments match, the template engine renders the code inside the ifequal block. You need to add an endifequal tag to end the block.
For example, if your template is parsing a list of users, and you want only users who have a last name of Arthur, you could use the following code snippet:
{% for user in userList %}
    <h1>Arthurs</h1>
    {% ifequal user.last "Arthur" %}
        <li>{{ user.first }}</li>
    {% endifequal %}
{% endfor %}
The ifnotequal tag determines if two arguments are not equal. The arguments can be either variables or hard-coded strings. If the arguments do not match, the template engine renders the code inside the ifnotequal block. You need to add an endifnotequal tag to end the block.
For example, if your template is parsing a list of blogs, and you want to exclude blogs with the title of “test,” you could use the following code snippet:
{% for blog in blogList %}
    {% ifnotequal blog.title "test" %}
        <h1>{{ blog.title }}</h1>
        {{ blog.text }}
    {% endifnotequal %}
{% endfor %}
Use if Logic to Determine the View Content
In this section, you will use ifequal logic to control the content displayed by the person_details.html template. Follow these steps to modify the person_details.html template file so that it can determine if the person’s gender is M or F. Add some character to the site by displaying the Australian terms “Bloke” and “Sheila” instead of M and F:
Open the
iFriends/templates/People/person_details.htmlfile in an editor.Remove the following line of code from the file:
<li>Gender: {{ p.gender }}</li>Add the following
ifequaltag code to the file to compare the value of gender to the stringM. Then use the Australian terms Bloke and Sheila instead of M and F, as shown in Listing 8.3:<li>Gender: {% ifequal p.gender "M" %} Bloke {% else %} Sheila {% endifequal %} </li>Save the file.
Access the
details()view of thePeopleobject in a web browser to verify that the view now displays Bloke and Sheila correctly, as shown in Figure 8.2.

Example 8.3. Full Contents of iFriends/templates/People/person_details.html
{% extends "iFriends_base.html" %}
{% block title %}Details{% endblock %}
{% block content %}
<table width=100%>
<tr bgcolor="aabbcc"><td colspan="3">
<font size="5" color="white">Personal Information</font>
</td></tr>
<tr valign="top"><td width=30% bgcolor="aaaaaa"><font
color="white" size="5">
<li>Name: {{p.name}}</li>
<li>Birthday: {{ p.birthday }}</li>
<li>Gender:
     {% ifequal p.gender "M" %}
         Bloke
     {% else %}
         Sheila
     {% endifequal %}
</li>
<li>Desc: {{ p.desc }} </li>
</font></td>
<td width=40% bgcolor="aa99aa"><font color="white" size="4">
{% include "quote.html" %}
</font></td>
<td width=30%>
<h3>Contact Info</h3>
<li>Email: {{ p.email }}</li>
<li>Website: {{ p.favoriteURL }}</li>
</td></tr>
{% endblock %}
Django provides the url tag to help you add links to your web pages. If possible, it is best to avoid hard-coded links. If you modify the URLconf file and thus change the URL pattern, you might wind up needing to change every place in your code that you hard-coded the link.
To solve this problem, the url tag allows you to specify the view function, including arguments, directly. The url tag results in an absolute URL being placed in the rendered HTML document.
The first argument inside the url tag is a path to a view function, such as the path to the details() function in the views.py file of the People application in the iFriends project:
iFriends.People.views.details
Additional arguments are optional and should be separated by commas with no spaces. Arguments are considered positional unless you specify a keyword=value. For example:
{url mySite.arch.views.list arg1,arg2,year=2008 %}
By the Way
If you are using named URL patterns, you can refer to the name of the pattern in the url tag instead of using the path to the view.
The arguments specified in the url tag must correspond to what is defined in the URLconf file. If they do not, no URL is returned.
Watch Out!
The url tag searches for the first match in the URLconf file. If multiple patterns are pointing to the same view, either use named patterns, or make certain that the first one in the list is the one you want.
Add Dynamic Links to a Template
In this section, you will modify the person_index.html file you created earlier in this hour to add dynamic links to the details page for each person in the list. Follow these steps to add dynamic links that refer to the view function directly to the index view of the People application:
Open the
iFriends/templates/People/person_index.htmlfile in an editor.Remove the following line of code from the file:
<li> {{ p.name }}</li>Add the following code to the file, as shown in Listing 8.4, to add links to the
details()view function and pass thePerson.idargument to the view:<li> <a href="{% url iFriends.People.views.details p.id %}">{{ p.name}}</a>
</li>
Save the file.
Open the
iFriends/urls.pyfile in an editor.Comment out the following line by putting a # in front of it so that the template parser won’t pick it up when parsing the
urltag from step 3.#(r'^Info/$', 'details'),
Save the file.
Access the following URL in a web browser to bring up the index view, shown in Figure 8.3, and verify that the names are now links:
http://127.0.0.1:8000/People/
Click one of the person links to verify that the links are working correctly. That person’s detail view should be loaded, as shown in Figure 8.4.

Example 8.4. Full Contents of iFriends/templates/People/person_index.html
{% extends "iFriends_base.html" %}

{% block title %}People{% endblock %}
{% block content %}
<table width=100%>
<tr bgcolor="aabbcc"><td colspan="3">
<font size="5" color="white">Personal List</font>
</td></tr>
<tr valign="top"><td width=30% bgcolor="aaaaaa"><font
color="white" size="5">
{% for p in pList %}
    <li>
    <a href="{% url iFriends.People.views.details p.id %}">{{ p.
name }}</a>
    </li>
{% endfor %}
</font></td></tr>
{% endblock %}
Another template tag that you will find useful is with. The with tag allows you to assign a complex variable name a simpler one. This is most helpful when you have to reference the object several times.
For example, consider the business.accounting.contact_info subobject. Referencing that object several times would take a lot of keystrokes. The following example shows how to use the with tag to reduce the code necessary to reference the object:
{% with business.accounting.contact_info as ci %}
Phone: {{ ci.phone }}
Email: {{ ci.email }}
Website: {{ci.URL }}
{% endwith %}
The cycle tag is a useful tool if you need to modify values as you cycle through a list. The cycle tag accepts a comma-separated list of arguments that will be cycled through.
For example, if you were creating a large table in your template and you wanted each row of the template to use a different background color, you could use the cycle tag to set the bgcolor value of the rows. The following code generates the web page shown in Figure 8.5:
<table width=100%>
{% for line in report %}
    {% if forloop.first %}
    <tr bgcolor="aaaaaa">
    {% else %}
    <tr bgcolor="{% cycle eeeeee,cccccc %}">
    {% endif %}
    {% for item in line %}
        <td>{{ item }}</td>
    {% endfor %}
    </tr>
{% endfor %}
</table>

In this hour, you learned how to use template tags to add logic in your templates. You learned how to generate several lines of HTML code from a list using the for tag. You also learned how to add HTML code conditionally using the if, ifchanged, ifequal, and ifnotequal tags.
Using loops, conditions, and other tags enables you to write simpler and more useable code and makes it easier to modify and update your website.
The workshop consists of a set of questions and answers designed to solidify your understanding of the material covered in this hour. Try answering the questions before looking at the answers.