
Running the Example
The following steps describe how to start the PointBase database server, WebLogic Server, configure a JMS topic in WebLogic, and run the sample client:
1. | Start PointBase server in a new command window as follows: C:>cd styejbexamples C:styejbexamples>setEnvWebLogic.bat C:styejbexamples>startPointBase.bat |
2. | Start WebLogic Server in a new command window as follows: C:>cd styejbexamples C:styejbexamples>setEnvWebLogic.bat C:styejbexamples>startWebLogic.bat |
3. | Open the WebLogic Administration Console by opening a Web browser and typing the URL
http://localhost:7001/console. When prompted, enter the username and the password you have created when you installed the WebLogic Server (refer to Appendix A, “Weblogic Application Server 7.0”). |
Set up a JMS server as follows:
1. | In the left pane, expand Services > JMS. |
2. | Click Servers. |
3. | In the right pane, click Create a New JMSServer. |
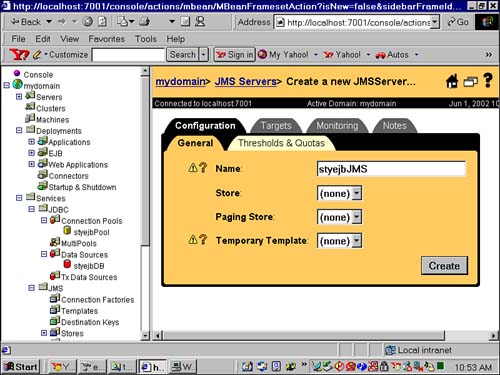
4. | Enter or select these values: Name: styejbJMS Store: (none) Paging Store: (none) Temporary Template: (none) |
5. | Click Create. Figure 14.3 shows the corresponding screenshot. Figure 14.3. Configuring a JMS server in WebLogic Server.
|
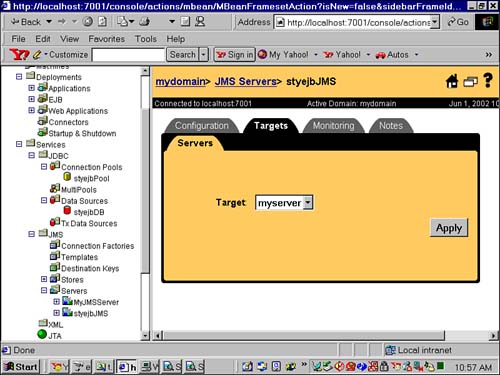
6. | Click the Targets tab. |
7. | |
8. | Click Apply. Figure 14.4 shows the corresponding screenshot. Figure 14.4. Assigning the JMS server to the target server.
|
Set up a JMS Destination as follows:
1. | In the left pane, expand Services > JMS > Servers > styejbJMS. |
2. | Click Destinations. |
3. | In the right pane, click the Configure a New JMSTopic link. |
4. | Enter or select these values: Name: OrderVerifierTopic JNDIName: OrderVerifierTopic Enable Store: default Template: (none) |
5. | Click Create. Figure 14.5 shows the corresponding screenshot. Figure 14.5. Configuring a JMS Destination in WebLogic Server.
|

You can run the client in the same window you used to package the bean and build the client by using the following command:
C:styejbexamplesday14>runClientWebLogic.bat
Running the client produces the following output:
Starting Client . . .
Looking up the JMS destination(Topic) via JNDI.
Locating connection factory.
Creating a connection  and establishing a session.
Creating an order with status:Submitted
Order id 1029463968627 is created
Creating a text message with order id and publishing it.
Sleeping for 2 sec.
Now the order status is:Verified
The following steps describe how to start JBoss server, configure a JMS Topic in JBoss, and run the sample client:
..................Content has been hidden....................
You can't read the all page of ebook, please click here login for view all page.