
Implementing the Client
The Web client for the EmailerServlet is an HTML form (see Listing 20.9) for testing our JavaMail application. The HTML form (see Figure 20.4) makes a request with the recipient's e-mail address and the body of the message to be sent.
Listing 20.9. The HTML Form index.html
<html>
   <head>
      <title>JavaMailer EJB Form</title>
   </head>
   <body>
      <h1>Send Message Using JavaMail Form</h1>
      <form method="POST" action="MailerServlet">
         <table cellspacing="2" cellpadding="2" border="0">
            <tr><td>To:</td>
                <td><input type="text" name="toAddress" size="40"></td>
            </tr>
            <tr><td>Message:</td>
               <td>
                 <textarea name="message" cols="50" rows="10"></textarea>
               </td>
            </tr>
            <tr><td><input type="submit" name="Send" value="Send"></td>
               <td><input type="Reset"></td>
            </tr>
         </table>
      </form>
   </body>
</html>
|
Figure 20.4. WebLogic Server Administration Console.
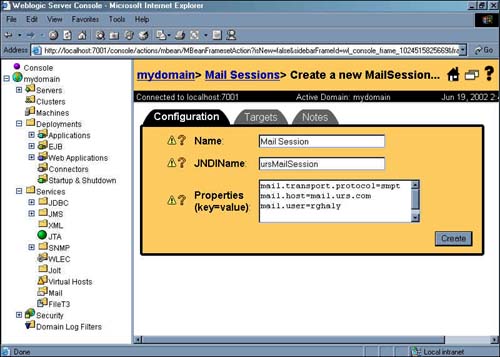
Configuring the Mail Session in WebLogic
Before running the JavaMail application, you must create and configure a JavaMail Session into a JNDI service in the WebLogic Server Administration Console (http://localhost:7001/console). This allows server-side components and applications to access JavaMail services with JNDI. In our example, you create a mail Session by specifying the default mail user, mail host, transport, and store protocols in the Administration Console so that components that use JavaMail do not have to set these properties (see Figure 20.4).
Applications that are heavy e-mail users benefit because WebLogic Server creates a single Session object and makes it available via JNDI to any component that needs it.
1. | In the Administration Console, click on the Mail node in the left pane. |
2. | Click Create a New Mail Session. |
3. | In the Name field, enter a name for the new session. Enter MailSession. |
4. | In the JNDIName field, enter a JNDI lookup name. Use ursMailSession. Your code uses this string to look up the javax.mail.Session object. |
5. | In the Properties field, enter properties to configure the Session. Use Table 20.2 to set the required fields. In our example, you set the protocol, mail server host, and username as shown in Figure 20.4. |
| Property | Description |
|---|---|
| mail.store.protocol | The protocol to use to retrieve e-mail. The default is IMAP. |
| mail.transport.protocol | The protocol to use to send e-mail. SMTP is the default. |
| mail.host | The name of the mail host machine. |
| mail.user | The name of the default user for retrieving e-mail. |
| mail.protocol.host | The mail host for a specific protocol. For example, you can set mail.SMTP.host and mail.IMAP.host to different machine names. |
| mail.protocol.user | The protocol-specific default user name for logging in to a mailer server. For example, mail.smtp.user=styejb. |
| mail.from | The default return address. |
| mail.debug | Set to True to enable JavaMail debug output. |
Note
You can override any properties set in the mail Session in your code by creating a Properties object that contains the properties you want to override. Then, after you look up the mail Session object in JNDI, call the Session.getInstance() method with your Properties to get a customized Session.
To configure the JBoss environment, you must customize the entries in the mail-service.xml file in the <JBOSS_HOME>/server/default/deploy directory. The README.TXT file provides more information about how to configure these parameters.