The whole point of Flickr is to store and share your photos—something you can’t do until you first upload your photos to Flickr.
This lesson is all about the uploading process. Here, we’re going to get our photos up to Flickr, and in the next lesson, we’ll start organizing those photos.
Flickr enables you to upload photos in various ways, including the following:
• Using web forms
• Using Uploadr
• Using email
We’ll take a look at each of these methods in this lesson. Which one is right for you? Stay tuned and find out.
At this point, you should have a free Flickr account and might be wondering how many photos you can upload.
It turns out that there’s no limit on the number of photos you can upload; the limit is on the total of all the file sizes you upload each month. For a free account, that can’t exceed 100MB per month.
Tip
You can also upload up to two videos a month, as long as they’re limited to 90 seconds in playing length and 150MB.
If 100MB isn’t enough space for you, you can upgrade to a Flickr Pro account, which, as of this writing, costs $24.95 a year. There is no limit to the number or size of images you can upload to a Pro account.
Tip
Want to sign up for a Pro account? You’ll find many links throughout the Flickr site that will let you do just that. For example, you can use the Get a Year of Pro for $24.95 link on your home page (the page that appears when you log in to Flickr). More on Pro accounts is coming up.
There is also a limit on the file sizes that you can upload. If you have a free account, you can upload individual images up to 10MB in size. If you have a Pro account, that’s up to 20MB in size. Videos are limited to 150MB in size.
What image types can you upload? There are plenty of image formats floating around the Internet, and Flickr doesn’t support them all. Officially, Flickr supports only JPEGs, nonanimated GIFs, and PNGs.
Tip
You can also upload TIFs and some other file types, but note that they will automatically be converted to and stored in JPEG format.
What about file dimensions? Is there a limit? It turns out that Flickr automatically resizes your photos into several sizes it calls “web-friendly:”
• 75×75 pixel thumbnail
• 100-pixel version (the dimension of the longest side)
• 240-pixel version (the dimension of the longest side)
• 500-pixel version (the dimension of the longest side)
• 1024-pixel version (the dimension of the longest side)
How do you view these various sizes? When you view a photo page, click the All Sizes link below the photo title to view each of the sizes.
What about the original size photo you uploaded? It turns out that the original file is not available if you have a free account. The original file that you uploaded (and what many people new to Flickr think is available on the Flickr site) is available only if you have a Pro account.
Okay, now that we’ve finished with the preliminaries, let’s start uploading some photos. First, we’ll use the original Flickr way: with web forms.
Web forms are those pages that appear in your browser and display all kinds of browser controls such as buttons and list boxes. The original way to upload files to Flickr, and still the default way, is to use a web form.
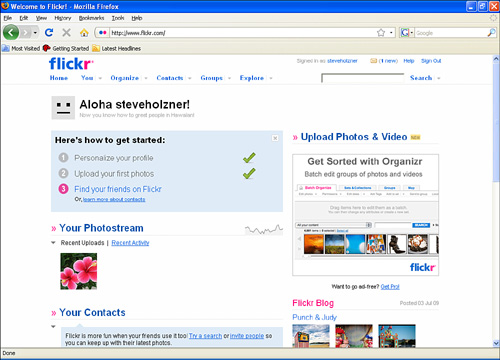
If you followed the directions in Lesson 1, “Essential Flickr,” when you go to Flickr (that is, Flickr.com), you will see the page shown in Figure 2.1.
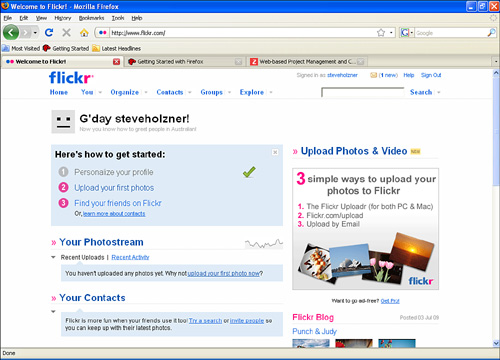
The page that appears in Figure 2.1 is your Flickr home page (that is, the center of your Flickr activity). Right now, Flickr knows you’re just starting out, and so is listing these three steps to get started:
• Personalize Your Profile
• Upload Your First Photos
• Find Your Friends on Flickr
You’ve completed the first step, Personalize Your Profile, in Lesson 1, and Flickr shows it with a green check mark next to it (see Figure 2.1).
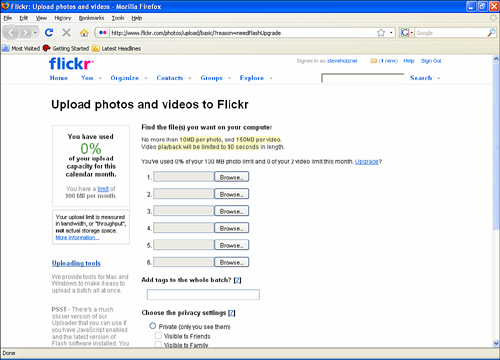
In this lesson, we tackle the second step, Upload Your First Photos. So click that step now, bringing up the page shown in Figure 2.2.
Tip
What if your home page doesn’t show the three steps you see in Figure 2.1? After you’ve completed the three steps, they’ll disappear. You can always reach the standard uploading form by clicking the Upload Photos & Video link on the home page (and visible in Figure 2.1), or by navigating to www.flickr.com/photos/upload/basic. If you want a quick way to upload an image, click the You link in the home page, and the page that opens will let you upload a single image (but not set tags or privacy for the image).
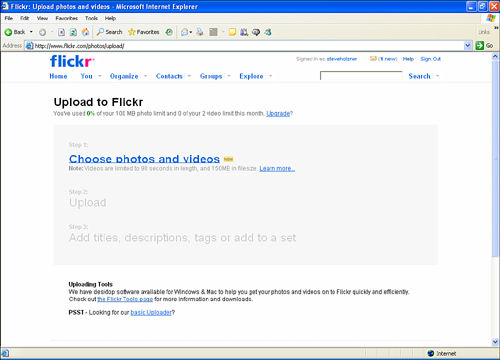
The form you see in Figure 2.2 is the standard Flickr uploading form. Note that on the left it keeps track of the fraction of your monthly upload capacity that you’ve used. Here, that’s 0% because we haven’t uploaded anything yet.
The standard form is a good one, and it has served Flickr for a long time, but it’s somewhat limited. You can upload only up to six images at one time, as you can see in Figure 2.2, and you have to browse to each one separately (no drag and drop). You can add tags only to the whole batch en masse.
The standard form has four sections:
• Specify the Images
• Set the Tags
• Specify the Privacy Setting
• Advanced Options
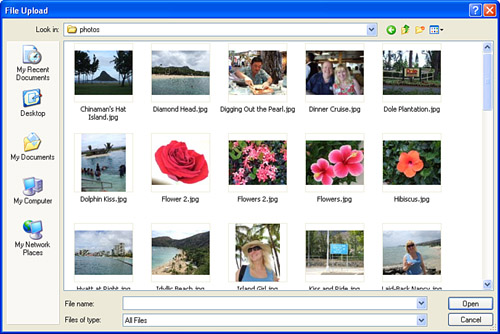
In the first section, you specify the images you want to upload. Suppose you’ve decided to upload some images from your recent Hawaii vacation. Just follow these steps:
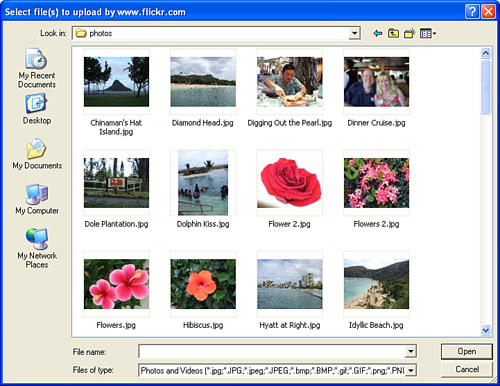
- Click a Browse button. This causes your browser to display a File Upload dialog box (see Figure 2.3).
- Double-click the image you want to upload. That makes your browser close the dialog box, and the filename will appear in the text box next to the Browse button.
The second section of the standard form lets you associate tags with the images en masse. You can’t specify individual tags here.
Tags are used to make photos searchable on Flickr. You can search for images by tag. In the Add Tags to the Whole Batch? text field, list any tags you want to connect to the images. For example, you might use the tag Hawaii for your Hawaii images.
If you have a tag that’s made up of two words or more, surround that tag in double quotation marks (like “Hawaii Beach”). You might also note that Flickr automatically strips out words such as “and” or “the” from tags.
The third section of standard upload form lets you set the privacy of your images with these controls:
The default privacy for your uploaded photos is Public (this item’s radio button is selected), which means no privacy at all; anyone can see the images.
If you want to make your images more private, click the Private radio button. If you leave just that radio button clicked, only you can see the images. To expand that to people you’ve listed as friends or family (see the next lesson), check the check boxes in front of the friends or family items.
The fourth section in the standard upload form is the Advanced Options section. Click Show Advanced Settings to display these options, and you’ll see a heading followed by three check boxes:
• Set Safety Level
Safe (your default)
Moderate
Restricted
The safety level is the suitability of your images and video, and the default is Safe (that is, safe for viewing by minors). You can also set the safety level to Moderate or Restricted (not suitable for minors). Under the Flickr community guidelines, you’re responsible for setting your content’s safety level.
Caution
Restricted video content isn’t permitted on Flickr. Only safe or moderate videos can be uploaded and shared. If you upload restricted video under a different safety setting, your account will be terminated.
The Advanced Options section also lets you set the content type of the upload to one of three settings:
Photos / Videos (your default)
Screenshots
Art, Illustration, CGI, or Other Non-Photographic Images
And finally, you can block your upload from public searches with the advanced options by clicking the Yes check box:
• Hide These Images from Public Searches?
Yes
When you’ve filled out the standard upload form to your satisfaction, click the Upload button at the bottom of the form. Your images will be uploaded, and you’ll see the page that appears in Figure 2.4, where you can configure your upload.
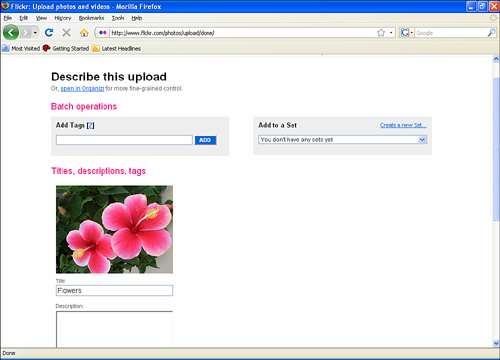
The top two boxes let you perform batch operations—connect the same tags to all images in the upload and add the upload to a set. We haven’t created any sets yet (that’s coming up in the next lesson), so skip down to work with the individual images in this upload.
For each uploaded image, you can set its:
• Title
• Description
• Tags
Each Flickr image usually has all three of these items set. The title is just what it sounds like: a title for the image (which appears above the image in your photostream). The description gives more information about the image, and now you can set tags on an image-by-image basis.
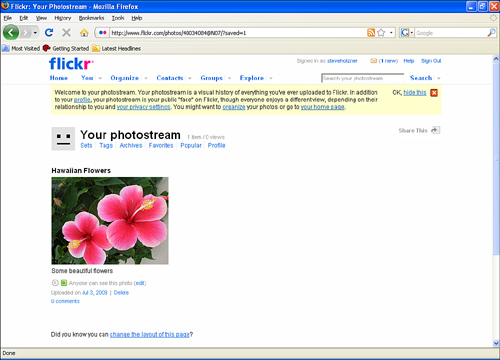
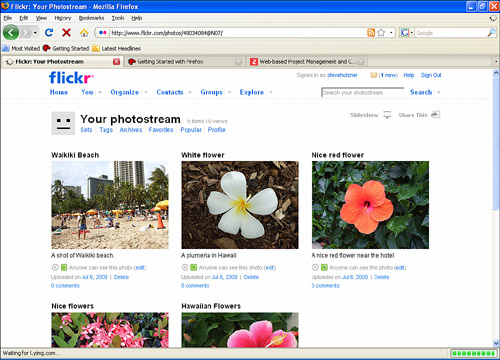
Fill out the Title, Description, and Tags boxes for each image in your upload and click the Save button at the bottom of the page. When you do, the uploaded images are added to your photostream, which appears in your browser, as shown in Figure 2.5. Success! You’ve uploaded your first images.
Flickr acknowledges that you’ve uploaded your first photos. Take a look at your home page (click the Home link at the top of any Flickr page), and you’ll see that Flickr has checked off the Upload Your First Photos item in its Getting Started list, as shown in Figure 2.6.
Now you’ve uploaded your first images. Not bad!
Tip
To move back to your photostream from your home page, click the Your Photostream link on the home page.
That’s how to upload images using the standard form—still the way that most people upload to Flickr. But there’s a new form, too, so let’s take a look at it next.
If you’ve got the latest Flash player installed (and JavaScript is enabled on your browser), you can use Flickr’s new Flash-based form for uploading.
Just go to your home page (Flickr.com and log in if Flickr doesn’t log you in automatically), and click the Upload Photos & Video link, which brings up the Flash-based form you see in Figure 2.7.
Click the Choose Photos and Videos link to open an upload dialog, as shown in Figure 2.8. (This dialog box will look different depending on which browser you’re using.)
If you just want to upload one photo, double-click that photo. If you want to upload multiple photos, hold down the Ctrl key (Mac users substitute the Command key), click the photos you want to select (or hold down the Shift key to upload a range), and then click the Open button.
The Flash uploader displays a list of the photos you’ve selected, as shown in Figure 2.9.
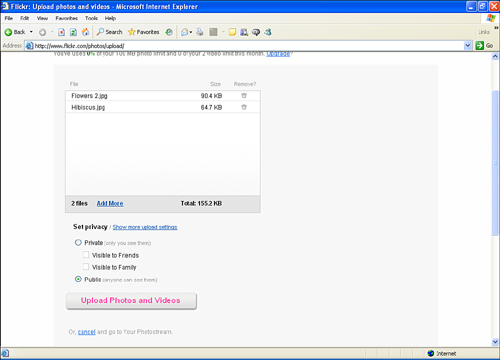
By default, the Flash version lets you set the privacy level of only the photos you’re uploading, as you can see in Figure 2.9. To see more options, click the Show More Upload Settings link, and you’ll get these options:
• Set Privacy
Private (only you see them)
Visible to Friends
Visible to Family
Public (anyone can see them)
• Set Safety Level
Safe (your default)
Moderate
Restricted
• Set Content Type
Photos / Videos (your default)
Screenshots
Art, Illustration, CGI, or Other Non-Photographic Images
• Hide These Images from Public Searches?
Yes
After you’ve set the options for all the photos you’re uploading, click the Upload Photos and Videos button. That uploads the photos and displays the message “Finished! Next: Add a Description, Perhaps?”
Click the words Add A Description to see a new page (the same as shown in Figure 2.4), which lets you add descriptions, titles, and tags for all uploaded photos.
After entering the descriptions, tags, and titles for your photos, click the Save button at the bottom of the page.
When you click the Save button, Flickr takes you to your photostream page, and you can see the newly uploaded photos as part of your photostream, complete with tags, descriptions, and titles.
As you can see, the Flash uploader is just like the standard uploader—just a little slicker.
Flickr also has desktop software that you can use: the Flickr Uploadr.
To give the Uploadr a try, go to the Upload page (from your home page, click the Upload Photos & Video link). Then search for this text:
We have desktop software available for Windows & Mac to help you get your photos and videos on to Flickr quickly and efficiently. Check out the Flickr Tools page for more information and downloads.
Click the Flickr Tools link to open that page in your browser. On the Tools page, look for the heading Desktop Uploadr, and find these two links under that heading:
• Windows Vista & XP: Download (12MB)
• Mac OS X 10.5 & 10.4: Download (20MB)
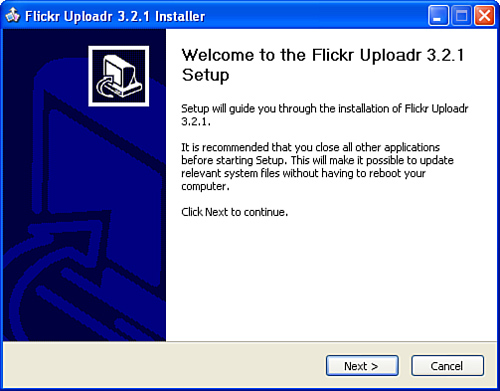
Click the link for your operating system. Your browser will display a dialog box. Click the Save button and save the Uploadr download to your hard disk. When the download is complete, click the Run button.
Clicking the Run button launches the Uploadr installation program, as you can see in Figure 2.10.
To install Uploadr, follow these steps (for the Windows version):
- Click the Next button.
- Select a location to install Uploadr to and click Next. The location of Uploadr isn’t important; you can accept the default location selected by the installer.
- On the next page, if you want a desktop shortcut icon for Uploadr to make it easy to launch, leave the Create Desktop Icon check box checked and click Install.
- After installation is complete, click Finish.
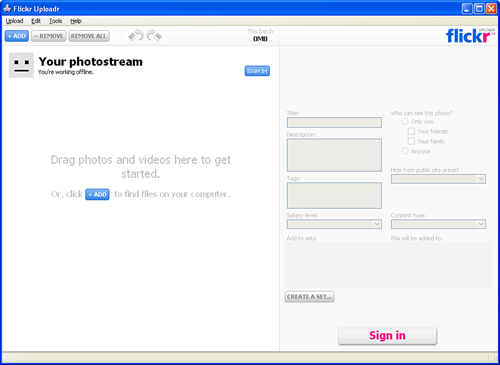
Double-click the new desktop icon for Uploadr to run it, as you see in Figure 2.11.
The first step is to sign in to Flickr.
To upload your photos, you need to be signed in to Flickr, so click the Sign In button in Uploadr.
To sign in to Flickr, follow these steps:
- Uploadr will display a dialog box explaining that you have to sign in to Flickr. Click OK.
- This starts your browser. Find the text “If you arrived at this page because you specifically asked Flickr Uploadr to connect to your Flickr account, click here.” Click the Next button underneath that text.
- Flickr next displays this text:
By authorizing this link, you’ll allow Flickr Uploadr to:
• Access your Flickr account (including private content)
• Upload, Edit, and Replace photos and videos in your account
• Interact with other members’ photos and videos (comment, add notes, favorite)
Click the OK, I’ll Authorize It button.
- The next window in your browser has this message: “You have successfully authorized the application Flickr Uploadr.” Close the browser window.
- Go back to Flickr Uploadr and click the Ready! button.
Now you’re ready to use Uploadr. The easiest way is to drag photos into Uploadr.
For example, in Windows, open Windows Explorer and navigate to the photo you want to upload. Then drag that photo or photos onto the text “Drag photos and videos here to get started” in Uploadr. Doing so displays the dragged photo in Uploadr, as shown in Figure 2.12.
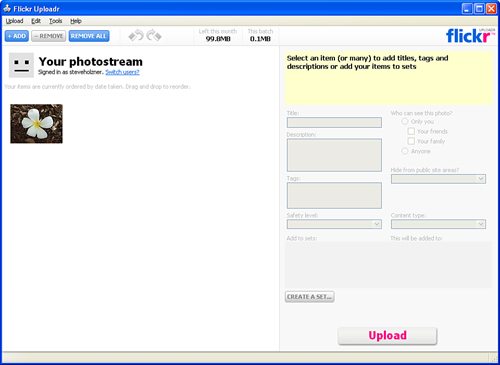
Select the photos you want to add information to, and enter the titles, descriptions, and tags.
Then click the Upload button. After the uploading process is finished, you’ll see a dialog box with this message: “Your upload is complete.” Click the Go to Flickr button to open the description page shown in Figure 2.13.
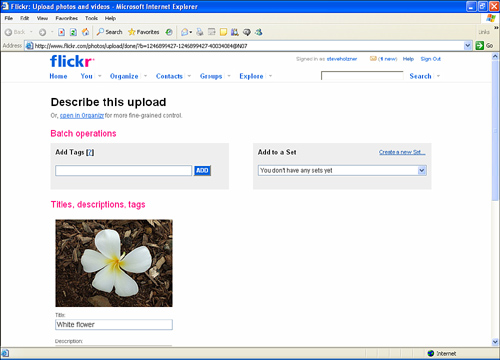
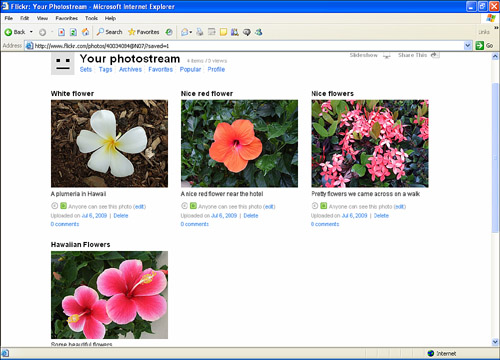
On this page, you get the chance to edit a photo’s title, description, and tags. After making any edits you want, click the Save button. Your newly uploaded photo appears in your photostream, as shown in Figure 2.14.
Cool. Now you’ve uploaded a new photo (or photos) using Flickr Uploadr.
Now let’s upload using email.
Flickr assigned everyone a unique email address that you can use to upload photos. That’s great not only for emailing photos from your desktop, but from your cell phone as well.
To find your unique email address, go to www.flickr.com/account/uploadbyemail/. You can see this page in Figure 2.15; your email address will appear at the upper right.
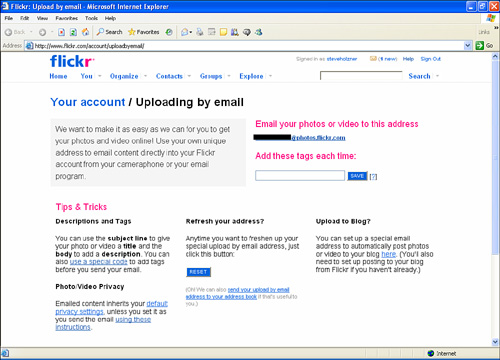
To email photos to your photostream, you attach the photos to the email you send to your unique email address.
What about the titles, descriptions, and tags? The email’s subject becomes the title, the body becomes the description, and any words you place after “tags:” in the body become the tags. For example:
Subject: Squirrels
Body: We put out some peanuts and about a dozen squirrels showed up.
Tags: peanuts “cute squirrels”
For example, you might decide to upload a photo of Waikiki Beach from your Hawaii vacation to your photostream via email—and you can see the new photo in the photostream in Figure 2.16.
Now you’re able to upload photos directly using email.
Tip
Want to post photos from Flickr to your blog via email? You’ll find the directions at www.flickr.com/account/uploadbyemail/blog/.