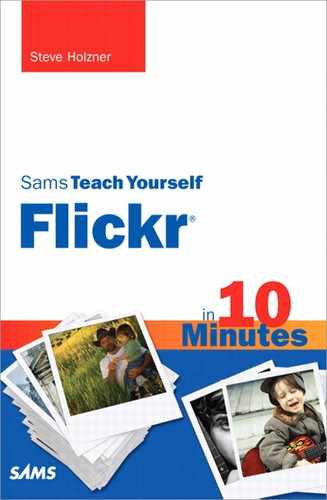
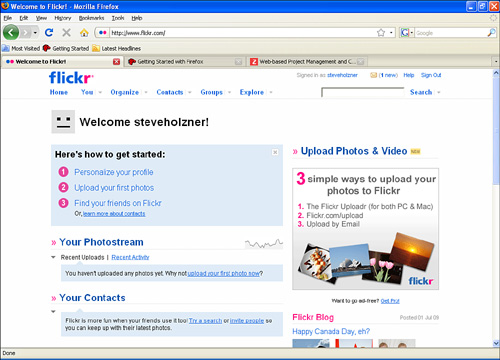
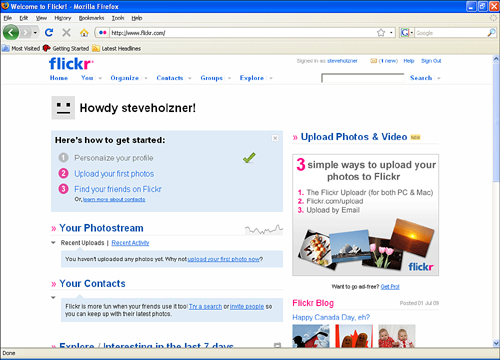
Flickr recently passed three billion photos stored. So, no need to worry that Flickr will run out of images, no matter how many times you refresh the page. Take a look at Figure 1.1, the entrance page to Flickr. This figure shows a random image from Flickr’s immense storehouse of images. Welcome to Flickr!
Flickr describes itself this way:
Flickr is the best way to store, sort, search, and share your photos online. Flickr helps you organize that huge mass of photos you have and offers a way for you and your friends and family to tell stories about them.
Flickr’s self-description barely scrapes the surface. Yes, Flickr is a storehouse for photos, and you can sort the photos you store on Flickr with ease. But that doesn’t get into the true Flickr feeling, which is social. Flickr is really all about sharing your photos as much as it is about managing them, sharing them with friends and family or, if you like, with the whole world—depending on your privacy settings.
You’ll find that thousands of people on Flickr are ready to look at and comment on your photos. At root, Flickr invites interaction. You can, of course, use Flickr to back up your photos, and all kinds of snazzy technological perks are available, such as uploading photos directly from your cell phone or having them printed out and sent to you, but the core of Flickr is social. It’s all about image sharing.
You can get a taste of the sharing aspect of Flickr immediately—no need to have a Flickr account yet. See the search box in Figure 1.1? Type a search term there, such as dog, and click the Search button.
You’ll be presented with public photos that have been tagged with the word “dog” by the people who uploaded those photos, as you can see in Figure 1.2. Like a photo? Just click it to see a full-size version.

Already you can get a sense of the sharing ethos of Flickr. Photos like the ones you matched are set to public, and so anyone (with or without a Flickr account) can access them. Note in particular the top photo of wild dogs. That photo has more than 100 comments attached to it. That’s one way Flickr members communicate with each other; they comment on each other’s photos.
Note also that the photo is marked as being added to some people’s Faves collection. You can keep track of your favorite photos this way on Flickr. And as you can see, 20 notes have also been added to the photo. If you’d like to see other photos by the same photographer, you can just click the link at the bottom of the entries. Flickr makes it easy. You can also leave comments on photos, which are general text just about anyone can leave, or notes, which are restricted to the photo’s poster and possibly friends and family. (Notes usually give more of the photographer’s perspective on photos.)
All of which is to say that Flickr is much more than just a storehouse for images. Through a combination of tagging (which allows you to search for the photos you want), comments, favorites, groups, notes, friends and family privacy settings, and more, Flickr opens a whole community to you.
Flickr is also used increasingly by bloggers, another social contingent on the Web. They use Flickr as a repository for photos they want to include on their blogs.
Let’s start our guided tour of Flickr with a brief history, then a quick look at how it works, and then see about signing up for an account so that we can start uploading images.
Flickr was the brainchild of Ludicorp, a small company based in Vancouver, Canada, and was launched in February 2004. (Flickr wasn’t meant to be an independent application. Instead, it was part of Ludicorp’s application called Game Neverending, a huge online game for multiple players. However, Flickr soon proved popular enough to stand on its own.)
The social aspect of Flickr took the forefront from the beginning. Early versions of Flickr centered on real-time chat sharing. New features have been continually added to Flickr. Many of these features have become very popular, such as groups, which you can join to share a common interest, tagging photos to make them accessible by searches, marking photos as favorites to keep a smaller set of images you like in ready reach, and more.
Flickr’s success didn’t go unnoticed for long. In March 2005, Yahoo! acquired Flickr (and Ludicorp). In a single week in June 2005, all images were moved from servers in Canada to servers in the United States (which meant, among other things, that the images then became subject to U.S. law).
Flickr’s acquisition by Yahoo! has not been without friction, particularly when Flickr started requiring all members, including those who had joined before the acquisition (whom Flickr refers to as Old Skool), to convert their ID to a Yahoo! ID. That caused an uproar for quite some time.
In April 2008, Flickr started allowing paid members (that is, members with Pro accounts) to upload videos (as long as they were less than 90 seconds in playing time and under 150MB). In March 2009, Flickr started allowing the use of high-definition video (which is only available for Pro members, is still subject to the 90-second limit, but can include files of up to 500MB).
The current limits for free accounts are 100MB of photos uploaded a month, plus a maximum of two videos.
Now that you know a bit more about Flickr’s past, it’s time to take a brief look at how it works, through a cursory overview that will serve as a road map for the rest of the book.
Flickr is user friendly. It has lots of features, but you should not feel like you need to memorize how all of them work as you read through this section. Instead, just understand that using Flickr is intuitive and logical, and consider the information in this section as a general walkthrough that will help you follow the discussion throughout the rest of this book.
There are numerous ways to upload your images to your Flickr account, including the following:
• Web interfaces
• Uploadr
• Windows/Apple uploads
Flickr includes a web interface (with the customary buttons and browse controls) that enables you to upload your images through your browser.
There’s also Flickr’s application named Uploadr. (You’re going to find a bunch of items in Flickr that have lost their final “e”, such as Uploadr or Organizr.) Uploadr runs on Macs and on PCs and supports drag-and-drop operation, batch uploading (a big improvement over the web interface), the setting of tags and image descriptions while uploading, and privacy settings.
Flickr doesn’t just allow you to look at pretty pictures. You can also print out images and have them delivered to you. In fact, you have a number of “print” options available. You can order business cards, photo books, stationery, personalized credit cards, and large-size prints (from Flickr partner companies).
Speaking of partners, it’s worth noting that Flickr has partnered with Getty Images to sell stock photos from selected members (whom Getty selects).
One of the biggest challenges of managing hundreds of images is organizing them. There’s great satisfaction to be had in bringing order to a mountain of photos, and that’s something Flickr enables you to easily achieve. In Flickr, the primary way to organize images is via tags (and being able to use tags is one of the chief reasons to put your images on Flickr). Tags hold information about an image, and they can be used as search terms (for example, place names, animal types, geographic names). Adding tags to images is a great way to make them searchable, and searching is one thing computers excel at. By searching your collections of images by tags, you can pull out the specific ones you’re looking for immediately. You don’t have to flip through several hundred photos individually.
In addition, Flickr enables you to organize your images into sets. A set is a group of images connected in some way (all from the same vacation, for example). A particular photo can be a member of one set or of many sets (or, of course, no set at all).
You can group sets into collections—and collections might themselves be grouped into higher-order collections.
If you don’t want to organize and handle your images manually, there’s even an extensive Flickr API (application programming interface) that lets you use programming languages like PHP to work with your images—and you can do just about everything using programming code as you can do on the Flickr site itself.
There’s even a web application that you can use through your browser to organize your photos: the Organizr. Using the Organizr, you can edit tags and photo descriptions, specify groupings, and even put the photos on a world map (functionality that is offered by Yahoo! Maps). The Organizr lets you select multiple images simultaneously and apply the same changes to all of them. It uses Ajax to mimic the look and feel of a desktop application while, it’s making changes remotely to your Flickr account.
Privacy is a big issue on the Internet, and Flickr responds with access controls available for every image.
The photos you place on Flickr are called your photostream, and you can specify the privacy settings for each image in your photostream. You can set the privacy level for an image (or many images at once) to Private or Public. Public images can be seen by everyone, whereas private images can be seen only by you. But, that’s not the end of the story for private images. You can also allow contacts you’ve set as friends or family to access your private images.
While you don’t have ultimate precision in setting the access to your photos, you can set that access to 1) everyone, 2) no one but yourself, 3) friends, 4) family, or 5) friends and family.
Flickr also supports groups founded to reflect a common interest. Note, however, that if you add images from your photostream to a group pool of photos, the group’s access setting takes precedence over your own for those images.
In November 2006, Flickr added support for guest passes, which let you share private photos with nonmembers. For example, you might want to email such a pass to your grandparents to let them see your terrific collection of botanical snapshots.
In March 2007, Flickr announced mandatory filtering of all images as Safe or Unsafe. Safe images are those that are unlikely to offend and so suitable for minors. Unsafe images are those that are more likely to offend.
By default, your account is set to Safe. But if you’re going to upload images that could offend, it’s up to you to classify them as Unsafe. Searching for images by nonmembers or certain members (such as ones whose Yahoo! accounts indicate they’re underage) can only be done using a utility named SafeSearch.
Flickr reviews photos uploaded to its site and reclassifies those it deems potentially offensive.
It all starts when you sign in with Flickr. To sign in to Flickr, you need a Yahoo! ID. (As mentioned previously, Flickr is owned by Yahoo!, so there’s no way around that.)
You might already have a Yahoo! ID, in which case signing in is easy (if you remember your ID and password). If you don’t have a Yahoo! ID, you need to create one. We take a look at both scenarios here.
If you already have a Yahoo! ID (that is, you use Yahoo! Mail, Yahoo! Groups, or some other Yahoo! application), signing in to Flickr is easy.
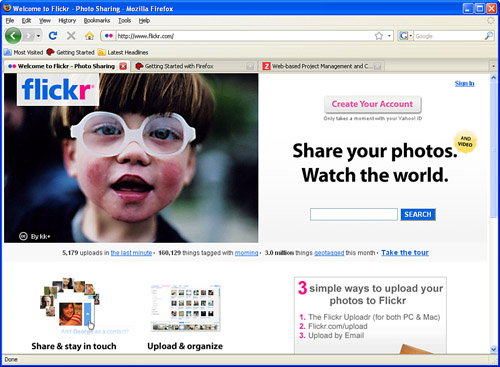
Take a look back at Figure 1.1. See the Sign In link in the upper right? Just click that link to open the sign-in page shown in Figure 1.3.
On this page, enter your Yahoo! ID and your password, and then click the Sign In button. That’s all it takes.
Tip
Want to avoid signing in every time you want to use Flickr? If so, before you sign in, check the Keep Me Signed In check box shown in Figure 1.3. Checking that check box will keep you signed in for 2 weeks (unless you sign out).
If you know (or suspect) that you have a Yahoo! account but can’t remember your ID or password, click the I Can’t Access My Account | Help link shown in Figure 1.3. That link takes you to a page with these radio buttons:
• I Forgot My Password
• My Password Doesn’t Work
• I Forgot My Yahoo! ID
• My Account May Have Been Compromised
Select the correct radio button and click Next to get help from Yahoo! to reclaim your ID or password, and then use them to sign in.
Okay, you’re in. Flickr will now ask you to create a screen name (the name you’ll be known by in Flickr). Let’s give the people who don’t have a Yahoo! ID the chance in the next section to catch up. (If you have your Yahoo! ID in hand at this point, skip ahead to the “Creating Your Screen Name” section.)
If you don’t have a Yahoo! ID, creating one is easy. Navigate to Flickr.com and click either the Sign In button shown in Figure 1.1 or the Create Your Account button. Both take you to the same page shown in Figure 1.3.
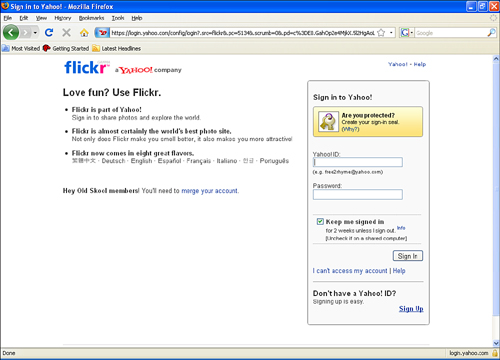
On the sign-in page, click the Sign Up link in the lower right (see Figure 1.3) to open the Yahoo! sign-up page (see Figure 1.4).
This is where you create your Yahoo! ID that you will use to sign in to Flickr.
In the Tell Us About Yourself section, enter the following:
• First name
• Last name
• Gender
• Birthday (month, day, and year)
• The country you live in
• Your postal code
In the Select an ID and Password section, complete the following fields:
• Yahoo! ID and Email: This is the ID you’ll be using to sign in to Flickr, so make sure you remember it. (Use 4 to 32 characters, and start with a letter.) Yahoo! IDs look like email addresses, and by default, they’re xxx@yahoo.com, but you can select ymail.com or rocketmail.com from the drop-down list. After you’ve entered the ID you want, click the Check button to determine the availability of that ID. If it’s not available, Yahoo! will tell you so and list some alternatives. If the ID you selected is available, Yahoo! will replace the two text boxes on this line with your new ID (displayed as plain text). If you want to change your ID at that point, click the Change link.
• Password: Enter the password you want to use (remembering that capitalization counts). Make it 6 to 32 characters, no spaces, and don’t use your name or Yahoo! ID, (Yahoo! checks for that). Yahoo! will check the strength of your password (that is, how guessable it is) and display a green check mark at the end of this line if it’s okay.
• Re-Type Password: Enter your password again to confirm that you entered it correctly in both boxes.
In the In Case You Forget Your ID or Password section, Yahoo! wants you to enter information to make it easy to get your password back to you if you forget it. So, complete the following fields:
• Alternate Email: This is the email address Yahoo! will send your password to if you’ve lost it.
• 1. Security Question: Select a question from the drop-down list, such as Where Did You Meet Your Spouse? or What Is the First Name of Your Favorite Aunt?
• Your Answer: Enter your answer to the first security question.
• 2. Security Question: Select a question from the drop-down list, such as Where Did You Meet Your Spouse? or What Is the First Name of Your Favorite Aunt?
• Your Answer: Enter your answer to the second security question.
Scroll down the sign-up page to the bottom half (see Figure 1.5).
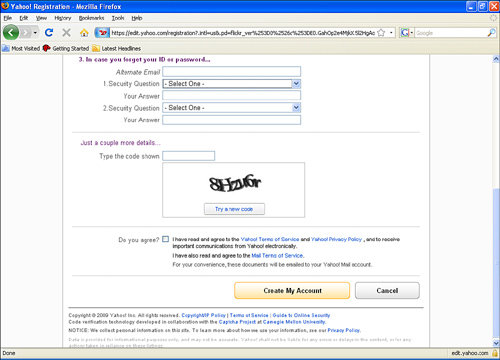
In this part of the page, enter the jumbled visual code into the Type the Code Shown box to verify that you’re a person and not a program signing up for a Yahoo! account (as spammers might do). If you can’t read the visual code (and that’s becoming more and more likely as they seem to be more jumbled over the years), click the Try a New Code button to get a new visual code (and keep clicking the button until you get a code you like).
Then take a look at the Yahoo! terms and conditions by clicking the Yahoo! Terms of Service and Yahoo! Privacy Policy link near the bottom of the page. (To open the terms and conditions in a new page, right-click the link and select Open Link in a New Window from the menu that appears.)
If you accept the terms and conditions, check the Do You Agree? check box.
Finally, if you’re satisfied, click the Create My Account button at the bottom of the page.
Tip
The Yahoo! sign-up page times out in 15 minutes, so if it took you longer than that to enter your data, you’ll have to do it all over again. Sorry!
If the account creation was successful, you’ll see an account summary page, like that in Figure 1.6.
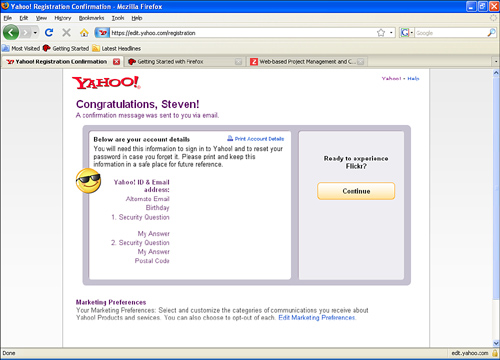
To go on to Flickr, click the Continue button.
A page that asks for your password appears, as shown in Figure 1.7.
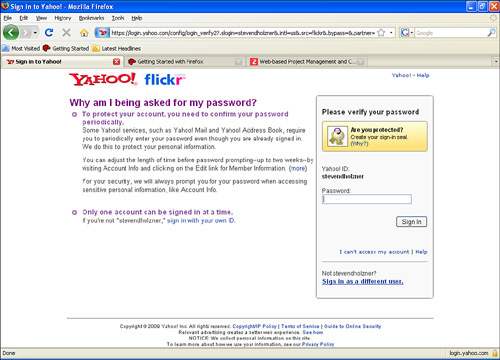
Flickr periodically asks for your password for security reasons. Enter your password and click the Sign In button.
When you click the Sign In button, as instructed in the preceding section, you will be presented with the screen-name selection page (see Figure 1.8).
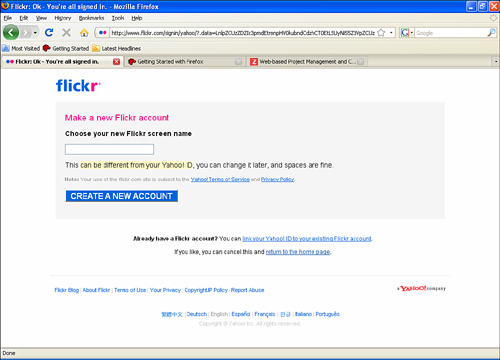
Your Flickr screen name is your name as far as Flickr is concerned. It’s the name that others will know you by in Flickr, so choose something you won’t regret.
After entering your new screen name, click the Create a New Account button, which opens the page you see in Figure 1.9.
This page shows you how to get started in Flickr, and the most important item here is creating your profile.
Your Flickr profile displays the information you want others to have about you on Flickr. Creating that profile is an important part of getting you set up to use Flickr.
Tip
Do you have to create a profile on Flickr? No, if you want to remain anonymous (except for your screen name), you don’t have to create a profile.
To create your profile, first click the Personalize Your Profile link (see Figure 1.9), which opens the page shown in Figure 1.10.

The three steps in customizing your Flickr account appear:
• Create Your Buddy Icon
• Choose Your Custom Flickr URL
• Personalize Your Profile
We’ll take a look at these in turn, starting with creating your buddy icon, so click the Let’s Do It button now.
Clicking the Let’s Do It button brings up the page you see in Figure 1.11.
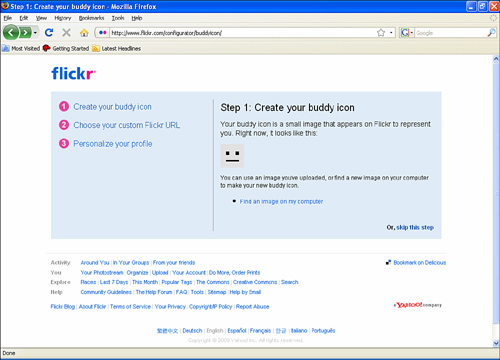
Your buddy icon presents a visual face to other Flickr users, and you can change the buddy icon as often as you like. Right now, it’s a gray box with two dots and a line, as shown in Figure 1.11. (This icon is legendary, and whole Flickr groups are devoted to finding situations in nature that mimic the default buddy icon and posting photos of them.)
If you want to load an image from your computer into your buddy icon (because you don’t have any images available in your photostream yet), click the Find an Image on My Computer link and follow the directions to browse to and upload your new buddy icon image.
Otherwise, click the Skip This Step link to, obviously, skip this step.
The next step appears in Figure 1.12, which asks you to create a Flickr URL.
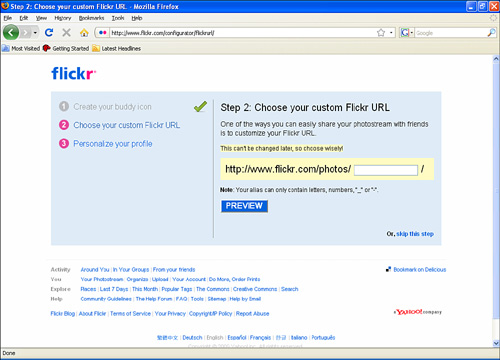
Your Flickr URL is the URL you’ll give to people who want to view your images. If you don’t choose a Flickr URL, you’ll end up with something ugly like www.flickr.com/photos/43582294259.
Caution
It’s very important to realize that when you’ve created your Flickr URL, it can’t be changed, so choose wisely.
Customize your URL by adding the end part (the www.flickr.com/photos/ part is fixed and can’t be changed), and then click the Preview button.
Flickr reloads the page, displaying your Flickr URL in red.
If you’re okay with the result, click OK, lock it in, and then click the Continue button that appears. (If you want to make changes, click the Wait! I Need to Choose a Different Alias link instead.)
The next step—the step where you create your Flickr profile—appears in Figure 1.13.
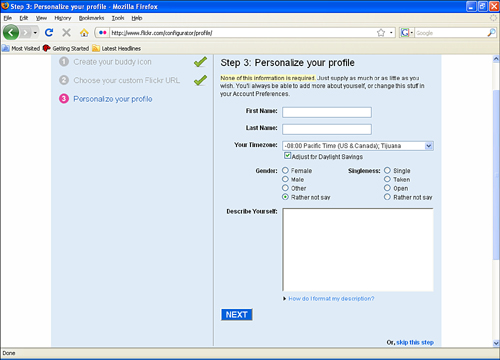
Complete the following (optional) fields:
• First Name
• Last Name
• Your Timezone (If you want Flickr to adjust your local time for daylight savings time, check the Adjust for Daylight Savings check box.)
• Gender
• Singleness (Select from Single, Taken, Open, or Rather Not Say.)
• Describe Yourself (This is your chance to go wild describing yourself. However, keep in mind who might look you up on Flickr. Your father? Your grandparents? Make sure you won’t later regret what you say.)
When you’re done with the profile, click the Next button. Doing so brings you back to the startup page (see Figure 1.14). Now that you’ve successfully completed the first step, Personalize Your Profile is grayed out and a green check mark appears next to it.
The next step is upload your first photos, and that’s the subject of Lesson 2, “Uploading Photos.”