Flickr was founded when the Internet was still involved, in a visual sense, with pictures. Web pages were all about embedded photos and text. And Flickr was all about storing photos online.
You can imagine the Flickr staff’s dismay as video, whose files are huge compared to photos, became popular on the Internet. To their credit, they now allow you to store video on Flickr.
Still, Flickr is no YouTube. If you’ve got a free account, you’ve limited as to what you can upload in a month. And as you’re going to see, the videos you can upload on Flickr are more like clips than full video.
Still, Flickr has joined the video age, and with the advent of truly cheap video cameras (costing less than many digital cameras), uploading videos to Flickr is gaining steam. People upload video for the same reason they upload photos: to share them. Your aunt and uncle might want to see that holiday video you took at their house. Or you might want to brag about that time you finally got surfing right on your latest vacation. Or you might want to post baby videos rather than baby photos.
It’s all possible on Flickr now.
Let’s dig into this topic immediately.
Flickr lets you store videos now, but there are limits on how much you can upload in a calendar month (that is, from midnight to midnight, Pacific time, from the first of the month to the end of the month).
If you have a free account, you can upload only two videos per month. Yep, that’s it, so choose wisely. In addition, each video file must be smaller than 150MB. That’s your limit.
Pro users, on the other hand, have it much easier. They can upload unlimited numbers of videos. Does that mean you can upload a DVD rip of your favorite Star Trek movie? No. For Pro users, video files are limited to 500MB in length.
What about HD video? High-definition video is becoming the new standard, and Flickr is taking notice. It allows you to upload HD video and display it, but only if you’re a Pro user.
Tip
Actually, it turns out that you can upload HD videos, even if you’re a free account user. But—and here’s the mighty big catch—Flickr won’t display it! So why are you allowed to upload HD video at all? Flickr says it allows free users to do that in hopes they’ll switch to a Pro account.
Although there are many similarities with working with photos on Flickr, there are also many differences when it comes to working with videos. For example, you can’t order a print of a video, and you can’t rotate or edit a video.
Let’s get started by seeing how to upload video now.
Tip
One thing to make sure of is that your video is ready for Flickr before you upload it—the upload limits are so strict you might not get another change this month (and note that you can’t affect the size limits for videos by deleting photos either). Many popular video cameras that create AVI files in Windows aren’t ready for Flickr, for example. They use a proprietary codex that the camera loaded onto your computer; without that codex, they won’t play on other people’s computers.
A good test to make sure that your video is ready to be shared is to email a copy to someone else and see if it plays. (You don’t have to do this for every video, of course, but you should make sure you don’t need a proprietary codex for the videos your video camera creates). If the video won’t play on someone else’s computer, are you stuck? Not at all. You can get free software online to convert your video to another format. For example, if your camera produces proprietary AVI files, use converter software to convert your video to, say, WMV format instead (and test the results by emailing the converted video to a friend, too).
There are as many ways to upload video as there are ways to upload photos on Flickr. When you upload video, you have all the standard options available to you with photos—you can set tags, privacy, descriptions, and so on.
We’ll start with the standard uploading form.
You can upload videos with the standard upload form, just as you can with photos. Here’s how:
- Navigate to your home page at Flickr.com and sign in if you’re not already signed in.
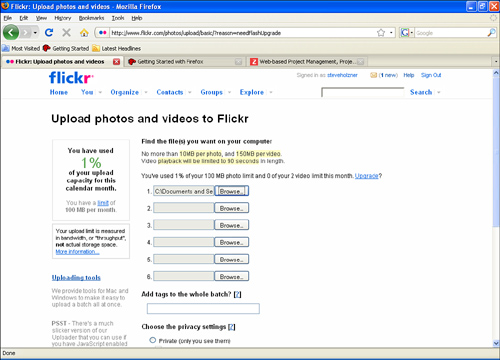
- Click the Upload Photos & Video link to open the standard form shown in Figure 7.1.
- Click a Browse button and select the video you want to upload.
- Click the Open button to make the video’s path and name appear in the text box to the left of the Browse button.
- Repeat steps 3 and 4 for a second video if you have another to upload, keeping in mind that if you have a free account you’re limited to two video uploads a month.
- In the Add Tags to the Whole Batch? box, add any tags you want to the videos.
- In the Choose the Privacy Settings, select from the following settings:
• Private (Only You See Them)
Visible to Friends
Visible to Family
• Public (Anyone Can See Them)
- Check the Show Advanced Settings check box to open the advanced settings.
- In the Set Safety Level section, select from the follow three radio buttons:
• Safe (your default)
• Moderate
• Restricted
- In the Set Content Type section, make sure the first radio button is selected among these choices:
• Photos / Videos (your default)
• Screenshots
• Art, illustration, CGI, or Other Non-Photographic Images
- In the Hide These Images from Public Searches? section, select the Yes radio button if you want to hide your video from public searches.
- Click the Upload button.
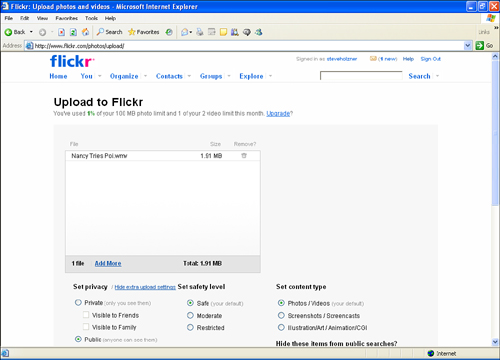
After the upload, you’ll see the page in Figure 7.2, asking you to describe this upload.

Follow these steps:
- In the Add Tags section, add any tags you want to apply to the whole upload (all videos).
- If you want to add the uploaded videos to a set, select that set from the Add to a Set section.
- Add a title to each video in its Title box.
- Add a description to each video in its Description box.
- Add any individual tags to each video in its Tags box.
- When you’re done, click the Save button.
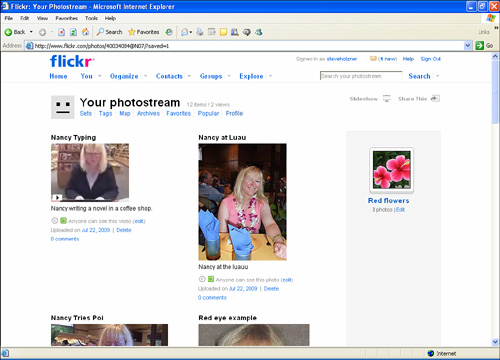
When you’ve saved the upload, the new videos appear in your photostream, as shown in Figure 7.3, where the uploaded video is the first item in the photostream. (The first frame of the video is displayed, which makes the video look like a photo—but note the small arrow button at lower left, indicating the item is actually a video, not just a photo.)
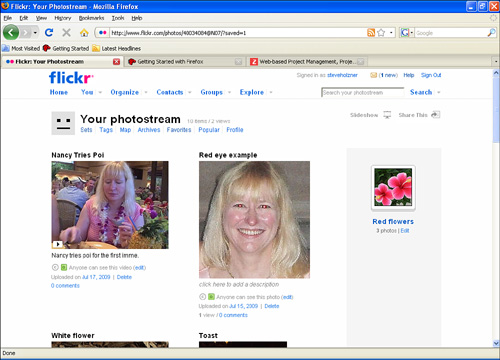
Want to see the video in action? Just click it to open the video’s page, as shown in Figure 7.4.
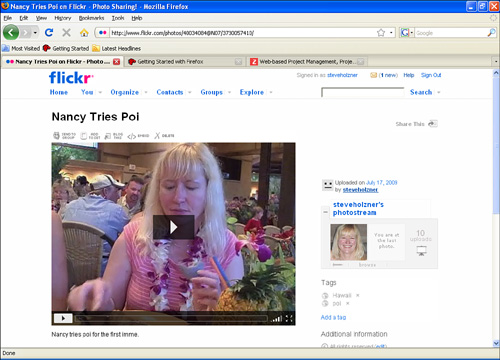
Just click one of the two arrow buttons (one in the middle of the image) you see in the video to play the video.
Now you’ve uploaded video to Flickr. Not bad.
Note the buttons above the video offer a restricted set of options:
• Send to Group
• Add to Set
• Blog This
• Embed (get code to embed the video in other pages)
• Delete
This compares to photos, which have these buttons:
• Add Note
• Send to Group
• Add to Set
• Blog This
• All Sizes
• Order Prints
• Rotate
• Edit Photo
• Delete
Although the buttons are different, note that in many respects you can treat video like photos in Flickr. For example, you can add videos to a set, search for videos, and send videos to groups.
If your browser supports it, you can also upload videos using Flickr’s Flash-based form. To do that, follow these steps:
- Browse to your Flickr home page at Flickr.com and log in if Flickr doesn’t automatically log you in.
- Click the Upload Photos & Video link.
- Click the Choose Photos and Videos link.
- Navigate to the first video to upload in the dialog box that opens.
- Select the video with the mouse and click Open, which will add the video to the upload list, as shown Figure 7.5.
- If you have more videos to upload, click the Add More link and repeat steps 4 and 5, adding the videos to the Upload list.
- Click the Show More Upload Settings link.
- Select the privacy options for the uploaded videos:
• Private (Only You See Them)
Visible to Friends
Visible to Family
• Public (Anyone Can See Them)
- Set the safety level of the videos:
• Safe (your default)
• Moderate
• Restricted
- Set the content type:
• Photos/Videos (your default)
• Screenshots/Screencasts
• Illustration/Art/Animation/CGI
- Set whether you want to hide the videos from public searches.
- Click the Upload Photos and Videos button.
- Click the Add a Description Perhaps link, opening the Describe This Upload page.
- If you’re uploading more than one item and want to apply the same tags to all items, enter those tags in the Batch Operations/Add Tags text box.
- If you want to add the upload to a set, select that set from the drop-down list box in the Add to a Set box.
- Under each uploaded video, enter a title in the Title box.
- Under each uploaded video, enter a description in the Description box.
- Optionally, for each uploaded video, enter tags in the Tags box.
- Click the Save button. Flickr will open your photostream or the set you added the videos to.
And there’s still another way to upload video: You can use Uploadr, Flickr’s dedicated upload tool.
You can also upload videos with Uploadr, Flickr’s dedicated upload tool.
If you don’t have Uploadr installed, go to the Upload page (from your home page, click the Upload Photos & Video link). Then search for this text:
We have desktop software available for Windows & Mac to help you get your photos and videos on to Flickr quickly and efficiently. Check out the Flickr Tools page for more information and downloads.
Click the link Flickr Tools page to open that page. On the Tools page, look for the heading Desktop Uploadr, and find these two links under that heading:
• Windows Vista & XP: Download (12MB)
• Mac OS X 10.5 & 10.4: Download (20MB)
Click the link for your operating system. Your browser will display a dialog box. Click the Save button and save the Uploadr download. When the download is complete, click the Run button.
Clicking the Run button launches the Uploadr installation program. To actually install Uploadr, follow these steps (for the Windows version):
- Click the Next button.
- Select a location on your hard disk to install Uploadr to, and then click Next.
- On the next page, if you want a desktop shortcut icon for Uploadr to make it easy to launch, leave the Create Desktop Icon check box checked and click Install.
- After installation is complete, click Finish.
Double-click the new desktop icon for Uploadr to run it. The first time you run Uploadr, you have to sign in to Flickr. To do that, click the Sign In button in Uploadr.
To sign in to Flickr, follow these steps:
- Uploadr will display a dialog box explaining that you have to sign in to Flickr. Click OK.
- This starts your browser. Find the text, “If you arrived at this page because you specifically asked Flickr Uploadr to connect to your Flickr account, click here,” and then click the Next button under that text.
- Flickr next displays this text:
By authorizing this link, you’ll allow Flickr Uploadr to:
• Access your Flickr account (including private content)
• Upload, Edit, and Replace photos and videos in your account
• Interact with other members’ photos and videos (comment, add notes, favorite)
Click the OK, I’ll Authorize It button.
- The next window in your browser has this message: “You have successfully authorized the application Flickr Uploadr.” Close the browser window.
- Go back to Flickr Uploadr and click the Ready! button.
Now you’re ready to use Uploadr.
If you’ve already installed Uploadr, double-click it at this time to start it.
The easiest way to tell Uploadr what videos you want to upload is to drag videos into Uploadr. Just follow these steps:
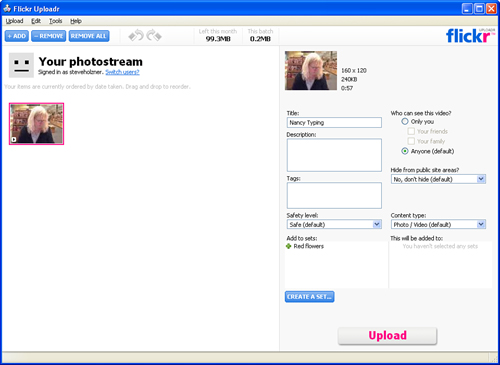
- Drag the videos to upload onto Uploadr, making the videos appear in Figure 7.6.
- Select a video that you’re uploading in Uploadr by clicking it.
- Enter a title for the video in the Title box.
- Enter a description for the video in the Description box.
- Enter tags for the video in the Tags box.
- Select the privacy options for the uploaded videos:
• Only You
Visible to Friends
Visible to Family
• Anyone (default)
- Select whether you want to hide the videos from public site searches.
- Select the safety level:
• Safe (default)
• Moderate
• Restricted
- If you want to add the videos to a set, select the set from the Add to Set drop-down list box.
- Set the content type:
• Photos/Videos (default)
• Screenshots/Screencasts
• Illustration/Art/Animation/CGI
- Select another video if you are uploading more videos and repeat steps 2 through 11 for any additional videos.
- Click the Upload button.
- After the upload is complete, Uploadr will display a dialog box. Click the Go to Flickr button in the dialog box, which opens the page you see in Figure 7.7.
- If you’re uploading more than one item and want to apply the same tags to all items, enter those tags in the Batch Operations/Add Tags text box.
- If you want to add the upload to a set, select that set from the drop-down list box in the Add to a Set box.
- Under each uploaded video, enter a title in the Title box.
- Under each uploaded video, enter a description in the Description box.
- Optionally, for each uploaded video, enter tags in the Tags box.
- Click the Save button. Flickr will open your photostream or the set you added the videos to, as shown in Figure 7.8. (The new video is at the upper left.)

There’s one more way of uploading video: You can email video to Flickr.
You can also upload videos via email. Flickr assigns everyone a unique email address that you can use to upload video to. To find your unique email address, go to www.flickr.com/account/uploadbyemail/. Your email address will appear at the upper right.
To email videos to your photostream, you just attach the videos to the email and then send that email to your unique email address.
The email’s subject becomes the title of the video, the body of the email becomes the description, and any words you place after the word “tags:” in the body become the tags.
Cool—now you can upload videos to Flickr using email.
How about searching for videos? Flickr lets you search for videos just as you can search for photos. Just enter search terms in the Flickr search box.
There are a few customizable aspects of searching for videos. You can exclude videos from search results at www.flickr.com/account/prefs/safesearch/. To exclude videos from search results, deselect the Include Videos in Search Results check box.
The videos on the video pages you open will play automatically when the page is opened. You can change that at www.flickr.com/account/prefs/autoplay/?from=privacy. Just select or deselect Yes under the heading Would You Like Videos to Autoplay When You View a Video Page?.
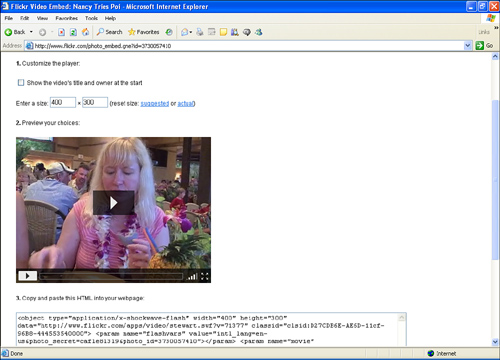
Flickr can also give you HTML you can use to embed your videos in web pages. Just follow these steps:
- Open the video’s page. (For example, from your home page at Flickr.com, click the Your Photostream link, and then click the thumbnail of the video to open its page.)
- Click the Embed Video link that appears above the video, opening the page you see in Figure 7.9.
- Customize the video player by selecting or deselecting the Show the Video’s Title and Owner at the Start check box.
- Enter the size you want the player to display the video with in the two text boxes.
- If you want to, click the arrow button on the video to display it using the options you’ve set.
- Copy the HTML embedding code that appears at the bottom of the page.
- Paste the HTML code into the page where you want the video to appear.