One of the most social aspects of Flickr is groups, those collections of members that gather around a common interest and share photos.
There are thousands of Flickr groups, and you can easily search for the groups you might want to join.
You can also create your own groups—you don’t need a Pro account or anything special to do so. You’ll see how to create your own groups in this lesson, too.
Let’s start digging into groups now.
Flickr groups let Flickr members come together around some common interest and share photos (and video) as well as interact with a discussion board.
There are three types of groups on Flickr:
• Public
• Public, Invitation Only
• Private
You can search for any public group, but can only join the public groups—unless you have an invitation to a public (invitation only) group. Private groups are not searchable, and you need an invitation to join.
Why join a group? You can often view photos in a group—called the photo pool of the group—without being a member. But membership has its privileges. For example, you can only post photos to the group pool if you’re a member.
We’ll start by taking a look at how to find groups you might be interested in on Flickr.
Let’s say you have a special interest in a particular topic and want to track down photos in that topic—perhaps even discuss that topic with other people. You can do so in Flickr with groups.
For example, suppose you’ve just returned from your vacation to Hawaii and want to see if there are any groups on Hawaii. How can you do that?
You can start on your Flick home page at Flickr.com. After you’ve logged in (not necessary if Flickr has already logged you in), you’ll see a link under the Flickr name that says Groups. Click it to open your Groups page, as shown in Figure 5.1.

Note the sections in this page. There’s a general welcome message, and underneath that, a link to the (short) Group FAQ.
On the right, you can see a search box that lets you search through the existing groups. Underneath that is a link to creating your own group.
At the bottom on the right is a small section, Groups We’ve Noticed, that the Flickr staff puts up to publicize groups it has noticed and wants to bring to people’s attention. Each group has a group photo, some information about the number of people in the group and the number of items in the group pool, and a text description of the group. To see the group’s page, click the group photo.
Let’s search for groups having to do with Hawaii. Enter the term Hawaii into the search box and click the Search button. Doing so brings up the page shown in Figure 5.2.

Did we find any groups having to do with Hawaii? Well, yes—as you can see in Figure 5.2, Flickr says, “We found 3,875 groups about Hawaii.” Not a bad haul.
Note that the search box has sprouted new options here. Using the drop-down list next to the search box, you can now search among
So now you have the option of searching among the groups you’re a member of as well as searching all groups.
You can also specify where to search for search terms using the radio buttons under the search box:
• Group Names & Descriptions
• Group Discussions
You can also select how to view the search results; for example, by
• Most Relevant
• Most Recent Activity
• Group Size
• Date Created
Let’s take a look at one of the groups we’ve found—the Hawaii group. (The name seems promising when you’re looking for groups about Hawaii.)
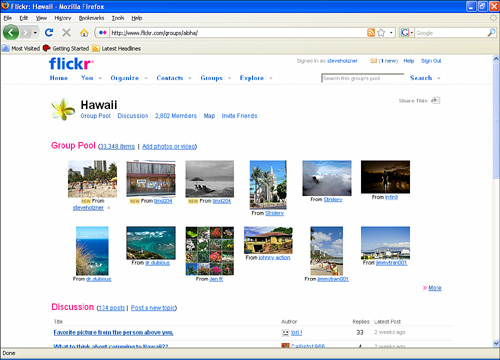
Clicking the Hawaii group in the search results opens that group’s page, as shown in Figure 5.3.
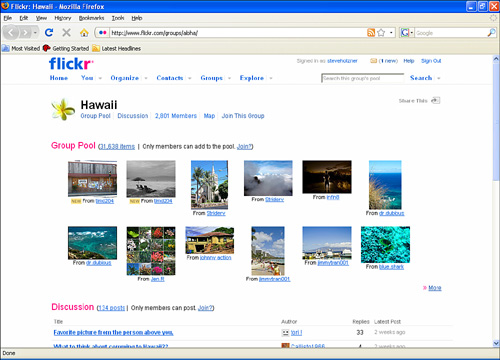
Each Flickr group is “based” on its group page, such as the Hawaii group’s page in Figure 5.3.
Note the links under the group name, giving you access to the most common features of the group:
• Group Pool
• Discussion
• 2,801 Members
• Map
• Join This Group
You can see an abbreviated version of the group pool on the group page, as shown in Figure 5.3. To see more thumbnails from the group pool, click the Group Pool link. To see the full photo, click the photo’s thumbnail.
To see the current discussions on the discussion board, click the Discussion link, opening the page you see in Figure 5.4.
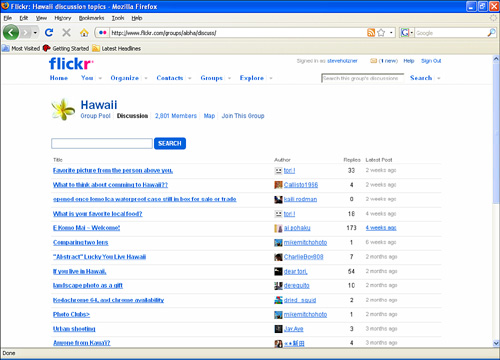
You can see the various discussion threads in Figure 5.4. To read a thread, click it, opening the thread’s page, as shown in Figure 5.5.
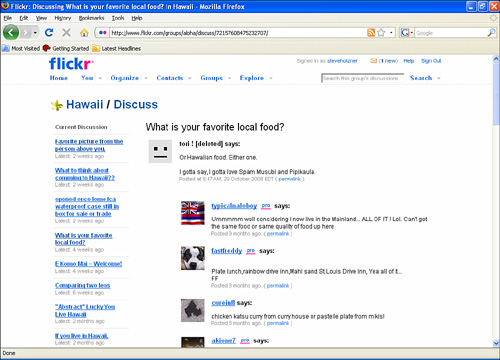
Want to post to the discussion? Only members can post—and we’ll join in a couple of pages.
You might also take a look at the map, by clicking the Map link, which brings up the page you see in Figure 5.6.
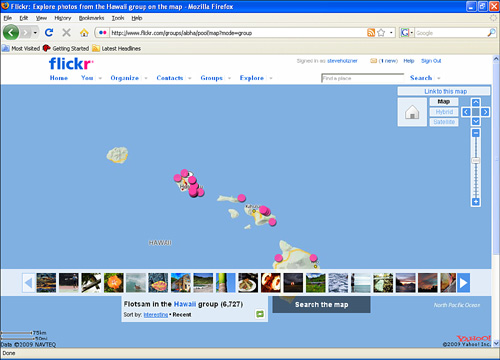
Flickr takes a random sample of the geotagged photos in the group and displays their location on a map (see Figure 5.6). As you can see, all the photos come from Hawaii—no surprise there.
Want to join this group, which will let you submit photos to the pool and join in the discussions? That’s coming up next.
To join a group, go to the group’s page and click the Join This Group link, opening a page like the one you see in Figure 5.7.
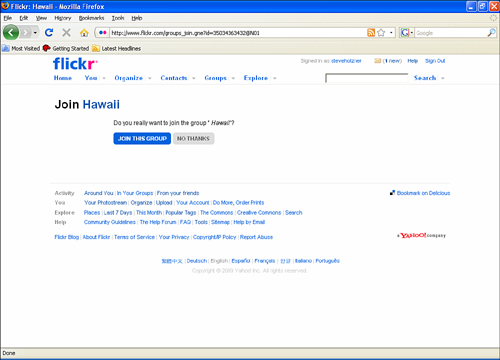
To join, click the Join This Group button. That’s all it takes to join a group that’s public and doesn’t need an invitation.
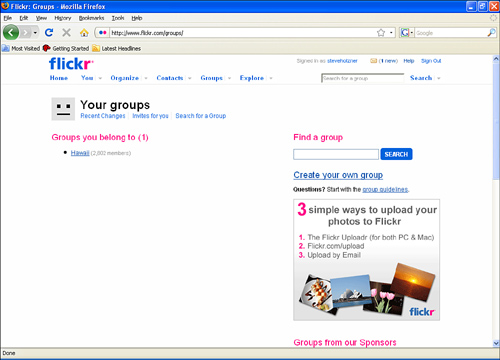
How do you know you’ve actually joined? Go to your Groups page (that is, go to your Flickr home page and click the Groups link) to see the new group listed there, as you see in Figure 5.8.
In addition, on the group’s page, you’ll find the Join This Group link has become an Invite Friends link.
Okay, now that you’ve joined a group, how about posting some photos to the group?
Want to share a photo in a group’s pool? Follow these steps:
- Navigate to your home page at Flickr.com and sign in if you’re not already signed in.
- Click the Your Photostream link to open your photostream.
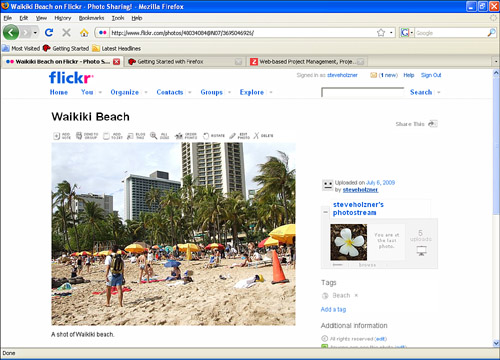
- Click the photo you want to share to open the photo’s page, as shown in Figure 5.9.
- Click the Send to Group button that appears between the photo and the photo title, which opens a drop-down menu.
- Select the name of the group you want to send the photo to from the drop-down menu.
- Flickr displays a dialog box telling you that the photo has been added to the group. Click OK.
The photo now appears in the group’s photo pool, as you see in Figure 5.10. (You can see the thumbnail at the upper left in the group pool.)
Tip
It’s important that you realize if you share a photo that you marked private with a group, the other group members have full access to that photo. Note also that the photo isn’t displayed for people who aren’t members of the group.
Want to remove a photo from a group? After you’ve added a photo to a group, the name of that group will appear at the right on the photo’s page—along with an X after the group name. To remove the photo from the group, just click the X.
You might also be interested to know there’s a limit to the number of groups you can add a particular photo to. If you have a free account, you can add a photo to up to 10 groups. If you have a Pro account, you can add a photo to up to 60 groups.
What if you’ve posted the photo to the limit of groups you’re allowed? There’s no way around it but to remove the photo from one of the groups you’ve already posted it to.
Now that you’ve become a member of a group, you can participate in the group’s discussions.
To add a comment to a thread, follow these steps:
- Navigate to your home page at Flickr.com and sign in if you’re not already signed in.
- Click the Groups link.
- Click the group in which you want to add to the discussion, opening the group’s page.
- Click the Discussion link in the group’s page, opening the discussion’s page.
- Click the thread you want to add a comment to, opening that thread’s page.
- Scroll down to the bottom of the list of replies.
- Enter your reply in the Reply to This Topic box.
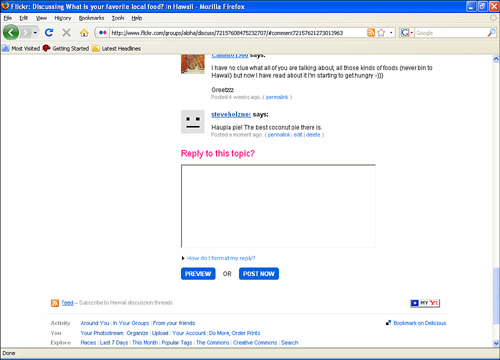
- Enter your reply; click the Preview button to see what your reply will look like, or the Post Now button to post your reply to the discussion.
If everything worked as it should, your reply will appear at the bottom of the list of replies (see Figure 5.11).
Tip
Can you paste photos into discussion posts? Yes, you can. There’s no built-in way on Flickr to do this, though; you rely on your browser to do this. Go to the photo’s page that you want to insert and click the All Sizes link, and then select the image you want to insert into the discussion. (Most people choose small.) Then right-click the photo and copy it using your browser’s shortcut menu. (Most often, this menu item says Copy or Copy Picture.) Then, when you’re writing your post, right-click the page and select Paste to paste the photo into the text you are typing.
Sometimes nothing but creating your own group will do. You might find to your surprise that there’s no group focused on ostrich beaks or stingray tails and decide that it’s time to create one.
Creating a group isn’t hard, although you should take the responsibilities of group administration seriously. There are thousands of Flickr groups, and because the administrators lost interest, many are more or less dead. As your new groups’ creator, you’re its first administrator.
In this example, we’ll create a public group for vacation photos, named Wish You Were Here - Vacation Photos.
To create a new Flickr group, follow these steps:
- Navigate to your home page at Flickr.com and sign in if you’re not already signed in.
- Click the Groups link.
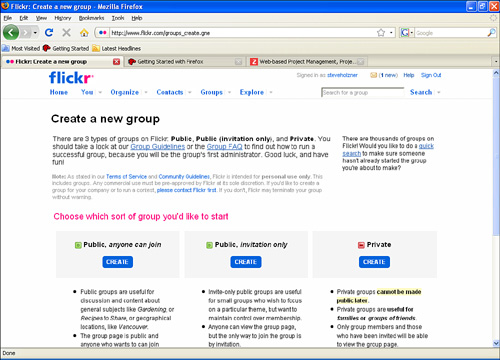
- Click the Create Your Own Group link to open the page shown in Figure 5.12.
There are three types of groups you can create:
• Public
• Public, Invitation Only
• Private
Here’s how Flickr describes public groups:
• Public groups are useful for discussion and content about general subjects like Gardening, Recipes to Share, or geographical locations, like Vancouver.
• The group page is public and anyone who wants to can join instantly.
• Admins can choose to show or hide discussions and/or group pools from nonmembers.
Here’s how Flickr describes public invitation-only groups:
• Invite-only public groups are useful for small groups who want to focus on a particular theme, but want to maintain control over membership.
• Anyone can view the group page, but the only way to join the group is by invitation.
• Admins can choose to show or hide discussions and/or group pools from nonmembers.
And here’s how Flickr describes private groups:
• Private groups cannot be made public later.
• Private groups are useful for families or groups of friends.
• Only group members and those who have been invited will be able to view the group page.
• Private groups are completely hidden from group searches and don’t display on people’s profiles amongst groups they belong to.
- Click the Create button for the type of group you want to create—Public, Public (Invitation Only), or Private.
This example will create a public group.
Clicking the Create button opens the new page you see in Figure 5.13, which asks questions about your new group.
- Enter the name of your new group.
- Enter a description for your group.
- Select the radio button that indicates whether your group is intended for 18+ or not.
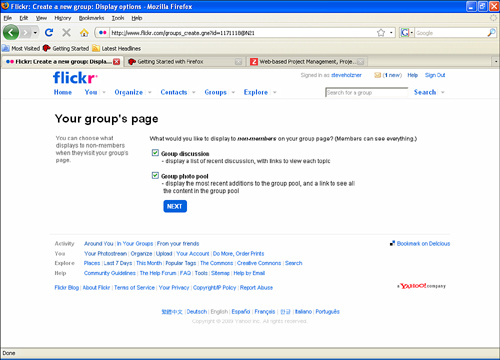
- Click the Next button to bring up the page you see in Figure 5.14.
This page lets you design your group’s page.
- Select the radio buttons corresponding to the items you want on your group’s page: Group Discussion and Group Photo Pool.
- Click Next, opening the page shown in Figure 5.15.
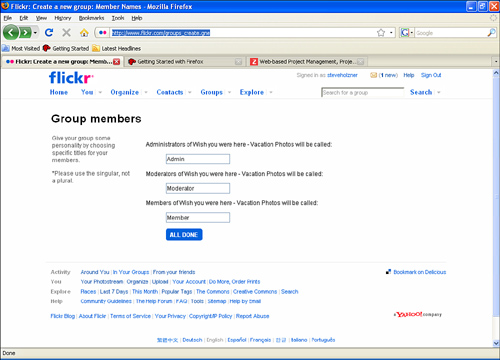
This page lets you select the names by which the people in your group will be known:
• Administrators
• Moderators Of
• Members
- Enter the names for the three levels of people in your group or accept the default names Flickr offers (shown in Figure 5.15); click the All Done button, opening the page you see in Figure 5.16.

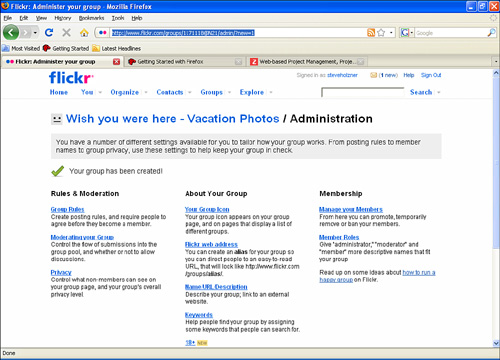
Your new group has been created. Congratulations!
The page you see in Figure 5.16 lets you continue the set up of your group, and it lets you administer your group. (You can always reach the group’s administration page by opening the group page and clicking the Administration link, which will be visible because you’re an administrator.)
Note in particular the middle column in Figure 5.16, which lets you customize the following:
• Group Icon
• Flickr Web Address
• Name/URL/Description
• Keywords
• 18+ Info
Let’s customize a few aspects of our group now, starting with the group icon. To set the group’s icon, follow these steps:
- Click the Your Group Icon link in your group’s administration page.
- In the page that opens, click the link that describes where your group’s icon will come from:
• In Your Photostream
• On Your Computer
• On the Web
In this example, we’ll fetch an icon from our photostream, so click that link.
- The next page displays your photostream. Click the photo you want to make into the group icon.
- In the next page, click the Make the Icon button.
Now when you open your group’s page (go to your Flickr home page, click Groups, and click the group name you want to open), you’ll see the group’s icon, as shown in Figure 5.17.

How about adding some keywords to your group to make it even easier for people to find your group?
To add keywords, follow these steps:
- Go to your Flickr home page (at Flickr.com) and log in if you’re not already logged in.
- Click the Groups link.
- Click the name of the group you want to add keywords to.
- In the group’s page, click the Administration link.
- Click the Keywords link, opening the page you can see in Figure 5.18.
- Enter the keywords you want to give to the group in the text box.
- Click the Save These button.

That’s it. You’ve now added new keywords to your group, letting people search for your group via its name, description, and keywords.
Okay, you’ve set up your new group. Now how about taking a look at how to administer the members?
When you create a group, you’re the group’s first administrator. Admins have just about unlimited power in a group. According to Flickr, admins can
• Modify information about the group
• Create or change the group name
• Create or change the group description
• Associate the group with an external URL
• Create a personalized URL for the group (like your photostream, this URL can only be set once so choose wisely)
• Determine whether your group topics or pool can be viewed by nonmembers
• Create a group icon
• Determine group moderation rules:
What kind of content can be added to the group pool (photos, video, or both)
Set frequency of group pool submissions
Determine what safety level of content is appropriate for the group (safe, moderate, or restricted)
Create group participation rules
You can administer the content of your group by deleting photos or discussion items. Just click the Delete link you’ll see (as an admin or a moderator) next to those items.
As the group’s admin, you can also make others into admins or moderators. We’ll take a look at that now.
You can make as many group members into admins as you like. If you don’t want to give people all the power of admins (such as changing the name of the group), you can make them moderators.
A moderator can remove inappropriate submissions and discussion posts and remove people from membership if they violate the rules.
How do you make someone an admin or a moderator?
Just follow these steps:
- Go to your Flickr home page (at Flickr.com) and log in if you’re not already logged in.
- Click the Groups link.
- Click the name of the group you want to add keywords to.
- In the group’s page, click the Administration link.
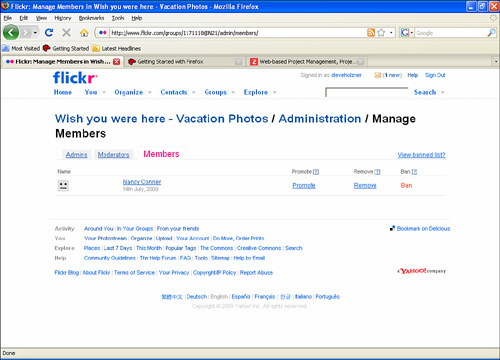
- Click the Manage your Members link, opening the page you see in Figure 5.19.
- Click the Members link to display your group’s members, as shown in Figure 5.19.
- Click the Promote link for the member you want to promote to admin or moderator, making a drop-down list appear.
- Select Moderator or Admin in the drop-down list and click the OK button that appears under the list box.
That’s all it takes.
What if you have to remove someone from your group?
You can remove or ban people from your group. If you remove someone, that person can come back to your group. If you ban someone, however, no comeback is possible. Here’s what Flickr has to say on the issue:
• If a troll types or posts something offensive, they should be warned.
• If they continue their behavior, they should be removed. You can do this from the Admin view of the members list.
• If they come back and continue their behavior, they should be banned. You can do this from the Admin view of the members list.
How do you remove or ban someone?
Just follow these steps:
- Go to your Flickr home page (at Flickr.com) and log in if you’re not already logged in.
- Click the Groups link.
- Click the name of the group you want to add keywords to.
- In the group’s page, click the Administration link.
- Click the Manage your Members link, opening the page you see in Figure 5.19.
- Click the Members link to display your group’s members.
- Click the Remove link for the member you want to remove.
- Click the Ban link for the member you want to ban.
This lesson covered Flickr groups. You saw how to search for groups and how to join them. You learned how to submit photos to the group pool and engage in discussions. In the second half of this lesson, you saw how to create your own group and how to customize it. You also learned how to administer your new group.