
Hour 22 Creating Typed Queued and EventDriven-Enabled Activities
What You Will Learn in This Hour:
![]() Creating a queued typed activity from service
Creating a queued typed activity from service
![]() Creating an
Creating an EventDriven-enabled activity
This hour builds on the previous hour. In the first exercise, you modify the custom runtime service to deliver typed data to the activity via a custom EventArgs class. In the second you create your own EventDriven-enabled activity that can be placed in a State or Listen activity just like a HandleExternalEvent or Delay activity can.
This section builds on the CustomerQueuedFromServiceActivity activity created in the previous hour. It will retrieve the customer data from database rather than hard-coding it in the service. The returned data will also be strongly typed by a custom EventArgs class you create. You will start with the activity and service you created in the previous exercise. Although there are not that many new concepts introduced, it demonstrates a valid activity that delegates database retrieval to a custom service on another thread.
Follow the next steps to add the custom activity and service from the previous hour. The files have new names to go along with this section, and the activity has been changed to call the new service. Otherwise, they are identical to what you created previously.
1. Open the QueuedCustomActivitySolution in the C:SamsWf24hrsHoursHour22TypeQueuedAndEventDrivenCustomActivities directory. Right-click the CustomQueuedActivities project and select Add, Existing Item.
2. Browse to C:SamsWf24hrsHoursHour22TypeQueuedAndEventDrivenCustomActivitiesExistingFiles, select all three files, and click Add.
The CustomerEventArgs class strongly types the customer data that is exchanged between the activity and the service.
The CustomerEventArgs class is derived from EventArgs and not ExternalDataEventArgs, so there is no WorkflowInstanceId passed to the base class. The workflow instance is provided outside of this class. The class simply holds the customer data. The CustomerEventArgs class is not precreated to give you a chance to see what the class looks like that types the data exchanged, because strongly typing the data is the point to this exercise. The class content is not explained because it is a simple type with three properties.
Follow the next steps to add the CustomerEventArgs class.
1. Right-click the CustomQueuedActivities project and select Add, Class.
2. Name the class CustomerEventArgs and click Add.
3. Replace the contents of the entire CustomerEventArgs file with the content contained in Listing 22.1.
LISTING 22.1 CustomerEventArgs Strongly Typed Class
using System;
using System.Collections.Generic;
using System.Linq;
using System.Text;
namespace CustomQueuedActivities
{
[Serializable]
public class CustomerEventArgs : EventArgs
{
public string CustomerNumber;
public string CustomerName;
public double CustomerCreditLimit;
public string CustomerType;
public double CustomerYtdSales;
public string CustomerHoldRules;
internal CustomerEventArgs(string customerNumber,
string customerName,
double customerCreditLimit,
string customerType,
double customerYtdSales,
string customerHoldRules)
{
this.CustomerNumber = customerNumber;
this.CustomerName = customerName;
this.CustomerCreditLimit = customerCreditLimit;
this.CustomerType = customerType;
this.CustomerYtdSales = customerYtdSales;
this.CustomerHoldRules = customerHoldRules;
}
}
}
4. Build the CustomQueuedActivities project.
The call to the GetCustomerCalledFromActivity method has to be changed to pass the customer number to the service because it is used to query the actual customer data. In the previous exercise, a hard-coded customer number was returned. The other changes made use the CustomerEventArgs class to type the data and to print the newly retrieved customer data to the console.
Follow the next steps to modify the CustomerQueuedFromTypedServiceActivity to use the CustomerEventArgs class.
1. Right-click the CustomerQueuedFromTypedServiceActivity in the Solution Explorer and choose View Code.
2. Go to the Execute method and replace this line of code:
customerQueuedFromTypedDataService.GetCustomer(this.QualifiedName); with the following to pass the CustomerNumber to the service as well.
customerQueuedFromTypedService.GetCustomerCalledFromActivity(
this.QualifiedName, CustomerNumber);
3. Go to the q_QueueItemAvailable method and replace this line of code: CustomerNumber = q.Dequeue( ).ToString( ); with the following to type the received information:
CustomerEventArgs cea = (CustomerEventArgs)q.Dequeue( );
4. Replace the line of code that writes the customer number to the console with the following to write out the customer information:
// Send the customer data to the console
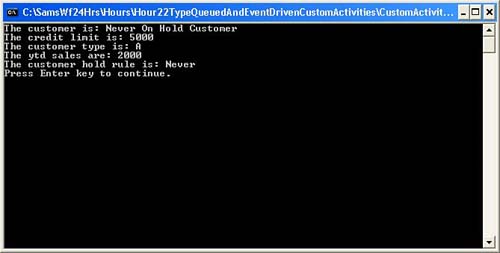
Console.WriteLine("The customber is: " + cea.CustomerName);
Console.WriteLine("The credit limit is: " +
cea.CustomerCreditLimit);
Console.WriteLine("The customer type is: " + cea.CustomerType);
Console.WriteLine("The ytd sales are: " +
cea.CustomerYtdSales);
Console.WriteLine("The customer hold rule is: " +
cea.CustomerHoldRules);
In this section, you modify the CustomerQueuedFromTypedService to retrieve the data from the database and to strongly type it based on the CustomerEventArgs class.
Follow the next steps to add a member variable and update the CustomerState object.
1. Open the CustomerQueuedFromTypedService class and add the following member variable below the constructor:
private static string ConnectionString = "Initial
Catalog=CustomActivity;" +
"Data Source=localhost; Integrated Security=SSPI;";
Follow the next step to update the CustomerState object.
1. Replace the CustomerState object (nested class) with the following new version that includes the CustomerNumber property now being passed to it:
// This class holds the data passed between the methods called
// across threads It is required since the QueueUserWorkItem
delegate
// only accepts one parameter in addition to the method to call.
private class CustomerState
{
public Guid instanceId;
public IComparable resultQueueName;
public string customerNumber;
public CustomerState(Guid instanceId,
IComparable resultQueueName, string customerNumber)
{
this.instanceId = instanceId;
this.resultQueueName = resultQueueName;
this.customerNumber = customerNumber;
}
}
1. Replace the GetCustomerCalledFromActivity method with the following code that receives the CustomerNumber and includes customerNumber when instantiating the CustomerState object.
public void GetCustomerCalledFromActivity(IComparable
resultQueueName, string customerNumber)
{
// This is called in the activity thread to get the customer
from the database
{
ThreadPool.QueueUserWorkItem(GetCustomerOnWorkerThread,
new
CustomerState(WorkflowEnvironment.WorkflowInstanceId,
resultQueueName, customerNumber));
}
}
Follow the next steps to change the GetCustomerOnWorkerThread method to retrieve the customer from the database and send it to the activity typed by the CustomerEventArgs.
1. Replace the body of the GetCustomerOnWorkerThread method with the following to initialize the CustState object:
// Instantiate the CustState object that the
// customer number and workflow instance Id will
// be retrieved from.
CustomerState custState = state as CustomerState;
2. Add the following content to the method to retrieve the customer from the database. This code is standard .NET SQL code and is therefore not explained.
// Retrieve the customer information from the database
SqlConnection dbConn = new SqlConnection(ConnectionString);
SqlCommand getCustomer = new SqlCommand("GetCustomer", dbConn);
getCustomer.CommandType = CommandType.StoredProcedure;
getCustomer.Parameters.AddWithValue("@CustomerNumber",
custState.customerNumber);
dbConn.Open( );
string CustomerName = null;
double CustomerCreditLimit = 0;
string CustomerType = null;
double CustomerYtdSales = 0;
string CustomerHoldRules = null;
using (SqlDataReader custReader =
getCustomer.ExecuteReader(CommandBehavior.CloseConnection))
{
if (custReader.Read( ))
{
CustomerName =
custReader["CustomerName"].ToString( ).Trim( );
CustomerCreditLimit =
double.Parse(custReader["CustomerCreditLimit"].ToString( ));
CustomerType =
custReader["CustomerType"].ToString( ).Trim( );
CustomerYtdSales =
double.Parse(custReader["CustomerYtdSales"].ToString( ));
CustomerHoldRules =
custReader["CustomerHoldRules"].ToString( ).Trim( );
}
}
3. Add the following code to the method to retrieve the workflow instance from the runtime:
// Retrieve the workflow instance
WorkflowInstance wi =
runtime.GetWorkflow(custState.instanceId);
4. Add the following code to instantiate a CustomerEventArgs object with the customer values returned from the database:
// Update the eventargs going back to the workflow with the
// customer information
CustomerEventArgs eventArgs =
new CustomerEventArgs(custState.customerNumber,
CustomerName,
CustomerCreditLimit,
CustomerType,
CustomerYtdSales,
CustomerHoldRules);
5. Add the following code to enqueue the typed customer data back to the workflow queue.
// Send the results back to the workflow queue
wi.EnqueueItem(custState.resultQueueName, eventArgs, null,
null);
6. Build the CustomQueuedActivities project.
1. Replace the line of code that adds the CustomerQueuedFromService service to the runtime with the following to add the CustomerQueuedFromTypedService:
// Add the CustomerQueuedFromTypedService to the runtime.
workflowRuntime.AddService(new
CustomerQueuedFromTypedService
(workflowRuntime));
Follow the next steps to run the workflow with the strongly typed data.
1. Remove any existing activities from the workflow.
2. Add a CustomerQueuedFromTypedServiceActivity to the workflow, enter 0001 in the CustomerNumber property, and run the workflow.
You now have a custom activity that retrieves information from the database on another thread while the workflow can be idled. The same pattern can be applied to activities that wait for human input or that perform other actions that take a long time.
The multiburst activity created in this hour can be placed on a workflow, wait for external input, and receive data in its second burst. However, it cannot yet be the first activity in an EventDriven activity, such as a Listen activity branch or a State activity. This precludes our activity from participating in the canonical wait on external input in one branch and timeout in another branch pattern. It is therefore not yet a complete activity in many ways, because activities that wait on external input frequently need to be placed in Listen activity branches and therefore monitored by Delay activities.
Many multiburst activities must support being placed on the workflow both independently of an EventDriven activity and embedded within an EventDriven activity. HandleExternalEvent and Delay activities, for example, can be placed in Listen activity branches or placed directly on the workflow. Activities that can wait on external input but cannot be the first activity in an EventDriven activity will be referred to as basic queued activities in this section. Those that can be added as the first activity will be referred to as EventDriven-enabled.
The programming model is very different for basic queued and EventDriven-enabled activities. This requires that EventDriven-enabled activities support two different models. They must support the model used so far throughout this hour, where the activity itself subscribes to the QueueItemAvailable event. They must also support a model that delegates subscribing to events to the parent EventDriven activity—for example, the Listen activity branch.
In this exercise, you create an EventDriven-enabled activity that must also be able to operate as a standard queued activity. This requires adding conditional checks that take different actions depending on whether the activity is running as an EventDriven-enabled or a basic queued activity. It will run as the first if it is embedded in an EventDriven activity and as the latter if it is running standalone.
The Execute method must check whether the queue has already been subscribed to, as it will when the activity is running as an embedded activity. If the activity is running standalone, the queues must still be created and events subscribed to in the Execute method. To help with this, much of the subscription and queue logic is factored out into DoSubscribe and ProcessQueueItem methods. The DoSubscribe method is called from the Execute method when running standalone activities, and from the IEventActivity.Subscribe method when running embedded activities.
You will instrument the methods with Console.Writeline statements that help understand the different execution patterns of each activity type.
The CustomerEventDrivenActivity will implement IEventActivity because it is required to do so to be an EventDriven-enabled activity. The IEventActivity interface contains Subscribe and Unsubscribe methods that receive the parent activities ActivityExecutionContext. The custom service and EventArgs classes are the same as their CustomerQueuedFromTypedServiceActivity permutations, so they will be used as is. The EventDriven-enabled activity is very different and will therefore be created from scratch.
Follow the next steps to create the CustomerEventDrivenActivity and set is base type.
1. Right-click CustomQueuedActivities project and select Add, Activity.
2. Name the activity CustomerEventDrivenActivity and click Add.
3. Open the CustomerEventDrivenActivity activity in design mode. Then click the activity, click the ellipsis in the Base Class property, select System.Workflow.ComponentModel, and select Activity in the middle pane. Then click OK.
Next you derive from the IEventActivity and IActivityEventListener interfaces. The first, as already mentioned, allows the activity to be EventDriven-enabled. The second is used by an event that monitors the named queue. It provides another way to accomplish what QueueItemAvailable provided to prior activities last hour.
Replace the class signature with the following that implements the interfaces:
public partial class CustomerEventDrivenActivity : Activity,
IEventActivity,
IActivityEventListener<QueueEventArgs>
Next, implement the IEventActivity.QueueName property, which stores the queue to listen. This member of the IEventActivity must be implemented when implementing the IEventActivity interface.
Add the following code below the constructor to implement the IEventActivity.QueueName property:
Follow the next steps to add the CustomerNumber dependency property.
1. Move your cursor directly below the QueueName property, insert a couple of additional blank lines, move your cursor between the lines, right-click, and select Insert Snippet. Double-click Other, double-click Workflow, and double-click DependencyProperty—Property to insert a new dependency property.
2. You should see the stub dependency property, and the text MyProperty should be highlighted.
3. Enter CustomerNumber (replacing MyProperty) and press Enter to leave the wizard.
Follow the next steps to override the Initialize method and initialize the queueName variable.
1. Add a couple of blank lines below the CustomerNumber dependency property and type protected override, press the spacebar, and select the Initialize method to create the Initialize method.
2. Add the following code below the code placed in the Initialize method to initialize the QueueName property. The queue will be created in a separate helper method called by both the EventDriven-enabled and basic queued activity implementations.
this.queueName = this.QualifiedName;
The CustomerEventDrivenActivity.Execute method operates differently depending on whether it is called when the activity is embedded or running standalone. When embedded in an EventDriven activity, the Execute method is not called until after the queue is subscribed to, data is delivered to the queue, and the queue event is executed. This is because the subscription is delegated to its parent EventDriven activity. The Execute method processes the data returned from the service because by the time it is called, the activity’s work is done. The custom service has been called and it has returned the data to the activity. Conversely, when the activity executes standalone, it operates as it did last hour.
Add the following code to override the Execute method.
1. Add a couple of blank lines below the Initialize method and type protected override, press the spacebar, and select the Execute method to create the Execute method.
2. Replace the content of the Execute method that checks if there is processing to be done. If there is none, the activity is closed, which will be the case when called from an EventDriven activity, because the work will already be done.
// If true activity already executed and it will therefore
be closed
if (this.ProcessQueueItem(executionContext))
{
Console.WriteLine("EventDriven-enabled, Execute method:
Returned " +
"true from ProcessQueueItem.");
return ActivityExecutionStatus.Closed;
}
Console.WriteLine("Standard queued, Execute method " +
"activity made it past check for EventDriven.");
3. Add the following code to begin processing and rerun the activity in executing state, which will be called when the activity is called standalone.
// If this is a standard queued activity, the queue
// will be created and subscribed to.
this.DoSubscribe(executionContext, this);
// Return control the runtime in executing mode
return ActivityExecutionStatus.Executing;
When the activity is embedded in an EventDriven activity, the IEventActivity.Subscribe method is called in the activity’s first execution burst. Therefore, IEventActivity.Subscribe calls DoSubscribe to create the queue and set up the event logic to monitor the queue, as would be done in the Execute method if the activity was running in standalone mode.
To create and code the Subscribe handler, add the following handler to specify what should be done when the queue is updated.
// Create queue and create event logic when activity
// called from within an EventDriven activity.
void IEventActivity.Subscribe(ActivityExecutionContext parentContext,
IActivityEventListener<QueueEventArgs> parentEventHandler)
{
Console.WriteLine("EventDriven permutation in
IEventActivity.Subscribe");
DoSubscribe(parentContext, parentEventHandler);
}
This method creates the queue, registers an event with the queue, and calls the custom customer service. It is called from the IEventActivity.Subscribe handler when the activity is embedded in an EventDriven activity and from the Execute method when the activity is standalone. The appropriate ActivityExecutionContext (parent EventDriven of custom activity) is passed to the method.
Follow the next steps to create and code the DoSubscribe method.
1. Add the DoSubscribe method signature that receives the proper context and the queue listener:
private Boolean DoSubscribe(ActivityExecutionContext
executionContext,
IActivityEventListener<QueueEventArgs> listener)
{
}
2. Create the queue, retrieve the custom CustomerQueuedFromTypedService, and call its GetCustomerCalledFromActivity method.
Console.WriteLine("In DoSubscribe: Both permutations should
call.");
WorkflowQueue q = CreateQueue(executionContext);
q.RegisterForQueueItemAvailable(listener);
// Retrieve the custom CustomerQueuedFromTypedService from the
// activity execution context.
CustomerQueuedFromTypedService customerQueuedFromTypedService =
executionContext.GetService<CustomerQueuedFromTypedService>( );
// Call the GetCustomerCalledFromActivity method
// on the custom CustomerQueuedFromService service
customerQueuedFromTypedService.GetCustomerCalledFromActivity(
this.QualifiedName, CustomerNumber);
return true;
The IEventActivity.UnSubscribe handler is called by the EventDriven parent activity when the activity is embedded in an EventDriven activity. It is called when data is received into the queue. This handler is called instead of the OnEvent handler called for standalone activities.
Add the following handler that executes when the parent EventDriven activity unsubscribes.
void IEventActivity.Unsubscribe(ActivityExecutionContext parentContext,
IActivityEventListener<QueueEventArgs> parentEventHandler)
{
Console.WriteLine("Unsubscribe called for EventDriven
perumutation");
DoUnsubscribe(parentContext, parentEventHandler);
}
To create the DoUnsubscribe helper method that unregisters the event from the queue, add the following code to unregister the event from the queue:
private void DoUnsubscribe(ActivityExecutionContext context,
IActivityEventListener<QueueEventArgs> listener)
{
WorkflowQueuingService qService =
context.GetService<WorkflowQueuingService>( );
WorkflowQueue queue = qService.GetWorkflowQueue(this.QueueName);
queue.UnregisterForQueueItemAvailable(listener);
}
Next, create OnEvent handler that is called for standalone queued activities when data is delivered to the queue. It is a replacement for the QueueItemAvailable handler used in previous activity examples. Most of the work performed is factored into the ProcessQueueItem method.
Add the following OnEvent handler:
void IActivityEventListener<QueueEventArgs>.OnEvent(object sender,
QueueEventArgs e)
{
Console.WriteLine("In OnQueueItemAvailable in both cases.");
// If activity is not scheduled for execution, do nothing
if (this.ExecutionStatus == ActivityExecutionStatus.Executing)
{
ActivityExecutionContext executionContext = sender as
ActivityExecutionContext;
if (this.ProcessQueueItem(executionContext))
{
executionContext.CloseActivity( );
}
}
}
The ProcessQueueItem method receives the data from the custom service and, in this case, displays it to the console. It is called from the Execute method and the OnEvent handler. It processes when called from the Execute method or from activities embedded in EventDriven activities. It processes from the OnEvent handler for standalone activities. It is called but terminates early when called from the Execute method for standalone activities because the queue is not yet created.
1. Add the following code to create the ProcessQueueItem method:
private bool ProcessQueueItem(ActivityExecutionContext
executionContext)
{
Console.WriteLine("In ProcessQueueItem");
// Retrieve the queuing service from the activity execution
context
WorkflowQueuingService qService =
executionContext.GetService<WorkflowQueuingService>( );
if (!qService.Exists(this.QueueName))
{
return false;
}
WorkflowQueue q = qService.GetWorkflowQueue(this.QueueName);
// If the queue has messages, then process the first one
if (q.Count == 0)
{
return false;
}
// Retrieve the data from the queue
CustomerEventArgs cea = (CustomerEventArgs)q.Dequeue( );
// Send the customer data to the console
Console.WriteLine("The customber is: " + cea.CustomerName);
Console.WriteLine("The credit limit is: " +
cea.CustomerCreditLimit);
Console.WriteLine("The customer type is: " + cea.CustomerType);
Console.WriteLine("The ytd sales are: " +
cea.CustomerYtdSales);
Console.WriteLine("The customer hold rule is: " +
cea.CustomerHoldRules);
DoUnsubscribe(executionContext, this);
DeleteQueue(executionContext);
return true;
}
Follow the next steps to create CreateQueue and DeleteQueue helper methods that perform the functions their names imply.
1. Add the following two helper methods that create and delete the queues:
private WorkflowQueue CreateQueue(ActivityExecutionContext context)
{
Console.WriteLine("CreateQueue");
WorkflowQueuingService qService =
context.GetService<WorkflowQueuingService>( );
if (!qService.Exists(this.QueueName))
{
qService.CreateWorkflowQueue(this.QueueName, true);
}
return qService.GetWorkflowQueue(this.QueueName);
}
private void DeleteQueue(ActivityExecutionContext context)
{
Console.WriteLine("DeleteQueue");
WorkflowQueuingService qService =
context.GetService<WorkflowQueuingService>( );
qService.DeleteWorkflowQueue(this.QueueName);
}
2. Build the CustomQueuedActivities project.
Follow the next steps to create the workflow with your newly created EventDriven-enabled activity.
1. Remove any existing activities from the workflow.
2. Add a CustomerEventDrivenActivity to the workflow, enter 0001 in its CustomerNumber property, and run the workflow.
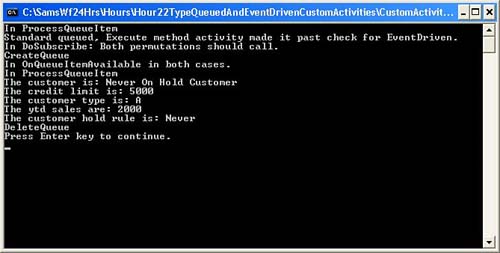
3. You should get the results shown in Figure 22.2.
5. Move the CustomerEventDrivenActivity from the workflow to the left branch.
6. Add a Delay activity to the right branch and set its TimeoutDuration property to 00:01:00.
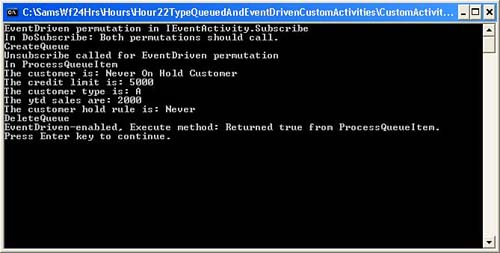
7. Run the workflow again and you should get the results shown in Figure 22.3.
This hour covered creating strongly typed queued and EventDriven-enabled activities. The first allows the data that is passed to the workflow from the host to be typed with classes that derive from EventArgs. The latter permits your “queued” activities to be placed in Listen activity branches and other EventDriven activities. You now have all the knowledge you need to create activities that await external stimulus and then send them to the workflow strongly typed. Finally, your activities can participate in the canonical wait for response-timeout pattern. Go and create Customer, CheckCredit, and other activities that receive data from your other systems using this knowledge.