
Hour 15 Working with Dynamic Update
What You’ll Learn in This Hour:
![]() Dynamic Update overview
Dynamic Update overview
![]() Dynamic Update from inside
Dynamic Update from inside
![]() Dynamic Update from outside
Dynamic Update from outside
![]() Dynamic Update and rules
Dynamic Update and rules
![]() Workflow change application
Workflow change application
This hour covers Dynamic Update, one of the intriguing features in WF. It permits running workflows to be changed by adding and removing activities. The changes are unique to the workflow instance they are applied to, which permits per order, invoice, or other business transaction customization. Increased flexibility is one of WF’s goals. One way to provide this is to permit already running workflows to be changed. Midprocess change alone, however, is not good enough in many cases. It can lead to chaos. That’s why it is important for the midprocess change to be supported by tracking. With the two coupled, it is possible that new types of versioning and deployments can be supported that are less rigid than compiled code but that still supply solid versioning support.
Furthermore, WF provides a couple of other features that increase Dynamic Update’s plausibility. The first is that WF provides a DynamicUpdateCondition property that can restrict at which points of a process, if any, Dynamic Update is allowed.
Second, the WF validation architecture permits midprocess changes to be validated. In fact, the same validation performed on activities at design time is carried out at runtime when Dynamic Update is applied. The WF validation architecture is covered in Hour 24, “Creating Control Flow Activities Session 2.” The fact that validation is abstracted and therefore equally employable at runtime and design time demonstrates that changing workflows at runtime is central to the WF model and not an afterthought.
Dynamic Update works on both sequential and state machine workflows. It is especially synergistic with state machine workflows because of the autonomous design of states. This state machine design makes it easier to add or remove a step (state) without adversely affecting the process. One scenario that works well on state machine workflows is to add a hold state to a workflow or series of workflows when, for instance, quality problems are discovered.
![]()
If you are interested in looking further into how Dynamic Update can be used with state machine workflows, the OrderingStateMachine SDK example provides a good example of adding a state through Dynamic Update. This hour will not cover using Dynamic Update with state machine workflows.
The next section of this hour covers applying Dynamic Update to add and remove activities from running workflows. The following section covers using Dynamic Update to change workflow rules. Finally, a sample application that creatively employs Dynamic Update is explored at a high level.
You can apply Dynamic Update in two ways: from outside the workflow and from within the workflow. Applying from outside requires a way to communicate, as well as knowledge of the current step of the running workflow instance, whereas applying from within requires design-time knowledge of where (not necessarily what) the changes are to be applied. Both methods are similar, although additional steps and logistics are involved when applying from outside.
The general dynamic update practice is straightforward. First, a copy of the workflow instance to be changed is copied to a clone for manipulation. After the changes are made, the original workflow is overwritten by the clone, thereby updating a running workflow instance. Two types combine to enable Dynamic Update:
![]() First, the
First, the WorkflowChanges type contains a TransientWorkflow property that serves as a workspace to hold proposed changes. The TransientWorkflow property is a composite activity collection that represents the cloned workflow instance. The TransientWorkflow property serves as the framework to add activities to, remove activities from, and change rules on.
![]() The
The WorkflowChanges type contains a Validate method that validates the proposed changes and a Condition property that controls when and if Dynamic Update can be applied to a workflow. As previously mentioned, this Validate method plays a major role in WF’s ability to support performing running workflow change with fidelity.
![]() The second type, the
The second type, the WorkflowInstance, contains helper methods to retrieve a workflow instance, and it requests that the cloned copy replace the workflow instance. It also holds the specific Dynamic Update rules for the given workflow model.
Let’s now add a Delay activity to a workflow from both the inside and the outside.
Tracking and a call to query the tracking service was added to the host to make it easier to show the changes made by Dynamic Update.
Follow the next steps to apply Dynamic Update from the inside.
1. Open the DynamicUpdateFromInside solution in the C:SamsWf24hrsHoursHour15DynamicUpdateDynamicUpdateFromInside directory.
2. Open InsideWorkflow shown in Figure 15.1.
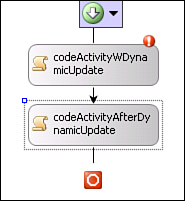
3. Double-click the codeActivityWDynamicUpdate activity and enter the code shown in Listing 15.1 in its handler (which is explained directly following).
LISTING 15.1 Dynamic Update From Inside
Console.WriteLine
("Printed from Code activity before Dynamic Update Code activity
at {0}",
DateTime.Now.TimeOfDay);
// use WorkflowChanges class to author dynamic change and pass
// it a reference to the current Workflow Instance
WorkflowChanges workflowTochange = new WorkflowChanges(this);
// Create a new Delay, initialized to 2 seconds
DelayActivity delayOrder = new DelayActivity();
delayOrder.Name = "delayOrder";
delayOrder.TimeoutDuration = new TimeSpan(0, 0, 2);
// Insert the Delay Activity to the TransientWorkflow collection
// (the workspace) between the two Code Activities
workflowTochange.TransientWorkflow.Activities.Insert(1, delayOrder);
// Replace the original Workflow Instance with the clone
this.ApplyWorkflowChanges(workflowTochange);
Adding a Delay activity dynamically took four steps:
1. Pass a workflow definition to the WorkflowChanges type. After changes are made, the updated WorkflowChanges type will replace the current workflow definition.
2. The Delay activity is programmatically created.
3. The Delay activity is added to the WorkflowChanges.TransientWorkflow property that contains a modifiable clone of the current workflow. Both the activity to add and its index position on the workflow are passed to the WorkflowChanges.TransientWorkflow.Activities.Insert method.
4. The changes are applied to the workflow instance. Validation is performed when WorkflowInstance.Applychanges is called, and it will throw an exception if validation fails.
This encapsulates the basic steps to perform dynamic updates from within a workflow. The WorkflowChanges.TransientWorkflow.Activities.Insert method, which permitted us to specify the position of the Delay activity, was used. There are also Add, Remove, Count and other members that facilitate managing the workflow clone or TransientWorkflow collection. No change method exists because activities cannot be changed. To change an activity you must delete the activity that requires change, create a new activity that includes the change, and then update the workflow with the new activity.
Follow the next steps to run the workflow.
1. Run the workflow, and you should see the results shown in Figure 15.2.
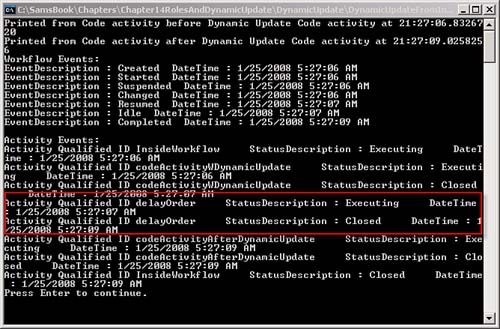
2. You can tell that the Delay activity was added because the time difference between the start of the first and second Code activities matches the Delay activity TimeoutDuration property. You can also tell because the delayOrder (the name of the Delay activity) is included in the tracking query returned. The tracking database has an AddedActivity and a RemovedActivity table that is populated by Dynamic Update. It theoretically allows for per instance change to be performed with visibility, although this is just an SDK sample that is probably not enterprise-ready.
3. Now you can override Dynamic Update. Click the workflow designer away from any activity.
4. Click the DynamicUpdateCondition property, click its drop-down, select Code Condition, enter DynamicCondition, and press Enter. Then enter the following in its handler:
e.Result = false;
5. You get an exception because Dynamic Update is no longer allowed on this workflow.
![]()
Why the need for Dynamic Update from the inside? One scenario is that some WF hosts are closed (for example, the SharePoint workflow host) and the only way to perform Dynamic Update would be from the inside. In these cases, custom activities (see Hours 20–24) could be embedded in the workflow that communicates with external programs that send the update instructions.
You have run the workflow with Dynamic Update where you saw a Delay activity added to a running workflow. Then you changed the Dynamic Update rule to prohibit Dynamic Update, and the change was no longer allowed. The combination of tracking support, conditional evaluation, and activity validation (see Hour 24, “Creating Control Flow Activities Session 2”) incorporated in Dynamic Update makes Dynamic Update very intriguing. Whereas XAML-only workflows can be run without compilation, Dynamic Update takes it a step further and permits change while in-flight on a per-instance basis. With Dynamic Update you can update a single workflow or selected workflow instances. Changing the XAML directly affects all workflows that run from that point.
In the “Applying Dynamic Update from the Outside Unplanned” section, you will conduct an unplanned change from the host. You will not implement a planned change from the host, but how to do so is discussed.
You will now work with a similar workflow. This time, though, you will change from the host (the outside). Scenarios where changing from the host may be useful range from changing one or more in-flight workflows because of new requirements that may range from putting the workflows on hold because of a product defect to meeting new design requirements. Another possibility is changing all workflows from the host when they are started to allow changes to be implemented this way until next time you redeploy the workflow with the changes embedded.
This time, because the changes are from the outside and are unplanned, they are performed when the workflow idles. This will lessen the chance of race conditions, in contrast to simply placing the request on the queue while the workflow is running without consideration to what it is doing. (Workflow queues are covered in Hour 21, “Creating Queued Activities,” and Hour 22, “Creating Typed Queued and EventDriven-Enabled Activities.”)
1. Open the DynamicUpdateFromOutside solution in the C:SamsWf24hrsHoursHour15DynamicUpdateDynamicUpdateFromOutside directory.
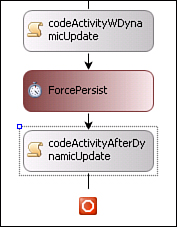
2. Open the OutsideWorkflow shown in Figure 15.3.
3. Now open Program.cs and add the code shown in Listing 15.2 to the OnWorkflowIdled handler, which is explained afterward.
LISTING 15.2 Dynamic Update From Outside Unplanned
if (wasChanged)
return; wasChanged = true;
// Instantiate a Workflow Instance
WorkflowInstance workflowInstance = e.WorkflowInstance;
// Static definition of the WF (replacing this when the change
// is conducted from within.
Activity clonedWorkflow =
workflowInstance.GetWorkflowDefinition();
// use WorkflowChanges class to author dynamic change
WorkflowChanges workflowChanges =
new WorkflowChanges(clonedWorkflow);
Console.WriteLine(" Host is adding a new Delay Activity");
// Create a new Delay, initialized to 2 seconds
DelayActivity delayOrder = new DelayActivity();
delayOrder.Name = "delayOrder";
delayOrder.TimeoutDuration = new TimeSpan(0, 0, 2);
// Add the Approval Activity to the collection
workflowChanges.TransientWorkflow.Activities.Add(delayOrder);
// apply transient changes to instance
workflowInstance.ApplyWorkflowChanges(workflowChanges);
First, the variable wasChanged is checked to test whether the update has previously been performed. The OnWorkflowIdled event may be called many times in most real-world workflows, and the Delay activity should be added only once.
Second, it requires an extra step to get the workflow from the host. The WorkflowInstance.GetWorkflowDefintion method returns a clone of the workflow instance. You can’t just refer to the workflow as you can from inside the workflow. This copy is then passed to the WorkflowChanges type. The rest of the code is identical to when performing Dynamic Update from the inside.
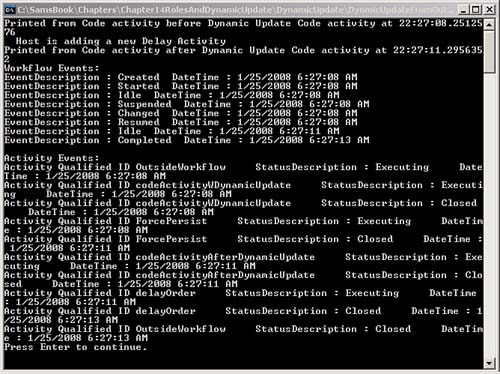
Follow the next steps to run the DynamicUpdateFromOutside unplanned.
If you know your process is spontaneous and workflow instances will frequently require change, another approach is to pause the workflow with a Suspend activity at a point of the workflow that you know will (is likely to) require change at design time. Then catch the Suspended event. The advantage is that you know ahead of time where to make the change—if not what change to make—and you don’t have to attempt to capture the workflow at an idle state at the point of the workflow in which you want to make the change. You know that it is stopped, and you know exactly where it is stopped. This method of (know where but not what) Dynamic Update can be useful for processes that contain parts that vary widely across workflows. For instance, maybe the credit-hold process is unique across orders because of all the human intervention, and a template is built for each order that can be changed as needed. In this situation, you may even carve out a section of the workflow after the Suspend activity and place stub activities that you will later change.
There is no example for this because it is so similar to the previous section. The main difference is placing the code in the suspended event handler rather than the idled.
It is important that rules be changeable at runtime because they are frequently the least deterministic element or processes. For instance, an order will go on credit-hold if it exceeds the credit limit. The actual credit limit, who to request approval from, and how many levels to escalate within are all determined by rules. These rules tend to change frequently.
WF RuleSets and declarative rule conditions can both be modified at runtime. The RuleDefinitions type contains a RuleSets property that holds a collection of RuleSets in the workflow and the Conditions property that holds a collection of workflow declarative rule conditions. The RuleDefinitionsProperty is a dependency property known by the workflow. Modifying the rules therefore requires accessing one or both of these properties during Dynamic Update, and then applying the changes to update the current workflow instance with the new values.
You can update the RuleSets and Conditions properties through CodeDom expressions or by updating the .rules file that holds their serialized representation. Updating the CodeDom permits programmatic rules change from the host. The .rules files can be updated directly or via a user interface that updates the .rules files. In a scenario that calls for workflows that continually update rules throughout the workflow life cycle, you could allow the .rules file to be updated from an external application. The host could then check the .rules file at each persistence point and update any changes.
All parts of the rules and corresponding actions can be changed regardless of which change method is selected. For example, all aspects of the rule (OrderValue < 1000 Then OrderPriority = 1) can be changed, including changing OrderValue to OrderValue + Tax or OrderValue to InvoiceAmount. The changes implemented in our examples will be limited to changing the literal values (1000 and 1 in the preceding example) because complex CodeDom programming is not within the scope of this book. However, changing the literal values offers a glimpse into changing other parts of the rule expressions. The ability to change the entire rule without recompilation is clearly a powerful feature that is not easily done in compiled software.
![]()
Code conditions can be applied to IfElse, While, and other activities, just as declarative rule conditions can. Code conditions, however, are not captured by the Conditions property and are therefore not changeable at runtime. This again exemplifies that XML representations both (XAML and .rules) are better supported by WF tools in some areas.
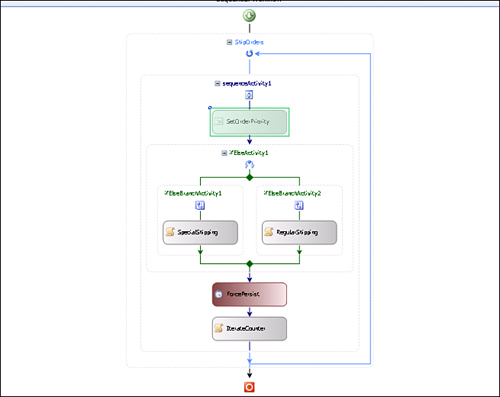
The rest of this section provides a sample of changing a RuleSet and Conditions property via the CodeDom and changing a RuleSet property through a .rules file. The workflow shown in Figure 15.5 will be used for all three changes, although the SetPriorityPolicy activity is enabled only when changing the RuleSet rule.
![]()
A custom Policy activity as covered in Hour 12, “Working with the WF RuleSet,” may be more appropriate to update rules at runtime. For XAML-only workflows, you can simply load the .rules file at runtime if it is sufficient to make the changes when starting the workflow. This allows business users to change the rules until the workflow begins. The rules cannot be modified after the workflow starts processing, however, which may not be sufficient, especially for some long-running workflows. The scope of the intended change is also important when deciding which approach to use. Dynamic Update can be applied to one or a select group of workflows. XAML and custom Policy activities generally apply to all future workflows. The custom Policy activity may also apply to currently processing workflows, depending on its implementation.
Follow the next steps to add code to allow which Dynamic Update scenario to run:
1. Open the DynamicUpdateRules solution in the C:SamsWf24hrsHoursHour15DynamicUpdateDynamicUpdateRules directory.
2. Open Program.cs and add the following code below the opening bracket of the using (WorkflowRuntime... line of code. This code allows for choosing which of the Dynamic Update scenarios to execute. It is necessary because only one host is being used for all three types of Dynamic Update that will be processed in this section.
Console.WriteLine("Enter 1 and press Enter for rule condition,");
Console.Write("2 for RuleSet rule,");
Console.Write("3 for .rules file: ");
selection = Console.ReadLine();
Console.WriteLine("Choice {0} selected.", selection);
Console.WriteLine();
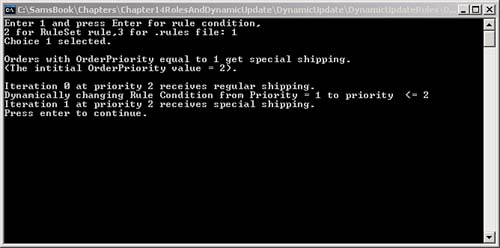
Now you will employ Dynamic Update to change the rule condition on the left branch of the IfElse activity. The initial value of the rule condition of the left branch is this.orderPriority == 1. The OrderPriority is passed in from the host as 2. Thus, the conditional will evaluate to false and regular shipping will be received. When the workflow reaches the Delay activity, it will persist. The host’s idled handler will be called, where the left branch rule condition will be set to "orderPriority <= 2". The rule will therefore evaluate to true on the next iteration and receive special shipping.
The IfElse activity will execute two times, because it is embedded in a While activity with the following code condition: Counter < 2.
Follow these steps to change a rule with Dynamic Update.
1. Add the code below the following comment in the Progam.cs Main method: Add Dynamic Update Selection Code here. This code passes in the property parameters to run scenario 1 (change rule condition via CodeDom).
// Dynamically changing rule condition via CodeDom
if (selection == "1")
{
Console.WriteLine(
"Orders with OrderPriority equal to 1 get special
shipping. ");
Console.WriteLine("(The initial OrderPriority value = 2)."
, orderPriority);
Console.WriteLine();
parameters.Add("OrderPriority", orderPriority);
}
2. Add the following code to the OnWorkflowIdled method. The code you enter over the next few steps will execute when the host idled event is triggered and you select option 1.
// Change the rule condition on the left-hand branch of the IfEsle
activity
// from orderPriority == 1 to orderPriority <= 2.
if (selection == "1" & !wasChanged)
{
}
3. Add the following code within the If {} brackets you entered in the preceding step. The code begins implementing Dynamic Update and is so far no different from what you have done earlier when using Dynamic Update to change the workflow activities and not the rules.
wasChanged = true;
Console.WriteLine("Dynamically changing Rule Condition from
Priority = 1 to priority <= 2");
// Retrieving a workflow instance and cloning it
WorkflowInstance workflowInstance = e.WorkflowInstance;
// Dynamic update of order rule
WorkflowChanges workflowchanges =
new WorkflowChanges(workflowInstance.GetWorkflowDefinition());
CompositeActivity workflowActivityToChange =
workflowchanges.TransientWorkflow;
4. Now we begin with the code specific to changing rules. Add the following code below the code you added in the preceding step. It retrieves the RuleDefinitionsProperty dependency property from the workflow being changed. The RuleDefinitionsProperty holds both the RuleSets and Conditions properties.
RuleDefinitions ruleDefinitions =
(RuleDefinitions)workflowActivityToChange.GetValue
(RuleDefinitions.RuleDefinitionsProperty);
5. Enter the following code below the code you just added to access the Conditions property of the RuleDefinitions property. This will provide you with a collection of all rule conditions in the workflow.
RuleConditionCollection ruleConditions =
ruleDefinitions.Conditions;
6. Enter the following code below the code you just added to select the BranchCondition rule condition from the collection of rule conditions and instantiate it as a RuleExpressionCondition. BranchCondition is the name of the rule condition in the left branch of the IfElse activity.
RuleExpressionCondition conditionBranchCondition =
(RuleExpressionCondition)ruleConditions["BranchCondition"];
7. Enter the following code below the code you just added to change the rule condition via the CodeDom. The conditionBranchCondition instantiated in the previous step is now instantiated as a CodeBinaryOperatorExpression. You have now entered the CodeDom, where the expression will be changed.
CodeBinaryOperatorExpression expression
= conditionBranchCondition.Expression as
CodeBinaryOperatorExpression;
8. Enter the following code below the code you just added to change the operator of the BranchCondition rule to less than or equal and the value compared to 2. When it is complete, you will have changed the BranchCondition rule condition from orderPriority == 1 to orderPriority <= 2. You can’t see it, but the expression is changed, just as if you entered the second expression yourself.
expression.Operator = CodeBinaryOperatorType.LessThanOrEqual;
expression.Right = new CodePrimitiveExpression(2);
9. Enter the following code below the code you just added to update the changes to the running workflow instance.
workflowInstance.ApplyWorkflowChanges(workflowchanges);
10. Run the workflow, enter 1 when prompted, and you should receive the results shown in Figure 15.6. The key is that regular shipping is received on the first iteration and special shipping on the second (the counter is 0-based, so the actual iteration values are 0 and 1).
![]()
Be careful when using Dynamic Update to change rules because neither tracking nor tracing shows that a rule has been changed. Both tracking and tracing still work, but the information they display does not tell you that a rule has been changed. This is problematic because changing rules can—and frequently should—alter workflow behavior. This may cause confusion and challenge auditability. For instance, why in a workflow that specifies orderReult == 1, does an order with a value of 2 receive special shipping?
Dynamic rules changes call for clear tracking that shows the rule was changed and what it was changed to. The tracking should also show when the outcome was changed because of Dynamic Update rule changes. There is a Diff method of the RuleDefinitions type that shows the differences between the original rules and the changed rules that could be used to show the differences. You could employ this from the place that Dynamic Update take place. It would still, however, be up to you to get the information to tracking and build other infrastructures. Some of these features may be reserved for Microsoft Rules Engine and BPM products.
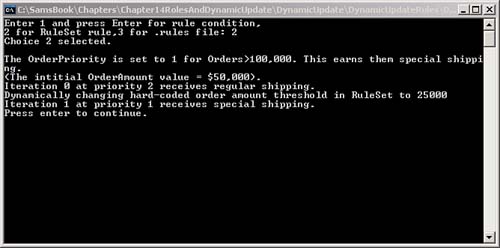
You can also change all elements of RuleSet rules. In this scenario, you will enable the Policy activity that sets the orderPriority to 1 for orders larger than 100,000 and to 2 for those that are less than 100,000. The OrderAmount is set to 50,000 and passed from the host to the workflow. Therefore, the first run sets the orderPriority to 2. The BranchCondition rule retains its default value (orderPrioroty == 1), causing the workflow to select the right branch of the IfElse activity and to supply regular shipping. When the workflow persists, the idled handler changes the RuleSet rule to set the priority to 1 for orders with an orderAmount > 25,000. This then produces special shipping on the second iteration.
1. If it is not already enabled, in the Workflow Designer, enable the SetOrderPriority activity.
2. Add the code shown in Listing 15.3 to the Program.cs Main method below the ending bracket of the if (selection == "1") if statement. This passes the proper parameters to run scenario 2 (change RuleSet rule via CodeDom).
LISTING 15.3 Changing a Rule in a .rules File with Dynamic Update
// Dynamically changing RuleSet rule condition via CodeDom
if (selection == "2")
{
Console.WriteLine(
"The OrderPriority is set to 1 for Orders>100,000. This earns them
special shipping.");
Console.Write("(The intitial OrderAmount value = $50,000)."
, orderPriority);
Console.WriteLine();
parameters.Add("OrderAmount", orderAmount);
}
3. Add the following code to the end of the OnWorkflowIdled method. It is explained directly following.
// If selection = 2, change RuleSet rule condition
if (selection == "2" & !wasChanged)
{
wasChanged = true;
Console.WriteLine("Dynamically changing hard-coded order amount
threshold in RuleSet to 25000");
// Retrieving a workflow isntance and cloning it
WorkflowInstance workflowInstance = e.WorkflowInstance;
// Dynamic update of order rule
WorkflowChanges workflowchanges =
new
WorkflowChanges(workflowInstance.GetWorkflowDefinition());
CompositeActivity workflowActivityToChange =
workflowchanges.TransientWorkflow;
RuleDefinitions ruleDefinitions =
(RuleDefinitions)workflowActivityToChange.GetValue(RuleDefinitions.RuleDefinitionsProperty);
RuleSet ruleSet =
ruleDefinitions.RuleSets["CalculateOrderPriority"];
foreach (Rule rule in ruleSet.Rules)
{
if (rule.Name == "SetPriority")
{
RuleExpressionCondition condition =
rule.Condition as RuleExpressionCondition;
CodeBinaryOperatorExpression expression
= condition.Expression as
CodeBinaryOperatorExpression;
//Resetting the hard-coded order amount threshold
expression.Right = new CodePrimitiveExpression(25000);
}
}
workflowInstance.ApplyWorkflowChanges(workflowchanges);
}
The code is identical to the code that changed the rule condition with three exceptions. First, the ruleDefinitions.RuleSets property is accessed instead of ruleDefinitions.Conditions property, because we are accessing RuleSet rules and not rule conditions. Second, the SetPriority rule is selected by iterating the rule in the ruleDefinitions.RuleSets collection. Finally, after the SetPriority rule is located, the CodeDom is used to change the condition from OrderAmount > 100000 to OrderAmount > 25000.
4. Run the workflow, enter 2 when prompted, and you should receive the results shown in Figure 15.7. The key again is that regular shipping is received on the first iteration and special shipping on the second. In this case, the BranchCondition rule condition remains orderPriority == 1. It is the SetPriority RuleSet rule that changes the value of the orderPriority from 2 to 1, which causes the “standard” BranchCondition rule evaluation to change from false to true.
![]()
Other RuleSet and rule attributes, such as whether the rule is active and whether the RuleSet supports forward chaining, can also be updated via the Rule and RuleSet types.
So far you have changed the RuleSet and Conditions properties via the CodeDom and then passed them to the WorkflowChanges object. A viable alternative approach is to change the .rules file that contains the serialized RuleSet and Conditions. From there, you can update the RuleSet or Conditions properties with the updated .rules file that contains the new values. This method can be used to support directly updating the .rules file to implement ad hoc changes or to fix bugs, for instance. As you saw in Hour 12, the RuleSet Dialog Editor can be rehosted. Using the RuleSet Dialog Editor or your own custom one, the .rules file could be edited by business users throughout the workflow life cycle. This may be appropriate for some long-running workflows that could then update the rules at each persistence point. Let’s begin.
Follow the next steps to change a rule in a .rules file.
1. Disable the SetOrderPriority activity.
2. Add the following code to the Program.cs Main method below the ending bracket of the if (selection == "2") if statement. This passes the proper parameters to run scenario 3 (change RuleSet rule via .rules file).
// Dynamically chnage RuleSet rule condition via .rules file
if (selection == "3")
{
Console.WriteLine("The OrderPriority is set to 1 for Orders >
100k which earns them special shipping.");
Console.Write("(The intitial OrderAmount value = $50,000).",
orderPriority);
Console.WriteLine();
parameters.Add("OrderAmount", orderAmount);
}
3. Add the following code to the end of the OnWorkflowIdled method. It is explained directly following:
// Update RuleSet rule via .rules file
if (selection == "3" & !wasChanged)
{
wasChanged = true;
Console.WriteLine("Dynamically changing hard-coded order amount
threshold in RuleSet to 25000");
// Retrieving a workflow isntance and cloning it
WorkflowInstance workflowInstance = e.WorkflowInstance;
// Next two lines serialize external rules into a type
WorkflowMarkupSerializer serializer =
new WorkflowMarkupSerializer();
XmlTextReader reader =
new
XmlTextReader(@"SamsWf24hrsHoursHour15DynamicUpdateDynamicUpdateRulesD
ynamicUpdateRulesManuallyUpdateRulesFile.rules");
WorkflowChanges workflowchanges =
new
WorkflowChanges(workflowInstance.GetWorkflowDefinition());
CompositeActivity workflowActivityToChange =
workflowchanges.TransientWorkflow;
// Get ruleDefinitions from exteranl rule
RuleDefinitions ruleDefinitions =
serializer.Deserialize(reader) as RuleDefinitions;
// Replace the current rules value DependencyProperty with
the value
// from the external rules.
workflowActivityToChange.SetValue(RuleDefinitions.RuleDefinitionsProperty,
ruleDefinitions);
workflowInstance.ApplyWorkflowChanges(workflowchanges);
}
There are two changes. A new WorkflowMarkupSerializer type is instantiated. The WorkflowMarkupSerializer type can serialize and deserialize XAML and .rules files (see the next note). In this case, it is used to deserialize the .rules file (convert it to a .NET type). The deserialized .rules file is then passed to an XmlTextReader type on the next line. The line of code shown next uses the WorkflowMarkupSerializer to deserialize the reader that contains the .rules file.
// Get ruleDefinitions from exteranl rule
RuleDefinitions ruleDefinitions = serializer.Deserialize(reader)
as RuleDefinitions;
![]()
WF’s two main formats are .NET types or XML, with the XML split between XAML and .rules formats. There are times it is needed or handy to convert between these formats, which is what WF does internally when a XAML workflow is complied at design time or received at runtime. The WorkflowMarkupSerializer type that permits this format conversion is not covered further in this book. See the applications in your sample directory WFTechnologiesMarkup if you are interested in learning more about WF serialization.
The rules in the RuleDefinitions property are now those contained in the .rules file (which presumably contains changes). When updating rules via the CodeDom, the initial RuleDefinitions was obtained from the RuleDefinitionsProperty dependency property.
RuleDefinitions ruleDefinitions =
(RuleDefinitions)workflowActivityToChange.GetValue
(RuleDefinitions.RuleDefinitionsProperty);
Finally, you update the DependencyProperty that holds the RuleDefinitions property as shown:
workflowActivityToChange.SetValue(RuleDefinitions.RuleDefinitionsProperty,
ruleDefinitions);
1. Browse to the ManuallyUpdateRulesFile.rules file in the C:SamsBookHoursHour15DynamicUpdateDynamicUpdateDynamicUpdateRulesDynamicUpdateRules directory and open the file with Notepad.
2. Search for 100000 and change the 100000 to 25000. Then save the file.
3. Run the workflow, enter 3 when prompted, and you should receive the results shown in Figure 15.8. The key again is that regular shipping is received on the first iteration and special shipping on the second. In this case, lowering the order threshold from 100,000 to 25,000 is done by changing the .rules file.

One of the WF developers at Microsoft created a sample application named Workflow Changes that adds visibility to Dynamic Update and integrates it with tracking in a similar manner to the WorkflowMonitor SDK sample demonstrated in Hour 5, “Creating an Escalation Workflow.” It demonstrates the kinds of applications that can be constructed by developers or that may be added by Microsoft and/or third parties using WF as a platform. The application itself does not appear ready for production use. It is shown again because of how well it expresses key WF potential application. There is no code in this section. If you want to learn more, you can follow a link to the application, which includes source code, at the end of this section.
The ability to update workflows midprocess is very powerful. However, our Dynamic Update implementation to date has lost a good deal of two of WF’s key features: design-time transparency and graphical construction. Runtime transparency has been maintained via tracking; however, even then the tracking display used leaves room for improvement.
The Workflow Changes application allows you to graphically modify running workflows using the same workflow designer used to create workflows in Visual Studio. Your changes are thereby reflected in the designer as you make them. The Workflow Changes application extends the design-time experience and transparency to runtime change. Let’s take a look at the Workflow Change application.
Figure 15.9 shows the main form. From this form you can select to view currently running or previously executed workflows. You can double-click one of the currently running workflows to bring it up in detail view. The difference (as shown in Figure 15.10) is that a menu appears across the top, where you can suspend, resume, terminate, or change the workflow. An activity toolbox and property windows also show up in a right pane, though they are not yet active.


After you select Change Workflow, the activity toolbox and property window are activated. What does this mean? You can add activities to this workflow instance from the toolbox as you normally do in Visual Studio. As shown in Figure 15.11, a Parallel activity was added, and a Suspend activity was placed in each branch.
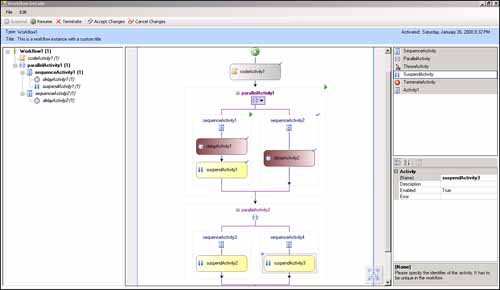
Now click the Accept Changes button, and all the Dynamic Update logic is handled behind the scenes. From the user standpoint, locate a workflow, add new activities, and apply the changes. You can even run the workflow from the UI by clicking the Resume button, which, as shown in the left pane of Figure 15.11, executes the remaining activities. Finally, you can view the results in tracking (not shown) so that the changes made to each workflow can be identified.
![]()
Some of you may have noticed that the activity toolbox contained only a subset of the standard WF activities. There was also a custom activity named Activity1. When rehosting the designer, you choose which activities to display and in many cases it is likely that many custom activities exist, such as Customer and Order, that allow business analysts to create simple workflows. Designer rehosting is not covered in this book. The workflow designer, though, is a Windows Control that can be hosted in a .NET 2.0 and later application. See the DesignerHosting SDK sample or the “Windows Workflow Foundation: Everything About Re-Hosting the Workflow Designer” article for more information on designer rehosting. The article comes with a comprehensive sample application that permits compilation, rules rehosting, and contains all WF OOB activities. In Hour 17, “Learning Advanced Hosting,” you will learn about the WF workflow loading methodology that can be used to process a workflow created in Visio or another modeling tool, which offers an alternative to designer rehosting.
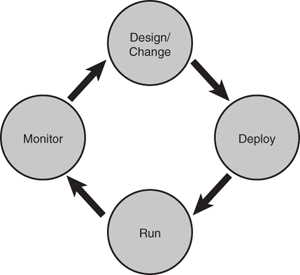
The Workflow Change application shows how a combination of WF features—Dynamic Update, designer rehosting, tracking, abstracted validation, general workflow designer transparency—combine to add efficiencies to the software development, run, modify, and deployment processes, as shown in Figure 15.12.
The concept of the Workflow Changes application is useful to permit business analysts and other nondevelopers to create simple workflows. It is also useful to developers as part of the general development process. The business analysts would have limited activities that allow for simpler, confined workflow creation. The developers would, on the other hand, have a richer set of activities and capabilities.
Here is the URL to the Workflow Change application if you want to learn more: http://wf.netfx3.com/files/folders/sample_applications/entry4074.aspx.
Dynamic Update is useful to change one, selected, all future, and other permutations of workflow instances at runtime or even thereafter. When adding and removing activities, the changes are reflected in tracking, which serves as an interesting versioning mechanism. When rules are changed, they are not reflected in tracking, which is unfortunate. It may, however, fall in the realm of a server product and not a workflow/rules platform to provide this functionality. Dynamic Update is fairly hard to use, and XAML-only workflows overlap in some areas. It will be interesting to see where Dynamic Update goes in future versions.