
Hour 4 Learning Host-Workflow Data Exchange
What You’ll Learn in This Hour:
![]() Overview of host-workflow data exchange
Overview of host-workflow data exchange
![]() Creating local service interface
Creating local service interface
![]() Creating an event argument payload
Creating an event argument payload
![]() Adding hosting logic to a Windows Form
Adding hosting logic to a Windows Form
![]() Creating a workflow with host-workflow communication activities
Creating a workflow with host-workflow communication activities
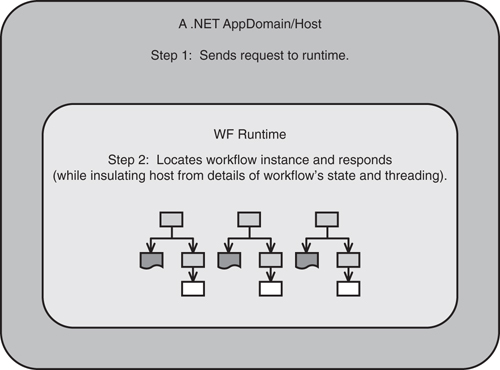
Although WF and therefore workflows run within the process space of the host, the host does not directly interact with a workflow instance. This may seem counterintuitive. After all, if the host application and workflow model are both .NET applications, why the need for an intermediary? The reason is that the WF runtime provides support services. The two main ones it provides are threading and reloading persisted workflows. When you call a workflow, the runtime accesses it for you and handles most threading details. Second, workflows sleep throughout most of their lifetime and are therefore persisted. The runtime receives the call and, if necessary, reloads the workflow and then transmits your request to it. For these reasons, and possibly others, host applications don’t, or at least shouldn’t, communicate directly with workflows.
Figure 4.1 illustrates the WF runtime brokering communication between hosts and workflows.
In this hour, we look at one type of host-workflow communication that is commonly referred to as external data exchange or local service. The reason is that this type of communication is conducted by a class that implements an interface that is, in turn, configured with an ExternalDataExchange attribute. There are other host-workflow communication options available in WF, including directly accessing its queuing system (discussed in Hour 22, “Creating Typed Queued and EventDriven-Enabled Activities,” on which all other host-workflow communication schemes are built.
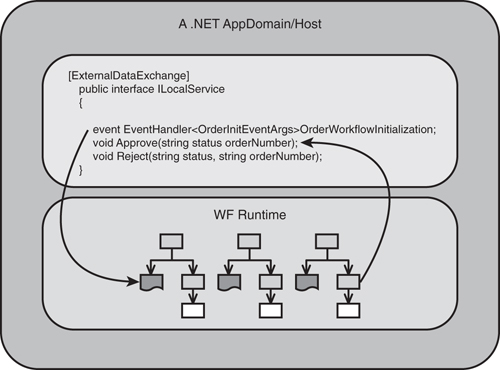
Figure 4.2 offers another view of the local service-based host-workflow data exchange. It shows the host and workflow being mediated by the local service in the middle. The local service contains a contract with a specific set of events and methods to facilitate a particular data exchange. The host raises events to communicate with the workflow, and the workflow invokes methods to communicate with the host. These can be thought of as custom events and methods created for one particular data exchange, such as sending an order to a workflow and waiting for the workflow to announce approval or rejection. These events are in addition to the standard workflow events, such as completed and idled, that are available to all workflows.
A Windows Forms application will be used as the host because most developers are familiar with them and they are simple to use. The general concepts, however, apply to just about any other application that hosts a workflow.
There are four steps in host-workflow communication:
1. Create a local service interface that acts as a host-workflow communication contract.
2. Create a specialized payload to transmit data from the host to the workflow.
3. Create a workflow with host-workflow-communication-centric activities.
4. Implement the local service interface in the host.
A couple of other adjunct steps, such as creating the runtime host and creating dependency properties, are also covered. Some of the headings are prefixed with Step 1, Step 2, and so on to help you know which topics directly relate to implementing local service-based host-workflow communication.
![]()
For those using the .NET 3.5, you should consider using the WCF Send and Receive activities in place of the method you learn to use in this hour. At the end of the book after using both, you can decide which method you prefer. You may also want to check the latest news at that time to see if Microsoft is indicating whether it will support both methods going forward equally, or one over the other.
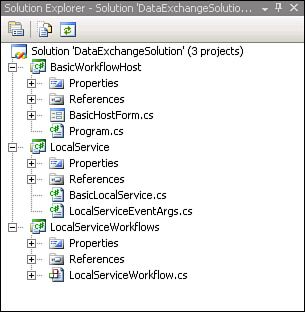
There are three projects in this solution. One will hold the Windows Forms host. Another will hold the local service interface that permits host-workflow communication. The third will hold the workflow that holds the WF local service-based communication activities. Factoring the projects out makes reuse easier.
Follow the next set of steps to create the solution.
1. Start Visual Studio 2008. Select File, New, Project.
2. Click on the plus to the left of Other Project Types.
3. Select the Visual Studio Solutions project template.
4. Enter DataExchangeSolution as the Name.
5. Enter or browse to C:SamsWf24hrsHoursHour04HostWorkflowDataExchange for the Location.
6. Click OK.
Follow the next set of steps to create a local service that controls communication between the host application and the workflow.
1. Right-click DataExchangeSolution in the Solution Explorer, and select Add, New Project.
2. Expand the Visual C# project templates and select Windows.
3. Select the Class Library project template.
4. Enter LocalService as the Name.
5. Enter or browse to C:SamsWf24hrsHoursHour04HostWorkflowDataExchangeDataExchangeSolution for the Location.
6. Click OK.
7. Rename Class1.cs to BasicLocalService.cs in the Solution Explorer. (If you are asked to rename all references in the project to reflect the name change, click Yes.)
8. Right-click the LocalService project in the Solution Explorer, select Add, Class, and name it LocalServiceEventArgs.cs.
9. Add a reference to the workflow trio as well (System.Workflow.Activities, System.Workflow.Runtime, and System.Worfklow.Componentmodel).
You add the workflow project to the solution in the next steps.
1. Right-click DataExchangeSolution in the Solution Explorer, and select Add, New Project.
2. Expand the Visual C# project templates and select Workflow.
3. Select the Sequential Workflow Library project template.
4. Enter LocalServiceWorkflows as the Name.
5. Enter or browse to C:SamsWf24hrsHoursHour04HostWorkflowDataExchangeDataExchangeSolution for the Location.
6. Click OK.
7. Rename Workflow1.cs to LocalServiceWorkflow.cs. (Click Yes to rename all references.)
8. Add a reference to the LocalService project.
Add the Windows Forms host project in the next steps.
1. Right-click DataExchangeSolution in the Solution Explorer, and select Add, New Project.
2. Expand the Visual C# project templates and select Windows.
3. Select the Windows Forms Application project template.
4. Enter BasicWorkflowHost as the Name.
5. Enter or browse to C:SamsWf24hrsHoursHour04HostWorkflowDataExchangeDataExchangeSolution for the Location.
6. Click OK.
7. Rename Form1.cs to BasicHostForm.cs in the Solution Explorer. Again, click Yes to rename all references.
8. Right-click the BasicWorkflowHost project in the Solution Explorer, select Add, Add a Reference to both the LocalServiceWorkflows and the LocalService projects.
9. Add a reference to the workflow trio as well (System.Workflow.Activities, System.Workflow.Runtime, and System.Worfklow.Componentmodel).
The local service interface contains the contract between the host and the workflow. The local service holds an ExternalDataExchange attribute, the events that will be raised against the workflow by the host, and the methods the workflow will invoke on the host. In the next steps you create a local service interface.
1. Open BasicLocalService.cs.
2. Replace the existing using directives with the ones shown next:
using System;
using System.Workflow.Activities;
using System.Workflow.Runtime;
3. Replace the class declaration with the following interface declaration that includes the ExternalDataExchange attribute. This is the attribute that tells the runtime that this interface performs host-workflow communication.
[ExternalDataExchange]
public interface ILocalService
{
}
4. Fill in the interface body with these event and method signatures:
void Approve(string status, string orderNumber);
void Reject(string status, string orderNumber);
event EventHandler<OrderInitEventArgs> OrderWorkflowInitialization;
5. The LocalService.cs class should look like Code Listing 4.1:
LISTING 4.1 LocalService.cs
using System;
using System.Workflow.Activities;
using System.Workflow.Runtime;
namespace LocalService
{
[ExternalDataExchange]
public interface ILocalService
{
void Approve(string status, string orderNumber);
void Reject(string status, string orderNumber);
event EventHandler<OrderInitEventArgs> OrderWorkflowInitialization;
}
}
You have now created a local service interface that contains two methods for workflow-to-host communication and one event for host-to-workflow communication. The events raised on the workflow are asynchronous, and the methods from the workflow are synchronous. Communicating with the workflow asynchronously is mandated so that the WF runtime’s threading and reloading services do not take place while the host is waiting for a response to its method call.
All local service-based event payloads are delivered by a class that is derived from ExternalDataEventArgs. Because WF may persist workflows, all event args payload classes (those derived from ExternalDataEventArgs) must be marked as serializable. The workflow instance id must be part of the payload because the WF runtime will need it to determine which workflow instance to route the event to. To ensure this the host must pass the workflow instance id in all events it raises on the workflow, and the event args class must contain the following statement in its constructor: : base(instanceId)
Follow the next steps to create the EventArgs class.
![]()
The standard WF runtime event payloads are also derived from ExternalDataEventArgs. They carry event-specific payloads. For instance, the completed event contains all public workflow variables and the terminated class contains exception information.
1. Open LocalServiceEventArgs.cs.
2. Replace the current using directives with the following:
using System;
using System.Workflow.Activities;
3. Replace the class declaration in the LocalServiceEventArgs.cs class with the following:
[Serializable]
public class OrderInitEventArgs : ExternalDataEventArgs
{
}
4. Add the following code within the OrderInitEventArgs class that defines a property to carry the order number:
private string orderNumber;
public string OrderNumber
{
get { return orderNumber; }
set { orderNumber = value; }
}
5. Add the constructor below the ending bracket of the OrderNumber property:
public OrderInitEventArgs(Guid instanceId, string number)
: base(instanceId)
{
orderNumber = number;
}
6. Your completed OrderInitEventArgs class should look like Listing 4.2.
LISTING 4.2 OrderInitEventArgs
using System;
using System.Workflow.Activities;
namespace LocalService
{
[Serializable]
public class OrderInitEventArgs : ExternalDataEventArgs
{
private string orderNumber;
public string OrderNumber
{
get { return orderNumber; }
set { orderNumber = value; }
}
public OrderInitEventArgs(Guid instanceId, string number)
: base(instanceId)
{
7. Right-click the LocalService project and select Build. Fix errors, if any.
Now it is time to connect the local service interface to the workflow. This is accomplished by using the HandleExternalEvent and CallExternalMethod activities. The HandleExternalEvent activity wraps to the events coming from the host to the workflow. The CallExternalMethod serves the same purpose for workflow-invoked methods on the host. These activities can be wired to any ExternalDataExchange-attributed interface accessible by the workflow project. This means the local service may be within the workflow project itself or in a project referenced by the workflow project. Before adding the communication activities, you will add a couple of properties as described in the next section.
The DependencyProperty is a .NET type that is heavily used in WF and WPF. They are essentially properties that contain a few advantages over standard .NET properties, such as data binding and event handling, which will be covered in Hour 20, “Creating Basic Custom Activities.” The one advantage relevant now is that they are stored more effectively because they do not allocate memory for blank values. Dependency properties are generally strongly typed to the type they are contained in and the type of property they are. For instance, the Customer DependencyProperty of type string in the Customer class is typed to both the Customer type and as a string member. There is a shortcut to add them so it takes no longer to add them than adding a standard .NET property. They are, however, quite verbose, which can make reading them and the classes they are contained in more difficult.
Let’s now create DependencyProperty variables that carry the approval information tracked by the workflow in the next steps:
1. Open the workflow code-beside file by right-clicking LocalServiceWorkflow.cs in the Solution Explorer and selecting View Code.
2. Create a DependencyProperty named OrderNo as follows:
A. Right-click below the constructor.
B. Select Insert Snippet.
C. Double-click the Other choice (skip to step D if using Visual Studio 2005).
D. Double-click the Workflow choice.
E. Double-click the Dependency Property—Property choice.
F. Replace the highlighted MyProperty text with OrderNo (leave the nonhighlighted Property in the suffix) and press Tab.
G. Press Enter to accept the string default and to leave the wizard (if the first Enter does not exit you from the wizard, press Enter again). You should see the code generated in Listing 4.3.
LISTING 4.3 OrderNo DependencyProperty
public static DependencyProperty OrderNoProperty =
DependencyProperty.Register("OrderNo",
typeof(string),
typeof(LocalServiceWorkflow));
[DescriptionAttribute("OrderNo")]
[CategoryAttribute("OrderNo Category")]
[BrowsableAttribute(true)]
[DesignerSerializationVisibilityAttribute(DesignerSerializationVisibility.Visible)]
public string OrderNo
{
get
{
return
((string)(base.GetValue(LocalServiceWorkflow.OrderNoProperty)));
}
set
{
base.SetValue(LocalServiceWorkflow.OrderNoProperty, value);
}
}
3. Create another DependencyProperty named Status as follows:
A. Right-click below the OrderNo DependencyProperty you just created (the entire DependencyProperty).
B. Select Insert Snippet.
C. Double-click the Other choice.
D. Double-click the Workflow choice.
E. Double-click the Dependency Property—Property choice.
F. Replace the highlighted MyProperty text with Status (leave the nonhighlighted Property in the suffix) and press Tab.
G. Press Enter to accept the string default and to leave the wizard. (If the first Enter does not exit you from the wizard, press Enter again.)
Now back to data exchange. Let’s add the HandleExternalEvent activities that receive the events in the next set of steps.
1. Double click on LocalServiceWorkflow in the solution explorer to open it in design mode.
2. Drag and drop a HandleExternalEvent activity onto the workflow and name it ReceiveOrder.
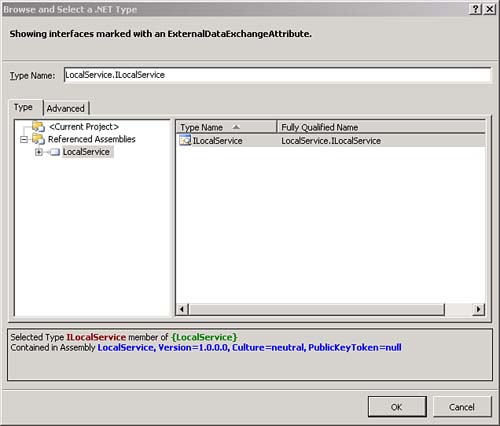
3. Click the InterfaceType property, then click the ellipsis, select LocalService, and then select ILocalService in the middle of the form.
![]()
If ILocalService does not show up, make sure the LocalService project is referenced and built. The easiest way is to add a new reference to it from the LocalServiceWorkflows project and build it again.
Your screen should look like Figure 4.4.
4. Click OK.
5. Click the drop-down in the EventName property and select the OrderWorkflowInitialization event.
6. Enter OrderInvoked in the Invoked property.
7. Enter the following code in the OrderInvoked handler to retrieve the OrderNumber from the event args.
// Retrieve the order number from the eventArgs
OrderNo = (e as LocalService.OrderInitEventArgs).OrderNumber;
8. Switch back to the workflow designer, and the ReceiveOrder activity property window should look like Figure 4.5.
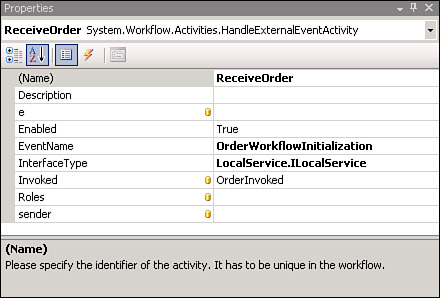
This activity is now wired to the OrderWorkflowInitialization event and will execute when the event is raised. In addition, the OrderInvoked method will be invoked after the event is raised and will be used to retrieve the OrderNo from the OrderInitEventArgs class.
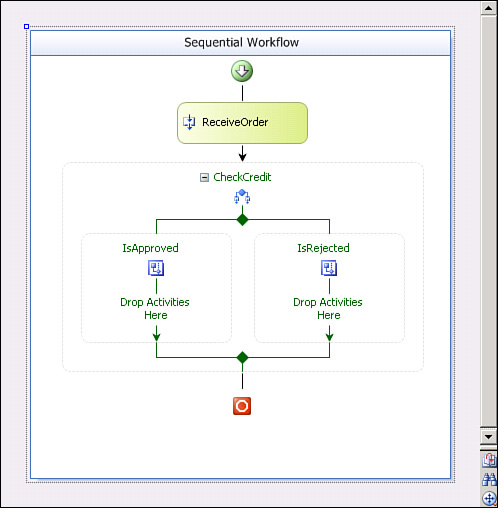
In the next steps you will add an IfElse activity and configure its rules.
1. Drag and drop an IfElse activity onto the workflow below the ReceiveOrder activity.
2. Name the IfElse activity CheckCredit, name the left branch IsApproved, and name the right branch IsRejected.
3. Click the red exclamation mark in the left branch, then click Property ‘Condition’ Is Not Set. You will now be into the Condition property ready to input a rule to determine whether this IfElseBranch should execute.
4. Click the drop-down in the Condition property and select Code Condition.
5. Click the + at the left of the Condition property, enter CheckOrderCondition in the Condition property, and press Enter.
6. You are placed in the CheckOrderCondition handler.
7. Enter the following code in the CheckOrderCondition handler to approve orders ending in 1:
if (OrderNo.EndsWith("1"))
e.Result = true;
else
e.Result = false;
8. Switch back to the workflow designer, and your workflow should now look like Figure 4.6.
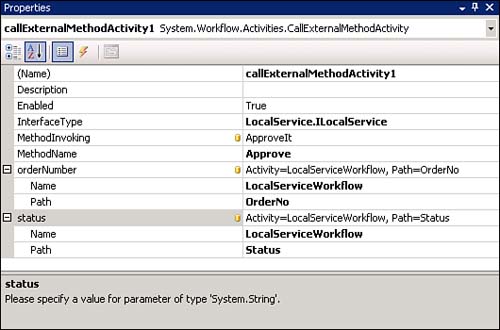
This is the activity that will invoke the Approve method that is part of the interface and will be added to the host. From a process standpoint, it will send approval to the host. In the next steps, you add the CallExternalMethod activity to approve the order.
1. Drag and drop a CallExternalMethod activity into the left IfElse activity branch.
2. Click the InterfaceType property, then click the ellipsis, select the LocalService, and then select ILocalService in the middle of the form.
4. Click the drop-down in the MethodName property and select the Approve method.
5. Enter ApproveIt into the MethodInvoking property (called before the approve method is called; thus it is a good place to perform preparatory work, such as initializing variables).
6. Enter the following in its code handler:
Status = "Approved";
7. Switch back to the workflow designer view.
8. Bind the OrderNo DependencyProperty to the orderNumber parameter by clicking the orderNumber property, then clicking its ellipsis, selecting OrderNo, and clicking OK.
9. Bind the Status DependencyProperty to the status parameter by clicking the status property, then clicking its ellipsis, selecting Status, and clicking OK.
10. Your CallExternalMethod activity property window should now look like Figure 4.7:
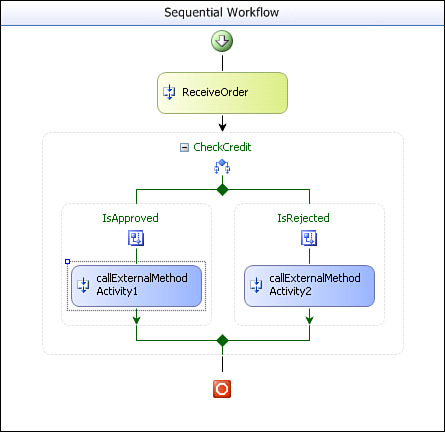
This is the activity that will invoke the Reject method that is part of the interface and will be added to the host. From a process standpoint it will send rejection to the host. In the next steps you add the CallExternalMethod activity that rejects the order.
1. Drag and drop a CallExternalMethod activity into the right IfElse activity branch.
2. Click the InterfaceType property, then click the ellipsis, select the LocalService, and then select ILocalService in the middle of the form.
3. Click OK.
4. Click the drop-down in the MethodName property and select the Reject method.
5. Enter RejectIt in the MethodInvoking property (called before the reject method is called; thus it is a good place to perform preparatory work, such as initializing variables).
6. Enter the following in its code handler:
Status = "Rejected";
7. Switch back to the workflow designer view.
8. Bind the OrderNo DependencyProperty to the orderNumber parameter by clicking on the orderNumber property, then clicking on its ellipsis, selecting OrderNo, and clicking OK.
9. Bind the Status DependencyProperty to the status parameter by clicking on the status property, then clicking on its ellipsis, selecting Status, and clicking OK.
10. Your workflow should now look like Figure 4.8:
11. Build your LocalServiceWorkflows project and fix compilation errors, if any.
12. The code in your workflow code-beside file should look like Listing 4.4:
LISTING 4.4 LocalServiceWorkflow Code-Beside File
using System;
using System.ComponentModel;
using System.ComponentModel.Design;
using System.Collections;
using System.Drawing;
using System.Workflow.ComponentModel.Compiler;
using System.Workflow.ComponentModel.Serialization;
using System.Workflow.ComponentModel;
using System.Workflow.ComponentModel.Design;
using System.Workflow.Runtime;
using System.Workflow.Activities;
using System.Workflow.Activities.Rules;
namespace LocalServiceWorkflows
{
public sealed partial class LocalServiceWorkflow: SequentialWorkflowActivity
{
public LocalServiceWorkflow( )
{
InitializeComponent( );
}
public static DependencyProperty OrderNoProperty =
DependencyProperty.Register("OrderNo",
typeof(string),
typeof(LocalServiceWorkflow));
[DescriptionAttribute("OrderNo")]
[CategoryAttribute("OrderNo Category")]
[BrowsableAttribute(true)]
[DesignerSerializationVisibilityAttribute(DesignerSerializationVisibility.Visible
)]
public string OrderNo
{
get
{
return
((string)(base.GetValue(LocalServiceWorkflow.OrderNoProperty)));
}
set
{
base.SetValue(LocalServiceWorkflow.OrderNoProperty, value);
}
}
public static DependencyProperty StatusProperty =
DependencyProperty.Register("Status",
typeof(string),
typeof(LocalServiceWorkflow));
[DescriptionAttribute("Status")]
[CategoryAttribute("Status Category")]
[BrowsableAttribute(true)]
[DesignerSerializationVisibilityAttribute(DesignerSerializationVisibility.Visible
)]
public string Status
{
get
{
return
((string)(base.GetValue(LocalServiceWorkflow.StatusProperty)));
}
set
{
base.SetValue(LocalServiceWorkflow.StatusProperty, value);
}
}
private void OrderInvoked(object sender, ExternalDataEventArgs e)
{
// Retreive the order number from the eventArgs
OrderNo = (e as LocalService.OrderInitEventArgs).OrderNumber;
}
private void CheckOrderCondition(object sender, ConditionalEventArgs e)
{
if (OrderNo.EndsWith("1"))
e.Result = true;
else
e.Result = false;
}
private void ApproveIt(object sender, EventArgs e)
{
Status = "Approved";
}
private void RejectIt(object sender, EventArgs e)
{
Status = "Rejected";
}
}
}
You will create a Windows Forms application that implements the local service interface you created. It will create the event args payload used by the local service and raise events to the host. Likewise it will act on the methods invoked by the workflow. It will also instantiate the WorkflowRuntime and create and start a WorkflowInstance as you saw in Hour 3, “Learning Basic Hosting.”
Whereas a Console Host application runs sequentially from beginning to end and then terminates, a Windows Forms application remains running until explicitly exited. The main implication of this is that you need to plan where you will instantiate the WorkflowRuntime. You do not want to do this each time an order is submitted. There needs to be only one WF runtime per application that will, in turn, run all the individual workflow instances.
Therefore, we are adding the runtime instantiation to the form load method, which is called only once in our application. For good measure and practice for other hosting scenarios, you first check to see if the runtime has already been instantiated. If so, you return the existing runtime. If not, you create a new runtime.
You also learn to use a new runtime service called the ExternalDataExchangeService. It is a container for one or more local services. You first add the ExternalDataExchangeService to the runtime and then add the local service you created to the ExternalDataExchangeService, as you will see shortly. We will add this service in code, but it can be added though configuration files as you did with the persistence service in Hour 3.
In the next steps you add controls to the form.
Over the next few subsections, you add the WF runtime to the Windows Forms host.
You need to prepare this form to be a host. It needs to implement the local service so it can exchange data with the workflow. It also needs WorkflowRuntime and WorkflowInstance variables and the other code to host the runtime and create and run a workflow. In many ways it will be similar to the host created from scratch earlier in Hour 3.
Follow the next steps to prepare the form host for runtime hosting.
1. Open BasicHostForm.cs in code view.
2. Add the following using directives below the existing ones:
using System.Workflow.Runtime;
using System.Workflow.Activities;
3. Change the class signature to incorporate the local service interface as shown:
public partial class BasicHostForm : Form,
LocalService.ILocalService
4. Add the following variable declarations below the constructor (the UpdateDelegate delegate will be explained shortly):
private WorkflowRuntime workflowRuntime;
private WorkflowInstance workflowInstance;
private delegate void UpdateDelegate( );
In the next steps, you add a method to and begin to instantiate the WF runtime.
1. Double-click the form to create the Form_Load handler and populate it with the code shown in the next snippet that calls a method that either instantiates a new WorkflowRuntime or returns an existing WorkflowRuntime:
// Get an existing workflow runtime or create a new one
workflowRuntime = GetWorkflowRuntime(workflowRuntime);
2. Add the GetWorkflowRuntime method signature below the Form_Load handler. The GetWorkflowRuntime method creates the WorkflowRuntime, registers runtime events with it, and adds runtime services to it:
private WorkflowRuntime GetWorkflowRuntime
(WorkflowRuntime WorkflowRuntime)
{
}
3. Add the logic to check whether the workflow runtime has already been instantiated inside the GetWorkflowRuntime method:
if (WorkflowRuntime == null)
{
}
4. Instantiate the runtime inside the if statement you just added:
workflowRuntime = new WorkflowRuntime( );
In the steps in this section, you register events and the local service with the WF runtime.
1. Below the code you just added, register the terminated event by entering "workflowRuntime.", then select WorkflowTerminated from the menu, press the spacebar, enter += and press Tab twice.
2. Add the ExternalDataExchangeService to the runtime below the event you just registered in the GetWorkflowRuntime method:
// Add the local service
ExternalDataExchangeService des = new
ExternalDataExchangeService( );
3. Add the local service to the ExternalDataExchangeService:
workflowRuntime.AddService(des);
// this implements the local service
des.AddService(this);
In this set of steps, you start the WF runtime and return it to the calling method.
1. Add code to start the runtime:
workflowRuntime.StartRuntime( );
2. Add code to return the runtime outside of the if statement scope as shown:
return workflowRuntime;
The GetWorkflowRuntime method should look like Listing 4.5.
LISTING 4.5 GetWorkflowRuntime Hosting Method
private WorkflowRuntime GetWorkflowRuntime
(WorkflowRuntime WorkflowRuntime)
{
if (WorkflowRuntime == null)
{
workflowRuntime = new WorkflowRuntime( );
// Set workflow event
workflowRuntime.WorkflowTerminated +=
new EventHandler<WorkflowTerminatedEventArgs>
(workflowRuntime_WorkflowTerminated);
//Add the local service
ExternalDataExchangeService des = new
ExternalDataExchangeService( );
workflowRuntime.AddService(des);
// this implements the local service
des.AddService(this);
workflowRuntime.StartRuntime( );
}
return workflowRuntime;
}
When you registered the terminated event, you also created an event handler for it. The reason you registered this one event is so that errors will be reported to you. There are quite a few moving parts between the workflow, local service, and host, and it is pretty easy to introduce an error that is hard to debug. Trapping this event makes it easier to know a problem exists and to identify what the problem is.
In the next step, you add code to the terminated event handler.
We finally go back to the host-workflow data exchange now that the host is set up.
Creating the workflow instance in the Windows Forms application is similar to doing so in a console host. Our workflow, though, differs in communication topology. You are no longer passing a dictionary object to the CreateWorkflow method. You are using local service-based communication.
Therefore, you have to raise an event to send the data to the workflow. The workflow contains a HandleExternalEvent activity as its first activity that is awaiting the event, although there will be one workflow runtime for the application. The user may create multiple workflow instances, which are created each time the user clicks the Submit button.
In the next steps, you add the logic to start the workflow instance when the Submit button is clicked.
1. Double-click the Submit button (buttonSubmitOrder) and add the following code to its handler:
// Create and start a workflow instance
workflowInstance = workflowRuntime.CreateWorkflow(typeof
(LocalServiceWorkflows.LocalServiceWorkflow));
workflowInstance.Start( );
2. Add the following code below the code you just added to create the event args payload to be delivered to the WF runtime:
// Pass the order number entered and raise the event specifed in
the local service
// that carries the payload defined in the order init event
argument class:
LocalService.OrderInitEventArgs eventArgs =
new LocalService.OrderInitEventArgs
(workflowInstance.InstanceId, textBoxOrderNumber.Text);
3. Raise the event to be captured by the initial HandleExternalEvent activity on the workflow and package the event args with it.
OrderWorkflowInitialization(null, eventArgs);
You need to implement the two methods and one event defined in the local service interface. The methods return either approved or rejected, which is passed to the form. Windows Forms controls, however, are not thread safe. Your workflow runs on a different thread than the Windows Form.
This book uses anonymous delegates (see MSDN or other sources if you want to learn more about anonymous delegates) to update the Windows Forms controls from the workflow threads. This is why you declared the UpdateDelegate at the top of this class. You enclose the changes to controls you want to make inside of the UpdateDelegate( ). This will become clearer when you see the code for the Approve and Reject methods shortly.
![]()
Threading is covered in Hour 17, “Learning Advanced Hosting,” and an option exists to run workflows on the same thread synchronously. This eliminates the need to account for cross-thread communication via delegate-based communication or other methods. I think you could make a fair argument that the synchronous threading is best suited for many UI scenarios.
1. Right before the end of the class declaration, implement the workflow event:
public event EventHandler<LocalService.OrderInitEventArgs>
OrderWorkflowInitialization;
2. Implement the methods that each update a textbox with the order status returned from the workflow:
public void Approve(string status, string orderNumber)
{
UpdateDelegate ud = delegate( )
{
textBoxStatus.Text = "Order No: " + orderNumber + " is " +
status;
};
this.Invoke(ud);
}
public void Reject(string status, string orderNumber)
{
UpdateDelegate ud = delegate( )
{
textBoxStatus.Text = "Order No: " + orderNumber + " is " +
status;
};
this.Invoke(ud);
}
3. Build the BasicWorkflowHost project and fix errors, if any.
4. The code in your form class should look like Listing 4.6.
LISTING 4.6 BasicHostForm Windows Forms Host
using System;
using System.Collections.Generic;
using System.ComponentModel;
using System.Data;
using System.Drawing;
using System.Linq;
using System.Text;
using System.Windows.Forms;
using System.Workflow.Runtime;
using System.Workflow.Activities;
namespace BasicWorkflowHost
{
public partial class BasicHostForm : Form, LocalService.ILocalService
{
public BasicHostForm( )
{
InitializeComponent( );
}
private WorkflowRuntime workflowRuntime;
private WorkflowInstance workflowInstance;
private delegate void UpdateDelegate( );
private void BasicHostForm_Load(object sender, EventArgs e)
{
// Get an existing workflow runtime or create a new one
workflowRuntime = GetWorkflowRuntime(workflowRuntime);
}
private WorkflowRuntime GetWorkflowRuntime
(WorkflowRuntime WorkflowRuntime)
{
if (WorkflowRuntime == null)
{
workflowRuntime = new WorkflowRuntime( );
workflowRuntime.WorkflowTerminated += new
EventHandler<WorkflowTerminatedEventArgs>(workflowRuntime_WorkflowTerminated);
// Add the local service
ExternalDataExchangeService des = new
ExternalDataExchangeService( );
workflowRuntime.AddService(des);
// this implements the local service
des.AddService(this);
workflowRuntime.StartRuntime( );
}
return workflowRuntime;
}
void workflowRuntime_WorkflowTerminated(object sender,
WorkflowTerminatedEventArgs e)
{
MessageBox.Show("Workflow terminated: " + e.Exception.Message);
}
private void buttonSubmitOrder_Click(object sender, EventArgs e)
{
// Create and start a workflow instance
workflowInstance = workflowRuntime.CreateWorkflow(typeof
(LocalServiceWorkflows.LocalServiceWorkflow));
workflowInstance.Start( );
// Pass the order number entered and raise the event specifed in the
local service
// that carries the payload defined in the order init event
argument class:
LocalService.OrderInitEventArgs eventArgs =
new LocalService.OrderInitEventArgs
(workflowInstance.InstanceId, textBoxOrderNumber.Text);
OrderWorkflowInitialization(null, eventArgs);
}
public event EventHandler<LocalService.OrderInitEventArgs>
OrderWorkflowInitialization;
public void Approve(string status, string orderNumber)
{
UpdateDelegate ud = delegate( )
{
textBoxStatus.Text = "Order No: " + orderNumber + " is " +
status;
};
this.Invoke(ud);
}
public void Reject(string status, string orderNumber)
{
UpdateDelegate ud = delegate( )
{
textBoxStatus.Text = "Order No: " + orderNumber + " is " +
status;
};
this.Invoke(ud);
}
}
}
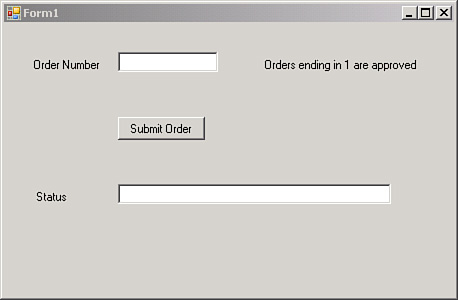
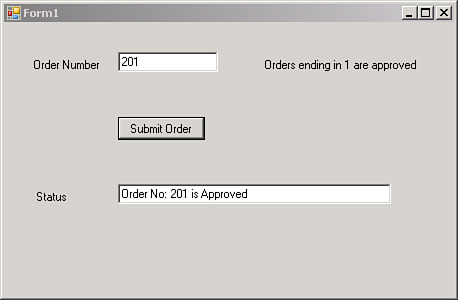
The project is rather simple. Entering an order number ending in 1 will result in approval. Any other ending number will conversely result in rejection.
In the next steps, you run the project.
You can now create a simple workflow, build a basic host, and perform mid-flight host-workflow communication. You used local services, event args classes, HandleExternalEvent activities, and CallExternalMethod activities to conduct mid-flight host-workflow communication. You also learned about the DependencyProperty type and hosting the WF runtime in a Windows Forms application. In the next hour you will build on what you learned in an application that supports escalation across multiple forms.