
Hour 6 Creating Basic State Machine Workflows
What You’ll Learn in This Hour:
![]() Overview of state machine workflows
Overview of state machine workflows
![]() Summary of main state machine workflow artifacts used to build state machine workflows in WF
Summary of main state machine workflow artifacts used to build state machine workflows in WF
![]() Build a simple state machine workflow and execute it
Build a simple state machine workflow and execute it
![]() Extend the workflow to be more useful and to use more features
Extend the workflow to be more useful and to use more features
You build a state machine workflow in this hour in two parts. In the first part, you create a basic workflow with single-level approval support. In the second, you add second-level approval and explore state retrieval and hierarchical states, which are a couple of the capabilities unique to state machine workflows. Additional advanced features will be covered in Hour 7, “Creating Advanced State Machine Workflows.”
The state machine will be connected to a Windows Form and rely on a local service for mediation. See Hour 4, “Learning Host-Workflow Data Exchange,” if you need help creating and/or implementing the local service.
State machines are a very common modeling technique—for both creating executing programs and static diagrams—built on process milestones and events. State machines are largely predicated on the notion that processes are dynamic and take many divergent paths to completion. This is why state machines are frequently associated with human-centric processes. In fact, one reason WF proclaims to offer human workflow is that it includes state machine workflow modeling. The state machine workflows in WF are similar to those offered in UML. The creators of WF saw the need to offer a state-based, event-driven workflow modeling option as well.
State machines are centered on two internal elements: states and events. The states are the business milestones or stages in the business process. In our ordering example, create, approval, distribution, and level-two approval are all states. Each state possesses one or more valid actions. The approval state, for example, contains approval and rejection actions. Structuring the process as a set of autonomous states that each contains a set of valid actions is what makes it so easy to transition to and from states throughout the process. No more effort is required to transition from the distribution state to the approval state than to follow the projected path from distribution to closed. In either case, the desired destination state must be specified. This more accurately captures the unfolding of real-world processes that, for instance, transition from create to approval to distribute, only to go back to an earlier state when last-minutes changes occur.
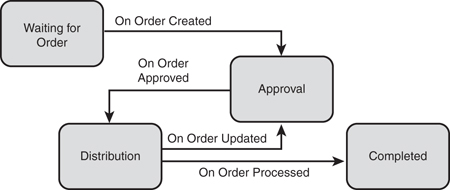
Figure 6.1 illustrates a generic state machine workflow. The business milestones are embodied in the states. Transitions between the milestones are identified in the lines that connect the milestones. Finally, the text represent the events that trigger the actions and potentially transitions. The states are first-class citizens. The current state is always unambiguous in a state machine workflow. This clarity carries over to the past and current valid transitions as well that are both readily extractable. This introspection capability is most powerful when the states are business milestones. This way, the current state is not only technically valuable but also contains business value.
Although state machines offer many compelling features, they also own a couple of well-known limitations:
The first is that they can be hard to comprehend and implement. Although they offer a solid implementation framework for many processes, it is frequently easier to look at a process sequentially in its logical execution path than to look at a set of self-standing states connected by a collection of lines that identify all possible routes. Business people particularly find them hard to understand.
Second, whereas state machine workflows represent a rather elegant solution to transition and monitor state, they can be hard to maintain and comprehend when many states and events exist. In fact, combinational explosion is a common term used to describe this phenomenon. Imagine Figure 6.1 outfitted with exception handling and more states, as would be the case in many real-world processes. Some workarounds exist, including a concept known as hierarchical states (covered later in this hour), that alleviate this problem.
Hours 8 to 10 demonstrate activities that can be placed on sequential and state machine workflows that provide data-driven control flow and a foreach-like activity with parallel capabilities. These advanced control flow activities allow sequential workflows to be much more dynamic than they could traditionally be. In Hours 20 to 24, you create your own custom activities, some of which control flow. WF, therefore, offers many alternatives and augmentations to the common sequential and state machine patterns, which underlie WF’s flexibility.
There are six main components to a state machine workflow activity (there are others to the state machine workflow instance):
![]() The
The StateMachineWorkflowActivity encompasses the entire workflow. The StateMachineWorkflowActivity serves the same purpose to state machine workflows that the SequentialWorkflowActivity provides to sequential workflows. It is the outermost activity that all other workflow activities are placed into to compose the workflow.
![]() The
The State activity makes up half the cornerstone of the state machine workflow. The business milestones in the process, such as approval, second-level approval, and distribution, are all represented as State activities on a state machine workflow.
![]() The other half of the cornerstone of the state machine workflow, the
The other half of the cornerstone of the state machine workflow, the EventDriven activity, holds the events in each state. For instance, both approval and rejection are events within the approval state. EventDriven activities in state machine workflow are nearly identical to their sequential workflow counterparts in the branches in Listen activities. (The activity contains multiple branches that require that the first activity inserted be a blocking activity, such as HandleExternalEvent or Delay.)
![]() The
The SetState activity updates the TargetStateName property and therefore is responsible for transitioning among states.
![]()
StateInitialization activities are essentially sequence activities that permit a collection of activities (no blocking or Listen activities) to be included. These activities provide whatever preprocessing is necessary when the state is transitioned to. Sample usage scenarios include passing information to the calling program upon entering the state, checking roles, and instantiating counters.
![]()
StateFinalization activities permit actions to be conducted when a state is transitioned away from. Otherwise, they are identical to StateInitialization activities.
These are the basics of state machine workflows. Next, you create one.
The Windows Form and local service projects are already created. You will add a workflow project to the solution that utilizes these existing projects in the next steps.
1. Open the BasicStateMachineWorkflowSolution solution in the c:SamsWf24hrsHoursHour06StateMachineWorkflowLab1BasicStateMAchineWorkflowSolution directory, right click on the solution, and select Add, and New Project.
2. Click the + to expand Visual C# Project Templates, select Workflow on the left pane, and choose the State Machine Workflow Library project template. Name the project BasicStateMachineWorkflows.
3. Rename Worklflow1.cs StateMachineWorkflowBasic.cs.
4. Add a reference to the BasicStateMachineLocalServices project.
5. Add a reference to System.Windows.Forms.
In this section, you create the state machine workflow.
In the next steps you perform preparatory work, such as adding a reference.
1. Add a reference from BasicStateMachineWindowsForm to the BasicStateMachineWorkflows project.
2. Open StateMachineWorkflowBasic.cs and add the following code to initialize variables below the constructor.
private string orderNumber;
private double orderAmount;
const double level2OrderAmount = 1000;
3. Add the following using directive:
using System.Windows.Forms;
First, look at the workflow designer; it is different from the one used so far to create sequential workflows. It is a free-form designer that permits State activities to be added in any location. The states will then be connected through lines among the events contained in the states. The x and y coordinate and event connections are tracked in a .layout file with the same name as the workflow.
The workflow is prepopulated with one State activity, the initial state. Click the workflow surface (not the initial state) and look at the properties. The InitialName property is set to the name of the State that was automatically added to the workflow. This State is entered when the workflow is started. In this exercise, you add two other states. One is the completed state, a special state that signifies the end of a state machine workflow. After a state machine workflow arrives at the Completed state, it is finished. No other activities can be inserted into this state. You will also add an approval state that represents a typical state that lies between the created and completed states.
In the next steps, you will add completed and approval states to the workflow.
1. Click the State activity added with the workflow and set its name to Initial.
2. Click the workflow surface and select the drop-down in the workflow InitialStateName property and set it to the Initial state. (This is a workflow-level property that points to a State activity. It is not a property set on a State activity, as might be expected.)
3. Drag and drop a State activity onto the workflow to the right of the existing State activity and set its Name property to Approval.
4. Add another State activity below the State activity you just added and set its Name property to Completed.
5. Click the workflow surface and select the drop-down in the workflow CompletedStateName property and set it to the Completed state. (This again is a workflow-level property.)
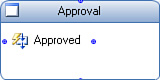
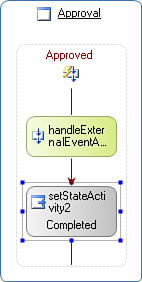
6. Add an EventDriven activity into the Approval state and name it Approved. The Approval State should now look like Figure 6.2.
7. Now add another EventDriven activity to the Approval state and name it Rejected.
8. Add another EventDriven activity, and this time drop it in the Initial state and name it Created.
Although most of the emphasis and much of the planning revolves around the states and events, specifying the logic that occurs after an event’s capture is where much of the work lies. Luckily, there’s not much new to you because the logic is encapsulated in an EventDriven activity. In sequential workflows, you worked with EventDriven activities when using the Listen activity.
The State activity requires that its immediate child be an EventDriven activity. The EventDriven activity requires its immediate child to be a blocking activity (for example, Delay or HandleExternalEvent). After the initial blocking activity, you may insert any other activities you can place in an EventDriven activity not embedded in a State activity with one exception. There can only be one blocking activity in the entire EventDriven. This is so, because state machine workflows are supposed to wait for events, act on them quickly, and then move to the next state. They are inhibited from doing this when being blocked.
Most of the work done in this section should be familiar because you are wiring the workflow and host together. The SetState activity used at the end is a simple activity where you specify the name of the next state to transition.
In the next steps, you will add child activities to the EventDriven activity, including a HandleExternalEvent activity that you associate with a local service.
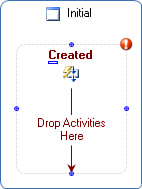
1. Double-click the Created EventDriven activity. Your workflow should now look like Figure 6.4.
2. Add a HandleExternalEvent activity to the EventDriven activity that appears (note the breadcrumb navigation at the top of the form if you need to return to the overall workflow form).
3. Click the HandleExternalEvent activity, click the ellipsis in its InterfaceType property, click BasicStateMachineLocalServices, and select ILocalService in the middle of the form. Your screen should now look like Figure 6.5.

4. Click OK.
5. Click the drop-down in its EventName property and set it to the OrderWorkflowInitalization event.
6. Enter CreatedInvoked in the Invoked property, and then enter the following code in the handler to retrieve the order number from the event args and display a message:
// Retrieve the order number and amount from the eventArgs
orderNumber = (e as
BasicStateMachineLocalServices.OrderEventArgs).OrderNumber;
orderAmount = (e as
BasicStateMachineLocalServices.OrderEventArgs).OrderAmount;
MessageBox.Show
("Order number " + orderNumber + " has been created.");
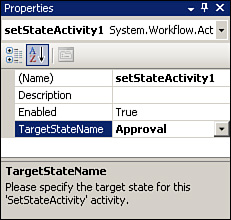
7. In the designer, add a SetState activity directly below the HandleExternalEvent activity.
8. Click the drop-down in its TargetStateName property and set it to Approval.
You added a State activity, added an EventDriven activity to the State activity, and configured the EventDriven to act on an event. Then you added another child activity that transitions the workflow to another state. You may add additional logic in the EventDriven, but this covers the basic pattern to receive an event and transition to another state.
Each State activity can hold StateInitialization and StateFinalization activities in addition to EventDriven activities. These activities may hold any nonblocking activities (Sequence activities constrained to prohibit blocking activities). The StateInitialization and StateFinalization activities are entered when the state itself is entered and exited. The StateInitalization activity can, for example, be used to check roles at the state level rather than the event level (roles are covered in Hour 14, “Working with Roles”). User-specified tracking information can be specified here as well (user-specified tracking is covered in Hour 13, “Learning to Track Workflows”). These are a couple of sample usages. You can, however, use both initialization and finalization for any pre- or post-State activity work you see fit. Initialization and finalization activities may be inserted in any State activity other than the completed state, which may include no activities.
1. Add a StateInitialization activity to the Initial state and name it InitalizeCreateState. The Initial activity should look like Figure 6.7.

2. Double-click the InitalizeCreateState activity, and you should be taken to a new form with what appears to be a sequence activity that you can add other activities into.
3. Add a Code activity and name it PerformInitialization. Double-click the activity and enter the following in its handler:
MessageBox.Show
("State machine in Created state initalization.");
In the steps in this section, you will configure the approved order event, which mainly entails associating a HandleExternalEvent activity with a local service interface.
1. Double-click the Approved event in the Approval State.
2. Add a HandleExternalEvent activity to the EventDriven activity.
3. Click the HandleExternalEvent activity, click the ellipsis in its InterfaceType property, click BasicStateMachineLocalServices, and select ILocalService in the middle of the form. Then click OK.
4. Click the drop-down in its EventName property and set it to the OrderWorkflowApproved event.
5. Enter ApprovedInvoked in the Invoked property and enter the following code in the handler to display a message:
MessageBox.Show("Order number " + orderNumber + " has been
approved.");
6. Add a SetState activity directly below the HandleExternalEvent activity.
7. Click the drop-down in its TargetStateName property and set it to the Completed state.
8. Your completed EventDriven activity should look like Figure 6.8.
In this section, you will configure the Rejected event.
1. Double-click the Rejected event in the Approval State activity.
2. Add a HandleExternalEvent activity to the EventDriven activity.
3. Click the HandleExternalEvent activity, click the ellipsis in its InterfaceType property, click BasicStateMachineLocalServices, and select ILocalService in the middle of the form. Then Click OK.
4. Click the drop-down in its EventName property and set it to the OrderWorkflowRejected event.
5. Enter RejectedInvoked in the Invoked property and enter the following code in the handler to display a message:
MessageBox.Show("Order number " + orderNumber + " has been
rejected.");
6. Add a SetState activity directly below the HandleExternalEvent activity.
7. Click the drop-down in its TargetStateName property and set it to the Completed state.
The code in your workflow file to support the invoked methods should look like Listing 6.1.
LISTING 6.1 Invoked State Machine Workflow Handlers
private string orderNumber;
private double orderAmount;
const double level2OrderAmount = 1000;
private void CreatedInvoked(object sender, ExternalDataEventArgs e)
{
// Retreive the order number from the eventArgs
orderNumber =
(e as
BasicStateMachineLocalServices.OrderEventArgs).OrderNumber;
orderAmount =
(e as
BasicStateMachineLocalServices.OrderEventArgs).OrderAmount;
MessageBox.Show("Order number " + orderNumber + " has been
created.");
}
private void PerformInitialization_ExecuteCode(object sender, EventArgs e)
{
MessageBox.Show
("State machine in Created state initalization.");
}
private void ApprovedInvoked(object sender, ExternalDataEventArgs e)
{
MessageBox.Show("Order number " + orderNumber + " has been
approved.");
}
private void RejectedInvoked(object sender, ExternalDataEventArgs e)
{
MessageBox.Show("Order number " + orderNumber + " has been
rejected.");
}
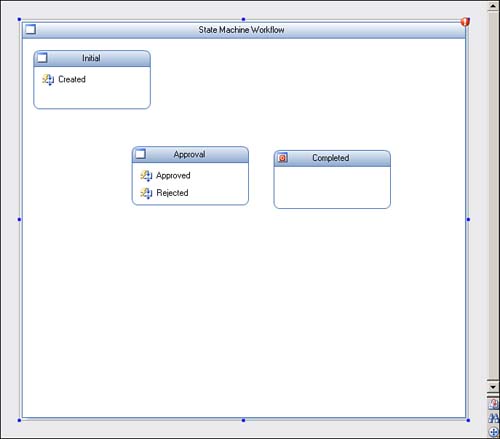
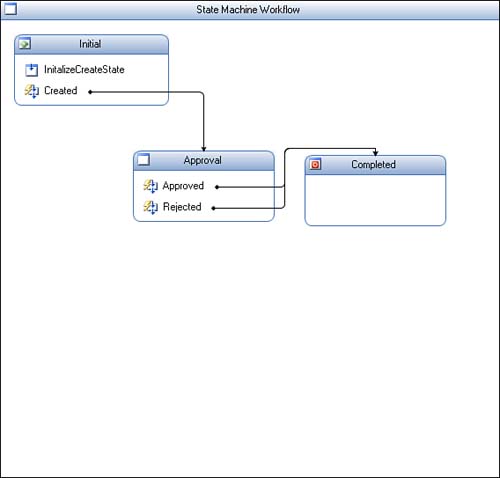
That’s it. You just created a state machine workflow. The states and events can be seen in Figure 6.9. There are also three EventDriven activities behind the states that contain the logic. State machine workflows in many ways are inverse sequential workflows. State machine workflows surround sequential logic with events, whereas sequential workflows surround events with sequential logic.
In summary, the steps to create a state machine workflow are as follows:
1. Add a State activity.
2. Insert an EventDriven activity in the State activity.
3. Add a HandleExternalEvent activity to the EventDriven activity, and wire it up to the local service.
4. Add a SetState activity and tell it what State to transition to.
Most of the work revolves around thinking though the states and events. We will enhance this workflow quite a bit functionally and will add many other state machine workflow features, but that’s the basics.
Follow the next steps to run the workflow two times, the first time approving the order and the second rejecting it.
1. Press F5 to run the project. You should see the form shown in Figure 6.10.
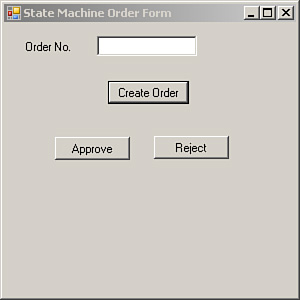
2. Enter an order number and amount and click the Create Order button.
3. Click OK in the Order Created dialog box.
4. Click the Approve button and click OK in the Approved Order dialog box.
5. Repeat steps 3 and 4 and click the Reject button this time to reject the order.
Let’s modify our workflow to allow second-level approval and add a distribution state so you can see how a slightly more advanced state machine looks, which involves adding more events. You will perform the following three items that rely on new concepts:
![]() Create combined, or hierarchical, states, which are designed to combat the number of events growing out of control, by allowing cross-state access. For instance, order update may be an appropriate action from multiple states, and order cancellation may be appropriate from all states.
Create combined, or hierarchical, states, which are designed to combat the number of events growing out of control, by allowing cross-state access. For instance, order update may be an appropriate action from multiple states, and order cancellation may be appropriate from all states.
![]() Use the
Use the StateMachineWorkflowInstance type to introspect a state machine workflow.
![]() Add logic within the
Add logic within the EventDriven of a State activity to determine which state to transition to.
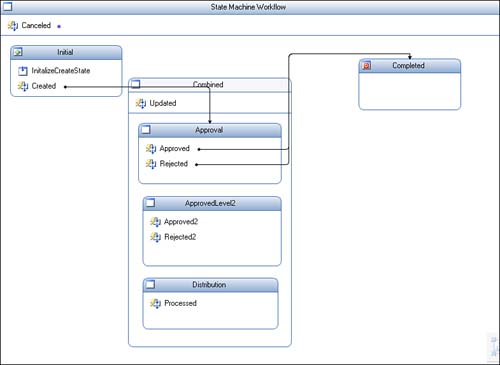
Figure 6.11 contains an illustration of what the enhanced workflow looks like.
You will add states, configure event driven activities, and use more advanced control flow to determine the next state in this section’s subsections.
In the following steps, you add the additional State and EventDriven activities to the workflow.
1. Open the BasicStateMachineWorkflowSolution solution in the C:SamsWf24hrsHourHour06StateMachineWorkflowLab2BasicStateMAchineWorkflowSolution directory. The form and the local service have both been updated for the enhanced state machine workflow.
Add a new State and name it ApprovalLevel2.
2. Add a new State and name it Distribution.
3. Add a new State and name it Combined.
4. Add two EventDriven activities to the ApprovalLevel2 state. Name the first Approved2 and the second Rejected2.
5. Add an EventDrivenActivity to the Distribution state and name it Processed.
6. Populate the Combined state with the other states it will share events with.
7. Drag and drop the Approval state into the Combined state.
8. Drag and drop the ApprovalLevel2 state into the Combined state.
9. Drag and drop the Distribution state into the Combined state.
10. Now add an EventDriven activity to the CombinedOrderState and name it Updated. This event will be valid from any state in the Combined state.
11. Add another EventDriven activity and insert it directly into the workflow. Name this event Canceled. This event is valid from any state on the workflow.
Now the updated state machine workflow is modeled. The CombinedOrder state contains three State activities and one direct event. The events contained in its child states are exclusive to their respective states. The EventDriven that is added to the Combined state is available to all three states. The Canceled event is available from all workflow states. This means that the valid events for any state in the Combined state are its respective states plus the Canceled and Updated events. Valid events for other states are their individual events plus the Canceled event. Although the sample uses only one level of hierarchy, no limit exists on hierarchical state nesting.
In the next steps, you have to configure the new HandleExternalEvent activities and add SetState activities. The local service interface and form have been updated for you.
1. Double-click the Canceled event that is located in the workflow itself.
2. Add a HandleExternalEvent activity to the EventDriven activity.
3. Click the HandleExternalEvent activity, click the ellipsis in its InterfaceType property, click BasicStateMachineLocalServices, and select ILocalService in the middle of the form. Then click OK.
4. Click the drop-down in its EventName property and set it to the OrderWorkflowCanceled event.
5. Enter CanceledInvoked in the Invoked property and enter the following code in the handler to display a message:
MessageBox.Show("Order number " + orderNumber + " has been
canceled.");
6. Add a SetState activity directly below the HandleExternalEvent activity.
7. Click the drop-down in its TargetStateName property and set it to the Completed state.
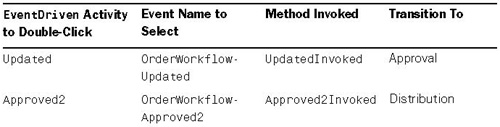
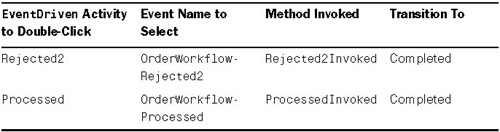
8. Repeat steps 1–8 using Table 6.1 for guidance (change the message in the invoked event to reflect the event that fires):
All previous state transitions had a one-to-one relationship with the event they are triggered from. The approved event, however, has two possible transitions. Order values less than or equal to $1,000 move to the processing state, whereas those that are larger move on to second-hand approval. This is conducted in the next steps by adding an IfElse activity after the initial HandleExternalEvent activity in the EventDriven. As previously mentioned, pretty much any activity that can be added to a Sequence activity can be added following the initial blocking activity.
1. Double-click the Approved event.
2. Add an IfElse activity below the HandleExternalEvent activity and name it CheckOrderAmount.
3. Name its left branch LessThanApprovalThreshHold and the right branch Else.
4. Click the drop-down in the left branch Condition property and select code condition.
5. Click the + and enter OrderLimit in the Condition property.
6. Enter the following code in the handler:
if (orderAmount <= level2OrderAmount)
e.Result = true;
else
e.Result = false;
7. Add a new SetState activity to the left branch and add the existing one to the right branch.
8. Click the drop-down in its TargetStateName property in the left branch and set it to the Distribution state.
9. Click the drop-down in its TargetStateName property in the right branch and ensure that it is set to the ApprovalLevel2 state.
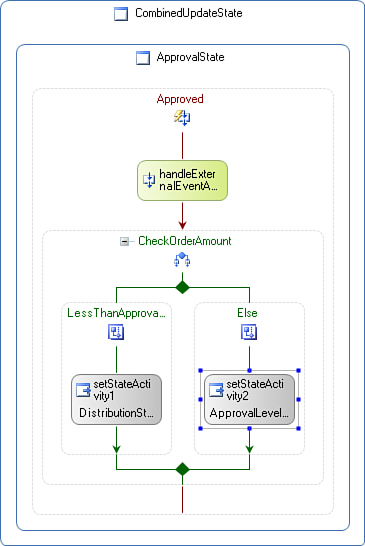
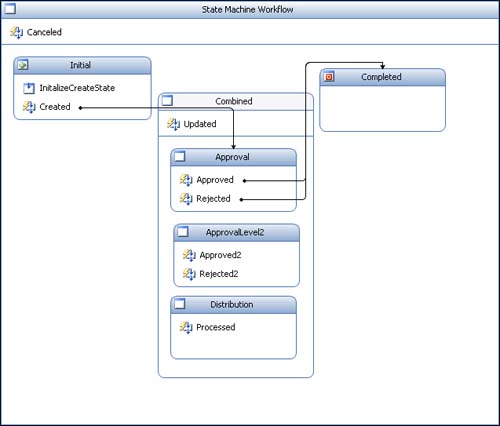
The completed, enhanced state machine workflow should look like Figure 6.14.
The StateMachineWorkflowInstance is a class that accepts the current workflow runtime and workflow instance ID as parameters and provides access to an object with a number of useful members when working with state machine workflows.
To make it easier to know which buttons are valid on the order form, the current state is displayed in the current state text box. The labels next to the buttons describe from which states they are available. This aid can be used for all states except the created state. (In the next hour you learn to dim the buttons to match the valid states. This is a temporary workaround.) The state is extracted when the workflow is idled (in the idled method), which it is, of course, when the workflow is waiting for the next button to be selected on the form.
Follow the next steps to add additional controls to the form to use the StateMachineWorkflowInstance type to track the workflows behavior.
1. Add a text box to the form and name it textBoxCurrentState and add a label above it named Current State.
2. Add the code in the next snippet to the BasicStateMachineWindowsForm.cs file to the workflowRuntime_WorkflowIdled event handler:
StateMachineWorkflowInstance stateMachineInstance =
new StateMachineWorkflowInstance(workflowRuntime,
workflowInstance.InstanceId);
UpdateDelegate ud = delegate( )
{
// Update the workflow state on the form thread
if (stateMachineInstance.CurrentState != null)
textBoxCurrentState.Text =
stateMachineInstance.CurrentStateName;
else
textBoxCurrentState.Text = "";
};
this.Invoke(ud);
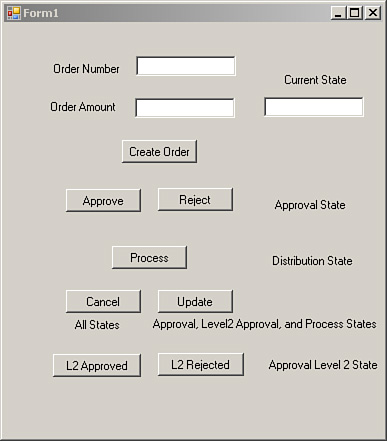
Follow the steps to run the enhanced state machine workflow twice, once with an amount under $1,000 and once with an amount over. The first will result in direct approval and the latter will traverse the level 2 and distribution states as well.
1. Press F5 to run the project.
You should see the form shown in Figure 6.15.

2. Enter an order amount less than $1,000 to go from approval to distribution to completed (assuming approved and not rejected is selected).
3. Enter an order amount larger than $1,000 to go from the approval state to the approval level 2 state to the distribution state and finally to the completed state.
In this hour, you created a very simple state machine workflow and then enhanced it to a more reasonable workflow and extended the features. States and EventDriven activities are key components when you create state machine workflows. The StateMachineWorkflowInstance allows for the introspection of running state machine workflows. WF’s support for both sequential and state machine workflows offers a powerful combination not found in many other workflows products, which usually feature one or the other. State machine workflows (and other WF activities) allow WF to better support human-centric, dynamic workflows. More state machine workflow features will be explored in the next hour.