
Hour 21 Creating Queued Activities
What You Will Learn in This Hour:
![]() Overview of activity life cycle topics
Overview of activity life cycle topics
![]() Basic queued activity
Basic queued activity
![]() Queued activity from service
Queued activity from service
This hour covers creating custom activities that execute across more than one burst. Out-of-the-box activities, including the HandleExternalEvent and Delay, exemplify multiburst activities. In their first burst, they create a queue and register a handler with the queue. They then enter an idle state. When their idle state ends—because of an event receipt or timer expiration—they enter their second burst of execution. These types of multiburst executing activities are vital to WF because through them comes much of WF’s ability to provide state support to long-lived processes. You will then enable multiburst activities to be the first child in EventDriven activities. Listen activity branches and State activities are sample EventDriven activities.
Following are a couple of figures to give a conceptual understanding of single- and multiburst activities.
Figure 21.1 illustrates the life cycle of a single-burst activity that transitions from initialized to executing to closed.

Figure 21.2 demonstrates the life cycle of a multiburst activity. It sets up a queue in its Execute method, idles, and then resumes when the queue is updated.

Queued activities are very life cycle- and thread-centric. Implementing queued activities requires understanding more of WF’s internal operations. Therefore, some of these operations are summarized before we dive into queued activity development. The topics explained in this section are somewhat complex and abstract. If you do not get them on your first reading, go through the exercises and then come back to them. The next two subsections describe the WorkflowQueue type and ActivityExecutionContext, in that order.
All WF host-workflow communication is built on the WorkflowQueue type. The WorkflowQueue type is a named location (or queue) that can respond to events and receive data. When a named queue is triggered, the WF runtime locates the workflow instance associated with the named queue. If the workflow instance is dehydrated in a persistence store, the WF runtime reactivates it. Then the WF runtime delivers the data to the workflow instance.
All WF host-workflow communication is built on this queuing infrastructure, including the ExternalDataExchange communication used throughout this book. The actual named queues receiving the events are hidden from you when using ExternalDataExchange, Web Services, and Windows Communication Foundation for host-workflow communication.
When working with multiburst activities, you work directly with named queues. There is no abstraction layer built on top of them. The multiburst activities will create a named queue, idle, and then receive the data placed into the named queue. This hour teaches you to use named queues in the context of multiburst activities. However, what you learn is relevant to using named queues in other scenarios as well. Because all other host-workflow communication capabilities are built on top of named queues, there may be times that one of their implementations does not perform a particular task you need that can be obtained by going directly to the named queues. More so, some prefer to cut out the middlemen and to use the underlying named queues for all host-workflow communication, or to build their own communication abstraction on top.
ActivityExecutionContext is the container in which the activity executes. Many of the operations a custom activity performs require it to access the ActivityExecutionContext parameter received in its Execute method. As you saw last hour, custom code can be written in the Execute method that accesses a database and retrieves a customer, for instance. However, many custom activities will use the ActivityExecutionContext for the following reasons:
![]() To access out-of-the-box and custom runtime services (see the “Custom Activity Queued from Service” section) registered with the runtime. The WorkflowQueuingService, for instance, is retrieved from the
To access out-of-the-box and custom runtime services (see the “Custom Activity Queued from Service” section) registered with the runtime. The WorkflowQueuingService, for instance, is retrieved from the ActivityExecutionContext to create WorkflowQueue objects when working with multiburst activities.
![]() To allow logic in multiburst activities to process on a different thread while the activity returns control to the runtime (see the “Custom Activity Queued from Service” section).
To allow logic in multiburst activities to process on a different thread while the activity returns control to the runtime (see the “Custom Activity Queued from Service” section).
![]() To move logic from the execute method to services that can be accessed for architectural and maintenance reasons. No samples are directly provided, but the “Custom Activity Queued from Service” section offers the framework.
To move logic from the execute method to services that can be accessed for architectural and maintenance reasons. No samples are directly provided, but the “Custom Activity Queued from Service” section offers the framework.
![]() When working with composite activities (see Hour 23, “Creating Control Flow Activities Session 1,” and Hour 24, “Creating Control Flow Activities Session 2”) to access and control child activities.
When working with composite activities (see Hour 23, “Creating Control Flow Activities Session 1,” and Hour 24, “Creating Control Flow Activities Session 2”) to access and control child activities.
![]() To call its
To call its CloseActivity method when working with multiburst and composite activities (see the “Basic Custom Queued Activity” section).
![]() To spawn unique
To spawn unique ActivityExecutionContexts and to place them in the ActivityExecutionContextManager collection when creating custom activities that execute the same child activity more than once (for example, While and Replicator). Creating unique ActivityExecutionContexts is not covered in this book.
There are four exercises created over the next two hours, the first two in this hour and the latter two in the next, that all build on each other.
The first example creates a very simple queued activity where the host delivers data to the named queue. This is the most simple multiburst activity that you can create.
The second example includes a custom runtime service that processes on a worker thread and, when complete, updates the named queue. This demonstrates using custom runtime services with multiburst activities. The third example extends the second. It accesses a database and uses an EventArgs class to type the data sent from the service to the named queue.
The fourth implements IEventActivity and enables the multiburst activity to be the first child in EventDriven activities. Listen activity branches and State activities are sample EventDriven activities.
![]()
The exercises in this hour and the next use aspects of the Long Running Activity Sample (http://www.microsoft.com/downloads/details.aspx?FamilyId=8C2EF231-0622-4BEC-9D35-9E86B64D94C5&displaylang=en) and the FileWatcher SDK sample.
The solution contains two projects. The first holds the custom activity and the second holds the workflow you place the custom activity on. Follow the next steps to create the solution and project.
1. Create a new blank solution named QueuedCustomActivitySolution and place it in the C:SamsWf24hrsHoursHour21QueuedCustomActivities directory (see Hour 2, “A Spin Around Windows Workflow Foundation”).
2. Add a Workflow Activity Library (not a Sequential Workflow Library) project named CustomQueuedActivities to the solution.
3. Rename Activity1.cs to BasicQueued.cs in the Solution Explorer.
4. Add a Sequential Workflow Console application project named CustomActivityTester to the solution.
5. Add code to pause the host. (See Hour 3, “Learning Basic Hosting,” if you need help.)
Finally, it’s time to create a queued activity. This activity will create a queue, subscribe to an event on the queue, and create a handler that is invoked when data is received in the queue.
Follow the next steps to set the activity’s base type and create a DependencyProperty.
1. Open the BasicQueued activity in design mode. Then click the activity, click the ellipsis in the Base Class property, select System.Workflow.ComponentModel, and select Activity in the middle pane. Then click OK.
2. Right-click the activity and select View Code.
3. Move your cursor directly below the constructor, insert a couple of additional blank lines, move your cursor between the lines, right-click, and select Insert Snippet. Double-click Other, double-click Workflow, and double-click DependencyProperty—Property to insert a new dependency property.
4. You should see the stub dependency property, and the text MyProperty should be highlighted.
5. Enter CustomerNumber (replacing MyProperty), and press Enter to leave the wizard.
The Initialize method is called when the workflow instance is created—or to be precise, when WorkflowRuntime.CreateWorkflow is called. It is not scheduled like the Execute and other methods. It is a good idea to create queues in the Initialize method, in many cases, because it avoids race conditions that can occur if the queues are created when the workflow has already started execution.
Runtime services registered with the WF runtime can be accessed from the Initialize method’s IServiceProvider parameter. It is also a good idea to leave the base.Initialize(provider); intact when overriding so that base initialization still occurs.
Follow the next steps to override the Initialize method and create the queue.
1. Add a couple of blank lines below the CustomerNumber dependency property you just added and type protected override, press the spacebar, and select the Initialize method to create the Initialize method.
The following method is created:
protected override void Initialize(IServiceProvider provider)
{
base.Initialize(provider);
}
2. Add the following code to the method body below the existing code to retrieve the WorkflowQueuingService from IServiceProvider:
// Retrieve the workflow queuing service from the
IServiceProvider
WorkflowQueuingService qservice =
(WorkflowQueuingService)provider.GetService
(typeof(WorkflowQueuingService));
3. Add the following code below the code you just entered to create a WorkflowQueue:
// Create a workflow queue and give it the name of the activity
// instance on the workflow.
WorkflowQueue q =
qservice.CreateWorkflowQueue(this.QualifiedName, true);
4. The completed Initialize method should look like Listing 21.1.
LISTING 21.1 Creating WorkflowQueue in Initialize Method
// Leave base initialization logic.
base.Initialize(provider);
// Retrieve the workflow queuing service from the IServiceProvider
WorkflowQueuingService qservice =
(WorkflowQueuingService)provider.GetService
(typeof(WorkflowQueuingService));
// Create a workflow queue and give it the name of the activity
// instance on the workflow.
WorkflowQueue q = qservice.CreateWorkflowQueue(this.QualifiedName,
true);
You just created a WorkflowQueue that will later be used to deliver data to.
Follow the next steps to override the Execute method to retreive the WorkflowQueue created in the Initialize method, register an event with the queue, and return control to the WF runtime in executing state.
1. Add a couple of blank lines below the Initialize method and type protected override, press the spacebar, and select the Execute method to create the Execute method.
The following method will be created:
protected override ActivityExecutionStatus
Execute(ActivityExecutionContext executionContext)
{
return base.Execute(executionContext);
}
2. Replace the body of the Execute method with the following code to retrieve the WorkflowQueuingService from the ActivityExecutionContext. The next line will then retrieve the WorkflowQueue created in the Initialize method from the queuing service.
// Retrieve the WorkflowQueuingService from the
ActivityExecutionContext
WorkflowQueuingService qservice =
executionContext.GetService<WorkflowQueuingService>( );
// Retrieve the WorkflowQueue (created in the Initialize
method)
// from the WorkflowQueuingService
WorkflowQueue q =
qservice.GetWorkflowQueue(this.QualifiedName);
3. Enter q.QueueItemAvailable += and then press Tab twice to accept the default event signature (below the code you just entered) to register an event and create a handler to the queue. The results should look like this (without the comments):
// Register an event for when data is delivered to the queue
// and create a handler for it.
q.QueueItemAvailable +=
new EventHandler<QueueEventArgs>(q_QueueItemAvailable);
4. Add the following code below the event you just registered (make sure you are not in the handler) to return control to the WF runtime with the activity in the Executing state.
// Return control to the runtime in executing state.
return ActivityExecutionStatus.Executing;
5. The completed Execute method should look like Listing 21.2.
LISTING 21.2 Retrieving and Subscribing to a WorkflowQueue in the Execute Method
// Retrieve the WorkflowQueuingService from the
ActivityExecutionContext
WorkflowQueuingService qservice =
executionContext.GetService<WorkflowQueuingService>( );
// Retrieve the WorkflowQueue (created in the Initialize method)
// from the WorkflowQueuingService
WorkflowQueue q = qservice.GetWorkflowQueue(this.QualifiedName);
// Register an event to when data is delivered to the queue
// and create a handler for it.
q.QueueItemAvailable +=
new EventHandler<QueueEventArgs>(q_QueueItemAvailable);
// Return control the runtime in executing state.
return ActivityExecutionStatus.Executing;
The activity now retrieves the queue created in the Initialize method from the queuing service. Then the activity registers a handler on the queue and returns control to the runtime in executing state. All that remains is to add code to the handler and update the host program to send data to the queue.
The q_QueueItemAvailable handler is invoked when data is placed in the named queue. Follow the next steps to update the host program to place data in the named queue in the next step. The first couple of steps involve retrieving the ActivityExecutionContext, WorkflowQueuingService, and the named queue. The third step, CustomerNumber = q.Dequeue( ).ToString( ); obtains the data placed in the queue in the host program.
1. Replace the body of the activity’s q_QueueItemAvailable handler (generated when you created the event) with the following to retrieve the ActivityExecutionContext:
// Sender contains the activity execution context
ActivityExecutionContext executionContext =
sender as ActivityExecutionContext;
2. Add the following code below the code you just entered to retrieve the queuing service and then the queue from the queuing service:
// Retrieve the queuing service from the activity execution
context
WorkflowQueuingService qservice =
executionContext.GetService<WorkflowQueuingService>( );
// Access the workflow queue the data is delivered to
WorkflowQueue q =
qservice.GetWorkflowQueue(this.QualifiedName);
3. Add the following code below the code you just entered to retrieve the data from the host:
// Retrieve the data from the queue
CustomerNumber = q.Dequeue( ).ToString( );
4. Add the following code below the code you just entered to send the customer number retrieved from the queue to the console:
Console.WriteLine("The customer number is " + CustomerNumber);
5. Add the following code below the code you just entered to close the activity. ActivityExecutionStatus.CloseActivity( ) is used instead of ActivityExecutionStatus.Closed because event handlers do not permit values to be returned.
// Close the activity
executionContext.CloseActivity( );
6. The completed q_QueueItemAvailable should look like Listing 21.3.
LISTING 21.3 QItemEventHandler Body
// Sender contains the activity execution context
ActivityExecutionContext executionContext =
sender as ActivityExecutionContext;
// Retrieve the queuing service from the activity execution context
WorkflowQueuingService qservice =
executionContext.GetService<WorkflowQueuingService>( );
// Access the workflow queue the data is delivered to
WorkflowQueue q = qservice.GetWorkflowQueue(this.QualifiedName);
// Retrieve the data from the queue
CustomerNumber = q.Dequeue( ).ToString( );
Console.WriteLine("The customer number is " + CustomerNumber);
// Close the activity
executionContext.CloseActivity( );
![]()
The examples in this hour all create one queue, and the activities all complete after the second burst. However, activities can create more than one queue and execute in more than two bursts. If the QueueItemAvailable handler returns without closing the activity, the activity remains in executing state.
Uninitialize is called when transitioning from executing to closed and permits any cleanup to take place. One common action performed in the Uninitialize method is to delete queues.
Follow the next steps to override the Uninitialize method and delete the queues.
1. Add a couple of blank lines below the q_QueueItemAvailable handler and type protected override, press the spacebar, and select the Uninitialize method to create the Uninitialize method.
The following method is created:
protected override void Uninitialize(IServiceProvider provider)
{
// Leave base uninitialization logic.
base.Uninitialize(provider);
}
2. Replace the current code in the method body with Listing 21.4.
LISTING 21.4 Deleting Queues in Uninitialized Body
// Leave base uninitialization logic.
base.Uninitialize(provider);
// Retrieve the workflow queuing service from the IServiceProvider
WorkflowQueuingService qservice =
(WorkflowQueuingService)provider.GetService
(typeof(WorkflowQueuingService));
// Create a workflow queue and give it the name of the activity
// instance on the workflow.
qservice.DeleteWorkflowQueue(this.QualifiedName);
3. Build the CustomQueuedActivities project.
Follow the next step to send the data from the host to the queue to invoke the QueueItemAvailable event handler.
1. Add the following code to the host (Program.cs in CustomerActivityTester) above the waitHandle.WaitOne( ); line of code:
//send some data to the event activity
Console.WriteLine("Enter the customer number: ");
string custNumber = Console.ReadLine( );
instance.EnqueueItem("basicQueued1", custNumber, null, null);
Follow the next steps to run the workflow.

In this section, you create a custom runtime service that will enqueue the customer number to the named queue created in the activity’s Execute method. It will perform this task in place of the host, which retrieved the customer number in the BasicQueued activity (Figure 21.4).
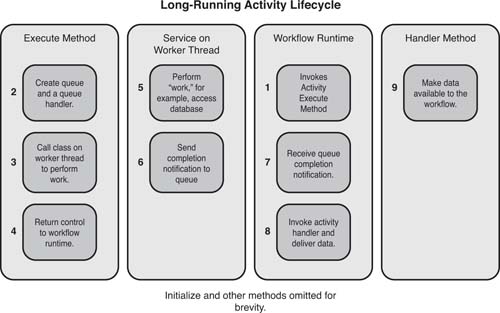
The WF runtime loads workflow instances and then executes the activities on a workflow instance. It is recommended that activities execute quickly and return control to the WF runtime. If an activity conducts work that will not complete very quickly, the activity should employ a custom runtime service to perform this work on another thread. If an activity is waiting on external input or setting up a timer, it should almost always operate on a new thread and return control to the WF runtime. This enables the WF runtime and host application to maximize performance and load the maximum number of workflow instances optimum for the setup. It also allows for dynamic update and other actions to be placed on the workflow instance.
If the activity performs a database call or other task that is not instantaneous but is not necessarily immediate, it still may be best to perform this work via a custom runtime service on a new thread. Doing so may optimize performance because the host and runtime can load workflow instances based on the optimum threadpool and other settings.
You will create the CustomerQueuedFromService custom runtime service that operates on the separate thread first. Then you create the CustomerQueuedFromServiceActivity to call the custom runtime service. This section demonstrates how to create a custom service, access the custom service from the activity’s Execute method, and how to notify the runtime from the service when the service has completed processing.
The CustomerQueuedFromService includes two methods and one embedded class. The first method is called on the activity thread and invokes the second method that does the “database” work on the worker thread. The embedded class holds the information exchanged between the activity and the service.
Follow the next steps to create the CustomerQueuedFromService class and configure it.
1. Right-click the CustomQueuedActivities project and select Add, Class.
2. Name the class CustomerQueuedFromService and click Add.
3. Add public before the class name to make it public.
4. Add the following using directives:
using System.Workflow.Runtime;
using System.Threading;
using System.Data.SqlClient;
using System.Data;
The service needs access to the WorkflowRuntime. The workflow instance will be retrieved from the WF runtime and the data will be enqueued via the workflow instance when the service has completed its work.
1. Add the following constructor below the class declaration opening bracket:
// The workflow runtime is being used in this class solely
// to permit data transfer between the workflow isntance
// and the service.
public CustomerQueuedFromService(WorkflowRuntime runtime)
{
this.runtime = runtime;
}
2. Add the following member variable declarations below the constructor:
private WorkflowRuntime runtime;
This method, the GetCustomerCalledFromActivity method, is called from the activity on the workflow thread. It then calls the GetCustomerOnWorkerThread method that does the actual work on the worker thread.
Follow the next steps to add and code the GetCustomer method.
Follow the next step to create the embedded CustomerState class that stores the information passed between the activity and the service.
1. Add the following class below the method you just added. This class contains the data passed between the two GetCustomer methods on different threads. This class is needed because the QueueUserWorkItem accepts only one parameter in addition to the method name called.
// This class holds the data passed between the methods called
// across threads It is required since the QueueUserWorkItem
delegate
// only accepts one parameter in addition to the method to call.
private class CustomerState
{
public Guid instanceId;
public IComparable resultQueueName;
public CustomerState(Guid instanceId,
IComparable resultQueueName)
{
this.instanceId = instanceId;
this.resultQueueName = resultQueueName;
}
}
Follow the next steps to create the GetCustomerOnWorkerThread method that does the work and then enqueues the data to the named queue. Doing so will invoke the activity event QueueItemAvailable handler you will create in the next section.
1. Add the following method signature below the class you just added:
// Method on donated thread that processes the request
// while control is returned from activity to workflow.
private void GetCustomerOnWorkerThread(object state)
{
}
2. Add the following line of code to the body of the method that produces a hard-coded customer number value:
// Hard-coded customer number
string customerNumber = "0001 from service";
3. Add the following code below the code you just added to retrieve the WorkflowInstance from the runtime:
// Get the workflow instance Id from the
// CustomerState object.
CustomerState custState = state as CustomerState;
WorkflowInstance wi =
runtime.GetWorkflow(custState.instanceId);
4. Add the following code below the code you just added to enqueue the customer number to the activity and invoke the activity handler:
// Send the message back to the activity and pass the result
wi.EnqueueItem(custState.resultQueueName, customerNumber,
null, null);
5. The completed CustomerQueuedFromService class should look like Listing 21.5.
LISTING 21.5 CustomerQueuedFromService Worker Thread Service
public class CustomerQueuedFromService
{
// The workflow runtime is being used in this class solely
// to permit data transfer between the workflow instance
// and the service.
public CustomerQueuedFromService(WorkflowRuntime runtime)
{
this.runtime = runtime;
}
private WorkflowRuntime runtime;
// This is called in the activity thread
public void GetCustomerCalledFromActivity(IComparable resultQueueName)
{
ThreadPool.QueueUserWorkItem(GetCustomerOnWorkerThread,
new CustomerState(WorkflowEnvironment.WorkflowInstanceId,
resultQueueName));
}
// This class holds the data passed between the methods called
// across threads It is required since the QueueUserWorkItem delegate
// only accepts one parameter in addition to the method to call.
private class CustomerState
{
public Guid instanceId;
public IComparable resultQueueName;
public CustomerState(Guid instanceId,
IComparable resultQueueName)
{
this.instanceId = instanceId;
this.resultQueueName = resultQueueName;
}
}
// Method on donated thread that processes the request
// while control is returned from activity to workflow.
private void GetCustomerOnWorkerThread(object state)
{
// Hard-coded customer number
string customerNumber = "0001 from service";
// Get the workflow instance Id from the
// CustomerState object.
CustomerState custState = state as CustomerState;
WorkflowInstance wi = runtime.GetWorkflow(custState.instanceId);
// Send the message back to the activity and pass the result
wi.EnqueueItem(custState.resultQueueName, customerNumber, null, null);
}
}
6. Build the CustomQueuedActivities project and fix any errors.
The CustomerQueuedFromServiceActivity custom activity is similar to the BasicQueued activity. The difference is that the CustomerQueuedFromServiceActivity custom activity retrieves the CustomerQueuedFromService from the ActivityExecutionContext. Otherwise, the fact that data is enqueued from a runtime service instead of the host does not change the activity.
Follow the next steps to create the CustomerQueuedFromServiceActivity and perform some other preliminary work.
1. Right-click CustomQueuedActivities project and select Add, Activity.
2. Name the activity CustomerQueuedFromServiceActivity and click Add.
3. Open the CustomerQueuedFromServiceActivity activity in design mode. Then click the activity, click the ellipsis in the Base Class property, select System.Workflow.ComponentModel, and select Activity in the middle pane. Then click OK.
4. Add a dependency property below the constructor named CustomerNumber and set its type to string.
Follow the next steps to override the Initialize method and create a queue in it.
1. Add a couple of blank lines below the CustomerNumber dependency property and type protected override, press the spacebar, and select the Initialize method to create the Initialize method.
2. Replace the body of the Initialize method with the following code to create the queue. This is identical to the code in the Initialize method of the BasicQueued activity:
// Call base intialize to gain its functionality
base.Initialize(provider);
// Retrieve the workflow queuing service from the
IServiceProvider
WorkflowQueuingService qservice =
(WorkflowQueuingService)provider.GetService
(typeof(WorkflowQueuingService));
// Create a workflow queue and give it the name of the activity
// instance on the workflow.
WorkflowQueue q =
qservice.CreateWorkflowQueue(this.QualifiedName, true);
The Execute method now retrieves two services. The first, the WorkflowQueuingService, was retrieved when creating the BasicQueued activity. The latter is the CustomerQueuedFromService service that will retrieve the customer on the worker thread. Steps 1, 2, and 5 are the same in this version of the activity as they were in the BasicQueued activity. Steps 3 and 4 are unique to this version of the activity.
Follow the next steps to create the Execute method.
1. Add a couple of blank lines below the Initialize method and type protected override, press the spacebar, and select the Execute method to create the Execute method.
2. Replace the body of the Execute method with the following code that retrieves the WorkflowQueuingService from the ActivityExecutionContext, retrieves the queue from the service, and then registers an event with the queue:
// Retrieve the WorkflowQueuingService from the
ActivityExecutionContext
WorkflowQueuingService qservice =
executionContext.GetService<WorkflowQueuingService>( );
// Retrieve the WorkflowQueue (created in the Initialize
method)
// from the WorkflowQueuingService
WorkflowQueue q =
qservice.GetWorkflowQueue(this.QualifiedName);
// Register an event to when data is delivered to the queue
// and create a handler for it.
q.QueueItemAvailable +=
new EventHandler<QueueEventArgs>(q_QueueItemAvailable);
3. Add the following code below the code you just added to retrieve the custom CustomerQueuedFromService from the ActivityExecutionContext.
// Retrieve the custom CustomerQueuedFromService from the
// activity execution context.
CustomerQueuedFromService CustomerQueuedFromService =
executionContext.GetService<CustomerQueuedFromService>( );
4. Add the following code below the code you just added to retrieve the custom CustomerQueuedFromService you just created from the ActivityExecutionContext.
// Call the GetCustomerCalledFromActivity method
// on the custom CustomerQueuedFromService service
CustomerQueuedFromService.GetCustomerCalledFromActivity(this.QualifiedName);
5. Add the following code below the code you just added to return the activity in executing state.
// Return control to the runtime in executing mode
return ActivityExecutionStatus.Executing;
The QueueItemAvailable handler is the same as the one used in the BasicQueued activity. The fact that the QueueItemAvailable handler is triggered from the custom service instead of the host does not change the way the handler is invoked and receives data from the queue.
Follow the next steps to create the QueueItemAvailable handler.
1. Add the handler signature below the method you just created. It must be created manually this time because the event was manually pasted.
void q_QueueItemAvailable(object sender, QueueEventArgs e)
{
}
2. Enter the following code in the Activity’s QueueItemAvailable handler:
// Sender contains the activity execution context
ActivityExecutionContext executionContext =
sender as ActivityExecutionContext;
// Retrieve the queuing service from the activity execution
context
WorkflowQueuingService qservice =
executionContext.GetService<WorkflowQueuingService>( );
// Access the workflow queue the data is delivered to
WorkflowQueue q = qservice.GetWorkflowQueue(this.Name);
// Retrieve the data from the queue
CustomerNumber = q.Dequeue( ).ToString( );
Console.WriteLine("The customer number retrieved from the
service is " +
CustomerNumber);
executionContext.CloseActivity( );
3. Build the CustomQueuedActivities project.
The CustomerQueuedFromServiceActivity class should look like Listing 21.6.
LISTING 21.6 CustomerQueuedFromServiceActivity That Uses External Service
public partial class CustomerQueuedFromServiceActivity :
System.Workflow.ComponentModel.Activity
{
public CustomerQueuedFromServiceActivity( )
{
InitializeComponent( );
}
public static DependencyProperty CustomerNumberProperty =
DependencyProperty.Register("CustomerNumber", typeof(string),
typeof(CustomerQueuedFromServiceActivity));
[DescriptionAttribute("CustomerNumber")]
[CategoryAttribute("CustomerNumber Category")]
[BrowsableAttribute(true)]
[DesignerSerializationVisibilityAttribute(DesignerSerializationVisibility.Visible)]
public string CustomerNumber
{
get
{
return
((string)(base.GetValue(CustomerQueuedFromServiceActivity.CustomerNumberProperty
)));
}
set
{
base.SetValue(CustomerQueuedFromServiceActivity.CustomerNumberProperty, value);
}
}
protected override void Initialize(IServiceProvider provider)
{
// Call base intialize to gain its functionality
base.Initialize(provider);
// Retrieve the workflow queuing service from the IServiceProvider
WorkflowQueuingService qservice =
(WorkflowQueuingService)provider.GetService
(typeof(WorkflowQueuingService));
// Create a workflow queue and give it the name of the activity
// instance on the workflow.
WorkflowQueue q = qservice.CreateWorkflowQueue(this.QualifiedName, true);
}
protected override ActivityExecutionStatus
Execute(ActivityExecutionContext executionContext)
{
// Retrieve the WorkflowQueuingService from the
ActivityExecutionContext
WorkflowQueuingService qservice =
executionContext.GetService<WorkflowQueuingService>( );
// Retrieve the WorkflowQueue (created in the Initialize method)
// from the WorkflowQueuingService
WorkflowQueue q = qservice.GetWorkflowQueue(this.QualifiedName);
// Register an event to when data is delivered to the queue
// and create a handler for it.
q.QueueItemAvailable +=
new EventHandler<QueueEventArgs>(q_QueueItemAvailable);
// Retrieve the custom CustomerQueuedFromService from the
// activity execution context.
CustomerQueuedFromService CustomerQueuedFromService =
executionContext.GetService<CustomerQueuedFromService>( );
// Call the GetCustomerCalledFromActivity method
// on the custom CustomerQueuedFromService service
CustomerQueuedFromService.GetCustomerCalledFromActivity(this.QualifiedName);
// Return control to the runtime in executing mode
return ActivityExecutionStatus.Executing;
}
void q_QueueItemAvailable(object sender, QueueEventArgs e)
{
// Sender contains the activity execution context
ActivityExecutionContext executionContext =
sender as ActivityExecutionContext;
// Retrieve the queuing service from the activity execution context
WorkflowQueuingService qservice =
executionContext.GetService<WorkflowQueuingService>( );
// Access the workflow queue the data is delivered to
WorkflowQueue q = qservice.GetWorkflowQueue(this.Name);
// Retrieve the data from the queue
CustomerNumber = q.Dequeue( ).ToString( );
Console.WriteLine("The customer number retrieved from the service is
" +
CustomerNumber);
executionContext.CloseActivity( );
}
}
Follow the next steps to register your CustomerQueuedFromService with the runtime.
1. Add a project reference from the CustomActivityTester project to the CustomQueuedActivities project that contains the custom CustomerQueuedFromService service.
2. Open Program.cs in the CustomActivityTester project.
3. Add the following using directive:
using CustomQueuedActivities;
4. Add the following code above the line that starts with WorkflowInstance instance to add the custom CustomerQueuedFromService you just created to the runtime:
// Add the CustomerQueuedFromService to the runtime.
workflowRuntime.AddService(new
CustomerQueuedFromService(workflowRuntime));
5. Remove the following lines of code from the host because the data is now delivered to the queue via the service and not the host:
//send some data to the event activity
Console.WriteLine("Enter the customer number: ");
string custNumber = Console.ReadLine( );
instance.EnqueueItem("basicQueued1", custNumber, null, null);

This hour covered creating multiburst activities. In doing so, it touched on queues, the underlying WF WorkflowQueue communication technology. It also showed how to access custom runtime services from within an activity. Queued activities are a critical functional piece of WF because they are paramount to its long-running process capability. Working with queues should also give you a better understanding of how WF works as a whole. Custom runtime services are also integral to WF and you now know there are choices of where to place the custom activity functionality—in the activity or in the runtime service. One or more DLLs registered as custom services can serve as general utility resources across many activities.