
Hour 17 Learning Advanced Hosting
What You’ll Learn in This Hour:
![]() Workflow events
Workflow events
![]() Runtime services
Runtime services
![]() ManualWorkflowSchedulerService and threading
ManualWorkflowSchedulerService and threading
![]()
InvokeWorkflow activity
![]() Host retention with the
Host retention with the InvokeWorkflow activity
![]()
InvokeWorkflow activity synchronous augmentation
WF is not a server product. The WorkflowRuntime type can be hosted in any .NET 2.0 or later Windows application. Host applications communicate with the WorkflowRuntime through a set of events it exposes. The WorkflowRuntime’s capabilities are defined via pluggable runtime services. The pluggable runtime services are managed through a set of WorkflowRuntime methods. There is also a WorkflowInstance type that operates on a one-to-one basis with a workflow instance. It is, however, primarily a helper object that works through the workflow runtime.
Hour 3, “Learning Basic Hosting,” briefly discussed the WorkflowRuntime and WorkflowInstance types. Hour 3 and other hours also covered selected runtime services and events as they became relevant. This hour summarizes all the runtime events and services. It then covers selected individual runtime events and services that have not yet been covered (or have been sparsely covered) in more detail. Threading and synchronous workflow loading are covered in a ManualWorkflowSchedulerService example.
The hour concludes by going through a new activity, the InvokeWorkflow activity, which allows a workflow to be called from another workflow. This activity is covered in this hour because its asynchronous operation creates many hosting considerations. Some of these considerations include keeping the host alive until the called workflow completes and ways to call workflows synchronously. Examples are shown that allow synchronous-like operation with the InvokeWorkflow activity and that keep the host alive.
All the workflow events—for example, Started, Loaded, Unloaded—are summarized in the following list. Then a sample application is used that illustrates the workflow instance life cycle as the instance transitions among events. The application also allows the user to manually execute the Suspended, Resumed, Aborted, Terminateed, WorkflowCreated, and Started events to see the effect of these events. Many of WF’s workflow events have already been covered throughout the book and especially in Hour 3, where the Persist, Load, and Unload events were covered.
![]()
ServicesExceptionNotHandled—Occurs when a runtime service registered with the WorkflowRuntime raises an unhandled exception.
![]()
Started—Occurs when the workflow runtime is started.
![]()
Stopped—Occurs when the workflow runtime is stopped.
![]()
WorkflowAborted—Occurs when a workflow instance is aborted. The WorkflowInstance.Abort method may be called from the host. Aborting a workflow discards all work since the last persistence (save) point. The workflow instance is still active when it is returned to the persistence point.
![]()
WorkflowCompleted—Occurs when a workflow instance successfully completes.
![]()
WorkflowCreated—Occurs when a workflow instance has been created—more precisely, when WorkflowInstance.CreateWorkflow is called, which occurs before the workflow is actually started. The Initialized method, called when the workflow is created, is generally used to perform preparatory work, such as to set up a custom queue for any activity (see Hour 21, “Creating Queued Activities,” and Hour 22, “Creating Typed Queued and EventDriven-Enabled Activities.”
![]()
WorkflowIdled—As seen in Hour 3, the workflow idled event is triggered when the workflow has to wait before continuing to process, because the next activities in its path are blocking activities, such as HandleExternalEvent and Delay.
![]()
WorkflowLoaded—Occurs when the workflow instance is loaded back into memory by the persistence service and before the workflow begins reexecuting.
![]()
WorkflowResumed—ccurs when execution of a workflow instance is resumed following a suspension. It is also called when dynamic update is performed before the workflow begins reexecuting.
![]()
WorkflowStarted—Occurs when a WorkflowInstance.Start method is called to start workflow execution.
![]()
WorkflowSuspended—Occurs when the WorkflowInstance.Suspend method is called, when the Suspend activity is executed, and when the workflow runtime suspends the workflow during dynamic update. The workflow will remain suspended until the WorkflowInstance.Resume method is called, unless it is suspended by the runtime during dynamic update, wherein the workflow is resumed during the update process.
![]()
WorkflowTerminated—Occurs when the WorkflowInstance.Terminate method is called, when the Terminate activity is executed, and when an unhandled exception occurs on a workflow. Unlike aborted workflows, terminated workflows are complete and cannot be restarted.
![]()
WorkflowUnloaded—Occurs when a workflow goes idle and the unload method is called from the idled event handler. Alternatively, workflows are unloaded when a workflow reaches an idle state and a persistence service is configured to unload workflows in an idle state registered with the host.
![]()
The ServicesExceptionNotHandled, Started, and Stopped events operate on the workflow runtime. All other events are handled by the workflow runtime but are specific to a workflow instance. These workflow instance-level events are mediated by the runtime so it can ensure that the workflow is interacted with on the correct thread and that the workflow is ready to receive the event.
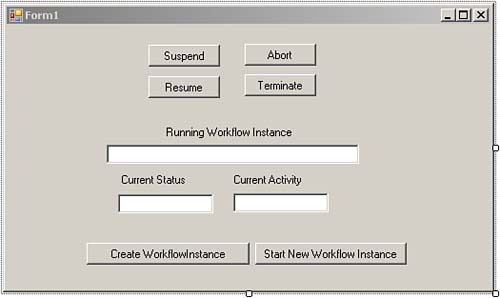
A Windows Forms application and a workflow are used in this section to demonstrate workflow events. The workflow event handlers update the form display so that the workflows event transition can be followed. There are also buttons that permit you to manually Suspend, Resume, Abort, Terminate, Create, and Start a workflow. Because you have already registered events and created event handlers, you will not do that again here. Running the application is the exercise. Figures 17.1 and 17.2 show the form and workflow that will be used.
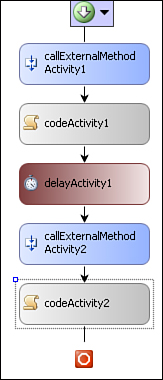
The workflow (Figure 17.2) is structured to send messages to the Windows Form that contain the name of the currently executing activity. The CallExternalMethod activities both send the current activity to the form. The Delay activity causes the workflow to unload during its brief timeout duration. The code activities both sleep for a couple of seconds to give you a chance to interact with the form buttons while the workflow remains on a given activity.
You will run the workflow four times in this section. The first time, you run it through its standard course. Then you will abort, suspend, and terminate the workflow.
Follow the next steps to run the workflow in its normal course.
1. Open the EventHandlerSolution.sln in the C:SamsWf24hrsHoursHour17AdvancedHostingEventHandlerSolution directory.
2. Press F5 to run the application.
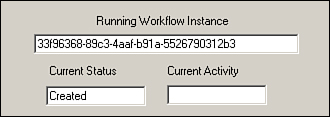
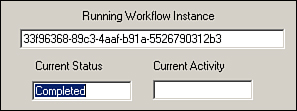
3. Click the CreateWorkflowInstance button. The status changes to Created, and the workflow instance ID text box is populated (Figure 17.3). The workflow is created but not yet started. In this state, workflow queues are updated (see Hours 21 and 22) and other preparatory work takes place.
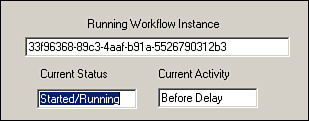
4. Click the StartNewWorkflowInstance button. The workflow is now started (or running). See Figure 17.4.
5. The workflow will run through the activities. It will be unloaded when the Delay activity is reached. It will then reload after the Delay activity expires and execute the remaining activities until it completes (Figure 17.5).
![]()
The Current Activity text box on the form is populated with Before Delay, Probably Delay, or After Delay. The Before Delay and After Delay messages are sent from the CallExternalMethod activities before and after the Delay activity. The Delay activity cannot communicate with the form, so it is assumed that when the workflow is in the unloaded state it is in the Delay activity (thus, Probably Delay).
Follow the next steps to suspend and resume the workflow.
Abort returns the workflow to its last persistence state. Therefore its only valid execution point is when executing the activities that follow the Delay activity. The Delay will cause the workflow to unload.
Follow the next steps to abort the workflow.
1. Click the CreateWorkflowInstance button and then click the StartNewWorkflowInstance button.
2. Wait until the workflow is executing the activities that follow the Delay activity and click the Abort button. The activities that follow the Delay activity will execute again. The abort caused the workflow execution to go back to the persistence point. The workflow then completes.
Follow the next steps to terminate the workflow.
WF has to run pretty much anywhere Windows runs. This means that it has to run on client PCs with limited resources, on fault-tolerant server applications, and at many points between these two extremes. The large footprint it must support also produces unpredictability. It cannot assume that SQL Server, or any database for that matter, will be available to persist, which is most likely the case in many client scenarios. The need, then, is to create a workflow runtime that can be absorbed into various computing environments.
A large part of the solution is runtime services. Runtime services can be registered with the runtime to change the runtime. For instance, registering the persistence service with the WF runtime changes the WF runtime behavior to save workflows to a storage medium when they idle. The default persistence service saves workflows to SQL Server. You can, however, create your own persistence service that stores the workflows to XML files or to an Oracle database. The first is a good solution in many client scenarios, the latter in environments where Oracle is used.
The workflow runtime can run with no persistence service. It can run with the default SQL Persistence service. Or it can run with a custom persistence service. The end result is a runtime capable of supporting just about any persistence requirements. The persistence, tracking, and ExternalDataExchangeService services have been used extensively throughout the book to change the capabilities of the underlying runtime.
Other runtime services exist as well. Some control how WF schedules workflow instance, or WF’s threading. Others determine how WF loads a workflow model into memory. You can create your own runtime services as well. One common use case for a custom runtime service is to create a common library (a type provider) that can then be accessed by workflow instances.
All WF runtime services inherit from the base WorkflowRuntimeService base class that provides general runtime service capabilities applicable to any runtime service. On top of the WorkflowRuntimeService is a class specific to one type of runtime service. For instance, the TrackingService provides functionality needed by all tracking services, and the WorkflowLoaderService is the base class for all loading services. The SqlTrackingService can be used as is to store tracking data in SQL Server. The DefaultWorkflowLoaderService (described shortly) loads workflows into memory. The SqlTrackingService is sealed, and the DefaultWorkflowLoaderService is not.
Therefore, in most cases, if you were to create a custom tracking service, you would derive the TrackingService base class. If you want to create a custom workflow loading service, you can derive from either the base WorkflowLoaderService or the DefaultWorkflowLoaderService, depending on which one your requirements align with better.
![]()
As stated before, if you are interested in creating custom runtime services, see the tracking and persistence samples in the SDK.
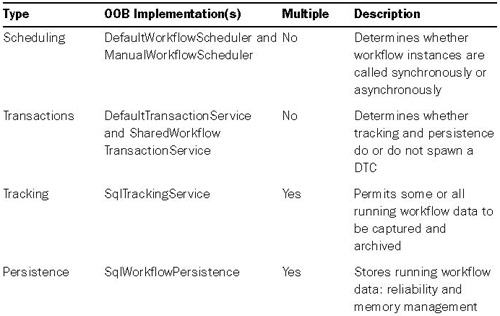
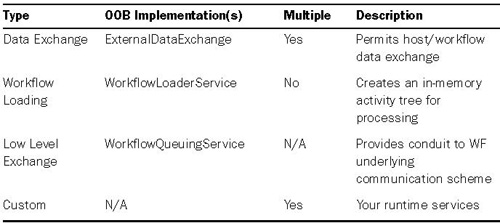
Some runtime services are loaded by default. The DefaultWorkflowSchedulerService, for instance, is loaded by the runtime if no other scheduler service is registered. So, this service has been with us on all the workflows we’ve run, even though it has not been explicitly registered. Other runtime services, such as the tracking service, allow for multiple entry registration. Table 17.1 contains a listing and a few details on each of the runtime services.
Let’s first look at the out-of-the-box (OOB) runtime services offered by WF that have not been previously used (or used only sporadically).
The DefaultWorkflowLoaderService loads workflows, and it is employed by default. Therefore, unless you create your own workflow loading service, no action on your part is required. Your hosts will load and run workflows. However, just about everything in WF is extensible, including the way it loads a workflow to process. The default loading service can load either a .NET type or a XAML workflow (and a .rules file).
The WorkflowLoaderService (the base loading service class) can accept either a .NET type or an XML text reader. If you derive your own custom loader from the WorkflowLoaderService type, you can serialize any XML document and run it in WF. One of the benefits of XAML (or any XML) workflows is that they can be stored in a database. A custom loader could be created to retrieve the XAML workflow directly from a database. Another excellent reason for a custom loader is to directly load Visio diagrams into WF. Visio diagrams can be saved to XML, so the job of the custom loader would be to deserialize the Visio XML format into an object that WF could load. WF does this for XAML. For other XAML formats, you must create the object graph. See my blog at www.reassociates.net for an example that loads Visio diagrams from a database into WF where they are executed.
All host-workflow communication operates on top of WF’s internal workflow queues. All high level WF communication, including ExternalDataExchangeService, web services, and Windows Communication Foundation, is built on the WorkflowQueuingService. The WF queuing service is implemented by .NET delegates and is not a message queuing system (MSMQ). The low-level queuing was used briefly when you worked with state machine workflows and will be used more in Hours 22 and 23.
WF ships with two scheduling services: the DefaultWorkflowSchedulerService and the ManualWorkflowSchedulerService. Both queue workflow instances and process them when a thread is made available. The biggest difference is that the default scheduling service runs workflows asynchronously, whereas the manual scheduling service runs them synchronously.
The default scheduling service uses CLR threadpool threads to run workflow instances on. Depending on the server configuration, about five runtime instances can be loaded and executing at any given time. This means actively running workflow instances. Persisted workflows do not count. You can control the number by setting its MaxSimultaneousWorkflows property.
![]()
Even if you have thousands of long-running workflows, it is unlikely that a large number of them will receive an external event or have a timer expire at the exact same time. Only during their execution bursts do workflows take a thread (assuming you have a persistence service registered). You can also have multiple WF runtime servers and multiple back-end persistence servers for scalability and durability reasons.
The ManualWorkflowSchedulerService runs workflows synchronously. In this case, a processing workflow blocks the host during the workflow’s execution burst. The thread is returned to the host as soon as the workflow unloads, suspends, terminates, or otherwise completes. The host cannot run any more workflows until the workflow unloads from memory. This manual scheduling service is generally considered the correct choice when hosting the WF runtime in IIS because IIS has its own thread reuse mechanisms and it has very few spare threads. For these reasons, this service is sometimes used synonymously with using WF in ASP.NET (see Hour 18, “Working with Web Services and ASP.NET Hosting”).
When using your Windows Forms application to host workflows in earlier chapters, you employed anonymous delegates to communicate across the workflow and the host thread. The Windows Forms application needed to host only one application at a time. It executed quickly enough that blocking would not adversely affect the UI. It actually would be preferable if it blocked, because it would prevent the user from trying to activate another event while the current one is processing. Therefore, employing the manual scheduling service from your Windows Forms host may have been preferable.
If you used a Windows Service application to host the WF runtime that fronted multiple Windows Forms hosts, the default scheduling would seem more logical because there would be a benefit to simultaneously process multiple workflows instances from different Windows Forms hosts.
Using the manual scheduling service will be demonstrated next.
![]()
All runtime services can be added via configuration. See Hour 3 for an example of general steps involved. The SqlWorkflowPersistenceService is used, but most of the steps to create a config file and how to access it are identical across all services. Then see MSDN for the precise details on the service you want to add via configuration.
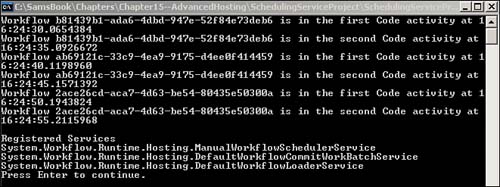
A workflow console project will be used to demonstrate the differences between the DefaultWorkflowSchedulerService and the ManualWorkflowSchedulerService. The console host will run three workflows. A variable in the host will determine which scheduling service is used. When running the application, you will see that each workflow executes in serial when the manual scheduling service is used and in parallel when the default scheduling service is used.
Ironically, a Delay activity is not used to cause the workflows to pause to make the workflows take longer to run and therefore make it easier to spot when they start and end. The Delay activity causes the workflow to unload, and they then appear to execute in parallel even when the manual scheduling service is used because of the short execution bursts (as will be demonstrated in this section).
A console application exists that will run three workflows.
Follow these steps to model and configure the workflow.
1. Create a new Sequential Workflow Console Application project named SchedulingServiceProject and place it in the C:SamsWf24hrsHoursHour17AdvancedHosting directory.
2. Add two Code activities to the workflow.
3. Double-click the first Code activity and add the following code to its handler:
string instanceId = this.WorkflowInstanceId.ToString();
Console.WriteLine
("Workflow " + instanceId + " is in the first Code
activity at " +
DateTime.Now.TimeOfDay);
Thread.Sleep(5000);
4. Right-click Thread and select Resolve, using System.Threading.
5. Double-click the second Code activity and add the following code to its handler:
string instanceId = this.WorkflowInstanceId.ToString();
Console.WriteLine
("Workflow " + instanceId + " is in the second Code
activity at "
+ DateTime.Now.TimeOfDay);
Thread.Sleep(5000);
Follow the next steps to update the host to run three workflow instances.
1. Open Program.cs.
2. Add the following code to create a static variable (below the class’s opening bracket).
static bool RunManual = false;
3. Replace the code that creates and starts the workflow instance with the following that starts three workflow instances.
WorkflowInstance instance1 =
workflowRuntime.CreateWorkflow(typeof(SchedulingServiceProject.Workflow1));
instance1.Start();
WorkflowInstance instance2 =
workflowRuntime.CreateWorkflow(typeof(SchedulingServiceProject.Workflow1));
instance2.Start();
WorkflowInstance instance3 =
workflowRuntime.CreateWorkflow(typeof(SchedulingServiceProject.Workflow1));
instance3.Start();
4. Add the following code to pause the host (below the waitHandle.WaitOne(); line of code).
Console.WriteLine("Press Enter to continue.");
Console.Read();
The DefaultWorkflowSchedulerService will be used because it is the default scheduling service and no other was specified. Each workflow’s first Code activity will start at almost the same time, and the workflows will complete at near the same time as well, because all workflows run in parallel.
Follow the next steps to run the three workflow instances in parallel.
After switching to the ManualWorkflowSchedulerService, the first workflow will run until completion, then the second will run all the way through, and finally, the third will do the same. When instantiating the manual scheduler service, you will tell it to automatically reload when timers expire. The ManualWorkflowSchedulerService.RunWorkflow method must be used to run workflows under the manual scheduler service after the starting the workflow. The WorkflowRuntime.GetAllServices method will also be used to return the registered runtime services.
Follow the next steps to configure the host to run the workflows sequentially.
1. Open Program.cs.
2. Change RunManual to true.
3. Add the following code to the top of the Using block to instantiate the manual scheduling service.
ManualWorkflowSchedulerService manualScheduler =
new ManualWorkflowSchedulerService(true);
4. Add the following code below the code you just added to load the manual scheduling service if RunManual is true:
5. Replace the code that creates and starts the workflow instances with the following that includes the extra step required by the manual scheduling service to run the workflow:
WorkflowInstance instance1 =
workflowRuntime.CreateWorkflow(typeof(SchedulingServiceProject.Workflow1));
instance1.Start();
if (RunManual)
manualScheduler.RunWorkflow(instance1.InstanceId);
WorkflowInstance instance2 =
workflowRuntime.CreateWorkflow(typeof(SchedulingServiceProject.Workflow1));
instance2.Start();
if (RunManual)
manualScheduler.RunWorkflow(instance2.InstanceId);
WorkflowInstance instance3 =
workflowRuntime.CreateWorkflow(typeof(SchedulingServiceProject.Workflow1));
instance3.Start();
if (RunManual)
manualScheduler.RunWorkflow(instance3.InstanceId);
6. Add the following code below the code that creates and starts the workflows that use the WorkflowRuntime.GetAllServices method to display all the services registered with the runtime.
Console.WriteLine();
Console.WriteLine("Registered Services");
// Retrieve registered runtime servies.
ReadOnlyCollection<object> services =
workflowRuntime.GetAllServices(typeof(object));
for (int i = 0; i < services.Count; i++)
{
Console.WriteLine(services[i].ToString());
}
7. Right-click ReadOnlyCollection, select Resolve, using System.Collections.ObjectModel.
Follow the next steps to run the workflows in serial and see which runtime services are registered.
1. Press F5 to run the application.
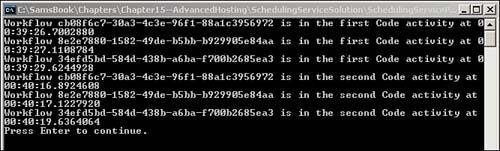
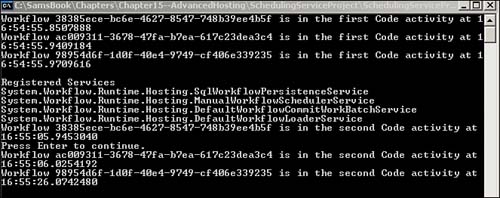
2. You will see results similar to Figure 17.7 as the workflows run in serial.
As you can see, the default scheduler and default loader services are registered in addition to the manual scheduler service. The first two are registered by default.
The Thread.Sleep statements in the Code activities do not trigger WF’s unload and persist events. Therefore, they produce workflows that block for long periods of time within an activity. Follow the next steps to remove the Thread.Sleep statements from the Code activities and insert a Delay activity between the Code activities. The workflow—even though still using the manual scheduling service—will appear to run in parallel, because control is returned to the host each time the Delay activity begins and the workflow unloads.
1. Add the following static variable below the RunManual declaration:
static string connectionString = "Initial Catalog=
WFTrackingAndPersistence;" +
"Data Source=localhost; Integrated Security=SSPI;";
2. Add the following code to instantiate and register the persistence service at the beginning of the Using block:
// Persistence parameter values
bool unloadOnIdle = true;
TimeSpan reloadIntevral = new TimeSpan(0, 0, 0, 20, 0);
TimeSpan ownershipDuration = TimeSpan.MaxValue;
// Instantiate a sql persistence service
SqlWorkflowPersistenceService sqlPersistenceService =
new SqlWorkflowPersistenceService(connectionString,
unloadOnIdle, ownershipDuration, reloadIntevral);
workflowRuntime.AddService(sqlPersistenceService);
3. Remove the Thread.Sleep lines of code from both Code activity handlers.
4. Add a Delay activity between the two Code (see Figure 17.8) activities and set its timeout duration to 00:00:10.
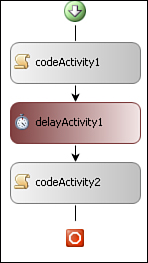
5. Run the workflow and (as shown in Figure 17.9) it should appear to run in parallel even though the manual scheduling service is used. The SqlWorkflowPersistenceService should also be listed as one of the services.
The InvokeWorkflow allows the current workflow to call another workflow in the current project or a referenced assembly. Configuring the activity itself is trivial; simply point it to a workflow in the current project or a referenced assembly. The issue, however, is that it calls the workflow asynchronously, and it is up to you to keep the host running while the invoked workflow executes, unless your scenario calls for fire-and-forget. If not, the host will prematurely complete and the called workflow will be aborted before completing. Most of the effort involved with using the InvokeWorkflow activity revolves around understanding the hosting implications. The next exercise will show how to use the InvokeWorkflow activity in fire-and-forget mode and then check that all workflows have finished executing before the host expires, thereby terminating any running workflows.
You will go through three exercises with the InvokeWorkflow activity. The first uses a standard host, and the host expires before the called workflow completes. The second shows one way to configure the host to ensure that it remains active until all workflows started by it complete. The third method emulates a synchronous call and passes parameters between the workflows. The third method requires quite a bit of code to achieve a synchronous call.
A third-party activity exists that allows workflows to be called synchronously. The third-party activity can be found at www.masteringbiztalk.com/blogs/jon/PermaLink,guid,33cfb35c-aca7-4a5e-8b35-ff983b0b83e4.aspx. This activity is not covered here, but is recommended if you need to perform synchronous calls. You will configure synchronous calls the hard way in this hour, so you will have that to fall back on.
In the next subsection you create a workflow that runs and prematurely exits and in the following subsection you run the workflow in this configuration.
Follow the next steps to create CallingWorkflow, which will call an already created CalledWorkflow using an InvokeWorkflow activity. The CalledWorkflow contains two Code activities that display identifying messages, and each has Thread.Sleep(30000) statements.
1. Open the InvokeWorkflowSolution solution in C:SamsWf24hrsHoursHour17AdvancedHostingInvokeWorkflowSolution.
2. Right-click the project and select Add, Sequential Workflow.
3. Name the workflow CallingWorkflow and click Add.
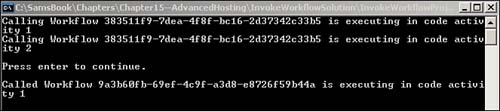
4. Add a Code activity, double-click it, and add the following code to its handler:
Console.WriteLine("Calling Workflow " +
this.WorkflowInstanceId.ToString() +
" is executing in code activity 1");
5. Add another Code activity below the Code activity, double-click the new Code activity, and add the following code to its handler:
Console.WriteLine("Calling Workflow " +
this.WorkflowInstanceId.ToString() +
" is executing in code activity 2");
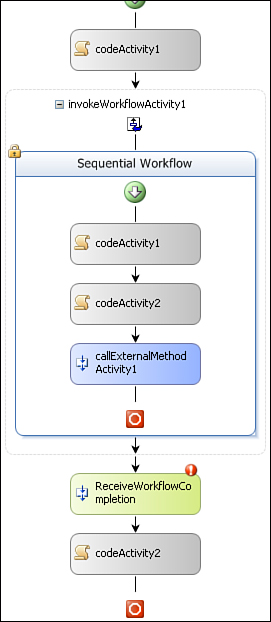
6. Add an InvokeWorkflow activity between the two Code activities.
7. Click the ellipsis in its TargetWorkflowProperty, select CalledWorkflow, and click OK.
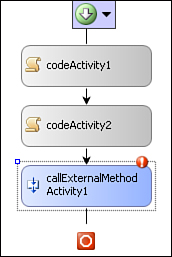
8. Your workflow should now look like Figure 17.10, with the CalledWorkflow visible in the InvokeWorkflow activity.
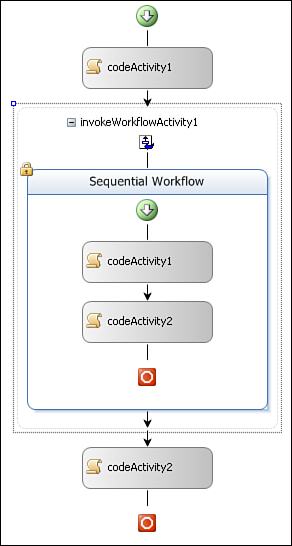
![]()
The InvokeWorkflow activity should show the called workflow. However, my experience is that it sometimes shows the workflow and at other times instructs to compile to see the called workflow. If it shows that the workflow is bound in the InvokeWorkflow activity TargetWorkflow parameter, it is probably okay.
When running the workflow, the host will expire as soon as the calling workflow completes. It will not wait for the called workflow because it’s invoked asynchronously. Both the calling and called workflows share the same host and workflow runtime. It is up to you, the host author, to ensure the host remains in scope until both workflows complete. To the workflow runtime, both workflows are the same. Again, it is up to you to add logic to the host to make sure it remains in scope as long as it needs to run the workflows spawned from it.
Follow the next step to run the workflow.
Luckily, a pretty easy solution exists. The WorkflowRuntime provides a GetLoadedWorkflows method that returns all loaded workflows. Checking that there are 0 workflows in both the completed and terminated event handlers ensures there are no active workflows. You may also want to insert the check for active workflow in the persisted handler, but that depends on your implementation.
Follow the next steps to configure the host to wait until the called workflow completes.
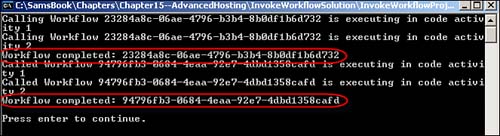
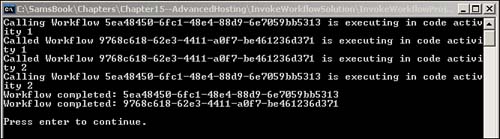
1. Add the following code to the end of the WorkflowCompleted handler:
Console.WriteLine("Workflow completed: " +
e.WorkflowInstance.InstanceId.ToString());
if
(e.WorkflowInstance.WorkflowRuntime.GetLoadedWorkflows().Count == 0)
waitHandle.Set();
2. Add the following code to the end of the WorkflowTerminated handler:
if
(e.WorkflowInstance.WorkflowRuntime.GetLoadedWorkflows().Count == 0)
waitHandle.Set();
3. Run the workflow again, and both the calling and called workflows should run until completion (Figure 17.12):
This option supports performing a synchronous-like call between the workflows. The InvokeWorkflow activity is still used to call the workflow, and it still does so asynchronously. A HandleExternalEvent activity is added below the InvokeWorkflow activity that waits for the called workflow to send completion notification. This mimics a synchronous call because the calling workflow does not move beyond the HandleExternalEvent activity until the called workflow triggers the event when it is ready. Calling the workflow synchronously may also eliminate the need to check that all workflows are complete in the workflow runtime completed handler, if the CallExternalMethod activity performing the notification is the last activity in the called workflow.
Parameters are passed from the InvokeWorkflow to public properties on the called workflow. The CallingWorkflow can receive data back via the HandleExternalEvent activity as it waits for response from the CalledWorkflow.
Follow the next steps to add a local service class that carries the status from the called to the calling workflow. It also includes the calling workflow instance ID for reasons described shortly.
1. Add a new Class Library project to the solution and name it InvokeWorkflowLocalServices.
2. Rename Class1.cs to IInvokeWorkflowLocalService.cs in the Solution Explorer. (If you are asked to rename all references in the project to reflect the name change, click Yes.)
3. Right-click the LocalService project in the Solution Explorer, select Add, Class, and name it CompletedWorkflowEventArgs.cs.
4. Add a reference to the workflow trio as well (System.Workflow.Activities, System.Workflow.Runtime and System.Workflow.ComponentModel).
Follow the next steps to code the local service.
1. Open IInvokeWorkflowLocalService.cs.
2. Replace the entire file contents with the following:
using System;
using System.Collections.Generic;
using System.Linq;
using System.Text;
using System.Workflow.Activities;
namespace InvokeWorkflowLocalServices
{
[ExternalDataExchange]
public interface IInvokeWorkflowLocalService
{
void CommunicateWorkflowStatus(Guid callingWorkflowInstancedId,
string
workflowStatus);
event EventHandler<CompletedWorkflowEventArgs> WorkflowCompleted;
}
}
Follow the next steps to code the EventArgs class.
1. Open CompletedWorkflowEventArgs.cs and replace the entire file contents with the following:
using System;
using System.Collections.Generic;
using System.Linq;
using System.Text;
using System.Workflow.Activities;
namespace InvokeWorkflowLocalServices
{
[Serializable]
public class CompletedWorkflowEventArgs : ExternalDataEventArgs
{
private string workflowStatus;
public string WorkflowStatus
{
get { return workflowStatus; }
set { workflowStatus = value; }
}
// Instance Id is the calling workflow instance id
public CompletedWorkflowEventArgs(Guid instanceId, string
workflowStatus)
: base(instanceId)
{
this.workflowStatus = workflowStatus;
}
}
}
2. Right-click the InvokeWorkflowLocalServices project and select Build. Fix errors, if any.
The following steps are required to pass parameters using the InvokeWorkflow activity:
1. Create a dependency property in the CalledWorkflow named CallingWorkflowInstanceId. Public properties and dependency properties in the called workflow are available as parameters to the invoke workflow activity.
2. Create the CallingWorkflowInstanceId field in the calling workflow. This is the value that will be bound to the invoke workflow activity parameter and then passed to the called workflow.
3. Store the WorkflowInstanceId to the CallingWorkflowInstanceId field in the InvokeWorkflow activity Invoked handler.
Behind the scenes you are using WorkflowParameterBinding. You used it previously when passing parameters via dictionary object from the host. These public properties and dependency properties are accessed by way of the InvokeWorkflow activity rather than through a dictionary object.
1. Open CalledWorkflow and switch to the code view.
2. Right-click below the class opening bracket, select Insert Snippet, double-click Other, double-click Workflow, and double-click DependencyProperty—Property to insert a new dependency property. You should see the stub dependency property, and the text MyProperty should be highlighted.
3. Replace the highlighted MyProperty text with CallingWorkflowInstanceId, press Tab, and set its type to Guid. Then press Enter to exit the wizard.
4. Open CallingWorkflow and click the InvokeWorkflow activity. Its Properties window should now contain a CallingWorkflowInstanceId property as shown in Figure 17.13. (If it does not show, build the InvokeWorkflowProject.)
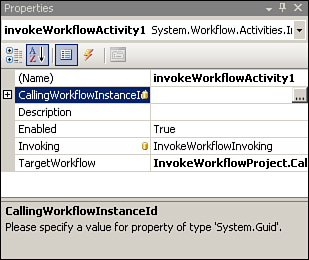
5. Click the ellipsis in the CallingWorkflowInstanceId property of the InvokeWorkflow activity. Select the Bind to New Member tab. Enter CallingWorkflowInstanceId as the name, and choose Field. Then click OK.
6. Enter InvokeWorkflowInvoking in the InvokeWorkflow activity’s Invoking property. Then press Enter and enter the following code in the handler:
CallingWorkflowInstanceId = this.WorkflowInstanceId;
Follow the next steps to add activities to the calling and called workflows.
Follow the next steps to configure the CallExternalMethod activity.
1. Open the CalledWorkflow in design mode.
2. Add a project reference from the InvokeWorkflowProject to the InvokeWorkflowLocalServices project.
3. Click the CallExternalMethod activity’s InterfaceType property, select the IInvokeLocalService interface, and click OK.
4. Select the CommunicateWorkflowStatus method from the MethodName drop-down.
5. Click the ellipsis in the CallingWorkflowInstanceId property of the CallExternalMethod activity. Select the CallingWorkflowInstanceId property and click OK.
6. Enter Completed in the workflowStatus property.
Follow the next steps to configure the HandleExternalEvent activity.
1. Open the CallingWorkflow in design mode.
2. Click the HandleExternalEvent activity’s InterfaceType property, select the IInvokeLocalService interface, and click OK.
3. Select the WorkflowCompleted event from the EventName property.
4. Build the entire solution.
5. Your updated workflows should now look like Figures 17.14 and 17.15.
Now CallingWorkflow calls CalledWorkflow via InvokeWorkflow activity. Then CallingWorkflow completes synchronous call when it is ready by raising an event on CallingWorkflow via its CallExternalMethod activity.
The one major difference with this interface is that it is called from a different workflow than it raises an event on. It is called from the CalledWorkflow and raises an event on the CallingWorkflow. This is why the WorkflowInstanceId was passed as a parameter in the InvokeWorkflow activity when the calling workflow invoked the called workflow. It is this passed instance ID that is now used when raising the event on the calling workflow.
Follow the next steps to create and code the local service.
1. Add a new class to the InvokeWorkflowProject and name itInvokeWorkflowLocalService.cs.
2. Replace the entire class contents with the following:
using System;
using System.Collections.Generic;
using System.Linq;
using System.Text;
using InvokeWorkflowLocalServices;
namespace InvokeWorkflowProject
{
class InvokeWorkflowLocalService : IInvokeWorkflowLocalService
{
public event EventHandler<CompletedWorkflowEventArgs>
WorkflowCompleted;
// The called workflow calls this method via a CallExternalMethod
activity.
public void CommunicateWorkflowStatus(Guid
callingWorkflowInstanceId, string
workflowStatus)
{
// An event is now passed to the calling workflow to signify
completion
// the called workflow.
CompletedWorkflowEventArgs eventArgs =
new CompletedWorkflowEventArgs
(callingWorkflowInstanceId, workflowStatus);
WorkflowCompleted(null, eventArgs);
}
}
}
Follow the next steps to register the ExternalDataExchangeService with the host and run the workflow.
1. Add the following code to Program.cs in the InvokeWorkflowProject at the top of the using block to register the external data exchange service with the host.
InvokeWorkflowLocalService iwls = new
InvokeWorkflowLocalService();
ExternalDataExchangeService eds = new
ExternalDataExchangeService();
workflowRuntime.AddService(eds);
eds.AddService(iwls);
2. Right-click InvokeWorkflowLocalServices, select Resolve, and choose using InvokeWorkflowProject.
3. Press F5 to run the workflow, and you should receive results similar to Figure 17.16. Both workflows now end nearly simultaneously at the end of processing.
A wide range of topics were covered in this hour. It started with the workflow event and then discussed workflow services. The threading differences between the manual and default scheduling services were shown, and the synchronous nature of the manual scheduler service was pointed out as a potential benefit in some UI scenarios. The InvokeWorkflow activity was covered in fire-and-forget mode and then in a mode in which the host waited for all workflows to complete before expiring. Finally, a synchronous-like experience was created by augmenting the InvokeWorkflow activity with CallExternalMethod and HandleExternalEvent activities. In the same step, parameters were passed from the calling to the called workflow and back.