
Hour 2. Working with HTML, CSS, and JavaScript
This hour reviews the concepts and current trends of using HTML, CSS, and JavaScript. This is important as it plays a major role in development with jQuery Mobile. Sites that use jQuery Mobile are built with HTML, and while they are styled by a default theme, you may want to change the styles to something a little more custom. Doing this requires knowledge of how to read and edit CSS. Understanding JavaScript comes into play when you want to bind events to button presses or screen taps. Understanding standard JavaScript is also useful when learning to use the jQuery Mobile framework.
While it would be fun to cover everything there is to know about HTML, CSS, and JavaScript, it’s just not possible in an hour. However, if you have ever developed a website, toyed with HTML, or just been away for a few years, this should be an informative hour that gets you back up to speed.
Building Content with HTML
HTML is the basic building block of the Web. It is the frame that holds your site together and the foundation that allows you to extend your site into whatever you want it to be. HTML has come a long way from its inception and is continuing to grow and develop.
The Role of HTML
Before Cascading Style Sheets (CSS) were introduced, everything was handled with HTML tags. Images, text, layout, scrolling text, just about everything was put in place with HTML tags. You may remember viewing the source code on your browser and seeing lots of character entities being used for layout purposes.
Things continued to get more complex as developers were eager to explore new territory and push the language further. Layouts based on tables emerged, and this allowed new flexibility and control in regards to how a site was displayed. Table layouts were immensely popular. This allowed new flexible or self-resizing sections and a more dynamic site flow. CSS was new, and when it was supported in browsers it was limited. This made styling containers and forms difficult. Some light CSS was starting to be thrown in, but it did not fully replace table layout containers, use of the <font> tag, and some other style-only tags.
Web developers continued to mold, push, and hack the way HTML was being rendered by browsers. This progression and community adopted standards helped to drive advancements in the various Internet browsers that were available. Soon most browsers had at least rudimentary support for CSS2. That soon moved into a fair amount of arguing over how HTML should really be used in site development.
The DOCTYPE
Continuing through the evolution of HTML brings us to talking about the DOCTYPE. This is an interesting tag that was added to let browsers know how to render the page.
While this is not actually an HTML tag per se, it is a necessary component for the correct rendering and handling of your website.
Developers who are still happily using deprecated HTML tags but want to move on to HTML 4 can use the Transitional DOCTYPE.
<!DOCTYPE HTML PUBLIC "-//W3C//DTD HTML 4.01 Transitional//EN"
"http://www.w3.org/TR/html4/loose.dtd">
The Transitional DOCTYPE allows the browser to parse through deprecated tags and displays them without throwing any errors.
Developers who do not want to include support for deprecated tags and the possible formatting errors that may ensue when using a “compatibility” mode can use the strict DOCTYPE.
<!DOCTYPE HTML PUBLIC "-//W3C//DTD HTML 4.01//EN"
"http://www.w3.org/TR/html4/strict.dtd">
Using the strict DOCTYPE tells the browser to throw errors when deprecated tags are included in the HTML file it is trying to load. This can be useful as it guarantees your work is at least up to the HTML 4 standard.
Caution: JavaScript Library Plug-ins and DOCTYPEs
Some JavaScript library plug-ins are a bit picky about the use of the Transitional and strict DOCTYPE used on a site. If you are using a JavaScript library or plug-in that does not work the same way for you as it does on a demo site, try changing your DOCTYPE and see whether it magically starts working as intended.
For current developers who want to cater to modern and mobile browsers, the HTML5 DOCTYPE is definitely the way to go.
Using the HTML5 DOCTYPE works on almost all legacy browsers and is already in use on many websites today.
To use the HTML5 DOCTYPE in your HTML file, use the following snippet:
<!DOCTYPE html>
Yep, that is really all there is to using the HTML5 DOCTYPE on your site. There is nothing crazy, long, or complicated to it.
What is even more impressive is that legacy browsers have rudimentary support for it. Rather than throw the browser into a complete quirks mode, it uses more of a semi-quirks mode that generally does not break the formatting of the site.
The Basic Structure
After the DOCTYPE has been added to the page, we can begin to assemble the basic structure of an HTML document. Listing 2.1 shows the required elements of an HTML file using the HTML5 DOCTYPE.
Listing 2.1 Required Elements of an HTML File Using the HTML5 DOCTYPE
1: <!DOCTYPE html>
2: <html>
3: <head><title></title></head>
4: <body></body>
5: </html>
As shown in Listing 2.1, the basic structure of an HTML document is exactly that, basic. On line 1 we declare the HTML5 DOCTYPE allowing the browser viewing this file to know how to parse the rest of the document. On line 2 we start the html element. All valid HTML tags that we want to use must be contained within this element. Line 3 contains both the opening and closing tags of the head element. Generally the head element contains the title element, meta tags, links to CSS files, links to JavaScript files, as well as a few other custom or specialty tags. Line 4 contains the opening and closing body tags. The body element contains all the structure, or the skeleton of your site. Along with standard HTML elements such as p, div, and ul, the body element may also contain inline JavaScript as well as links to external JavaScript files. Line 5 closes the html element and completes our HTML file.
Tip: Loading Files in the Head
Your site will stop loading until all files called in the head element have been downloaded and placed into memory. If you have large files or slow loading scripts included in your head element it can give the impression of a slow-loading or broken site. Unless these files are necessary to page functionality, it is best to put large JavaScript files just before the closing body tag.
Separation of Content and Presentation
The current view of correctly using HTML and CSS is to use it as the separation of content and presentation. This is a good idea as you can easily create themes and then change the entire look of your site just by changing the styles instead of the content. Some websites follow this model and have several different style sheets that allow you to switch the “theme” of the website.
Content is handled purely (or as close to purely as possible) by HTML while anything that affects the way the data is displayed or rendered to an end user is handled with CSS.
HTML tags that were once dedicated to changing the way fonts and text were displayed to the user were deprecated in HTML 4 and replaced with newer tags that attempted to describe the content being placed within them.
A short list of elements that had been deprecated but are again valid in HTML5:
• <b> is used to grab attention.
• <i> is used to declare an alternate voice or mood.
• <s> is used to display information no longer valid or relevant.
Sections of code are generally divided using div tags. Inside these tags are subsections that usually contain your text. The text is generally grouped into paragraphs and contained in p tags. HTML5 also introduces several new tags such as article and section elements that behave similarly to div elements. Sections can also be divided using the new header and footer elements.
If you have items that you want to list in your code, you can put them into an ordered list by using an ol tag, or you can use an unordered list by using the ul tag. The items you want displayed in the list are added as list items with <li> tags.
A trend with HTML 4 has been to use unordered lists to create navigation sections. While this is still in use today, the built-in navigation tags included with HTML5 will shortly make this practice obsolete.
Let’s review what we’ve just learned about HTML and put some content into the basic HTML structure. Listing 2.2 shows an HTML file that contains content without any styling.
Listing 2.2 The Full Text of nostyles.html
1: <!DOCTYPE html>
2: <html>
3: <head>
4: <title>Titles should be short descriptions of the page</title>
5: <meta charset="utf-8">
6: </head>
7: <body>
8: <div>
9: <h1>h1 tags should contain the most important information on your site </h1>
10: <p>Paragraph tags should be where most of your text content lives, or used as a separation between sections.</p>
11: <ul>
12: <li>This is a list element</li>
13: <li>This is another element, notice the bullets and indentation </li>
14: </ul>
15: <p>You probably noticed that I used a "div" tag to wrap these other tags in. I'm using it as a container.</p>
16: </div>
17: </body>
18: </html>
You can see that we added some content to our page; let’s walk through the additions.
On line 4 we added a title element; the value we placed in it describes exactly what a title element should contain.
The next addition is on line 8 where we added an opening div tag. Often you find div tags used to contain various sections of the site as we are doing here.
On line 9 we put in an h1 element. This element is used to denote the most important thing on the page. Because of this, any text placed in an h1 element is generally 200% larger than the standard font size.
On line 10 we set up some text in a p element. This displays the text with some default margins and padding. Every browser applies a default margin and padding size, so if you are going for identical cross-browser display you may want to overwrite the default styles in your CSS.
Line 11 shows the beginning of an unordered list by use of an opening ul tag. Line 12 shows an li element. The li element stands for list item and is a child element of the ul element. This means that without a ul element surrounding it, the li element is invalid.
Line 15 shows another p element example, and line 16 closes out our div element.
We know what the code does, but let’s take a look at what it actually looks like. Figure 2.1 shows what the rendered HTML looks like.
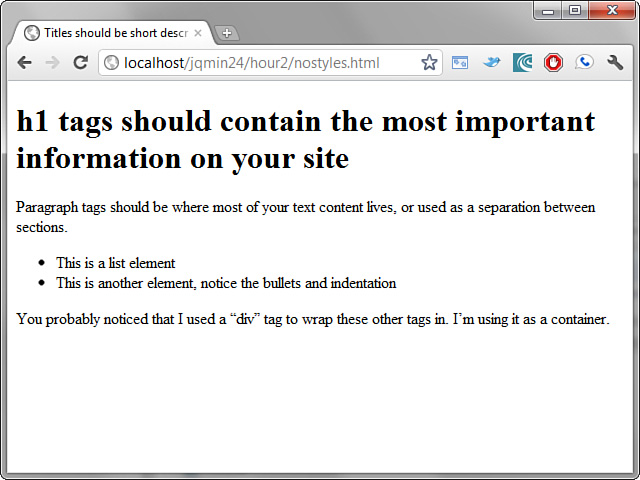
Figure 2.1 An HTML file using the HTML5 DOCTYPE without any CSS
Caution: Browser Defaults
You may have heard of browser-resets or CSS-resets styles. These are popular because every browser has a default rule or style that is applied to each HTML element. A quick example of this is to view an H1 tag in multiple browsers. You should notice that each browser renders this tag with a slightly different font size, and may or may not be styled bold.
We now have content and our page looks somewhat presentable; however, even though we now have substance, we are definitely missing style. Having substance without style is like holding onto an uncut gem; it is still valuable, but it is difficult to see the real value without some adding some design and polish.
Presenting CSS
Cascading Style Sheets are used to transform what would otherwise be boring content into an exciting and captivating experience. You can add styles to your site in a few different ways.
When adding CSS in style tags or with an external file, you can write your CSS all in a single line, or you can break it into a paragraph format.
Developers new to CSS generally prefer the paragraph format, while experienced developers may use a single line with spaces or tabs to show the style and layout hierarchy.
While I do favor one formatting style over the other, when it all comes down to it I minify my CSS for use on production, so keeping my CSS in one format over another really only matters for maintenance. We talk about minification and how it can benefit you in Hour 21, “Learning to Minify Everything.”
Listing 2.3 shows a snippet of CSS written out using the paragraph format. Each style property is set on a separate line indented from the root element. You can see how this is an easy-to-read format that requires no horizontal scrolling. The drawbacks on this method are vertically long files (and subsequently larger files due to numerous line returns), and no visible means of hierarchy.
Listing 2.3 CSS Code Using the Paragraph Style of Formatting
1: body {
2: background: #333333;
3: font-family: Helvetica, Arial, sans-serif;
4: font-size: 0.75em;
5: }
6:
7: h1 {
8: font-size: 200%
9: }
10:
11: p {
12: margin: 5px 0;
13: padding: 0 3px;
14: }
15:
16: .small {
17: font-size: 80%;
18: }
The CSS code in Listing 2.3 probably looks familiar. The paragraphs are easy to read, and each CSS property is listed on a line by itself to increase readability. As you can see on lines 6, 10, and 15, I included an empty line. This was intentional. Even with the tabs sometimes when scrolling through large CSS files it is possible to get confused, so the spaces help break up the sections.
Listing 2.4 contains the same styles as the previous snippet but is an example of the single-line hierarchy style of coding with CSS.
Listing 2.4 CSS Code Using the Single-Line Hierarchy Style of Formatting
1: body {background: #333333;font-family: Helvetica, Arial, sans-serif; font-size: 0.75em;}
2: h1 {font-size: 200%;}
3: p {margin: 5px 0;padding: 0 3px;}
4: .small {font-size: 80%;}
You can see how this takes up much less vertical space in your styles. This formatting style decreased the exact same code from 18 lines down to 4.
You can also see that by using tabs or spaces, the hierarchy of elements is shown. This is apparent by looking at line 1 and line 2. On line 1 the body element is not tabbed while the h1 element on line 2 has been tabbed showing that it is contained within the body element.
The drawbacks to using this method are that there is usually plenty of horizontal scrolling (especially with browser-specific styles and when incorporating CSS3 tags). This method can also be challenging to debug if you are not used to seeing CSS written in this format as the only character separating properties is a semicolon.
No matter which style you format your CSS code in, you can implement styles into your HTML files. Let’s discuss how.
Style Tags
One thing that HTML 4 has support for is the use of a style tag. This is generally included in the head element and contains all the styles that you want to apply to the document. Using a style element in your HTML file is good for when you have a few specific styles you want to apply to the current document.
Listing 2.5 shows an example of applying styles with a style element being included in the head element of an HTML file.
Listing 2.5 An Excerpt of headstyles.html
1: <head>
2: <title>Titles should be short descriptions of the page</title>
3: <meta charset="utf-8">
4: <style type="text/css">
5: body {
6: background: #e7e7e7;
7: font-family: Helvetica, Arial, sans-serif;
8: font-size: 0.75em;
9: }
10: h1 {
11: font-size: 200%;
12: }
13: p {
14: margin: 5px 0;
15: padding: 0 3px;
16: }
17: .small {
18: font-size: 80%;
19: }
20: ul {
21: list-style-type: none;
22: font-weight: bold;
23: }
24: </style>
25: </head>
Looking at line 1, you can see that we are starting in the head element. Line 2 is the title element. While this doesn’t have anything to do with styles, it does belong in the head element. Line 4 shows the opening style element. The style element includes type="text/css" to let the browser know how to process the data within this element. Lines 5 through 23 show CSS written in a paragraph format that does not have spaces between each element. Line 24 contains the closing style tag. That leaves line 25 showing the closing head element.
Figure 2.2 shows the file headstyles.html being rendered with the styles applied.
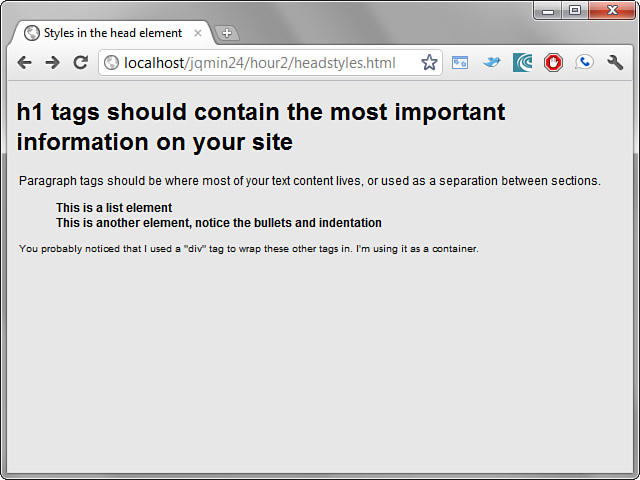
Figure 2.2 An HTML file that has been styled with the style element
By comparing Figure 2.1 and 2.2, you can see that styles can have quite the effect on presentation. Styles do not always need to be included in the style element. They may also be included through external CSS files.
Using External CSS Files
With various methods of content delivery and compression, the most popular choice for using CSS is to include it in a separate file. This is done by creating a file with a file extension of .css and then calling that file in the head element with a link element.
Here is an example of calling or linking to an external css file:
<link rel="stylesheet" type="text/css" href="styles.css" />
In the preceding snippet we have a file named styles.css in the same folder as the HTML file calling it. Any styles that have been coded and placed in the file styles.css will be pulled into the document and used.
It is worth noting that you can store your CSS in subfolders, and even load it from offsite.
You are not limited to using one CSS file in your HTML file, either; you can actually use multiple files. Using multiple external CSS files has the advantage of separating styles that are not needed until a certain portion of your site has been entered and has the possibility of making your code easier to maintain.
Another use of separating styles is to create browser-specific styles that are included only when a certain browser is detected.
Caution: Using Multiple CSS Files
Using multiple CSS files can have a few somewhat serious drawbacks. If you are calling them all on the same page you could create HTTP request blocking, and inadvertently create a slower loading web page while all of the files are downloaded and parsed into memory. If you are using separate files based on browser detection, you will most likely run into maintaining different files for different versions. Your site may also have an increased loading time as your detection scripts need to load and include files based on what they find.
Inline Styles
Inline styles are available to use, but I will throw in a strong recommendation that they be used only for quick prototyping or for when there is absolutely no other way to get what you want done.
Inline styles overwrite browser-preset styles and styles that have been included. They are useful when debugging because you can pinpoint exact elements and adjust them.
The reason why I am against using inline styles is because they break the line between content and presentation. If you are “hard-coding” a style on a content piece, that style will stay unless steps are taken to remove that specific style or element. Although it is possible to use other means to remove hard-coded styles, it is much easier to just avoid it and save yourself the headache of chasing down bad code inside your HTML files.
Listing 2.6 shows an example of using inline styles within different HTML elements.
Listing 2.6 The Full Text of inlinestyles.html
1: <!DOCTYPE html>
2: <html>
3: <head>
4: <title>Inline Styles</title>
5: <meta charset="utf-8">
6: </head>
7: <body>
8: <div style="margin:0 auto;width: 460px;border: 1px solid #000; padding: 3px;">
9: <p>The parent container is hard-coded</p>
10: <p style="font-weight: bold;">I probably should have used a class instead.</p>
11: </div>
12: </body>
13: </html>
The preceding code is perfectly valid, in fact the inline styles applied on line 8 will center the div element when viewed in a browser as well as apply a border and some padding. The inline style is applied to the div element by including a style attribute within the opening div element. On line 10 you can see that we added a style attribute to the opening p element. The style that is being applied to the p element will make the text bold.
Figure 2.3 shows what inlinestyles.html looks like when rendered with the applied inline styles.
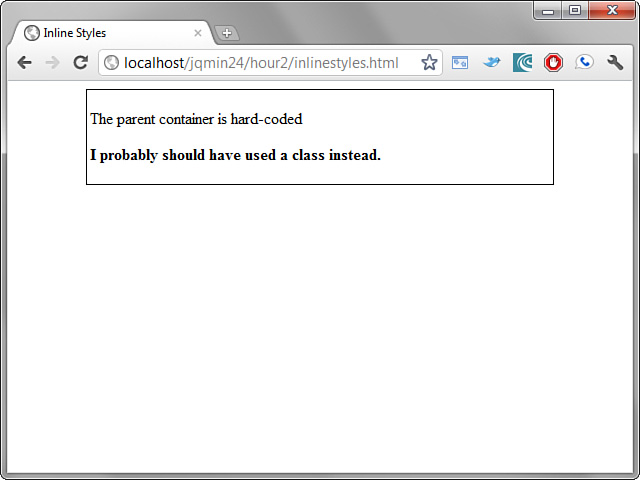
Figure 2.3 An HTML file that has been rendered with inline styles
Now that we’ve seen different ways to present our page using CSS, it is time to look at making it function.
Functioning with JavaScript
We now know how to style the content on a site—it might be nice if we could make something happen when a visitor comes to view the site. This is where JavaScript comes into play.
JavaScript originally picked up a bad reputation when it was first introduced. People did not understand what it was, or even what it was for. I remember a friend of mine was convinced that he had picked up a virus because every time he visited a certain website words would follow his mouse around the screen.
To many people, JavaScript became a nuisance and at best a practical joke language. At the time it was not realized what JavaScript could do or how it could enrich websites by adding animation, data collection, and event binding that can change the way a user interacts with a website. While I’m at it let me dispel one more myth, JavaScript is not Java.
Whether you realize it or not, today JavaScript does more heavy lifting and manipulation of the Document Object Model than ever before. Websites that could only do things with precompiled files and special playback plug-ins can now be displayed natively in a browser. JavaScript helps websites feel more interactive, or even more like a native application.
Where Scripts Can Be Added
You can include JavaScript by placing the code inside script tags. While these tags can be placed anywhere inside your document, you should take some time to consider where your script will be most effective.
The Head Element
Placing your script element inside the head element may cause blocking, but will make sure your code is ready or already executing before the rest of your page is loaded. Those that have experience with third-party “pixel” or tracking providers know that they want their pixel as high as they can get it. Placing a script in the head element ensures that it will be loaded, as the rest of the page must wait until the script has been downloaded before it can continue loading.
Loading scripts into the head element this way does have some drawbacks. If the script you are calling is remote you may end up waiting for it to load. Since some browsers let you have only two requests for URL data at a time, this can block one of your requests causing the rest of the elements on your site to load considerably slower.
The Middle
You could try loading scripts inside the body element. I’ve seen this done by developers who were debugging and never cleaned up their test scripts. I have also seen this used by those who thought it was a good idea to include the script right below the place where they needed it to execute.
While it seems like a good idea to keep the scripts close to where you are working or calling the methods, this can make site and page maintenance a nightmare. Trying to figure out where the code is that is breaking your site or web application is not a fun way to spend an afternoon (especially in compiled code where line numbers do not necessarily reflect the actual line numbers in your precompiled files).
The End of the Body
The last place you could include your scripts is just above the closing body tag. Putting your scripts here enables the rest of your page to start building before any included JavaScript files can drag the URL requests down with slowly loading remote JavaScript files. This gives users the feeling of a fast and responsive website because they can see the page starting to render even before the page has requested and loaded the functions that it needs to work.
The drawback to this method is the fact that if you are depending on extra functionality to be applied to the page on load and a user clicks on something that should trigger an event that uses events set up in your JavaScript file, the event may not be bound yet, so the click action will be wasted or will appear as an error.
A summary of placing JavaScript tags in your document:
• Loading scripts in the head element makes them load first but can adversely affect the perceived load time.
• Loading scripts inside the body may seem like a good idea but creates issues with maintenance and throws possible loading delays.
• Loading scripts just before the closing body tag makes your site appear to load quickly but may have an unintended consequence of missing site functionality for up to the first few seconds.
Loading Scripts
You can include JavaScript using a reference to an external .js file or include your code inside a script element. These references should be included in either the head element or inside the body element.
Script tags that reference an external file can be included like so:
<script src="http://code.jquery.com/jquery-1.6.4.min.js"></script>
Note that you can include more than one JavaScript file this way, and they can be included from both local and remote locations.
If you have JavaScript code that you want to include directly on the page, you may include it inside script tags.
Setting the Type
If you have looked at the source code of various websites you have probably noticed that some are missing the declaration "type=text/javascript" in the script tag. You can choose to include it (as per the HTML 4 spec) or omit it as all modern browsers already know that anything inside a script element will be JavaScript.
Listing 2.7 shows an HTML page that contains a sample function that looks for an element with an id of “year” and replaces what is in that element with the current year.
Listing 2.7 The Full Text of javascriptdate.html
1: <!DOCTYPE html>
2: <html>
3: <head>
4: <title>JavaScript Date</title>
5: <meta charset="utf-8">
6: <style type="text/css">
7: p {text-align: center;}
8: #year {font-weight: bold;font-size:200%;}
9: </style>
10: </head>
11: <body>
12: <p>When this page loads, the year below will switch to the current year that the client device is set to.</p>
13: <p id="year">2000</p>
14: <script type="text/javascript">
15: window.onload = setYear;
16: function setYear() {
17: var currentYear = new Date();
18: document.getElementById('year').innerHTML = currentYear.getFullYear();
19: }
20: </script>
21: </body>
22: </html>
Starting on line 14 we see the start of our script element. Line 15 is where we use the window object in conjunction with the onload method and set it to setYear. This is the name of the function we want to run when the page loads. Line 16 shows the declaration of the setYear() function. On line 17 we create a variable named currentYear and set the value to be a Date object. Line 18 ties the function together as we use document.getElementbyId('year') to parse through the Document Object Model (DOM) and find an element with an id of “year”. Then by using .innerHTML = currentYear.getFullYear(); we are able to change the value of the found element to equal the current year.
Something worth noting about this code example is that the Date object is taken from the client machine. This means that if someone doesn’t have their time set properly, the year that shows up on the site reflects whatever year the computer thinks it is. Because of that, using JavaScript to set the date is not a foolproof or terribly terrific idea. Whenever possible, try to use the time from the server instead of the client.
Figure 2.4 shows the code of javascriptdate.html being rendered on a browser that has the year set to 2011. Notice that it has changed the date from 2000 to 2011.
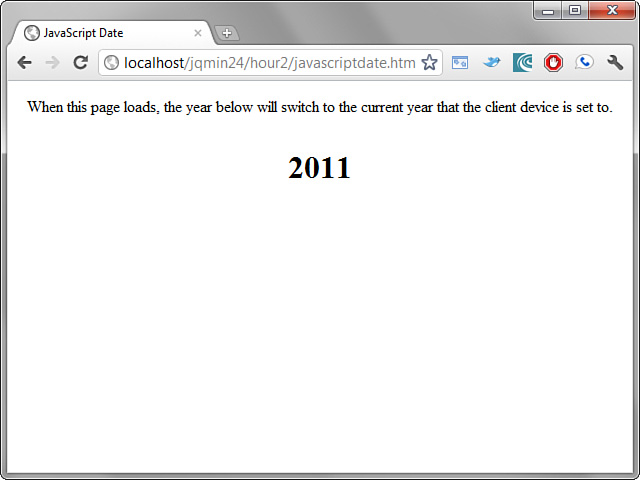
Figure 2.4 A rendered HTML file with JavaScript manipulating the displayed content
We can do more than simple data manipulation with JavaScript, we can actually make elements do things when clicked.
Event Binding
One thing that JavaScript is used for is to bind events. Binding events is useful when you want to make a mouse click trigger a function or submit a form.
Listing 2.8 shows an example of binding an event in JavaScript.
Listing 2.8 A Code Snippet from javascriptalert.html
1: <script type="text/javascript">
2: document.getElementById("btnAlert").addEventListener('click', clickAlert, false);
3: function clickAlert() {
4: alert("You clicked the button!");
5: }
6: </script>
Line 1 shows the beginning of the script element. In line 2 we use document.getElementById("btnAlert") to get the element with the id of "btnAlert" and then bind the click event to it by attaching .addEventListener('click', clickAlert, false) to it. Line 3 is where we start to create the clickAlert function. Line 4 shows an alert function being called. The value being passed inside the alert function is what will be displayed in a dialog window by the browser that is rendering the site. Line 5 is the closing brace for the clickAlert function and ends the code that will be executed when the function runs. Line 6 simply ends the script element.
In Figure 2.5 you see an alert window displaying the message “You clicked the button!” This window has a slightly different appearance depending on the browser and operating system you are using whenever the alert() function is called.
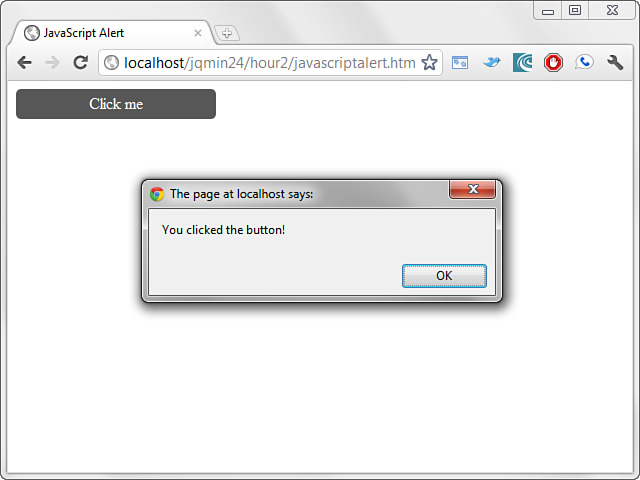
Figure 2.5 An alert window being displayed
Caution: Be Careful with the Alert
Using the alert() function shows a dialog window on your page. This is an application controlled message and stops users from being able to use your site until the message has been acknowledged. Some browsers detect multiple calls to this function and give the user an opportunity to ignore all alerts. For this reason you should think about nonintrusive messages through the use of light boxes or modal windows.
Summary
You just learned about the current use of HTML and CSS. You also learned that the separation of content and presentation is desirable for easy maintenance and site reconstruction with the use of CSS files.
You learned the different ways to apply CSS styles to your site by using the style element, including styles through the use of external .css files and by using inline styles.
You then learned the role of JavaScript in web development and how to include JavaScript by using external files or by placing code inside <script> tags inside the head or body elements of your HTML file.
Q&A
Q. Does the single-line hierarchy style of formatting ever pose any rendering problems?
A. Yes, using a single-line hierarchy style of formatting can occasionally be a problem with some browsers. When you are setting the property and value in your CSS, if you forget to add a space before the value the value may be skipped causing your styles to break. This is another reason why many developers prefer to use the paragraph style and then minify the code before using it on production.
Q. Can I still use tables even though developers are using CSS now for styling?
A. Of course you can. Just remember that tables should be used for displaying tabular data. You really should avoid using a table as a layout device and use it only for displaying lists and forms.
Q. If the HTML 4 spec deprecates some HTML tags, why would I want to use the Transitional DOCTYPE?
A. If you ever get the chance to work on a project where the code is inherited you may find yourself replacing portions of it at a time. When this is the case, using the Transitional DOCTYPE allows you to improve the site while maintaining the previous version.
Workshop
The workshop contains a quiz and some exercises to help you check your comprehension and understanding.
Quiz
1. Can the use of deprecated HTML tags can still be used in the HTML 4 strict DOCTYPE?
2. Why is inline styling discouraged?
3. Is JavaScript currently used for mouse trails and animated eyes or is it used for other things?
4. What version of HTML included support for CSS?
5. True or False: Using JavaScript to manipulate objects that have not been parsed and loaded into the DOM causes errors to be thrown and your JavaScript to fail.
Answers
1. No, but it can be used in the HTML 4.01 Transitional DOCTYPE.
2. Inline styles can be used, but they blur the line between content and presentation. This makes future upgrades to your site styles more involved and time intensive.
3. While that is possible, the current use of JavaScript is focused more on events and animation. While HTML5 and CSS3 are still growing, JavaScript is currently bridging the gap for interactivity and Flash replacement.
4. The HTML 4 specification was the first version of HTML to fully include support for CSS styles.
5. True. When you attempt to manipulate data that has not been parsed into the DOM you are grabbing at something that doesn’t exist. Even if you know that it will exist you need to wait until it has been created to manipulate it.
Exercises
1. Write a simple web page that contains a click event similar to the one in Listing 2.8 and change what happens when the event is triggered.
2. Create a web page using the HTML5 DOCTYPE and add some elements and basic styles. View the page in the oldest and the newest version of Internet Explorer that you have. Note how the HTML5 DOCTYPE does not throw IE into standard “quirks” mode and still displays your page correctly (and in case you wondered, no, the HTML5 DOCTYPE will not save you from the ie6 double-margin issue). If you do not have Internet Explorer or run on OSX or Linux, try grabbing an old version of Firefox and see how the page renders.
3. Perform a search on your favorite search engine for HTML5 websites and get familiar with the new tags and proposed standards. Do another search on the current boilerplate code that is available when starting an HTML5 page and notice the fallbacks and compatibility that is built in for both modern and legacy browsers.