
Hour 23. Building an App with PhoneGap and jQuery Mobile
There has been some debate about building native applications or using web applications and while both sides have valid points, there are times when a web application either isn’t feasible or just doesn’t provide the device permissions needed to allow the application to function properly. This hour we spend some time looking at a project that helps bridge the gap between native and web applications.
Getting Started with PhoneGap
PhoneGap started out as a project aimed at taking HTML5 web applications and making them available on mobile devices without requiring web developers to learn new languages to create native applications. PhoneGap currently supports features of the iOS, Android, Windows Phone, BlackBerry, webOS, Symbian, and bada platforms. For a list of currently supported features for each platform, visit http://phonegap.com/about/features. At the Adobe MAX Conference in 2011 it was announced that PhoneGap would be acquired by Adobe. Adobe recently donated the original codebase of PhoneGap to the Apache Software Foundation where it has become the Apache Cordova project (http://incubator.apache.org/cordova). That being said, PhoneGap can be thought of as a project powered by Apache Cordova, or a distribution of Apache Cordova. PhoneGap is a framework that allows you create native applications. Let’s learn more about native applications, how to install PhoneGap, and how to create a project.
Going Native
Native applications are built to run as standalone applications on the device. This means that they have been compiled and optimized for the device OS. Native applications are put into a different sandbox of security restrictions and allowed access to different layers of the hardware inside the machine. For example, a native application is granted access to the device storage, accelerometer, camera, and hardware keys. Another positive of native applications is that they may not require an Internet connection or a cached version to function. Not all applications use device features, and some may not use any features at all. Applications that are utilities generally do not use extra device features, although some check for and use an available data connection to push updates to the application.
When creating a native application it is important to know the capabilities of each device you are planning to build for and to plan for them. Not all devices will have a compass, accelerometer, or camera. They may also contain different screen resolutions and file system partitions. Some of these issues can be dealt with by the nature of your application, while others, such as layout concerns, can be handled with responsive layouts and by using frameworks such as jQuery Mobile.
Installing PhoneGap
PhoneGap is itself a framework, which means that the installation process is as easy as including it in your project. The downside to this is that depending on what platform you are programming for you need to change how you include PhoneGap. To get started we need to first download the current version of PhoneGap, which is available at http://phonegap.com/download-thankyou. Once you have the compressed file downloaded, you can start installing the other prerequisites. Each platform has a list of requirements that must be met to develop for that platform. For our sample work in this hour we are going to use PhoneGap with an Android project. We use Android because the Android SDK runs on Windows, OSX, and Linux, allowing anyone to create a sample project and test it. To develop with the Android SDK, you need to download the Android SDK as well as install Eclipse.
Downloading the Android SDK
To start with the Android SDK, following these steps:
1. Open a browser to http://developer.android.com/sdk/index.html and download the version of the SDK for your system. If you download a compressed file you only need to uncompress the file on your file system and then run the android script or batch file.
2. When the script or batch file is executed, the Android SDK Manager should appear and allow you to start downloading the pieces of the SDK that you want to develop with.
3. For testing across the most common Android devices you will probably want to download Android 2.3.3 (API 10 – Gingerbread), Android 3.2 (API 13 – Honeycomb), and Android 4.0.3 (API 15 – Ice Cream Sandwich). As we learned before, to use an Android Virtual Device (AVD), you need to have at least one of these APIs downloaded.
4. When you have finished downloading the files you want, open the Android Virtual Device Manager and create at least one AVD by clicking the New button and then walking through the values to create your device.
Once you have the device created you are ready to download Eclipse.
Note: Java for Eclipse
Windows and Linux users may need to install a Java Runtime Environment to use Eclipse; head over to http://java.com/ to download and install Java.
Downloading Eclipse
To download Eclipse, follow these steps:
1. Open a browser and go to http://eclipse.org/downloads/. On this page find the installation package for Eclipse Classic and download either the 32- or 64-bit version (depending on the OS and hardware of your computer).
If you are unsure of what version to run, you should be safe downloading the 32-bit version. The file comes down as a compressed file that can be uncompressed to any folder in your file system. OSX users may want to uncompress the file in the Applications folder, while Windows users may feel more comfortable uncompressing the file in their Program Files folder.
2. Once you have the file uncompressed you can open Eclipse by launching the eclipse application or executable file. When launched you are prompted for a workspace location. This is where all your project files will be created and saved. While the defaults are generally fine for most, if you are meticulous about where files are stored on your system, this is where you will want to change it. If you do not want to be prompted for your workspace location every time you open Eclipse, you can check the box asking to make this workspace your default.
3. After you have chosen your workspace location you are then shown the welcome screen. To get out of this screen and onto your workspace, an arrow icon in the top-right takes you to the workbench. You are now ready to install the Android Developer Tools (ADT) plug-in into Eclipse.
The ADT plug-in allows Eclipse to interface with the Android SDK that you downloaded previously.
4. To install the latest version of the ADT plug-in, click on the Help menu and then click on Install New Software. This brings up a new Install window that is used to install new software and plug-ins that work with Eclipse.
5. On the right side of the Install window click on the Add button. This brings up the Add Repository window that asks for the name and location of the plug-in. For the Name field type in ADT Plugin. For the Location field type in https://dl-ssl.google.com/android/eclipse/. Figure 23.1 shows the Install and Add Repository windows with the repository information filled out.

Figure 23.1 Adding the site for the ADT plug-in
6. After clicking OK, the files that are available to be installed appear in the Install window under Developer Tools with several entries below it. Click the Developer Tools check box and then click the Next button. The file dependencies will then be automatically checked, and either you will be shown errors with a description of what caused the error, or you will be able to click Next. After clicking Next you are shown the licenses for the files you are going to download. After giving them a thorough reading, click on I Accept the Terms of the License Agreements and click the Finish button.
7. During the installation process you may be shown a window telling you that the software you are downloading contains unsigned content. As this is an official plug-in from Google, as long as you are certain you typed in the address correctly, this can be noted and then safely ignored. Clicking OK dismisses the message and continues the installation process.
8. After the files have been downloaded you are asked to restart Eclipse. Click on Restart Now and wait while Eclipse shuts down and then restarts with the ADT plug-in installed. Now that the ADT plug-in is installed we need to make one more adjustment to make sure that it works with the Android SDK.
9. Open the Preferences window (press Command+, in OSX, or click on the Window menu and then select Preferences in Windows). Look on the right side of the Preferences window for an entry titled Android. Clicking on the Android entry shows the options for the ADT on the right side of the Preferences window. Make sure that the path to your uncompressed SDK is in the SDK Location field. If the field is empty or has an incorrect entry listed, click on the Browse button and navigate to the correct folder. When finished selecting the correct folder, click OK to save the setting.
Once that has been completed, you are now ready to start developing an Android project using PhoneGap. Let’s walk through setting up and compiling a project.
Creating an Android Project
To create a new project, follow these steps:
1. Click on the File menu and select New, Android Project. If you do not see Android Project, click on Project and a New Project window appears asking you to Select a Wizard. Many different types of projects are shown in the lower section of the window that can be created. In the lower section find the entry for Android in the list and expand it to show the option for Android Project. Select Android Project and click Next.
2. On the next page you need to give your project a name in the Project Name field. For our project, let’s type in WebCalc; the rest of the settings can be left at default. Figure 23.2 shows the screen for reference.
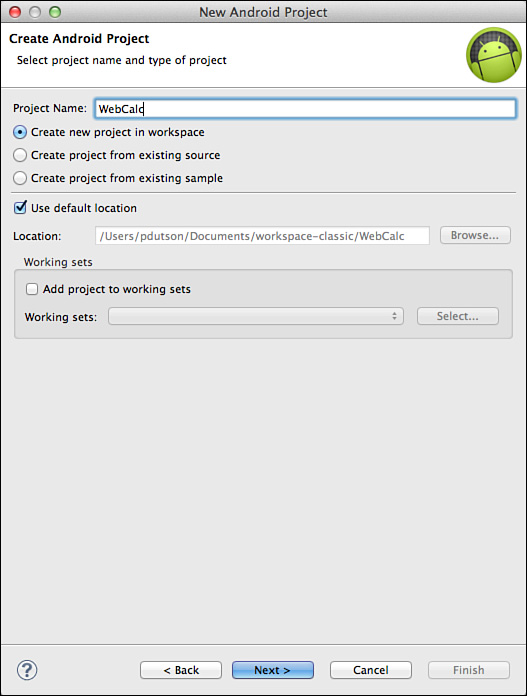
Figure 23.2 Initial setup page of a new Android project
3. Clicking Next moves the New Project Wizard to the Build Target section. In this section you have the option of choosing the API level your project will use. Unless you are specifically targeting a known version of the Android API, you should pick the highest version of the API level available.
Tip: Choosing an API Level
While you may be tempted to pick a low version of the API, you should always try to choose the highest API level available and allow Android to handle degradation. If you are worried about older devices running your application, you will be allowed to choose a minimum API level in your configuration file that limits legacy devices.
4. After selecting your build level, click Next to move the New Android Project Wizard to the Application Info section. On this page the Application Name should already be filled out, and the Package Name should be highlighted and ready to be changed. If you already have a namespace it can be typed here.
If you are unsure of what a namespace is, you can think of it as a kind of reverse domain name with the project name on the end. For example, com.phonegap.webcalc would be an acceptable namespace, although for your own projects you should change it to reflect your name or your company name. For the example code I chose a namespace of com.dutsonpa.webcalc.
5. After you have given your project a namespace, make sure that Create Activity is checked. You can change the Minimum SDK setting if you want, but by default it should be at the build level that you selected during step 3.
6. When you are happy with your project settings, click Finish.
Adding the PhoneGap Resources
Your base project will be generated and almost ready for use. To add PhoneGap there are three folders we need to add to your project:
1. Right-click on your project folder and choose New and then Folder from the expanded menu. In the New Folder window that appears select your base project for the Enter or Select the Parent Folder section. In the Folder Name field, type libs and click Finish.
2. After creating that folder, right-click on your project folder again and again choose New and then Folder from the expanded menu. When the New Folder window appears, expand the WebCalc folder in the Enter or Select the Parent Folder section and select the folder named assets. In the Folder Name field type www and click Finish.
Once these folders have been created, copy the PhoneGap assets into them.
3. Find the zip file you downloaded earlier from the PhoneGap website and unzip it. Inside there should be a folder named Android. This folder contains several files and subfolders. Find the file cordova-1.5.0.jar (where 1.5.0 is the version number) and either drag-and-drop the cordova-1.5.0.jar file or copy it to the libs folder that you created in your project during step 1.
4. After dragging or copying that file over, right-click on it and look at the context menu that appears for the Build Path option; then select Add to Build Path in the expanded menu.
This then adds the file to the Referenced Libraries section of the project.
5. Once you are finished adding the phonegap-1.5.0.jar file to the build path, copy the cordova-1.5.0.js file to the www folder that you created in the assets folder of your project during step 2.
6. Copy the entire xml folder from your extracted PhoneGap directory to the existing res folder in your project.
Figure 23.3 shows what your project structure should look like with the files copied into the project.
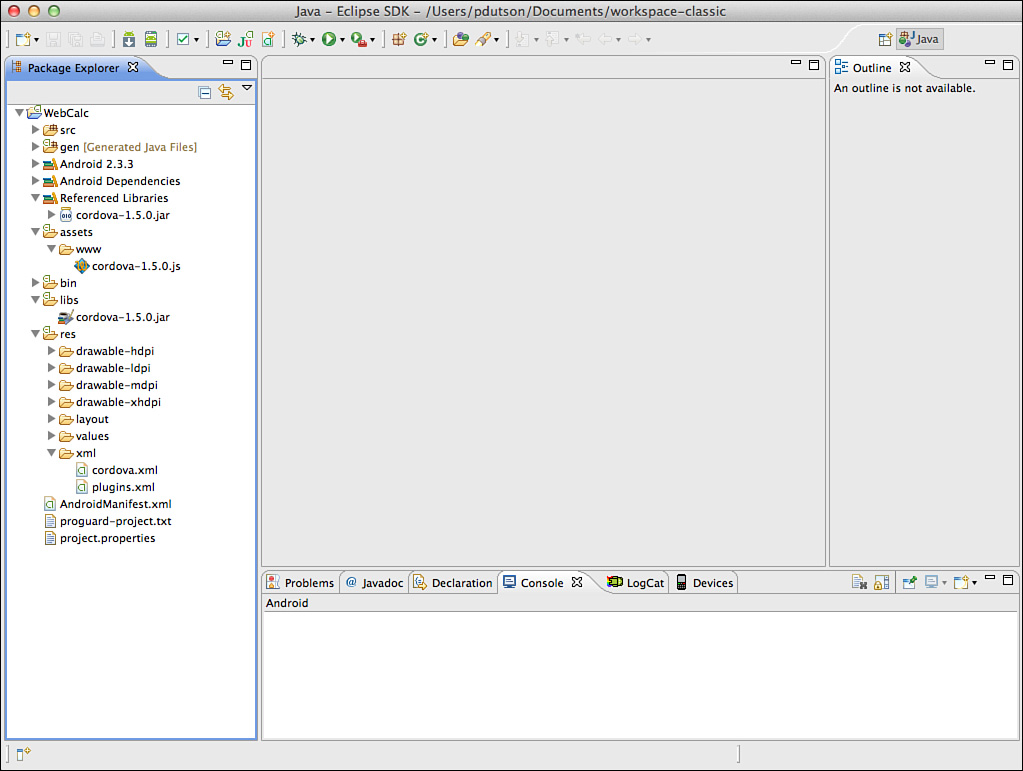
Figure 23.3 The basic project structure with PhoneGap resources added
The last things that we need to do to finish our project setup is make some modifications to the main Java file for the project and to the AndroidManifest.xml file.
Modifying WebCalcActivity.java and AndroidManifest.xml
The Java file can be found under the src folder inside our namespace package. It should be named after your project. In the example files it can be located at src/com.dutsonpa.webcalc/WebCalcActivity.java. Open the file by either double-clicking on it or by right-clicking on the file and choosing Open. When the file has opened in the editor look near the top of the file for some import statements. You may need to click on a little plus icon to expand the section and see them completely. First, you need to delete the first import statement import android.app.Activity. Next you need to add the following on the line after the import android.os.Bundle; statement:
import org.apache.cordova.*;
Move down to line 6, find the text that says extends Activity, and change it to say extends DroidGap. After that move down to line 11 and replace the line that says setContentView(R.layout.main); with super.loadUrl("file:///android_asset/www/index.html");.
To double-check the changes needed in the file refer to Listing 23.1 that shows the complete WebCalcActivity.java file with the changes made.
Listing 23.1 The Edited WebCalcActivity.java File
1: package com.dutsonpa.webcalc;
2:
3: import android.os.Bundle;
4: import org.apache.cordova.*;
5:
6: public class WebCalcActivity extends DroidGap {
7: /** Called when the activity is first created. */
8: @Override
9: public void onCreate(Bundle savedInstanceState) {
10: super.onCreate(savedInstanceState);
11: super.loadUrl("file:///android_asset/www/index.html");
12: }
13: }
If you used a different namespace in your project you should see it reflected in the package shown on line 1. Lines 3 and 4 show the default import used with an Android project and the import needed to use PhoneGap. Line 6 shows the change from Activity to DroidGap, and line 11 shows the new entry that will launch the index.html file when the application is launched. We add the index.html file in the next section, but before we do that let’s make a change to the AndroidManifest.xml file.
The AndroidManifest.xml file is located in the root of your project. This file holds many of the application settings crucial to the application being compiled and running properly. For our project we are going to add screen size support, a few device permissions, and an orientation activity.
We start by adding the following chunk of code to the AndroidManifest.xml file on line 7:
<supports-screens
android:largeScreens="true"
android:normalScreens="true"
android:smallScreens="true"
android:xlargeScreens="true"
android:resizeable="true"
android:anyDensity="true"
/>
Adding in the screen support section allows our application to work on various sized screens instead of working only on large, normal, or small screens. After this, we insert the following permissions making them lines 15 and 16:
<uses-permission android:name="android.permission.INTERNET" />
<uses-permission android:name="android.permission.READ_PHONE_STATE" />
While many different types of permissions can be used with PhoneGap, two permissions are required for your PhoneGap projects. These are the READ_PHONE_STATE and INTERNET permissions.
Note: Application Permissions
Your project may require several permissions to function properly. The following is a list of available permissions in your PhoneGap project:
• android.permission.CAMERA
• android.permission.VIBRATE
• android.permission.ACCESS_COARSE_LOCATION
• android.permission.ACCESS_FINE_LOCATION
• android.permission.ACCESS_LOCATION_EXTRA_COMMANDS
• android.permission.READ_PHONE_STATE
• android.permission.INTERNET
• android.permission.RECEIVE_SMS
• android.permission.RECORD_AUDIO
• android.permission.MODIFY_AUDIO_SETTINGS
• android.permission.READ_CONTACTS
• android.permission.WRITE_CONTACTS
• android.permission.WRITE_EXTERNAL_STORAGE
• android.permission.ACCESS_NETWORK_STATE
• android.permission.GET_ACCOUNTS
• android.permission.BROADCAST_STICKY
After the permissions have been added we then need to add the following extra property to the activity element:
android:configChanges="orientation|keyboardHidden"
After adding the preceding property to the existing activity element, we need to add a new activity element below the existing activity element:
<activity android:name="org.apache.cordova.DroidGap"
android:label="@string/app_name"
android:configChanges="orientation|keyboardHidden">
<intent-filter></intent-filter>
</activity>
Listing 23.2 shows what the AndroidManifest.xml file should look like with the changes applied.
Listing 23.2 The Edited AndroidManifest.xml File
1: <?xml version="1.0" encoding="utf-8"?>
2: <manifest xmlns:android="http://schemas.android.com/apk/res/android"
3: package="com.dutsonpa.webcalc"
4: android:versionCode="1"
5: android:versionName="1.0" >
6:
7: <supports-screens
8: android:largeScreens="true"
9: android:normalScreens="true"
10: android:smallScreens="true"
11: android:resizeable="true"
12: android:anyDensity="true"
13: />
14:
15: <uses-permission android:name="android.permission.INTERNET" />
16: <uses-permission android:name="android.permission.READ_PHONE_STATE" />
17:
18: <uses-sdk android:minSdkVersion="10" />
19:
20: <application
21: android:icon="@drawable/ic_launcher"
22: android:label="@string/app_name" >
23: <activity
24: android:name=".WebCalcActivity"
25: android:label="@string/app_name"
26: android:configChanges="orientation|keyboardHidden">
27: <intent-filter>
28: <action android:name="android.intent.action.MAIN" />
29:
30: <category android:name="android.intent.category.LAUNCHER" />
31: </intent-filter>
32: </activity>
33: <activity android:name="org.apache.cordova.DroidGap"
34: android:label="@string/app_name"
35: android:configChanges="orientation|keyboardHidden">
36: <intent-filter></intent-filter>
37: </activity>
38: </application>
39:
40: </manifest>
For the most part it is okay if your file doesn’t match up line for line with the preceding code, but it does matter if your XML is malformed. Make sure when you create elements that you properly close them and that they are named correctly. Eclipse will parse your file and underline in red elements or attributes that it believes are errors. Make sure to correct these problems and you should be all set. Now that we have all the base configuration set up, let’s add some assets that use jQuery Mobile to the project.
Including jQuery Mobile in Your Project
While it is possible to port just about any web app that currently uses jQuery Mobile to PhoneGap, the integration process depends heavily on how the web application behaves. For the sake of simplicity we are going to port a simple calculator that works as a web application into the PhoneGap project. The calculator is made up of three pages and uses jQuery Mobile for function and style. Listing 23.3 shows the index.html file that we will use.
Listing 23.3 The Ratio Calculator and Starting Page
1: <!DOCTYPE html>
2: <html>
3: <head>
4: <title>WebCalc</title>
5: <meta name="viewport" content="width=device-width, initial-scale=1">
6: <link rel="stylesheet" href="css/jquery.mobile-1.1.0-rc.1.min.css" />
7: <link rel="stylesheet" href="css/styles.css" />
8: <script src="cordova-1.5.0.js"></script>
9: <script src="javascript/jquery-1.7.1.min.js"></script>
10: <script src="javascript/scripts.js"></script>
11: <script src="javascript/jquery.mobile-1.1.0-rc.1.min.js"></script>
12: </head>
13: <body>
14: <div data-role="page" id="ratio">
15: <div data-role="header" data-id="header-nav">
16: <h1>WebCalc - Ratio</h1>
17: <div data-role="navbar">
18: <ul>
19: <li><a href="phi.html" data-direction="reverse" data-transition="flow">Phi</a></li>
20: <li><a href="EB9780132966245_41.html" class="ui-btn-active ui-state-persist">Ratio</a></li>
21: <li><a href="divisible.html" data-transition="flow">Divisible</a></li>
22: </ul>
23: </div>
24: </div>
25: <div data-role="content">
26: <h3 class="center">Ratio Calculator</h3>
27: <p><em>Width x Height = Aspect Ratio</em></p>
28: <div data-role="fieldcontain" class="ui-hide-label">
29: <div class="ui-grid-c">
30: <div class="ui-block-a">
31: <label for="ratio-width">Width:</label>
32: <input type="text" name="ratio-width" id="ratio-width" placeholder="Width" />
33: </div>
34: <div class="ui-block-b center lh-two-em">x</div>
35: <div class="ui-block-c">
36: <label for="ratio-height">Height:</label>
37: <input type="text" name="ratio-height" id="ratio-height" placeholder="Height"/>
38: </div>
39: <div class="ui-block-d"> </div>
40: </div>
41: <div class="lh-two-em bold">
42: Ratio (Aspect) = <span class="ratio-aspect">0</span>
43: </div>
44: </div>
45: <hr />
46: <p><em>Calculated ratio based on original values</em></p>
47: <div>
48: <div data-role="fieldcontain" class="ui-hide-label">
49: <div class="ui-grid-c">
50: <div class="ui-block-a">
51: <label for="ratio-cWidth">Width:</label>
52: <input type="text" name="ratio-cWidth" id="ratio-cWidth" placeholder="Width" />
53: </div>
54: <div class="ui-block-b center lh-two-em">x</div>
55: <div class="ui-block-c lh-two-em bold" id="ratio-cHeight">?</div>
56: <div class="ui-block-d"> </div>
57: </div>
58: <div class="lh-two-em">Ratio (Ascpect) = <span class="ratio-aspect">0</span></div>
59: </div>
60: </div>
61: <hr />
62: <input type="button" name="ratio-btn-reset" id="ratio-btn-reset" value="Reset Values" />
63: </div>
64: </div>
65: </body>
66: </html>
By looking at Listing 23.3 you can see that we are using the basic setup needed for a site using jQuery Mobile. We used the HTML5 DOCTYPE on line 1, the meta element for viewport sizing on line 5, and our includes for the jQuery Mobile assets on lines 6, 9, and 11. The PhoneGap required JavaScript file is included on line 8. Continuing down the page to line 14 you can see the div element has been given an attribute of id="ratio". This id will be used with the navigation bar to move between the three calculators of the site. Line 15 shows the header of the site being defined, and it also contains an attribute of data-id="nav-header". This attribute is used to create a static header that should stay in place even during page transitions. To accomplish this, the same attribute must be on the page that the one will link or transition to. Lines 17-23 show the navigation bar that links to the other two pages. Lines 25-63 show the actual bulk of the page. These lines contain some basic layout styling as well as two grids used to help format the data for the user. The page contains three input areas that allow the user to input dimensional data that will then be calculated and returned so that the user can find a given ratio. The ratio can then be used to figure out the height of another element when given the width of the element. There also is an included reset button that clears all three input fields. Figure 23.4 shows what the ratio calculation page looks like in a browser.
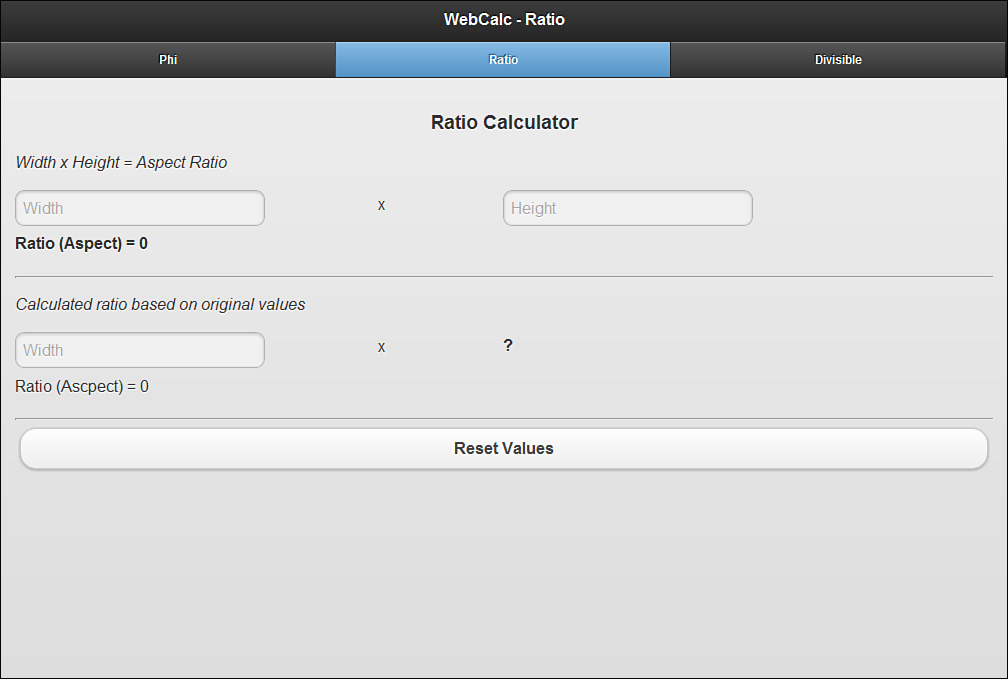
Figure 23.4 The ratio calculator rendered as a web application
According to the navigation bar at the top of the page, there is a page to the right of this page called Divisible. This is actually a link to the file divisible.html. The page section of this file is shown in Listing 23.4.
Listing 23.4 The Page of the Calculator for Divisible Calculation
1: <div data-role="page" id="divisible">
2: <div data-role="header" data-id="header-nav">
3: <h1>WebCalc - Divisible</h1>
4: <div data-role="navbar">
5: <ul>
6: <li><a href="phi.html" data-direction="reverse" data-transition="flow">Phi</a></li>
7: <li><a href="EB9780132966245_41.html" data-direction="reverse" data-transition="flow">Ratio</a></li>
8: <li><a href="divisible.html" class="ui-btn-active ui-state-persist">Divisible</a></li>
9: </ul>
10: </div>
11: </div>
12: <div data-role="content">
13: <h3 class="center">Divisible Calculator</h3>
14: <p>Enter a number to see what it is divisible by. This is useful when calculating grid and column sizes for layouts.</p>
15: <hr />
16: <div data-role="fieldcontain">
17: <label for="dbl-base">Base Number:</label>
18: <input type="text" name="dbl-base" id="dbl-base" />
19: </div>
20: <div class="ui-grid-b" id="dbl-results">
21: <div class="ui-block-a"> </div>
22: <div class="ui-block-b" id="left-col">
23: <div id="result2">2: <span></span></div>
24: <div id="result3">3: <span></span></div>
25: <div id="result4">4: <span></span></div>
26: <div id="result5">5: <span></span></div>
27: <div id="result6">6: <span></span></div>
28: <div id="result7">7: <span></span></div>
29: <div id="result8">8: <span></span></div>
30: <div id="result9">9: <span></span></div>
31: <div id="result10">10: <span></span></div>
32: <div id="result11">11: <span></span></div>
33: </div>
34: <div class="ui-block-c" id="right-col">
35: <div id="result12">12: <span></span></div>
36: <div id="result13">13: <span></span></div>
37: <div id="result14">14: <span></span></div>
38: <div id="result15">15: <span></span></div>
39: <div id="result16">16: <span></span></div>
40: <div id="result17">17: <span></span></div>
41: <div id="result18">18: <span></span></div>
42: <div id="result19">19: <span></span></div>
43: <div id="result20">20: <span></span></div>
44: </div>
45: </div>
46: </div>
47: </div>
Line 1 sets up the page section and has a property of id="divisible". Lines 4–10 show the navigation bar that was on the first page, although with some slight differences as to which button contains the property of class="ui-btn-active ui-state-persist". These classes make the element they are attached to appear in the active state and allow it to keep the active state when transitioned to and from the page. Another difference in this section is the use of the data-transition="flow" property as well as the data-direction="reverse" property that is being used. These have been added to help give a visual flow to the application. Lines 12-46 show the content section of the page. This section holds the setup for the calculator. You can see from the description that this section contains an input that allows the user to enter a number and then see in a list what the number is divisible by and how many times that particular number will go into the base number. This is a useful calculator when dealing with grids and layouts as you can do quick calculations and see the results in the div elements displayed in the content section. The calculations will be displayed in the empty span elements in JavaScript. Figure 23.5 shows what the divisible calculation page looks like in a browser.
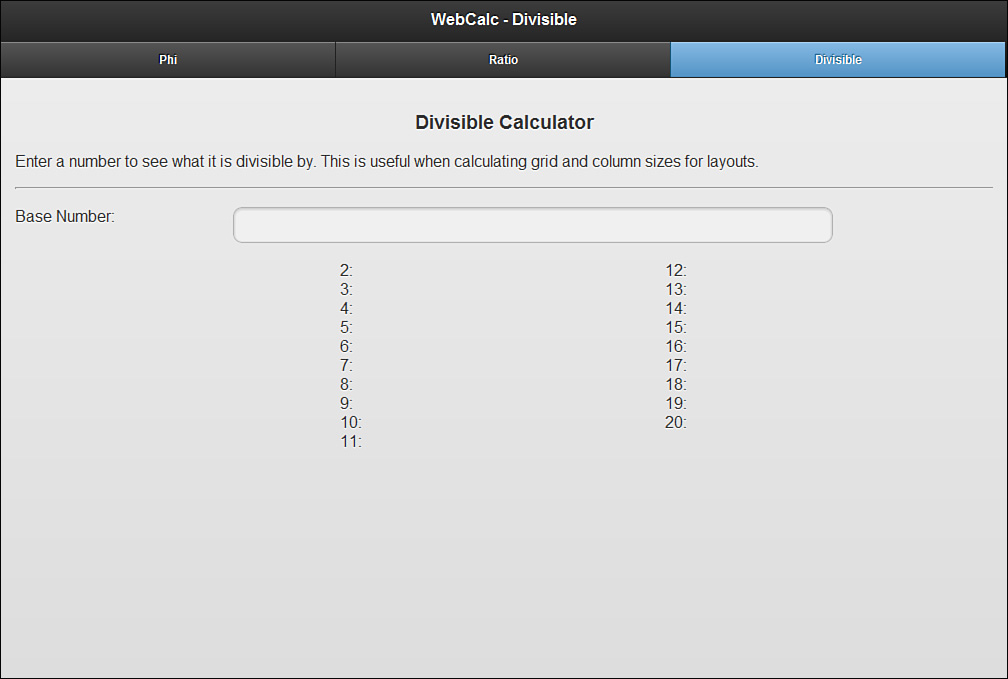
Figure 23.5 The divisible calculator rendered as a web application
The third page of the calculator is used to calculate phi or the Golden Ratio. Listing 23.5 shows the page section of phi.html.
Listing 23.5 The Page of the Calculator for Phi Calculation
1: <div data-role="page" id="phi">
2: <div data-role="header" data-id="header-nav">
3: <h1>WebCalc - Phi</h1>
4: <div data-role="navbar">
5: <ul>
6: <li><a href="phi.html" class="ui-btn-active ui-state-persist">Phi</a></li>
7: <li><a href="EB9780132966245_41.html" data-transition="flow">Ratio</a></li>
8: <li><a href="divisible.html" data-transition="flow">Divisible</a></li>
9: </ul>
10: </div>
11: </div>
12: <div data-role="content">
13: <h3 class="center">Phi Calculator</h3>
14: <p>
15: The Golden Ratio, or phi, is used in nature, and also in design. This
16: calculator will help you create two columns split by the Golden Ratio.
17: </p>
18: <hr />
19: <div data-role="fieldcontain">
20: <label for="phi-base">Base Number:</label>
21: <input type="text" name="phi-base" id="phi-base" />
22: </div>
23: <div class="ui-grid-c">
24: <div class="ui-block-a"> </div>
25: <div class="ui-block-b center">
26: <div id="phi-a" class="bold">a: <span></span></div>
27: </div>
28: <div class="ui-block-c center">
29: <div id="phi-b" class="bold">b: <span></span></div>
30: </div>
31: <div class="ui-block-d"> </div>
32: </div>
33: </div>
34: </div>
Just like the previous pages, this page has been given an id and shares the same navigation bar that is on lines 4-10. The property of class="ui-btn-active ui-state-persist" has also been moved, and the data-transition="flow" properties have been applied. The other difference here is that none of the links contain the data-direction="reverse" property. This is because this page is located on the far left of the viewable area and should only transition to the right, which is the default direction of the transition. The content area is contained in lines 12-33, and as indicated by the h3 element on line 13, contains the input and display for the Phi Calculator. This calculator is useful when designing to the Golden Ratio or Phi ratio. The next time you visit a blog site, look to see whether they are using two or three columns. If they are, there is a good chance that one of the columns is just over one and half times as wide as either the second or the second and third columns combined. When that is the case, the site has most likely been calculated using the Golden Ratio. To figure this ratio out, line 21 shows an input field where the user can enter a base value. Lines 23-32 show a grid system that will display the first and second columns or sections of the layout. Once again the empty span elements will be populated using JavaScript. Figure 23.6 shows what the phi calculation page looks like in a browser.
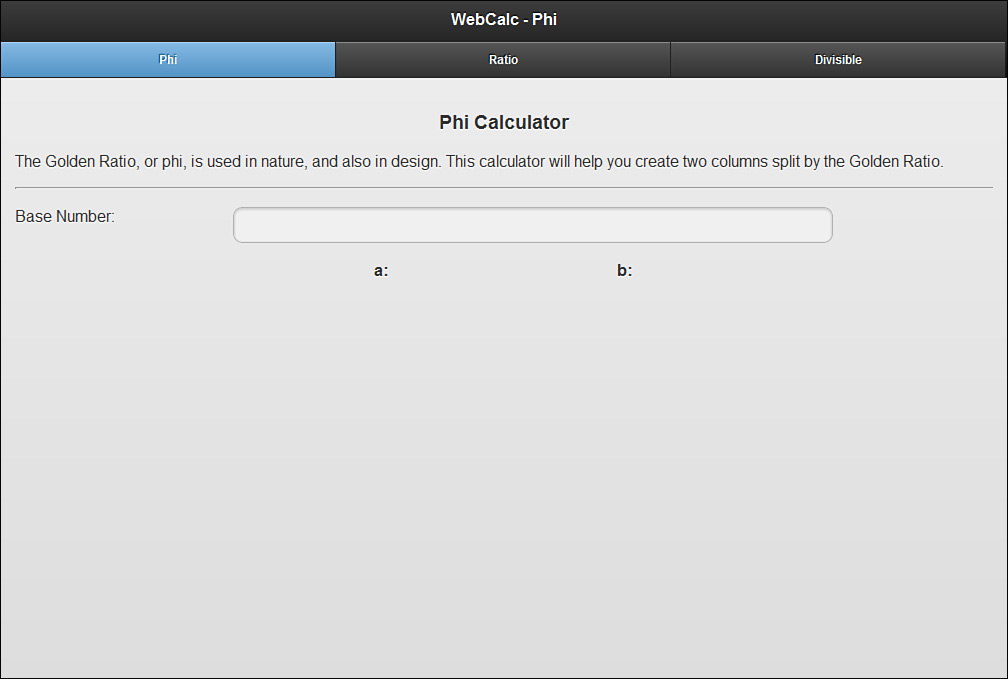
Figure 23.6 The phi calculator rendered as a web application
Now that we’ve seen the pages that are part of the application, the only thing we need to do is take all the files (including the CSS and JavaScript files) and drop them into their existing structure into the assets/www folder of our webcalc project in Eclipse. This can be done either by using the file system on your computer or by moving files into the project by using drag-and-drop. If you decide to drag and drop the files, a dialog window may appear asking whether you want to copy the files or link to them. I strongly recommend that you copy the files into the project, as this will protect you from accidental deletion or even from moving files and breaking your project later. Figure 23.7 shows what the project should look like with all the assets copied into the application.

Figure 23.7 With all the assets moved into the project, it is ready for testing.
Once you have copied all the asset files into the project you are ready to test and compile your application.
Compiling the Application
The easiest way to test the application is to right-click on the project name, find the Run As option in the context menu, and then select 1 Android Application. If you already have an AVD created, it will automatically launch and install the application on the device. If you do not have an AVD created, or if you have one that was created on an incompatible API level, an error will be thrown and you will be prompted to create a new AVD that is compatible with your application.
When the AVD launches you have to unlock it, and the application should launch automatically. Figure 23.8 shows the application running inside an AVD.
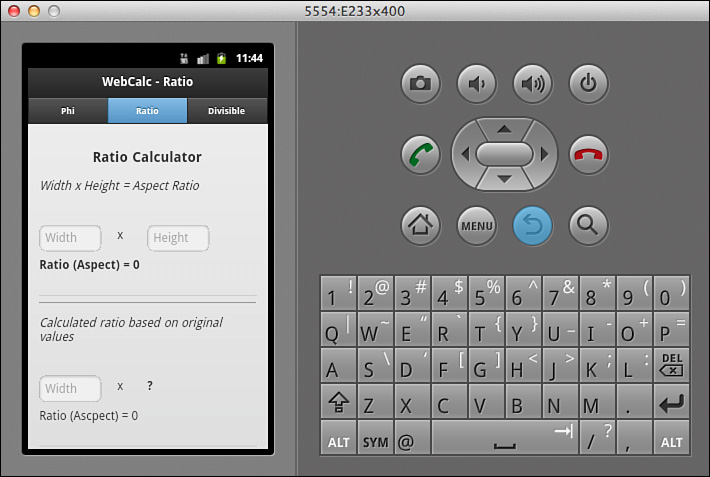
Figure 23.8 The application is ready to be tested in the AVD.
Before you start your final testing you should know that not all the page transitions are supported when using PhoneGap and jQuery 1.1RC1. When a transition is not supported the default transition used is the “fade” transition, which causes the screen to “blink” between pages. Currently the “flow” transition that we are using in this application is not supported by Android devices running Gingerbread (Android 2.3). If you decide to change the transition to “none” it will not display a transition, but will introduce a slight lag between button press and page load. Issues with page transitions will hopefully be fixed by the 1.1 final release. If this is a major setback for your application, you can fall back to jQuery Mobile 1.0 where the basic transitions are supported.
With page transition behavior aside remember that when using an emulator you may get some odd behavior. Some delay, blinking between screens, and even occasional failure to reorient the screen are all problems that may occur when using an AVD. If available, using at least one actual Android device for testing is ideal. To test with your Android device, put the device into USB debugging mode. This setting is located in either the Settings -> Applications -> Development or Settings -> Developer Options menu on your device. Once enabled plug the USB cable into your device and into your computer and then choose to run the project as an Android Application.
Note: Drivers for Debugging
Depending on your OS you may need to download some drivers. If you have trouble connecting your device to Eclipse and running the application, visit http://developer.android.com/guide/developing/device.html and follow the steps to set up your hardware. Also remember to read the fine print and ignore setting the android:debuggable="true" in your AndroidManifest.xml file.
When you are satisfied that your application is working properly you can prepare it for deployment by right-clicking on the project and choosing Android Tools and then Export Signed Application Package from the submenu. This opens a window that checks your project for errors. If none are found, you can then click the Next button. If you have already created an Android application before, then you should already have keystore, which you can use to sign your application. If you have never created one, you need to create a self-signed certificate by clicking on the CreateXXXX radio button and clicking Next. Follow the menu as it helps you generate a certificate. For more information on Android and certificates, visit http://developer.android.com/guide/publishing/app-signing.html. After you have used or created your certificate you are prompted to save the APK file to your file system. This is the file that contains your application, so make sure you know exactly where you are putting it. Once you have chosen a location, click on Finish to start the export process.
When the file has been exported, you are returned to your project. From there you can email, copy, or move the APK file onto your Android device and install it. Remember that when installing APK files in this manner you must go into your device settings and enable Unknown Sources in the Applications section. If you have a developer account to publish your app in Google Play, you can upload the exported APK directly to your account. To register as a Google Play developer, visit https://play.google.com/apps/publish/signup.
Note: Default Icon
When you create an application in Eclipse a default icon is used with your application. If you want to customize your icon, follow the icon guidelines found at http://developer.android.com/guide/practices/ui_guidelines/icon_design.html.
Once created, copy the images into your project into the appropriate res/drawable- folders.
That is really all there is to quickly creating an app using PhoneGap and jQuery Mobile. If you want to port your application to another platform such as iOS or BlackBerry, you can follow the guides at http://phonegap.com/start, or you could use the PhoneGap Build service (https://build.phonegap.com/). Using PhoneGap Build you only need to upload a zip of your HTML, CSS, and JavaScript files and it automatically generates application store ready files. PhoneGap is a useful framework that could be covered in a book by itself, but hopefully you have seen how it can be easily leveraged to quickly create or port applications from the Web to a mobile device.
Summary
In this hour you learned how to use PhoneGap and jQuery Mobile to create an application that can be used on the Android platform. You learned what tools are needed and how to create a project. By using PhoneGap, it is possible to port simple web applications to mobile devices in a short amount of time, and by using jQuery Mobile the layout of your application appears just like it does on a website. This allows you to use styling that you are already familiar with and provides a comfortable cross-platform experience.
Q&A
Q. It seems way too simple to include a jQuery Mobile project; is that really all it takes?
A. The difficulty level depends on the project. You can create some very complex and awesome applications by including backbone.js and using some web service calls. Doing so increases the possible difficulty level of your application. If you tie into the native hardware system it also increases the complexity level of your app. For example, the project sample in this hour did not include access to the camera. The application created in this hour was to give you a taste of using PhoneGap with a simple jQuery Mobile project.
Q. When using PhoneGap can I make the device make noises or take pictures?
A. Absolutely, just remember that when users install your application they are shown what permissions the application needs. If someone downloads an app that wants to use the camera and doesn’t explain why, the user may not complete the install.
Q. Is the app from this hour available in the Android section of Google Play?
A. Yes, this app is published and available for free download.
Workshop
The workshop contains a quiz and some exercises to help you check your comprehension and understanding.
Quiz
1. What platforms does PhoneGap work on?
2. True or False: PhoneGap is a standalone application.
3. What Android permissions must be included when using PhoneGap?
4. What file controls the application settings in your Android project?
5. What is required to test your application from Eclipse?
Answers
1. PhoneGap works with iOS, Android, Windows Phone, BlackBerry, webOS, Symbian, and bada.
2. False. PhoneGap is a framework that allows web applications to interface with mobile hardware allowing web developers to create applications with native capabilities.
3. At a minimum you must include android.permission.INTERNET and android.permission.READ_PHONE_STATE.
4. The AndroidManifest.xml file controls everything from the devices that are compatible with your application to the permissions your application needs to run.
5. Either an Android device in USB Debugging mode or an AVD created at a compatible API level must be created to run and test your application.
Exercises
1. Modify the project to be compatible with a different range of devices. The default included in the example project is API 10. Try lowering it and see how it handles on your AVD or on an actual device.
2. Check out the documentation at PhoneGap (http://docs.phonegap.com/) and add sound playback or even a vibration control when a reset button is pushed or when a calculation is run.
3. Create a new project in Eclipse; try porting one of your own web applications onto the Android platform.