
Hour 20. Creating QR and Tag Codes
Unless you’ve managed to avoid social websites, newspapers, flyers, billboards, and the advertising market in general, you have seen a QR and/or Tag code before. This hour you learn what they are and how you can use them.
Delving into QR and Tag Codes
Barcodes are heavily used in inventory tracking. When you want to buy an item at a store, a barcode is usually scanned at the register, displays how much the product costs, and makes a mark in the store inventory that the item was sold. The entire transaction is facilitated by the few characters of information held in the barcode on the item. This same principle of containing data also works on Quick Response (QR) codes and Tag codes.
Standard barcodes are read along a single axis; this makes them known as 1D or one-dimensional codes. This single axis of data limits the amount of data available but makes the code easily read by a scanner. QR codes are read along the X and Y axis, making them 2D or two-dimensional codes. This allows more data to be stored inside the same area as a barcode. Due to the complexity of the layout, some scanning devices may not scan the code correctly as it may be too small to be read. Microsoft Tag codes work in a similar but proprietary fashion. The Tag is read by a scanner and then referenced against an online database to deliver data back to the scanning application.
QR and Tag codes are found today in a variety of places. You can find them on billboards, magazines, catalogs, TV and Internet ads, business cards, conference tickets, and in many more places. The use of QR codes is gaining traction as more users take advantage of the experience that can be created by using them. Some businesses have even integrated the codes into an online shopping cart allowing users to scan and purchase an item directly from a catalog or ad.
Note: QR Code
The term QR Code is registered trademark of DENSO WAVE INCORPORATED (http://www.densowave.com/en/adcd/).
Scanning QR Codes
Most mobile devices do not come with a barcode scanner built in; however, as long as the device has access to an application store, you can download an app that allows you to scan codes. The following sections provide a list of applications and what platform they work on.
Scan
Scan aims to be as simple as possible. There are no buttons to press, no extra frills, just a simple scanner that also keeps track of the codes that you’ve scanned. Many iOS users prefer Scan due to the scanning speed. I did run into issues while using this on an Android device where the image was backwards, making it awkward to get the code to line up to be scanned—but it still worked as advertised. Scan is available for iOS and Android devices. You can learn more at http://scan.me/.
RedLaser
RedLaser is a scanning application created by eBay. It is a ridiculously detailed app in what it offers for features. It ties in with an online database for scanning results that makes it a fantastic tool for using on standard barcodes. If you want an all-in-one scanner that can be used for price checking as well as reading QR codes, this is one of the apps to look at. It is available for iOS, Android, and Windows Phone. You can learn more by visiting http://www.redlaser.com/.
ShopSavvy
This was the second scanner I ever installed, and it still remains one of my favorites. ShopSavvy works like RedLaser; for someone who only wants to scan QR codes and follow the links or read the messages, it is serious overkill. However, it is well-designed, keeps a history of previous scans, and worked on everything I attempted to scan with it. It is available on iOS, Android, and Windows Phone. You can learn more by visiting http://shopsavvy.com/.
ScanLife
ScanLife is another full-featured scanning app similar to RedLaser and ShopSavvy. ScanLife boasts support for a surprisingly large number of mobile devices. A unique feature included in the app is a live stream that lets you see what other people are scanning and allows you to tap on them and view information about the product that was scanned. ScanLife is available for iOS, Blackberry, Android, Windows Phone, and Nokia. To learn more, visit http://www.scanlife.com.
Barcode Scanner
The same team behind the ZXing library also released an app to go with it. This is a simple, no-frills app that allows you to scan barcodes and view the data contained in them. It does not hook into a database and return shopping results, price matches, or social options. Of course, it doesn’t hit any third-party servers to collect your scanning information, either. Instead, it is a dead-simple scanner that I use as my main tool for scanning QR codes. It is available for Android (by ZXing Team) and iOS (by Romain Pechayre). You can stay up to date on app releases by visiting http://code.google.com/p/zxing/wiki/GetTheReader.
Microsoft Tag
The Microsoft Tag reader works with QR codes as well as Tag codes. It is an easy-to-use application that keeps a tidy history of the codes you scan. The history does not seem to keep track of text-only QR codes, but it does keep track of ones that direct you to view a web page. It is available for Windows Phone, Windows Mobile, iOS, Android, Blackberry, Symbian, and J2ME phones. Learn more by visiting http://tag.microsoft.com/download.aspx.
Let’s take a deeper look at QR codes and how to create them.
Rendering Quick Response Codes
QR codes are not only useful, they can be used in many different ways. QR codes currently can be used to distribute contact information, appointments, SMS messages, text, websites, and more. Some QR codes require an Internet connection to be used while others contain purely text or information avoiding the need for a connection. To illustrate this, Figure 20.1 shows a QR code that contains only text, and Figure 20.2 shows a QR code with a URL.
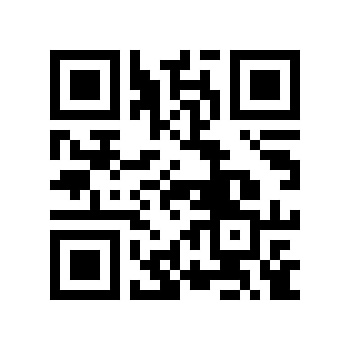
Figure 20.1 This QR code displays “QR Codes are pretty cool” when scanned.
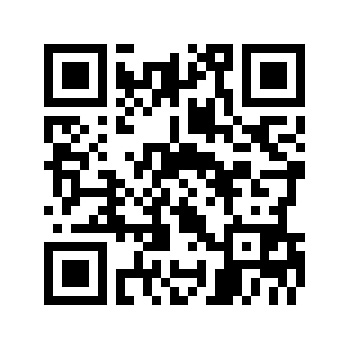
Figure 20.2 This QR code contains the URL http://www.jquerymobilein24.com/qrexample/.
QR codes do have some limitations you must be aware of to maximize their effectiveness. First of all, size matters—the bigger the code, the higher the compatibility of devices that can scan them. It is recommended that you use a code that measures 1.25″× 1.25″. I have done a bit of experimenting and found that a 1″×1″ code works; however, using a larger code allows the scanner to read the code faster and from a greater distance. The farther away your scanner is from the object, the larger your code needs to be.
Another limitation to keep in mind is that these codes generally are meant for mobile devices. That means you should plan on handling them accordingly. If you are creating QR codes for your website, you had better have a mobile site or at least a responsive layout done to accommodate these devices.
Lighting conditions also matter. This is just like trying to focus your camera in the dark, only worse. Most phones have a camera that will not allow the use of a manual focus when used with a scanning application. This means that your camera may drive itself nuts trying to focus on a blurry code over and over again due to poor lighting. Printing your code on a glossy surface may also affect the readability of your code. If you can print it on a matte sheet of paper, or in a location with minimal glare, your code will be easier to scan and process.
While there are some style tweaks that you can do with QR codes, you should use a solid background color that has a high contrast with the squares or dots of your code. You should never use a gradient as the background image.
QR code Do’s:
• Make the code as large as possible for your campaign.
• When printing codes, try to use a matte finish rather than glossy.
• Make sure you are planning for mobile devices to be using your codes.
• When possible, use good lighting where your code is displayed.
QR code Don’ts:
• Use codes smaller than 1″×1″.
• Direct mobile users to a full desktop site.
• Use noncontrasting colors or a gradient on the background.
Now that we know a little about QR codes, let’s take a look at generating them.
Third-Party QR Generation
Many websites are available that will generate your QR codes for you. Some of these websites are free to use in both commercial and personal settings, while others have license restrictions. Some sites also have free and paid plans that add extra options and analytics packages to your code. The following sections outline sites available for use and what features you can expect to find when using them.
ZXing
The ZXing (Zebra Crossing) project created by Google provides a scanning library that can be used in both Android and Java projects. They also feature a QR code generator that can be found at http://zxing.appspot.com/generator/. The generator is a straightforward application that allows you to pick the type of data you want to store in the QR code and then generates the code for you as well as gives you a link that you can use to replicate the image using the Google Chart Tools.
Kaywa
Kaywa provides a QR code generator found at http://qrcode.kaywa.com/ that is free for noncommercial use. They also make a scanning app that is available in the Android Market. The generator allows the creation of URL, text, phone number, and SMS QR codes. The images may be sampled on the site and then downloaded for use on your noncommercial site.
QRStuff
QRStuff is a service that offers both free and commercial services that can be found at http://www.qrstuff.com/. This service allows many different types of data to be embedded into QR codes and uses its own algorithm to create QR codes rather than relying on third-party API services. QRStuff offers a commercial account that allows the use of a URL shortener that enables you to build QR codes that point to a short link which can then be repointed at any time to make a pseudo-dynamic QR code. This service also allows some analytic tracking so that you can get some data on the amount of scans your code has received.
Delivr
Delivr is another service that allows both free and registered member services for QR code generation. You can visit http://delivr.com/qr-code-generator to get started creating your own QR codes. To differentiate itself from the competition, Delivr offers code generation for various app stores, social media links, affiliate links, and analytics campaign links. Signing up for the service gives you access to code analytics, short-link URLs, and statistics.
BeQRious
BeQRious is another provider that offers a well-designed QR code generator which also gives tracking and profile perks to registered members. BeQRious also offers design services that bring a unique and personalized appearance to your QR code. You can check out the generator by visiting http://beqrious.com/qr-code-generator/.
SPARQCode
SPARQCode offers a full suite of services, including its own scanner, a generator, and an API that can easily be tapped to create QR codes. The SPARQCode experience is a good place to start for anyone who wants to eventually go commercial. The services include a free trial that allows for 250 tracked scans so that you can decide whether you want to jump in and go for a full package. Check out the QR generator and learn more by visiting http://www.sparqcode.com/static/maestro.
Now that you know where to go to get codes, let’s take a look at how to create your own codes.
Generating Your QR Codes
The easiest way to get started generating your own code is to use the Google Chart Tools. By utilizing the Google Chart Tools, you can create codes instantly that will appear in your browser when you visit a parameterized URL. To begin generating QR codes, you need to use this base URL:
https://chart.googleapis.com/chart?cht=qr
Once you have that, you can then add some extra URL parameters to finish the code creation. By adding chs=300×300 you get back an image 300×300 pixels in size. You can change this value to change the dimension of the code returned. The current maximum size that you can request is 547×547 pixels.
To add the text or data you want to encode, you need to add a parameter of chl=yourtexthere. You should change the value of "yourtexthere" to whatever you want the QR code to contain. An important detail here is that whatever values you decide to put into the code must be URL encoded. This means that the text I am awesome would become I%20am%20awesome when encoded.
That is all the data required to create a QR code, but you may want to consider passing the chld= parameter for the error correction level. The error correction level affects how much of the embedded data is made redundant. Redundant information allows more compatibility and allows some of the QR code to be altered, missing, or destroyed and still maintain readability. By default the value is set at L, which allows for up to 7% of the code to be lost but still readable. You may choose to use M allowing up to 15%, Q allowing up to 25%, or H allowing up to 30%. Remember that data redundancy requires more space to write out the information, so you cannot put as much data into a QR code with a value of H as you can with one set at L.
Let’s take a look at a full URL that generates a QR code for us using the parameters we just learned about. Type the following URL into your browser:
https://chart.googleapis.com/chart?cht=qr&chs=300×300
&chl=I%27ve%20generated%20my%20own%20QR%20code&chld=H
Figure 20.3 shows the resulting QR code from running that URL in a browser.
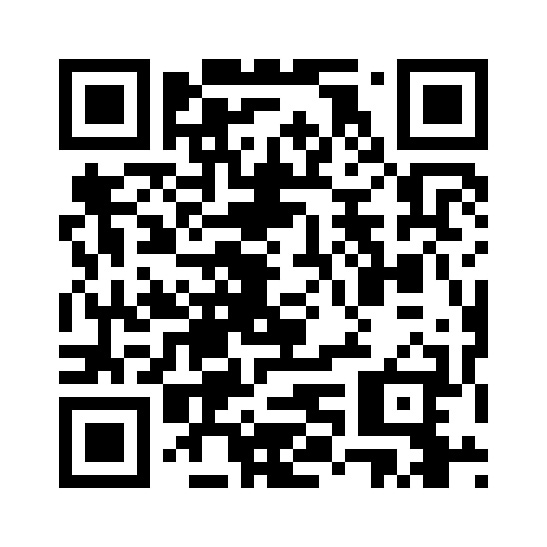
Figure 20.3 This QR code reads: “I’ve generated my own QR code.”
If you find that you are using this method a lot to generate codes for websites you are visiting or for assets available online, you can use a handy little bookmarklet to generate the QR code for you. A bookmarklet is a self-contained bit of JavaScript that can be saved and executed from your bookmark menu in your browser. You can use Google Chart Tools with a bookmarklet to create a QR code for the page you are currently on. The following is an example of a bookmarklet:
javascript:void(location.href="https://chart.googleapis.com/chart?cht=qr
&chs=300×300&chl="+encodeURIComponent(location.href)+"&chld=H");
When executed, the bookmarklet forwards you to the generated QR code that contains a link to the website you were at. By taking a look at the code inside the bookmarklet, you can see that it is going to return a QR code that is 300×300px and uses a redundancy level of H. You can take the preceding code snippet and create multiple bookmarklets with different settings based on what you’d prefer to have returned.
To learn more about using the Google Chart Tools for QR code generation, visit http://code.google.com/apis/chart/infographics/docs/qr_codes.html.
If using Google Chart Tools isn’t something you’d like to pursue, you can still create your own codes by implementing the Java library available from ZXing, or you can use some other libraries such as JSQR—JavaScript QR Code Encoder Library (http://www.jsqr.de/home.html)—or the d-project (http://www.d-project.com/qrcode/) libraries for ActionScript3, Java, JavaScript, and PHP.
Now that we can create QR codes, let’s look at what we can do with them to make them a little more personalized.
Stylizing QR Codes
Even though most scanners work better with a simple black-and-white QR code, you may actually get a better customer response if you stylize your code and give it a little personality. This can be done a few ways. You can adjust the color and size, and include some custom imagery inside it. Let’s start with adjusting the color of the code.
Adjusting the Color
The safest change you can make as far as color goes is to the foreground color. This can be done either by the generator or by processing the image in an image manipulation program by colorizing or selectively replacing the color. Figure 20.4 shows a QR code that has a red foreground color and a white background. For those who are reading the black and white version of this hour, the figures can be viewed in color at http://jquerymobilein24.com/qr.
Figure 20.4 The code will still be readable when enough contrast is available.
You can also use a gradient on the foreground image to change the style as well. Figure 20.5 shows a QR code with a diagonal gradient, which starts with orange in the top left and transitions to black at the bottom right and is applied to the foreground color with a white background.

Figure 20.5 Gradients must still contain a high contrast to be scanned.
If you decide to change the background color, you must remember to keep a high contrast between the foreground and background colors. Even with a high contrast, you cannot use white or any color that would appear lighter in contrast to the color behind it. A yellow background with a black foreground will work well, but a blue background with a white foreground will fail spectacularly. Figures 20.6 and 20.7 show two QR codes with color backgrounds and foregrounds.
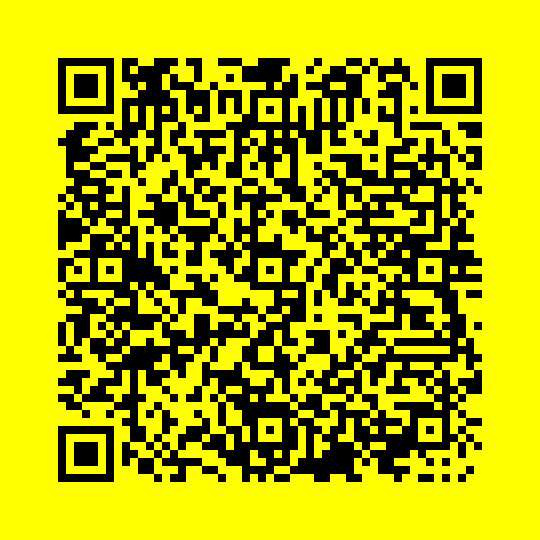
Figure 20.6 Using yellow and black provides enough contrast to be scanned.
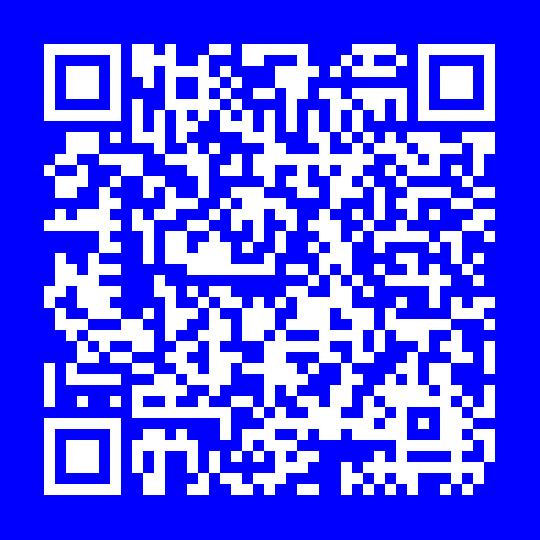
Figure 20.7 Using a dark background and a white or light foreground causes the QR code to fail.
Experiment to find color combinations that work when mixing background and foreground colors. Sometimes odd combinations, such as a lime-green background and a blue foreground, will work as shown in Figure 20.8.
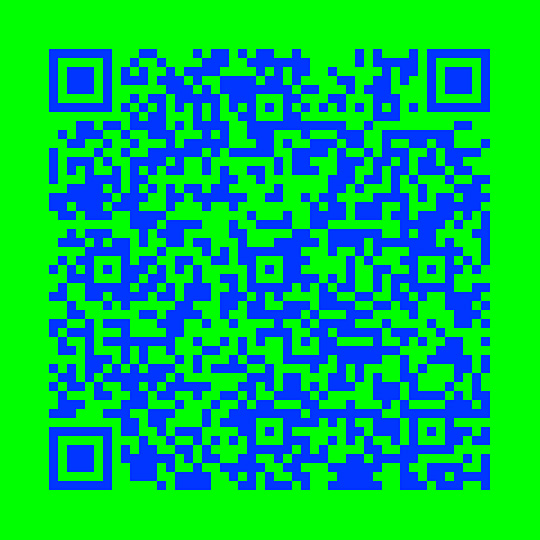
Figure 20.8 Green and blue work as they create a high enough contrast to be scanned.
Another option you have for customizing the QR code is to change the image or include others inside the code. Let’s take a look at what you can do.
Custom Images
When creating codes with data redundancy or a high level of error correction, you can mess up the image on purpose to make something more unique and brand fitting. When modifying the QR code, it is important that you pay attention to the four location boxes. Three of them are black boxes with a white inner border and then a black square. These are located in the top-right, top-left, and bottom-left. On the bottom-right is the fourth box. It is similar but contains fewer pixels or boxes. These boxes help the scanner orient itself to the code, so if you can avoid covering them, it helps. You can still place or stylize them a little, but stay away from covering them completely. You also need to stay away from a line that exists between the top-left and top-right boxes, as well as another line between the top-left and bottom-left box. These lines extend between the closest inside corners of the boxes. Figure 20.9 shows a guide you can use for areas that you should avoid.
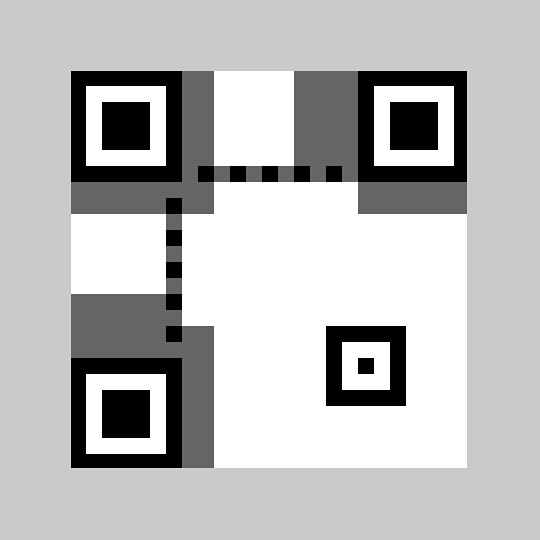
Figure 20.9 Areas to avoid when modifying QR codes
By looking at the guide, the light gray frame that borders the entire figure is called the quiet zone. The quiet zone helps the scanner find the area where the QR code is. The dark gray areas near the three large black squares are where the information about the QR code structure is stored. If you edit these areas, your code may fail to scan at all. The other boxes can be slightly modified, but other than changing the color, you may not want to modify them too heavily. For an exact detail of areas that are safe for editing, visit the entry for QR code at Wikipedia (http://en.wikipedia.org/wiki/QR_Code).
Figures 20.10 and 20.11 show a couple of QR codes that have been altered to display custom images. When using custom images inside a QR code, they can be color or black and white.
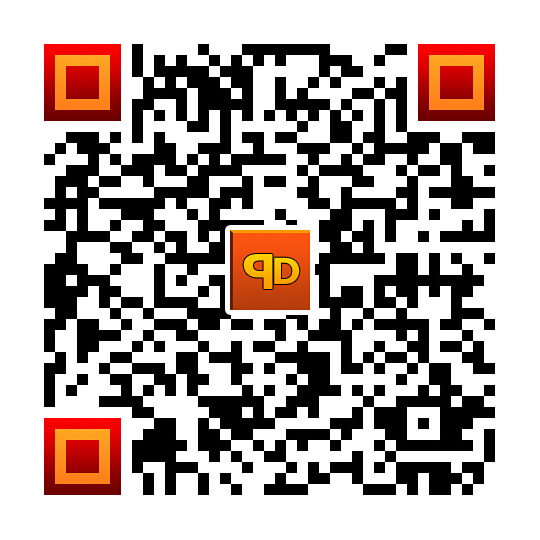
Figure 20.10 The logo inside the QR code still allows the code to be scanned.
Figure 20.11 The stylized QR code still works even with rounded edges.
Remember that not everyone uses the same software to scan your codes, so it is best to test with as many devices and scanners as possible. Now that we know about generating and styling QR codes, let’s take a look at creating Microsoft Tag codes.
Generating Microsoft Tag Codes
Microsoft created a unique code of its own that can be used to serve content to mobile devices just like QR codes do. Currently the only thing you need to get started is a Windows Live ID account. As soon as you create one, you can start generating codes and distributing them.
The benefits of using a Tag over a QR code include the ability to edit the Tag at any time. This is especially helpful when you find you have generated a QR code that has a typo encoded into it, when a link no longer points to a correct domain, and even when contact information has changed.
Let’s take a short walk through creating a Tag code.
Generating a Tag
The easiest way to start generating your own Tags is to go to http://tag.microsoft.com and click on the Sign In link. Either create a Windows Live ID, or sign in with an existing one. After you have signed in, you will be at the Tag Manager screen. From here you can manage all your Tags and create new ones. Find the Create a Tag button and click it. This takes you to a new screen where you can choose the details of the Tag that you are generating. On this screen you can type in a Tag Title that will be shown when the Tag is scanned as well as displayed in the history section of the Tag app. You can also choose the type of Tag you want to generate. The following is a list of the types of Tags you can create:
• URL—This launches the URL in the mobile browser when scanned.
• App Download—This allows you to create a URL that is opened based on the device that scans the Tag. If the device is not supported, a default link is used instead. This is handy for creating links to files or marketplaces for installation.
• Free Text—This works just like a plain text encoding inside a QR code. The maximum size for text storage inside a Tag is 1,000 characters.
• vCard—This points to a vCard that can be imported into the mobile address book. Inside the editor you are given the option of uploading a vCard or typing all your details in and having it generate one for you.
• Dialer—This creates a prompt that allows the device that scans it to call a phone number embedded in the Tag.
After choosing your type, you then have the option of putting some notes in that help you organize your Tags or remind you what the Tag was created for. After the notes you can upload an image. This is actually a cool feature. When your Tag is scanned the picture you uploaded is downloaded to the device and shows in the user’s history. This helps the user remember your brand, name, or content. The next feature allows you to change the start and end dates of your Tag. That’s right, you can actually schedule your Tags’ available date. This allows you to get Tags printed and distributed without worry that someone is going to see your campaign before you want them to, and allows you to schedule the end of the campaign as well.
Depending on the type you picked, the fields below allow you to fill out the details to finish your Tag. When done click the Save button and you are taken back to the management screen. From here you can download the Tag that you just created. When you choose to download your image you are given some options on how you want the code to be generated. Let’s look at the options and how to maximize them for your project.
Downloading a Tag
When you download your tag, you are given the option of downloading a Tag Barcode (with a colorful triangle pattern drawn on it), a Custom Tag Barcode (uses colored dots instead of triangles), a QR code, or a Near Field Communication (NFC) URL. The default download option is to generate a Tag Barcode that will also add some help text with a link to download a scanner. It will also be generated in color, but you have the option of generating it in black and white only. Figure 20.12 shows a Tag generated with the default options.
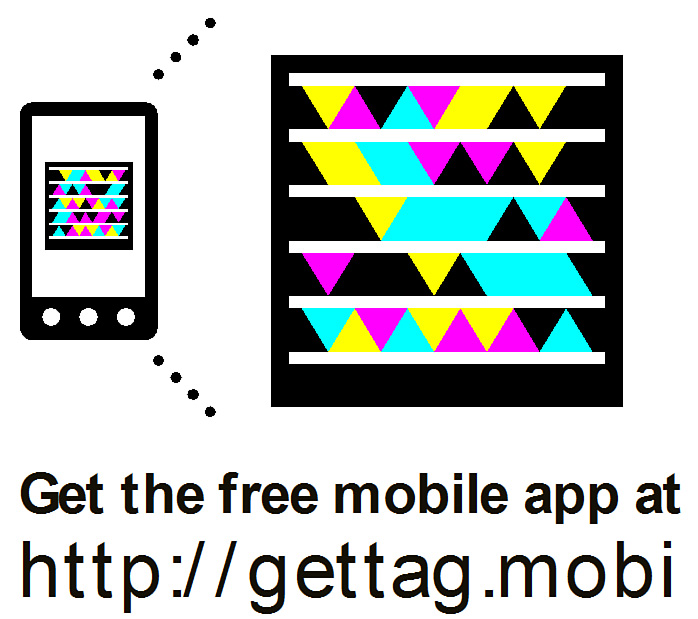
Figure 20.12 A Tag with help text and generated in color
A Tag downloaded this way can be saved as a .pdf, .wmf, .jpeg, .png, .gif, .tiff, .tag, or URL (as a .txt file). The format options allow you to easily move the work to a graphics editing program such as Adobe Illustrator to get the Tag ready for print.
The option of downloading a Custom Tag Barcode has the same basic options as the standard Custom Tag Barcode; however, you can only download a .pdf, .wmf, .tag, or URL (as a .txt file). When the file is downloaded, it contains colored or black-and-white dots instead of triangles. Using a graphics editing program or even PowerPoint, you can then embed an image into the code. Figure 20.13 shows an example of a Custom Tag.
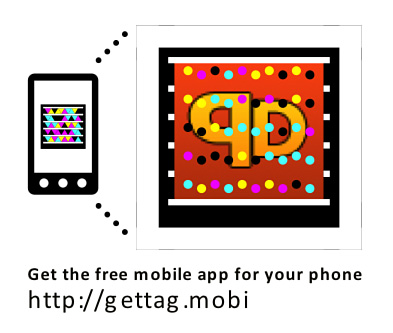
Figure 20.13 A Tag that has been customized
The interesting part about customizing a Tag is that you don’t need to worry about using the same color as the dots. You can blend into them and create some truly unique Tags and they still function. When creating a custom tag, you need to make sure that you leave the top and bottom white bars as well as the sidebars. If you save the file as a .wmf, you can actually import the file into PowerPoint and overlay it on another image. This makes generating custom codes a quick and easy process, provided you have PowerPoint. You can learn more and see some examples by visiting http://tag.microsoft.com/what-is-tag/custom-tags.aspx.
The option to generate a QR code allows you to download the code in .pdf, .wmf, .jpeg, .png, .gif, .tiff, and URL (as a .txt file) format. Oddly enough, it works just like a QR code, so there isn’t much to cover that we haven’t gone over already.
The last option to download an NFC URL allows you to download only a .txt file that contains the information needed for an NFC chip to be encoded with the data required to make the chip detectable with NFC.
After you download the file, you can then start using it just like you would with a QR code. One of the cool things is that the management page has a Reports link that takes you to an analytics page where you can view different stats about your Tags and how they are doing over a given timeframe.
Summary
In this hour you learned that there are many third-party vendors and tools that allow you to create QR codes and embed various data in them. You also learned how to create your own QR codes by leveraging Google Chart Tools as well as how to modify them for a unique experience. This is possible by using a parameterized URL that returns an image. You also learned about how a bookmarklet could be used to access the service. Some QR scanners were also covered so that you have an idea of the popular scanners available today and what devices they are compatible with.
You also learned about Microsoft Tag codes and how they are different from QR codes. Tag codes are similar to QR codes; however, they are managed by using a Windows Live ID account. Tag codes also use a code that can either be color or black-and-white with either triangles or dots. You also learned how to generate a Tag and about the types of data that can be contained in them.
Q&A
Q. If I generate a Microsoft Tag, will the service be around in the next five years?
A. Microsoft has stated that they will keep the codes working until at least 2015, and they will give a two-year notice to all users with a free account that the service is either being terminated or moving to a pay model.
Q. I’ve generated a QR code that was .75″×.75″ and it worked fine on my phone. Do I really need to generate them at a 1.25″×1.25″ size?
A. That depends. Are you sure that everyone who is going to scan your code has the same phone as you? Can you guarantee that even if they have the same phone they will be scanning your code under the same lighting conditions and medium? If you can, then by all means, create a .75″×.75″ code; otherwise, you may want to use a larger code to increase your compatibility.
Q. You listed a few QR scanners but not any Tag scanners. Are any Tag readers available or just the one from Microsoft?
A. Currently the Tag scanner from Microsoft is the only Tag scanner available that can read Tags. It was listed under the QR scanner section because it also works with QR codes. If you are working with both codes, it’s not a bad app to have installed.
Workshop
The workshop contains a quiz and some exercises to help you check your comprehension and understanding.
Quiz
1. When the highest level of error correction or redundancy is in effect on a QR code, what is the maximum percentage of the code that can be wrong and still work?
2. What does QR stand for?
3. What is the recommended display size for a QR code and why?
4. True or False: Custom images cannot be used inside QR codes.
5. How do custom images work inside Tag codes?
Answers
1. Depending on the level of error correction in the QR code, up to 30% of the code can be missing, lost, edited, or destroyed and the QR code will still work.
2. QR stands for Quick Response.
3. 1.25″×1.25″ is the recommended size. At this size more than 90% of devices capable of scanning a QR code should work.
4. False. You can use custom images as long as they stay out of certain areas within the QR code, and as long as they do not exceed the 30% error correction limit of the code.
5. Custom images must be used with a custom Tag. The image is embedded behind the code itself. In a Tag image, the custom image can cover the dots used in the image, but not the white lines at the top and bottom or the sidebars.
Exercises
1. Use a few of the mentioned services to generate your own QR codes. Try using the bookmarklet, or create your own. After you have generated some codes, open one in an image manipulation program and experiment with changing the color of the QR code. Try removing a few sections of the code to test the readability of the code with errors present.
2. Download and try out a few of the scanning apps. Check your device to see whether any of the programs function better than others. If you have access to multiple devices, give them a try as well.
3. Either with an existing or new Windows Live ID account, create a Tag code. After you have created your first code, go back and create a custom Tag and use a custom image with it.