Chapter 5
Sending and Receiving Email
IN THIS CHAPTER
![]() Setting up email accounts on your phone
Setting up email accounts on your phone
![]() Reading email on your phone
Reading email on your phone
![]() Managing your email folder
Managing your email folder
![]() Sending email from your phone
Sending email from your phone
If you’ve had email on your phone for a while, you know how convenient it is. If your Galaxy S20 phone is your first cellphone with the capability to send and receive email, prepare to be hooked.
I start this chapter by showing you how to set up your email, regardless of whether your email program is supported. Then I show you how to read and manage your email. Finally, I tell you how to write and send email in the last section in this chapter.
Setting Up Your Email
These days, many people have multiple personal email addresses for many reasons. Your phone’s Email app can manage up to ten email accounts. With a Galaxy S20 phone, you’ll want to create Google account if you don’t already have one. If you don’t have a Google account, you’ll miss out on so many exciting capabilities that it’s almost worth settling for a lesser phone.
If you have an email account that ends in @gmail.com, by default you have a Google account. If you do not have an account that ends in @gmail.com, you can either create a Google account with your existing email or create a separate email account on Google’s Gmail just for your phone. Setting up a new Gmail account if you don’t have one already (see the upcoming section “Setting up a new Gmail account”) is easy, but it isn’t too hard to use an existing email for a Google account.
The Email app on your phone routinely “polls” all the email systems for which you identify an email account and password. It then presents you with copies of your email.
 Your phone mainly interacts with your inbox on your email account. It isn’t really set up to work like the full-featured email application on your computer, though. For example, many email packages integrate with a sophisticated word processor, have sophisticated filing systems for your saved messages, and offer lots of fonts. As long as you don’t mind working without these capabilities, you might never need to get on your computer to access your email again, and you could store email in folders on your phone.
Setup is easy, and having access to all your email makes you so productive that I advise you to consider adding all your email accounts to your phone.
Getting ready
In general, connecting to a personal email account simply involves entering the name of your email account(s) and its password(s) in your phone. Have these handy when you’re ready to set up your phone.
As mentioned, you can have up to ten email accounts on your phone; however, you do need to pick one account as your favorite. You can send an email using any of the accounts, but your phone wants to know the email account that you want it to use as a default.
Next, you may want to have access to your work account. This is relatively common these days, but some companies see this as a security problem. You should consult with your IT department for some extra information. Technologically, it’s not hard to make this kind of thing happen as long as your business email is reasonably modern.
Finally, if you don’t already have a Gmail account, I strongly encourage you to get one. Read the nearby sidebar, “The advantages of setting up a Google account” to find out why.
Setting up your existing Gmail account
If you already have a Gmail account, setting it up on your phone is easy as can be. Follow these steps from the Apps menu:
-
Find the Gmail icon in the Apps list.
Here is a confusing part. The icon on the left in Figure 5-1 is the Gmail app. The icon on the right is for the general email app. The general email app is for your combined email accounts. The general email account is the app that you will use to access any and all of your email accounts.
-
Tap the Gmail icon.
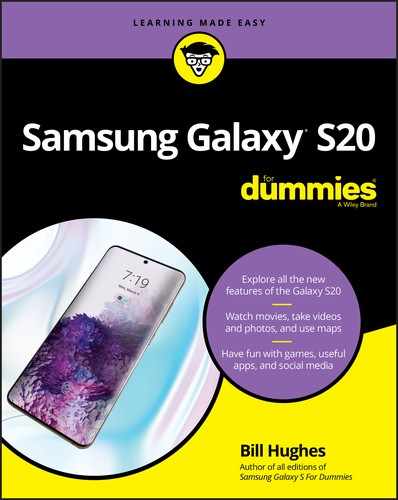
Because your phone does not know if you have a Gmail account yet, it offers you the option of entering your Gmail account or whether you want to create a new account. This page is shown in Figure 5-2.
-
Enter your Gmail account email address and tap Next.
Be sure to include the @gmail.com suffix.
-
Enter your existing Gmail password and tap Next.
Go ahead and type your password. When you’re ready, tap Next on the keyboard.

FIGURE 5-1: The Email and Gmail icons.
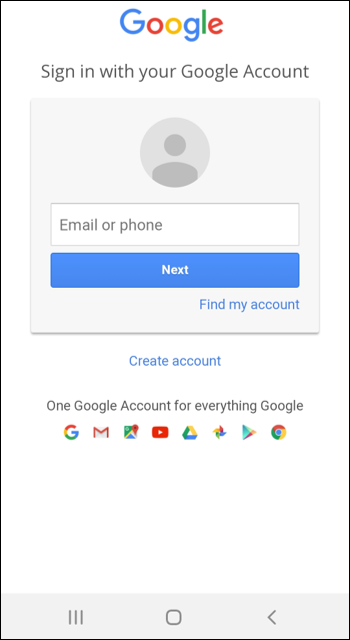
FIGURE 5-2: Add your account page.
You may get a pop-up reconfirming that you agree with the terms of use and all that legal stuff. Tap OK. You’ll see lots of flashing lights and whirling circles while your phone and your Gmail account get to know each other.
If everything is correct, your phone and your account get acquainted and become best friends. After a few minutes, they are ready to serve your needs. There are even a few screens that tell you all the wonderful things that your Gmail account will do for you. Believe every word!
If you have a problem, you probably mistyped something. Try retyping your information. From this point on, any email you get in your Gmail account will also appear on your phone!
Setting up a new Gmail account
If you need to set up a new Gmail account, you have a few more steps to follow. Before you get into the steps, think up a good user ID and password.
Gmail has been around for a while. That means all the good, simple email addresses are taken. Unless you plan to start using this email account as your main email, which you could do if you wanted, you’re probably best off if you pick some unusual combination of letters and numbers that you can remember for now to get through this process.
When you have all of this ready, follow Steps 1 and 2 in the previous section, but tap the Create Account link when you get to the screen shown in Figure 5-2. From there, follow these steps:
-
Enter your first and last names on the screen.
Google asks for your name in the screen shown in Figure 5-3. This is how Google personalizes any communications it has with you.
You may be tempted to use a fake name or some other clever two-word combination in place of a name. Don’t do it. You will still be getting email to Rita Book or Warren Peace long after the humor has worn off. -
Enter the username you want to use with Gmail.
On the screen shown in Figure 5-3, enter the username you want. Hopefully you get this name approved on the first shot.
If your first choice isn’t available, try again. There is no easy way to check before you go through these steps. Eventually, you hit on an unused ID, or you will use one of the suggestions in blue font. When you’re successful, it will congratulate you.
-
Pick a good password of at least eight characters.
Be sure to pick one that is unique and that you can remember.
-
Enter the other information and an alternate email address and tap Continue.
If you forget your password, Google wants to verify that you’re really you and not someone pretending to be you. Google does this check by sending a confirmation email to another account or sending a text to your phone. You can do this now or tap Skip to do it later.

FIGURE 5-3: The Create Your Google Account screen.
After you tap Done, light flashes, and you see the screen working away. This process usually takes less than two minutes. While you wait, you’ll see all kinds of messages that it’s getting ready to sync things. Don’t worry. I explain these messages in good time. For now, you can add any other email accounts you want by following the steps in the next section.
Working with non-Gmail email accounts
Your phone is set up to work with up to ten email accounts. If you have more than ten accounts, I’m thinking that you might have too much going on in your life. No phone, not even the Galaxy S20, can help you there!
I now cover the steps to adding your email accounts. Once you tell your phone all your email accounts, the Email screen will let you see the inbox of each account or combine all your email in a single inbox. You can choose which option works best for you.
Adding your first email account
To get started, have your email addresses and passwords ready. When you have them, go to your phone’s Home screen. Look for the Mail icon; it is an envelope in silhouette (refer to Figure 5-1). This is probably on your Home screen as one of the four primary shortcuts just above the Device Function keys or in your application list.
-
Tap the Mail icon from the Home screen.
This brings up a screen like the one shown in Figure 5-4. Choose one of the options to get started. In every case, it starts with entering your email address.
 Your email address should include the full shebang, including the @ sign and everything that follows it. Make sure to enter your password correctly, being careful with capitalization if your email server is case-sensitive (most are). If in doubt, select the option that lets you see your password.
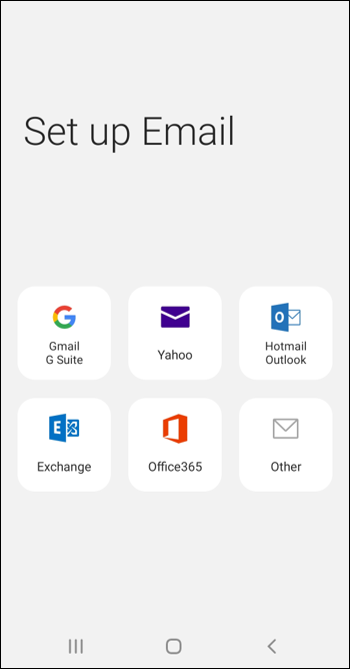
FIGURE 5-4: The setup screen for the Email app.
-
Tap the box to enter your password.
Don’t be surprised if your S20 brings you to a special screen specifically for your email provider for you to enter your password. Figure 5-5 shows the sign-in screen for a generic email account. Figure 5-6 shows the screen for a Microsoft Exchange account. One of these will work.

FIGURE 5-5: The setup screen for the Email app.

FIGURE 5-6: The Enter Account Information screen for a Microsoft Exchange account.
-
Carefully enter your password in the appropriate field and tap Next.
You’re asked for permissions. Just go with the default settings for now. This brings up the screen shown in Figure 5-7.
-
Select your desired Sync Settings and then tap Next.
You can select how often you want your phone and the email service to synchronize. A lot of thought and consideration has been put into the default settings. If you just want to get started, tap Next.
If you want to fine-tune things later, it is not hard to go back and adjust these settings. These settings are intended to be gentle on your data usage.
FIGURE 5-7: The Sync Settings screen.
If you want images in email to download immediately, store older email messages on your phone, or check to see whether you have new email all the time, you can change these settings on this page for this email account. If you know what you want that is different from the default settings, make the changes and then tap Next.
-
Enter a name for the new email account.
The next screen is shown in Figure 5-8. This gives you the option to call your email account something other than its address. You can call it what you like, but I recommend choosing something shorter, like Joe’s MSN or My Hotmail. (Do as I say, not as I do.)
-
Tap Done.
Using Figure 5-9 as an example, you can see that my account is now registered on my phone. It worked!

FIGURE 5-8: Naming your email account.

FIGURE 5-9: The Email Home screen.
Adding additional email accounts
Once you have entered your first email account, there are a few different steps to add additional accounts.
-
Tap the Options icon at the top-left part of the screen.
The three horizontal lines bring up the slide-in screen shown in Figure 5-10. This allows you to see other email folders. It also lets you access the setting icon.

FIGURE 5-10: The Options slide-in screen.
-
Tap the Settings icon.
Tapping Settings brings up the screen shown in Figure 5-11.
-
Tap Add Account next to the green plus sign.
This brings you back to the email setup screen (refer to Figure 5-5).
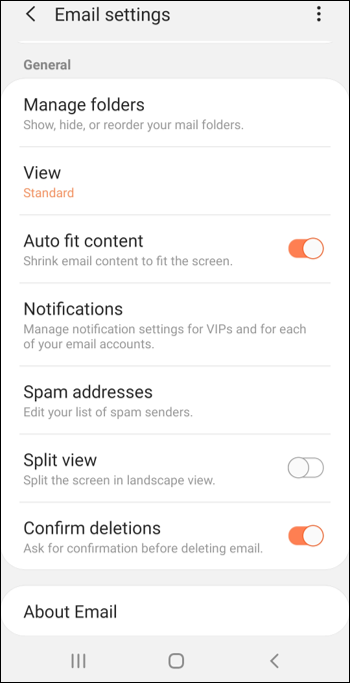
FIGURE 5-11: The Email Settings screen.
At this point you can add up to nine more accounts, and remember, you will be asked which email account you want to be your primary account. It is entirely up to you. You can send and receive email from all your accounts by selecting it, but only one can be the primary account used if you send an email from another application, such as the Contacts app.
Setting up a corporate email account
In addition to personal email accounts, you can add your work email account to your phone — if it’s based upon a Microsoft Exchange server, that is, and if it’s okay with your company’s IT department.
Before you get started, you need some information from the IT department of your company:
- The domain name of the office email server
- Your work email password
- The name of your exchange server
If the folks in IT are okay with you using your phone to access its email service, your IT department will have no trouble supplying you with this information.
Before you set up your work email on your phone, make sure that you have permission. If you do this without the green light from your company, and you end up violating your company’s rules, you could be in hot water. Increasing your productivity won’t be much help if you’re standing out in the parking lot holding all the contents of your office in a cardboard box.
Assuming that your company wants you to be more productive with no extra cost to the company, the process for adding your work email starts at your email Home screen shown in Figure 5-5.
-
Enter your email address and password.
The Corporate screen is shown in Figure 5-12.
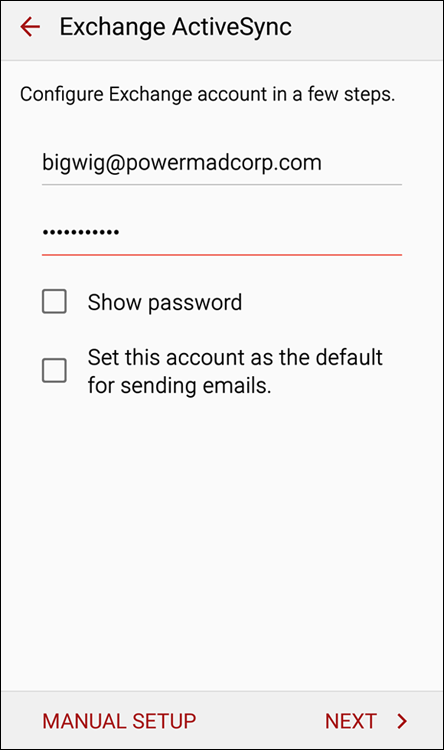
FIGURE 5-12: The Corporate setup email screen.
-
Tap Manual Setup.
This brings up the screen shown in Figure 5-13.
Chances are that you don’t have the foggiest notion what any of this means or what you are to do now.

FIGURE 5-13: The Manual Setup screen for adding corporate email accounts.
- Verify that your IT department is good with you having email on your own device and have them give you the necessary settings.
Seriously. It is increasingly common that a firm will give you access on your phone. At the same time, companies do not generally circulate documents with how to make this happen. This would be a big security problem if anyone could get access. Save yourself the time and get help from IT.
Reading Email on Your Phone
In Figure 5-9, you can see how the email screen looks for what I have called My Personal Email. You can also set up this screen so that it combines all your email into one inbox. At any given time, you might want to look at the accounts individually or all together.
To look at all your email in one large inbox, tap the downward pointing arrow next to the word Inbox and select Combined Inbox. This lists all your email in chronological order. To open any email message, just tap it.
If, on the other hand, you want to see just email from one account, tap the box at the top that says Combined Inbox. When you tap this icon, your phone will display all the individual email accounts. Tap on the account you want to focus on at the moment, and your phone will bring up your email in chronological order for just that email address.
Writing and Sending Email
 After you set up the receiving part of email, the other important side is composing and sending email. At any time when you’re in an email screen, simply tap the Menu button to get a pop-up screen. From the pop-up menu, tap the Compose icon to open the email composition screen.
Here’s the logic that determines which email account will send this email:
- If you’re in the inbox of an email account and you tap the Compose icon after tapping Menu, your phone sends the email to the intended recipient(s) through that account.
- If you’re in the combined inbox or some other part of the email app, your phone assumes that you want to send the email from the default email account that you selected when you registered your second (or additional) email account.
When you tap the Compose icon in the Menu pop-up menu, it tells you which account it will use. The Email composition screen shown in Figure 5-14 says this email will be coming from this account: [email protected].
As shown in this screen, the top has a stalwart To field, where you type the recipient’s address. You can also call up your contacts, a group, or your most recent email addresses. (Read all about contacts in Chapter 6.) Tap the address or contact you want, and it populates the To field.
Below that, in the Subject field, is where you enter the email’s topic. And below that is the body of the message, with the default signature, Sent from my Samsung Galaxy S20, although your cellular carrier might have customized this signature.
At the top of the screen are three links:
- Attach: Tap this hyperlink to attach a file of any variety to your email.
- Send: Tap this icon that looks like a paper airplane to send the email to the intended recipient(s).
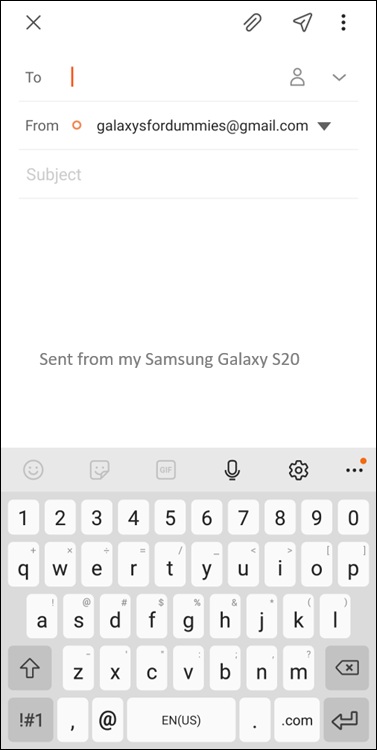
FIGURE 5-14: The Email composition screen.
- More (three vertical dots): Tap this option, and you get the pop-up shown in Figure 5-15. This may give you some of the following options:
- Save in Drafts: This allows you to complete the email later without losing your work.
- Send email to myself: This is an alternative to saving the email in your Sent mail folder.
- Priority: This option signifies that this is more important that the average email to your recipients.
- Security options: You have some fancy, 007 options here. You can sign the document or encrypt it.
- Turn on Rich text: To save data usage, email is sent in a default font. If you want to burn at little more data, you can get creative and add more elaborate fonts.
- Permission: This is an advanced setting to have a fancy template for the background in your email.

FIGURE 5-15: Composition email options.
If you change your mind about sending an email message, you can just tap the Back key. If you’re partially done with the message, you’re asked whether you want to save it in your Drafts folder.
The Drafts folder works like the Drafts folder in your computer’s email program. When you want to continue working on a saved email, you open the Drafts folder, tap on it, and continue working.
Replying to and Forwarding Email
Replying to or forwarding the email that you get is a common activity. You can do this from your Email app. Figure 5-16 shows a typical open email message.
You can reply by tapping the icon with the return arrow at the bottom of the screen. If other people were copied on the email, you could tap the double return arrow to Reply All.
When you tap either of these options, the Reply screen comes back with the To line populated by the sender’s email address (or addresses) and a blank space where you can leave your comments. (In the case of Figure 5-16, you could ask that your dad not send you any more jokes like these.)
To forward the email, tap the arrow pointing to the right above the word Forward and enter the addressee just as you do when sending a new email.

FIGURE 5-16: An opened email.