
Chapter 3
Calling People
IN THIS CHAPTER
![]() Dialing and answering phone calls
Dialing and answering phone calls
![]() Using your call list
Using your call list
![]() Making emergency calls
Making emergency calls
![]() Connecting to a Bluetooth headset
Connecting to a Bluetooth headset
At its essence, any cellphone — no matter how fancy or smart — exists to make phone calls. The good news is that making and receiving phone calls on your Galaxy S20 is easy.
In this chapter, I show you not only how to make a call, but also how to use your call list to keep track of your calls. And don’t skip the section on using your phone for emergencies.
Finally, if you’re like many people, you’re never doing just one thing at a time, and a Bluetooth headset can make it easier for you to talk on the phone while driving and getting directions, checking email, wrangling kids and dogs, or just plain living life. In this chapter, I show you how to hook up your phone to a Bluetooth headset so that you can make and receive phone calls hands-free.
Making Calls
After your phone is on and you’re connected to your cellular carrier (see Chapters 1 and 2), you can make a phone call. It all starts from the Home screen. Along the bottom of the screen, above the Device Function keys, are either four or five icons, which are the primary shortcuts (see Figure 3-1). The primary shortcuts on your phone may differ slightly, but in this case, from left to right, they are
- Phone
- Camera
- Messages

FIGURE 3-1: The primary shortcuts on the Home screen.
To make a call, follow these steps:
-
From the Home screen, tap the Phone icon.
 You will see a screen like the one shown in Figure 3-2. This screen, called Recents, shows any calls you have made or received, such as the one from your carrier to confirm that you phone has been set up correctly.
 -
Tap the Keypad link at the bottom left of your screen.
This icon is a green circle with little white dots that symbolize the touch pad on a regular landline phone.
-
Tap the telephone number you want to call.
The Keypad screen (see Figure 3-3) appears. This looks like a full-sized version of a touch pad on a regular landline phone.
 For long distance calls while in the United States, you don’t need to dial 1 before the area code — just dial the area code and then the seven-digit phone number. Similarly, you can include the 1 and the area code for local calls. On the other hand, if you’re traveling internationally, you need to include the 1 — and be prepared for international roaming charges!
In Chapter 6, you can read about how to make a phone call through your contacts.
-
Tap the green phone button at the bottom of the screen to place the call.
The screen changes to the screen shown in Figure 3-4. You have a chance to verify you dialed the person you intended.
Within a few seconds, you should hear the phone ringing at the other end or a busy signal. From then on, it is like a regular phone call.
-
When you’re done with your call, tap the red phone button at the bottom of the screen.
The call is disconnected.
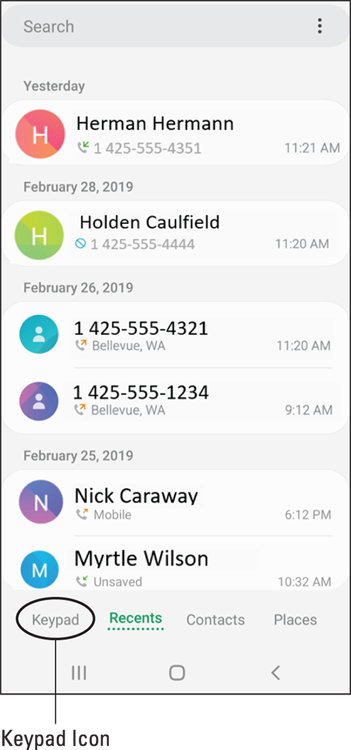
FIGURE 3-2: The Main screen for the phone.
If the other party answers the phone, you have a few options available to you by tapping on the correct icon/hyperlink on the screen, including:
- Put the call on hold.
- Add another call to have a three-way conversation.
- Increase the volume.
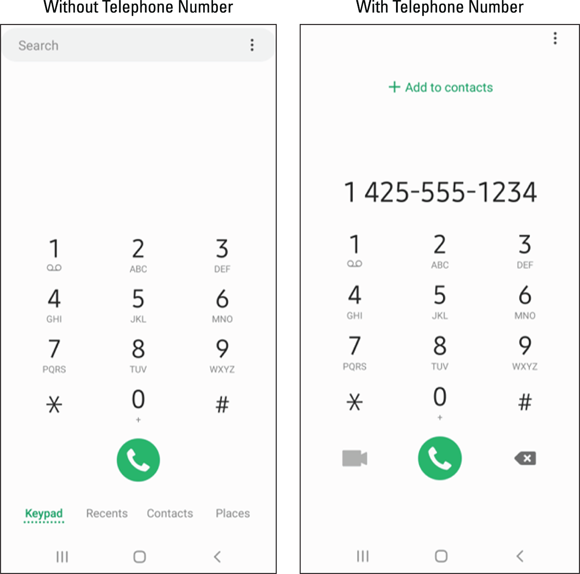
FIGURE 3-3: Dial the number from the Keypad screen.
- Switch on a Bluetooth device (see the section “Syncing a Bluetooth Headset,” later in this chapter).
- Turn on the phone’s speaker.
- Bring up the keypad to enter numbers.
- Mute the microphone on the phone.
You can do any or all of these, or you can just enjoy talking on the phone.
If the call doesn’t go through, either the cellular coverage where you are is insufficient, or your phone got switched to Airplane mode, which shuts off all the radios in the phone. (It’s possible, of course, that your cellular carrier let you out the door without having set you up for service, but that’s pretty unlikely!)

FIGURE 3-4: Dialing screen.
Check the notification section at the top of the screen. If there are no connection-strength bars, try moving to another location. If you see a small airplane silhouette, bring down the notification screen (see how in Chapter 2) and tap the plane icon to turn off Airplane mode.
If you pull down the notification screen and you don’t see the green silhouette of an airplane, scroll the green or gray icons to the left. This icon may be off the page. Alternatively, tap the icon with the boxes in the upper-right corner, and you will see all the notification icons.
Answering Calls
Receiving a call is even easier than making a call. When someone calls you, caller ID information appears in a pop-up screen. Figure 3-5 shows some screen options for an incoming call.
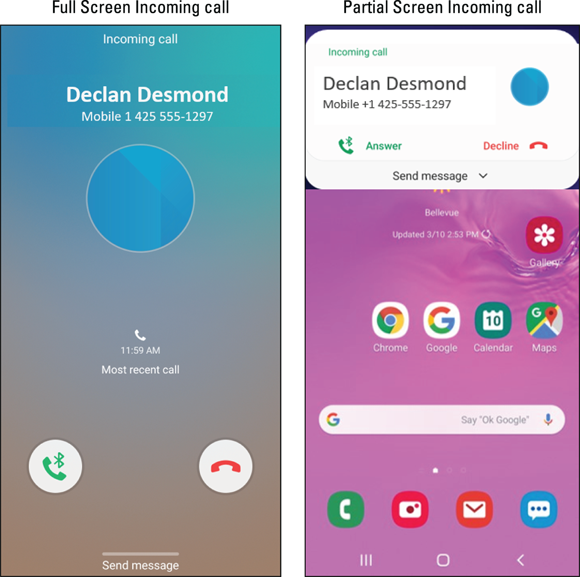
FIGURE 3-5: Possible screens when you’re receiving a call.
If you aren’t doing anything with the phone at that moment, it will present you with the full screen. If you’re using an app, it will give you a pop-up screen, as shown in the image on the right. To answer the call, tap or slide the green phone button. To not answer a call, you can simply ignore the ringing, or you can tap or slide the red phone button. The ringing stops immediately, and in either case, the call goes to voicemail.
In Part 4, I fill you in on some exciting options that you can enable (or not) when you get a call. For example, you can specify a unique ringtone for a particular number, or have an image of the caller pop up (if you save your contacts to your phone).
Regardless of what you were doing on the phone at that moment — such as listening to music or playing a game — the answer pop-up screen can appear. Any active application, including music or video, is suspended until the call is over.
 For callers to leave you messages, you must set up your voicemail. If you haven’t yet set up your voicemail, the caller will hear a recorded message saying that your voicemail account isn’t yet set up. Some cellular carriers can set up voicemail for you when you activate the account and get the phone; others require you to set up voicemail on your own. Ask how voicemail works at your carrier store or look for instructions in the manual included with your phone.
The answer and reject icons are pretty standard on any cellular phone. However, your Galaxy S20 is no standard phone. There is a third option, and what happens depends on your individual phone. In addition to the standard options of answer or reject, you have one more option — to reject and send the caller a text message. As your caller is sent to your voicemail, you also can immediately send the caller a text message that acknowledges the call.
Some of the typical canned messages that you can send are:
- Sorry, I’m busy. Call back later.
- I’m in a meeting.
- I’ll call you back.
- I’m at the movie theater.
- I’m in class.
You tap the message that applies. The message is sent as a text right away, which alerts the caller that you’re not ignoring him — it’s just that you can’t talk right now. Nice touch.
You can also create and store your own message, like “Go away and leave me alone,” or “Whatever I am doing is more important than talking to you.” You could also be polite. To create your own canned message, tap Compose new message and type away. It’s then stored on your phone for when you need it.
The caller has to be able to receive text messages on the phone used to make the call. This feature doesn’t work if your caller is calling from a landline or a cellphone that can’t receive texts.
Keeping Track of Your Calls: The Recents
One of the nice features of cellular phones is that the phone keeps a record of the calls that you’ve made and received. Sure, you might have caller ID on your landline at home or work, but most landline phones don’t keep track of whom you called. Cellphones, on the other hand, keep track of all the numbers you called. This information can be quite convenient, like when you want to return a call and you don’t have that number handy. In addition, you can easily add a number to the contact list on your phone.
By tapping the Recents link on the phone screen, you get a list of all incoming and outgoing calls. (This hyperlink is located at the bottom of the screen shown on the left side in Figure 3-2.) When you tap the Recents hyperlink, you see a call log like the one shown in Figure 3-6.
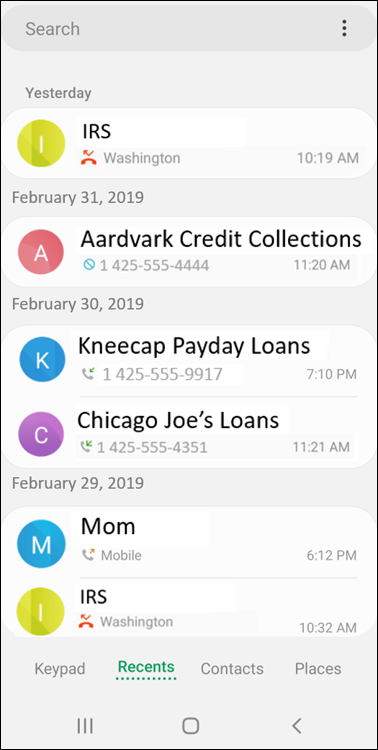
FIGURE 3-6: A call log.
Adjacent to the number for each call is an icon meaning the following:
- Outgoing call you made: An orange arrow points to the number.
- Incoming call you received: A green arrow points away from the number.
- Incoming call you missed: A red phone silhouette with a broken arrow.
- Incoming call you ignored: A blue slash sign is next to the phone number.
The log is a list of all the calls you made or were made to you. This is handy so that you can easily call someone again or call her back. By tapping any number in your call list, you see a screen like the one shown in Figure 3-7. From this screen, you can do several things:
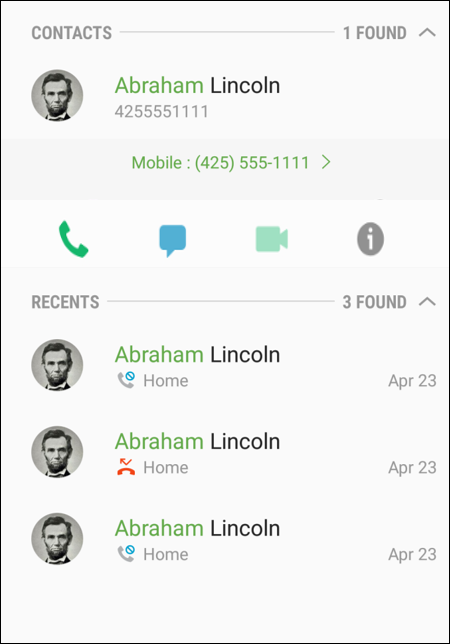
FIGURE 3-7: Call Log detail.
Making an Emergency Call: The 411 on 911
Cellphones are wonderful tools for calling for help in an emergency. The Samsung Galaxy S20, like all phones in the United States and Canada, can make emergency calls to 911.
Just tap the Phone icon on the Home screen, tap 911, and then tap Send. You’ll be routed to the 911 call center nearest to your location. This works wherever you’re at within the United States. So, say you live in Chicago but have a car accident in Charlotte; just tap 911 to be connected to the 911 call center in Charlotte, not Chicago.
Even if your phone isn’t registered on a network, you don’t have a problem as long as you have a charge in the battery. You phone lets you know that the only number you can dial is a 911 call center, even if the Home screen is locked.
When you call 911 from a landline, the address you’re calling from is usually displayed for the operator. When you’re calling from a cellphone, though, the operator doesn’t have that specific information. So, when you call 911, the operator might say, “911. Where is your emergency?” Don’t let this question throw you; after all, you’re probably focused on what is happening and not on where. Take a moment and come up with a good description of where you are — the street you’re on, the nearest cross street (if you know it), any businesses or other landmarks nearby. An operator who knows where you are is in a better position to help you with your emergency. Your phone does have a GPS receiver in it that 911 centers can access. However, it’s not always accurate; it may not be receiving location information at that moment, as is the case when you’re indoors.
When traveling outside the United States or Canada, 911 might not be the number you call in an emergency. Mexico uses 066, 060, or 080, but most tourist areas also accept 911. And most — but not all — of Europe uses 112. Knowing the local emergency number is as important as knowing enough of the language to say you need help.
Syncing a Bluetooth Headset
With a Bluetooth headset device, you can talk on your phone without having to hold the phone to your ear — and without any cords running from the phone to your earpiece. You’ve probably come across plenty of people talking on Bluetooth headsets. You might even have wondered whether they were a little crazy talking to themselves. Well, call yourself crazy now, because when you start using a Bluetooth headset, you might never want to go back.
Not surprisingly, Galaxy S20 phones can connect to Bluetooth devices. The first step to using a Bluetooth headset with your phone is to sync the two devices. Here’s how:
-
From the Home screen on your phone, slide up to get to the Apps screen.
This gets you to the list of all the applications on your phone.
-
 Flick or pan to the Settings icon and tap it.
 The Settings icon is shown here. This screen holds most of the settings that you can adjust on your phone. If you prefer, you can also bring down the notification screen and tap the gear icon or tap the menu button on the Home screen. All these actions will get you to the same place.
Tapping on the Settings icon brings up the screen shown in Figure 3-8.
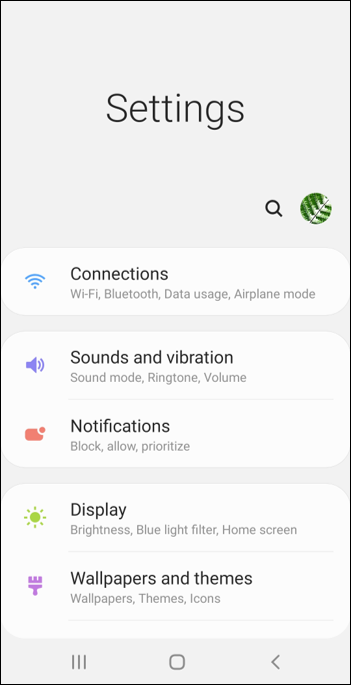
FIGURE 3-8: The Settings screen.
-
Tap the Connections icon.
All the options for connectivity on your phone appear.
-
Tap the Bluetooth icon.
This will bring up one of the two screens shown in Figure 3-9. If Bluetooth is off, it will looks like the screen to the left. If it is on, it will look like the screen on the right.

FIGURE 3-9: The Bluetooth Settings screens.
-
Put the phone in Pairing mode by turning on Bluetooth and tapping Scan.
This step enables your phone to be visible to other Bluetooth devices. This state will last for about 60 seconds — enough time for you to get your Bluetooth device into pairing mode so that both devices can negotiate the proper security settings and pair up every time they “see” each other from now on.
-
Next, put your headset into sync mode.
Follow the instructions that came with your headset.
After a moment, the phone “sees” the headset. When it does, you’re prompted to enter the security code, and the software keyboard pops up.
-
Enter the security code for your headset and then tap the Enter button.
The security code on most headsets is 0000, but check the instructions that came with your headset if that number doesn’t work.Your phone might see other devices in the immediate area. If so, it asks you which device you want to pair with. Tap the name of your headset.
Your headset is now synced to your phone. If you turn one on when the other is already on, they recognize each other and automatically pair up.
Some manufacturers make it easier to link via Bluetooth. For example, you may have received a pair of Samsung Galaxy Buds. With these ear buds, you simply open the case where you store the buds with your phone in scan mode. You’re asked to connect, and it’s all done. Don’t be surprised when it’s even easier than the steps listed in this section!
Options Other than Headsets
Headsets are not the only option anymore. Although many people walk around with the ubiquitous Bluetooth headset dangling from an ear, many other choices are out there. You can sync to all kinds of Bluetooth devices, including external keyboards, laptops, tablets, external speakers, and even your car.
There are also external sensors for measuring blood pressure, heart rate, and a lot of other physical information. Some of these are built into wearable devices, like a fitness bracelet. Manufacturers are now embedding computers into home appliances that can also connect to your smartphone through Bluetooth!
The good news is that regardless of the technology, you can connect all these devices to your phone simply by using the steps described in the preceding section. I talk more about these possibilities in later chapters.