Chapter 9
Sharing Pictures
IN THIS CHAPTER
![]() Taking pictures with your phone
Taking pictures with your phone
![]() Organizing your pictures
Organizing your pictures
![]() Sharing pictures with friends and family
Sharing pictures with friends and family
The Samsung Galaxy S20 should really be called a smartcamera with a phone. If you’re like many mobile phone users, you love that you can shoot photographs with your phone.
You probably carry your phone with you practically everywhere you go, so you never again have to miss a great photograph because you left your camera at home.
And don’t think that Samsung skimped on the camera on your Galaxy S20. In fact, they poured it on. Frankly, there has never been any smartphone like this on the market. In fact, there is so much power in the Galaxy S20 that many of the capabilities rival that of professional digital cameras. There are three cameras on the back: The first is a 12-megapixel camera with wide-angle lens, the second is a 12-megapixel camera with an ultra-wide-angle lens, and the third is a 64-megapixel camera with a telephoto lens. With the Galaxy S20, you can zoom in by a factor of 30x to make an object that is 100 yards away appear as if you’re 10 feet away.
In addition, there is a 10-megapixel camera on the front of the phone. This is sometimes called the “selfie lens,” because it’s easy to position the camera while looking at the screen. Don’t turn up your nose at a mere 10-megapixel camera — it’s more than enough for most selfies.
The Galaxy S20+ goes one step further than the S20 with the addition of a DepthVision lens. The objective of this lens is to create 3D images instead of the standard 2D images.
Don’t get me started on the capabilities of the S20 Ultra! A 12-megapixel camera is adequate for most people, but the camera with the wide-angle lens in the S20 Ultra boasts 108 megapixels. There are other awe-inspiring camera capabilities in the S20 Ultra. For example, you can zoom in by a factor of 100x and have the ability to take shots in extremely low light.
I could toss around specifications that would impress any scientist or professional photographer. I could explain the calculations needed to pick the better choice about when to use the wide-angle and the ultra-wide-angle lenses to get the optimal field-of-view.
The good news is that the good folks at Samsung get it and have taken steps to take all this raw power and make it easy. And if you want to get fancy, you have that option, although it may take a moment or two.
After you’ve taken your images, you can view them on that wicked Super AMOLED screen. Samsung also includes a Gallery app for organizing and sharing. As a practical matter, it makes sense to view most of photos on your phone. For most of us, that’s more convenient than making prints and putting them in a scrapbook. Your phone is always with you, and if someone wants a copy, you just tap a few icons and it’s in that person’s photo album.
It’s truly amazing to consider the number of options that you have for your photographs. Samsung and a bevy of third-party software developers keep adding new options, filters, and ways to share these files. It would not be surprising if your phone now has more capabilities than your digital camera.
These capabilities actually cause a problem. There are so many options that it can be overwhelming. Research has shown that people fall into one of three categories: The first group tends to use the default settings. If they want to alter the image, they’d prefer to do it on their own PCs. The second group likes to explore some of the capabilities on the phone and will have some fun looking at the scenarios, but keep things within reason. The third group goes nuts with all the capabilities of the phone.
To accommodate everyone, this chapter starts with the basics. I cover how to use the camera on your phone, view your pictures, and share them online. This works for everybody.
I then focus on the most popular settings for the second group. There are some important capabilities. With all these exotic lenses, there is some awesome intelligence embedded in the Camera app. Without your needing to do anything, it takes its cues from what is on the screen and will pick the best lens for what it thinks you’re trying to do.
For the third group, the best that can be done is to lead you in the right direction. As much as I would like to, it would be impossible to cover all the options and combinations. In my count, there are 2.43 billion possible combinations of filters, lighting, and modes. If you were to start now and take a picture every 10 seconds, you would not run out of combinations for over 700 years. This would not even include all the options for sharing these images.
Realistically, neither you nor your phone will last that long. To keep things in the realm of reality, I introduce only the most important and valuable options and go from there.
Say Cheese! Taking a Picture with Your Phone
Before you can take a picture, you have to open the Camera app. The traditional way is to simply access the Camera app from the Application list. Just tap the Camera icon to launch the app.
 Because the camera is so important, here are a few more ways to get to the Camera app. First, press the Power button twice. Boom. There it is. (If this happens to be turned off on your phone, you can toggle the Quick Launch Camera in the Advanced Features within Settings.)
Next, unless you have turned off the capability for security purposes, there is a camera icon on your lock screen. If you swipe the icon across the screen, the Camera app bypasses the security setting. You can snap away, but you can’t access the photo gallery or any other files.
 Here is a suggestion. If you see something suspicious, but are not ready to call 911, go ahead and start taking photos of what concerns you. If you need to, you can go back to the lock screen and slide the phone icon to the right to call 911, again without needing to unlock.
A closely related app on your phone is the Gallery, which is where your phone stores your images. The icons for these two apps are shown in the margin.
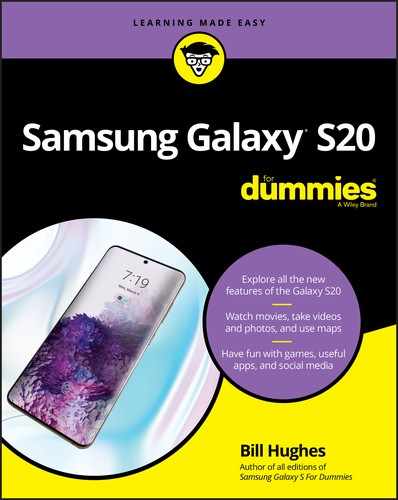
 With the Camera app open, you’re ready to take a picture within a second or two. The screen becomes your viewfinder. You see a screen like the one shown in Figure 9-1.
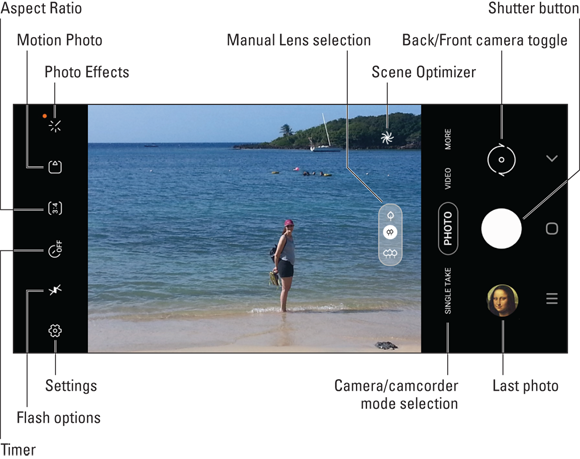
FIGURE 9-1: The screen is the viewfinder for the Camera app.
And how do you snap the picture? Just tap the big white button on the right, which is the digital shutter button. The image in your viewfinder turns into a digital image.
This screen still uses a significant share of battery life, but less than with earlier technologies. With Super AMOLED, you even save more power if you use darker backgrounds where possible. A few picture-taking options are right there on the viewfinder. Going from the viewfinder clockwise around the screen, the options include
- The viewfinder: The viewfinder shows what will be in the picture. Okay, this is obvious, but this is also one way you control the magnification. From within the viewfinder, you can zoom in and out by pinching or stretching the screen. See Figure 9-2 for an example.
- Stretch the screen to zoom in.
- Pinch the screen to zoom out.
- Lens Selection: You can zoom in by stretching or zoom out by pinching. Or you can tap one of the lens options. In Figures 9-1 and 9-2, the single tree is a telephoto with 2x magnification, the two trees are normal with 1x magnification, and the three trees are for the macro lens. Here’s where there is a difference among the Galaxy S20 models. There are a different number of front and back lenses based upon the model you have and whether you’re using the back- or front-facing camera. You’ll see a different number of options based upon the lenses you have. This is where the extra cost pays off if you have an S20+ or the S20 Ultra.
- Scene Optimizer: This icon is the capability I was telling you about — it looks at what is in the viewfinder and uses artificial intelligence to suggest how to get the best shot of what it sees. If it’s dark, it’ll suggest night mode. If it looks yummy, it’ll suggest the best setting for food (yes, there is a setting just for taking pictures of food). Unless you want to be super controlling or creative, my advice is to let the Scene Optimizer do its thing.
- Rear-facing camera to front-facing camera toggle: This icon takes you from the rear-facing camera to the not-too-shabby 10-megapixel front-facing camera. As mentioned, this is a good option for selfies because you can see what the shot will look like before you snap it.
- Shutter button: This icon takes the picture.
- Gallery: Tap this icon to see the pictures you’ve just taken. I discuss the Gallery in the section “Managing Your Photo Images,” later in this chapter.
- Camera/Camcorder mode: These are important. Figure 9-1 is set for Photo mode, which is probably the best place to start. Your camera is super-smart, and Photo mode does a good job of guessing how to make your image look its best. However, if you want to get a little fancy — or really fancy — you can change the settings. You can find more on this option later in this chapter. This is also how you switch to recording video. More on this later in Chapter 10.
- Settings: Settings also gives some fancy options that are covered in the next section.
- Flash options: Even if you want to keep it simple, you’ll want to know how to control your flash. Sometimes you need a flash for your photo. Sometimes you need a flash for your photo, but it’s not allowed, as when you’re taking images of fish in an aquarium, newborns, or some animals. (Remember what happened to King Kong?) Regardless of the situation, your phone gives you control of the flash. Tap the Settings icon at the top of the viewfinder. The options are Off, On, or Auto Flash, which lets the light meter within the camera decide whether a flash is necessary. The options are shown in Figure 9-2.
- Timer: This creates a few seconds lag between the time you press the shutter button and when it takes the image so you have time to get into a group picture.
- Aspect Ratio: The standard photo is typically 4 units wide by 3 units high. This means that it has a 4:3 aspect ratio. This is conventional, but why be conventional all the time? You can play with different options.
- Motion Photo: I cover this in more detail in the “Using the Photo mode settings” section, later in this chapter.
- Photo Effects: I cover this in more detail in the “Using the Photo mode settings” section, later in this chapter.

FIGURE 9-2: Flash options.
Also mentioned earlier is the ability to zoom. You accomplish this by using the stretch or pinch motion on the screen. To zoom in, you start with the normal image as shown in the left image of Figure 9-3. Then you put your fingers anywhere on the screen and stretch. That zooms you in, as shown in the right image of Figure 9-3.
The screen shows you the level of zoom and markings to show you how far you can go. There are also shortcuts underneath the image if you want to just jump to higher magnification. This screen show the maximum of 30x magnification. This image shows a modest 1.9x magnification.
When you jump to 30x, you can see the person admiring the scenery on the observation deck of the Space Needle. If you have the S20 Ultra and take it up to 100x, you can see that he has walked 3,296 steps today on his Fitbit (okay, not really, but 100x is still pretty amazing).
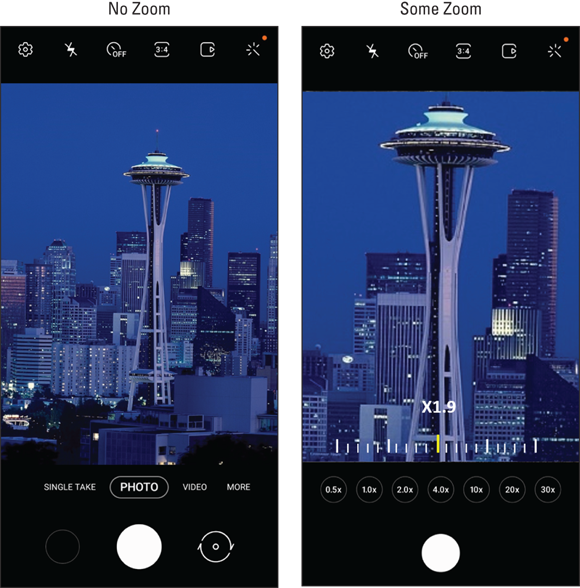
FIGURE 9-3: The viewfinder when zooming.
You probably know that it’s not a good idea to touch the lens of a camera. At the same time, it’s practically impossible to avoid touching the lenses on your Galaxy S20. This can create a problem where there can be a buildup of oil and dirt on your high-resolution lens. You should clean the lens of your camera from time to time with a microfiber cloth to get the most out of your camera. Otherwise, your high-resolution images might look like you live in a perpetual fog bank.
After you take a picture, you have a choice. The image is automatically stored in another app: the Gallery. This allows you to keep on snapping away and come back to the Gallery when you have time. I cover the Gallery app more in the upcoming section “Managing Your Photo Images.”
However, if you want to send that image right away, here’s what you do:
-
From the viewfinder screen, tap the Gallery icon.
The viewfinder shows the Gallery icon at the top-right corner of the viewfinder. When you tap it, it brings up the Gallery app, as shown in Figure 9-4.
This brings up the current image, along with the some other recent photos.
FIGURE 9-4: The Gallery app.
-
Tap the thumbnail of the image you want to share.
It also brings up some options, as seen in Figure 9-5. Right now, you’re interested in the Share option.
-
Tap the Share button.
This brings up the options you can use to forward the image; see Figure 9-6 (although your phone might not support all the options listed here and may have a few others not in this image).
- Facebook: You can take a picture and post it on your Facebook account with this option.
- Bluetooth: Send images to devices, such as a laptop or phone, linked with a Bluetooth connection.
- Messaging: This allows you to send it immediately to someone’s phone as a text message.
- Email: Send the image as an attachment with your primary email account.
- Gmail: If your main email is with Gmail, this option and the Email option are the same.
- Your cloud provider: Figure 9-6 shows Google Drive, but if you sign up for any of the cloud storage options, they’ll be here.
- Wi-Fi Direct: Talk about slick! This option turns your phone into a Wi-Fi access point so that your Wi-Fi–enabled PC or another smartphone can establish a connection with you.

FIGURE 9-5: Gallery options for the current image.

FIGURE 9-6: Sharing options for the current image.
The point is that there is an overabundance of options. If an app on your device works with images, this is the place you can upload that image. If one of these options doesn’t quite suit your need to share your pictures, perhaps you’re being too picky!
Getting a Little Fancier with Your Camera
Using the default Camera setting, Photo, to snap pics is perfectly fine for those candid, casual, on-the-go shots — say, friends in your living room. However, your Samsung Galaxy S20 phone camera can support much more sophisticated shots. Your digital SLR camera may have a bigger lens than your phone, but I can assure you that your phone has a much bigger brain than your camera. I suggest that even the users who want these default settings get familiar with the camera’s Mode settings. These are easy to access and will improve the image quality with minimal effort.
Using the Photo mode settings
The mode setting is where you make some basic settings that describe the situation under which you will be taking your shot. The default is a single picture in Photo mode, as shown in Figure 9-1. Sliding this icon to the left brings up the options associated with the MORE link, shown in Figure 9-7.
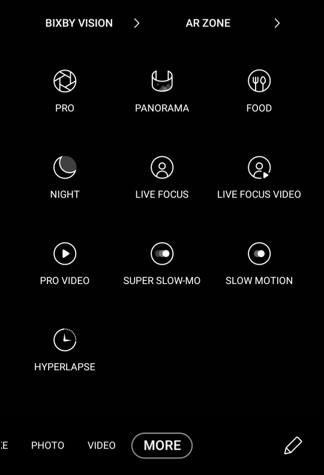
FIGURE 9-7: The Photo mode options on the camera viewfinder.
The options on the top of the viewfinder bring up a number of choices:
- Pro: This mode gets you to all kinds of camera settings that someone who knows what she’s doing would want to control rather than let the camera make the choice. This includes setting the exposure, shutter speed, ISO sensitivity, white balance, focal length, and color tone. If you don’t know what these terms mean, this is not the mode for you.
- Panorama: This mode lets you take a wider shot than you can with a single shot. Press the Camera button while you rotate through your desired field of view. The app then digitally stitches the individual photos into a single wide-angle shot.
- Food: This mode takes pictures that emphasize the colors in food to make your friends even more jealous (and/or hungry).
- Night: This mode takes pictures when it’s dark, and I mean darker than you ever thought possible.
- Live focus: This mode lets you get within 20 inches of an object, which is too close for the normal autofocus. On top of that, you can change the focus after taking the photo. (You read that right!)
Chapter 10 covers the options for Live Focus Video, Pro Video, Super Slow-mo, Slow Motion, and Hyperlapse. Otherwise, choose the option that sounds right by flicking through the options, and snap away.
Settings options on the viewfinder
Tapping the Settings icon on the viewfinder brings up a number of choices, shown in Figure 9-8:
- Scene Optimizer: Once again, I will point out that your phone is super-smart. This setting automatically adjusts setting to take the best possible picture. You can turn off this option, but why would you want to?
- Shot Suggestions: This takes the scene optimizer one step further. Your phone will suggest how to set up the shot, and when it’s perfect, it will take the picture for you. Try it and see if you like this one.
- Smart Selfie Angle: If your S20 sees that you’re taking a selfie and notices that you have a friend or two nearby, this option will automatically adjust to include them in the frame.
- Scan QR Codes: When the viewfinder sees a QR code, it will try to figure out what it says. If you don’t care, switch off the toggle button.
- Swipe Shutter Button to Edge to: You have two options here. The default when you swipe the shutter button to the side is to take a quick series of pictures. That way, you can go back and pick the best one to keep. You could also set it so that you just take a single picture and store the image as a GIF. If you don’t know what a GIF is, you probably don’t want to bother with this option.
- Save Options: Your average smartphone will save your photo in one of the popular photo formats. But this isn’t your average smartphone. You can change the default option to High Efficiency (HEIF) to save some storage. You can select RAW copies if you have super-duper photo-editing software back on your PC. A third option is to save your pictures as previewed. This option is useful if you don’t want to save your selfies in a format so that the lettering on your T-shirt is a mirror image (give it a try to see what I mean). Finally, the ultra-wide lens on your S20 will distort your image. This option corrects for that effect that can make a svelte person appear to have the physique of Homer Simpson. (Doh!)
- Auto HDR: The camera can apply this image enhancement when it’s needed. You can also just leave it on all the time. Your choice.
- Tracking Auto-Focus: The Samsung Galaxy S20 can spot a person’s face and assume that you want it to be the place where you focus if you toggle this option to the On position. Otherwise, if you don’t use this mode, the camera may assume that you want whatever is in the center of the viewfinder to be in focus.
- Grid Lines: Some people like to have a 3 x 3 grid on the viewfinder to help frame the shot. If you are one of these people, toggle on this option.
- Location Tags: The Samsung Galaxy S20 uses its GPS to tell the location of where you took the shot. If this is too intrusive, you can leave out this information on the image description.
- Shooting Methods: Do you remember the options you have for taking pictures and videos (refer to Figure 9-7)? Well, you can select them here, too. However, the default is that, when you close the camera, it will default back to Photo mode. If you want it to keep the last mode you used (say, to take videos), you can tell it to keep the last mode.
- Storage Location: You can keep your images in the memory of your phone or on the SD card. It’s usually best to use the SD card and save the phone memory for other things.
- Shutter Sound: It can be satisfying to hear the click when you take a picture. If you would rather not, turn that sound off here.
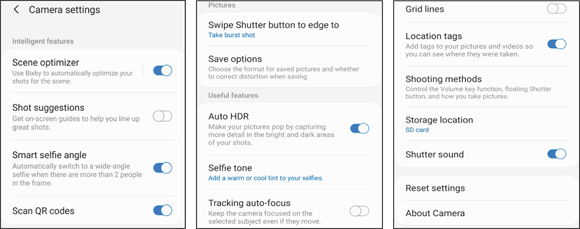
FIGURE 9-8: The Settings options.
Photo Effects options
When you tap the magic wand on the viewfinder, you get to see a number of effects that you can apply to your image. Some examples are shown in Figure 9-9.

FIGURE 9-9: Some examples of Effects options.
Select the option that looks right for your creative vision by tapping on the thumbnail and snap away.
Managing Your Photo Images
After you take some great pictures, you need to figure out what to do with them. Although you can send an image immediately to another site or via email, it will likely be the exception.
In most cases, it’s easier to keep on doing what you were doing and go back to the Gallery app when you have some time to look at the images and then decide what to do with them. Your choices include
- Store them on your phone within the Gallery app.
- Transfer them to your PC to your photo album application by sending them with email.
- Store them on an Internet site, like Google Photos or Flickr.
- Print them from your PC.
- Email or text them to your friends and family.
- Any combination of the preceding choices.
Unlike many regular phones with a built-in camera, the Galaxy S20 makes it easy to access these choices. You need to determine the approach you want to take to keep your images when you want them to stick around. The rest of this chapter goes through your options.
 Even though the Camera app and the Gallery app are closely related, they are two separate apps. Be sure that you keep straight which app you want to use.
The Gallery Home screen (refer to Figure 9-4) shows how the app first sorts the images on your phone into folders, depending upon when they originated.
All your photos from the Camera app are placed in files sorted by date. The app takes a shot at grouping them when a series of pictures or videos are taken about the same time.
Using Images on Your Phone
In addition to sharing photos from your camera, your Galaxy S20 phone allows you to use a Gallery photo as wallpaper or as a photo for a contact. And if the fancy shooting settings in the Camera app aren’t enough, you can wrangle minor edits — as in cropping or rotating — when you have an image in the Gallery app.
The first step is to find the image that you want in Gallery. If you want to do something to this image other than send it, tap the Edit button at the bottom of the screen (refer to Figure 9-5). Some of the options include
- Slideshow: This displays each of the images for a few seconds. You can not only set the speed for transition, but also add music and select among several image transitions.
- Crop: Cut away unnecessary or distracting parts of the image. The app creates a virtual box around what it considers to be the main object. You can move the box around the image, but you cannot resize it. You then can either save this cropped image or discard.
- Set As: Make this image your wallpaper or set it as the image for a contact.
- Print: This option allows you to print if you have set up a local printer to communicate with your phone either through Wi-Fi or Bluetooth.
- Rename: These options allow you to rotate the image right or left. This is useful if you turned the camera sideways to get more height in your shot and now want to turn the image to landscape (or vice versa).
- Details: See the information on the image — its metadata, which is fixed and cannot change.
Deleting Images on Your Phone
Not all the images on your phone are keepers. In fact, you may get accustomed to deleting far more pictures than you keep. This is hard for some of us who are used to expensive film. However, before too long, you’ll have far too many pictures, which defeats the purpose.
When you want to get rid of an image, press and hold the image you want to delete. In a second, a check box with the image selected will appear. Also, the links appear at the top to either Share or Delete. If you want to delete this image, tap Delete. The camera verifies that this is your intent. After you confirm, the image goes away.
If you want to delete more images, you can tap all the images you want to make go away. It is selected if it has a green checkmark on the image. Tap away, then hit delete. It will confirm with you once. Tap again and these images are gone forever.
 When I say that the photos you delete are gone forever, I do mean for-ev-er. Most of us have inadvertently deleted the only copy of an image from a PC or a digital camera. That’s not a pleasant feeling, so be careful.