Chapter 10
Creating Videos
IN THIS CHAPTER
![]() Taking videos with your phone
Taking videos with your phone
![]() Organizing your videos
Organizing your videos
![]() Sharing your videos with friends and family
Sharing your videos with friends and family
The Samsung Galaxy S20 really poured it on with the still images. Chapter 9 covers all the amazing capabilities that your phone can do with photographs. It’s truly amazing. But wait! There’s more — much, much more! You can take amazing videos with your phone.
However, before I jump into the capabilities, take a moment and think about what you want to do with videos. A knee-jerk reaction is: “I want the highest resolution and the most frames per second available. After all, memory is cheap.”
The issue to consider is that recording videos uses lots of memory and other resources. Plus, videos don’t lend themselves to easy modification after you take them. For example, you can take a photo on your phone. You can then make changes, such as adjusting the brightness and cropping it, after the fact.
Making similar adjustments to videos is impractical for most of us. If you take a video in super slo-mo, you can’t convert it to normal speed without very costly video-editing software. The point is that video images are fun, but you need to think through in advance what you want to achieve.
You may just want to capture the fun at the beach or a party with your friends and family. That’s fairly typical. It can be more fun than a still photography. You can also use your phone as a dash-cam with the hope of capturing an accident. That’s also fairly typical.
This first part of this chapter presents the basic of taking videos like these. I cover how you set it up, some of the basic options, and how you can view your wonderful creation. Later in the chapter, I discuss some of the more exotic capabilities of the S20.
Ready … Action! Taking a Video with Your Phone
To take a video, you start with the Camera app.
With the Camera app open, you’re ready to take a picture. But you want to take a video. To start the video, you swipe the Photo link to the left (which is down in the landscape orientation), shown in Figure 10-1.

FIGURE 10-1: The screen is the viewfinder for the Camera app in Video mode.
This is very similar to the screen in Figure 9-1. There are three differences for the icons on the viewfinder:
- Record Button: Instead of a shutter button, there is the record button.
- Video Stabilizer: This option does some digital magic and makes it look like you’re moving the phone smoothly from place to place. If you shut off this capability, the video will look jerky and will be hard to watch. Under normal circumstances, it’s best to leave the Video Stabilizer on. Your viewing audience will appreciate it.
- AR Doodle: This option is kind of fun. More on this later in this chapter.
All you need to do to get started is push the Record button. The image in your viewfinder turns into a video, and you see the icon switch from the image on the left in Figure 10-2 to the icon on the right.

FIGURE 10-2: The Record button, Pause button, and Stop button in the viewfinder.
Pausing allow you to temporarily stop recording the video and then restart. Stopping saves the video as it is. It saves the files and reverts to the Record button. If you want to record again, it creates a new file, which is often no big deal.
To get to the video, from the viewfinder screen, you simply tap the Gallery icon. The viewfinder shows the Gallery icon next to the Record button. When you tap it, it brings up the Gallery app, as shown in Figure 10-3.
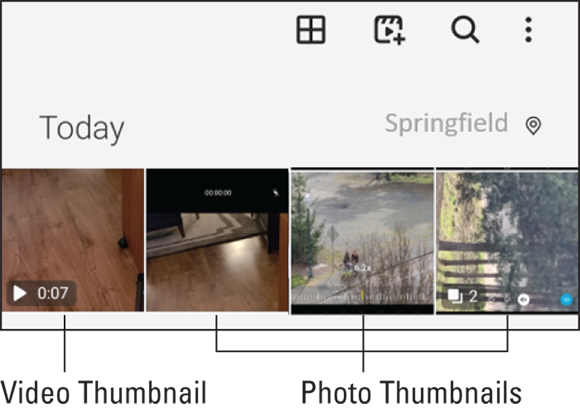
FIGURE 10-3: The Gallery app with a video.
This brings up the video along with the other recent photos. You can tell the videos from the photos because the videos have the play icon, which is an arrowhead pointing to the right, along with information on the duration of the video. In this case, the video is 7 seconds.
You have a few choices at this point. If you want to view the video, tap the thumbnail. It will expand the thumbnail to the full screen. Tap the link that says Play Video, and off it goes. Just like viewing photos, watching your video on your phone is a pleasant experience.
At the same time, a really good video is really, really worth sharing. To share your video, you press and hold the thumbnail. Every thumbnail suddenly has a white circle in the upper-left corner. Tap the circle with the file you want and a check mark appears (see Figure 10-4).
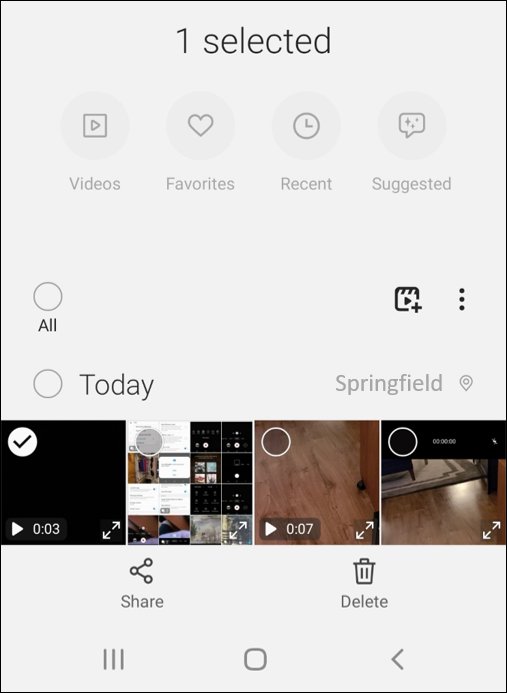
FIGURE 10-4: Selecting the current video.
You now have two options: You can share it or you can delete it. Since this is really, really worth sharing, you tap the share option. This brings up the sharing screen (see Figure 10-5).

FIGURE 10-5: Sharing options for the current video.
Yes, this is the same screen used as sharing photos, but bear with me. Good videos should be shared on social media without delay. Go ahead and tap the Facebook icon that has the title Your Story. That brings a screen up like seen in Figure 10-6.
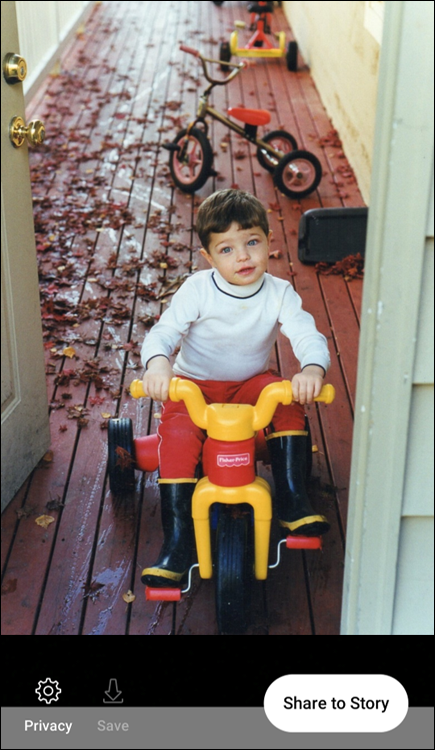
FIGURE 10-6: The Facebook Share to Story Option.
When you tap the Share button, it will verify a few things, such as validating your desired level of privacy. Accept it all and this video of a cute kid riding on his trike (or whatever is in your video) will be posted for the world to see.
Taking Videography to the Next Level
The default video settings do the job in the vast majority of cases. But that is boring. You have a number of exotic options that you may as well take out for a test drive and see how it goes.
The Video mode settings
Do you remember the part of the viewfinder where you moved from Photo mode to Video mode? If you keep going, you hit the More option. Sliding to this icon brings up the options shown in Figure 10-7.
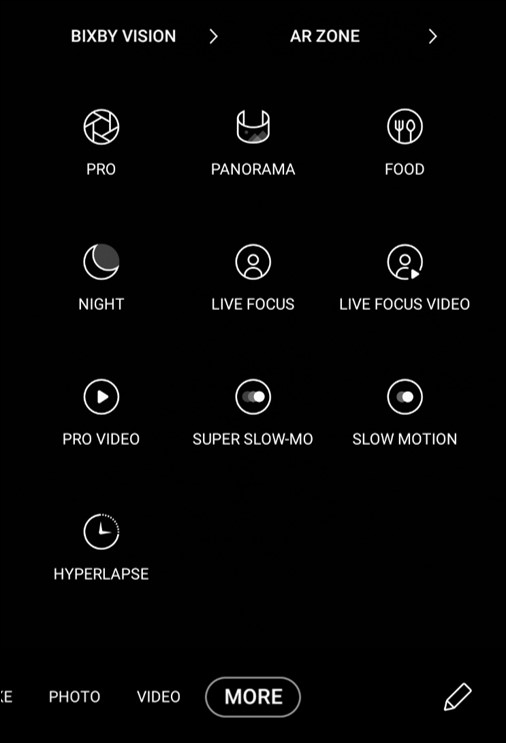
FIGURE 10-7: More Video options on the camera viewfinder.
The options in the viewfinder bring up a number of choices:
- Live Focus Video: This setting lets you get very close, within a few feet, of an object. The normal autofocus does not handle it well. If you hear the words, “I’m ready for my closeup, Mr. DeMille,” you can be assured that your shot of Norma Desmond, played by Gloria Swanson, will look great and be in focus.
- Pro Video: This option opens up all kinds of video options.
- Super Slow-Mo: This switches you to video mode to slow down really fast shots. The exceptional thing is that your S20 does this is in full 4K resolution, so you’re getting both high speed and high resolution with no compromise (other than filling up your memory card)!
- Slow Motion: This is plain-old, boring slow motion. It’s still cool.
- Hyperlapse: You can use this setting to create a time-lapse video. The video camera will adjust the speed of the shots based upon the movement of the phone.
Go ahead and experiment with these, so when the opportunity presents itself, you know what option to choose and find out if you need to get a larger memory card.
Settings options on the viewfinder
The Settings icon on the viewfinder brings up choices for the video. Before I get into these, I cover some important considerations.
The first choice you need to make is the aspect ratio. All the cool kids have displays that are 16:9. If you’re of a certain age, you remember standard televisions, which were 4:3. Forget about that old technology. Your videos should be 16:9, unless you’re getting carried away and are getting artsy.
The next consideration is what resolution you want. The most you can select is 8K. Not even the coolest kids have 8K screens. These are expensive and there is very little content for it … yet. Even the mainstream 4K TVs can have images that are a little too sharp for some people. However, 4K TVs have a lot of content these days, so they’re selling lots of TVs like this.
Still, the variations of HD are pretty darn good. The starting point on the variations of HD are Standard HD, which is 1280 x 720 pixels. This is sometimes referred to just as 720 HD. Then there is Full HD, which is 1920 x 1080 pixels on a screen. This is sometimes called 1080 HD. Between the 4K TVs and the 1080 HD is Ultra HD.
So, which option is the best? Usually more resolution is good, but at some point, it just takes up a lot more memory. Try them all and see what you like. My guess is that Full HD is probably fine.
Then, the next consideration are the frames per second. You have the option of standard, or you can choose 60 frames per second (fps). There is a widespread theory that using 60 fps is a conspiracy by memory manufacturers to sell more memory for little value to the customer. No one has been able to prove it. But they also haven’t been able to disprove it. If you have money to spend, I suggest getting a faster memory chip with more capacity.
 The main consideration for SD cards has been their rated capacity. If you use your phone for video recording at standard resolution and with the standard frame rate, you’re probably fine with a standard SD card. If you want a higher resolution or higher frame rate, you should get a card designed for faster data speeds. These days, the SD card is typically faster and is branded with “SDXC,” but if you’re using an older SD card from even a few years ago, it may choke on too much data coming at it too fast. The solution is easy: Buy a new SD card that says SDXC with as much capacity as you can afford.
With that background, the video options are shown in Figure 10-8:

FIGURE 10-8: The Settings options for video.
Here’s more on what these options mean:
- Rear Video Size: The rear lenses are the big hitters on your phone. You have the option to get really carried away here (see Figure 10-9). The first option is the 16:9 aspect ratio. When you tap the resolution link, you see the HD options (see Figure 10-10). This shows Full HD (FHD) at the standard frames per second.
- Front Video Size: Sometimes you want to be in your own video. Go ahead and use the selfie lens and video to your heart’s content. Figure 10-11 shows the aspect ratio options again. The resolution option is the same as the rear video lens.
- Advanced Recording Options: The Samsung Galaxy S20 can let you get really carried away with these options. You can, in spite of having gobs of storage, choose to use the high-efficiency option. You can also use HDR10+, which plays with contrast levels. Unless you know that this option is for you, you probably can skip it. The option you may want is the zoom-in mic. This will guess who is the most important person in the frame that you’re following, and will have the microphone pick up his or her voice out of the mix. Pretty cool.
- Video Stabilization: This is the same option that is on the viewfinder. Trust me. Leave it on.
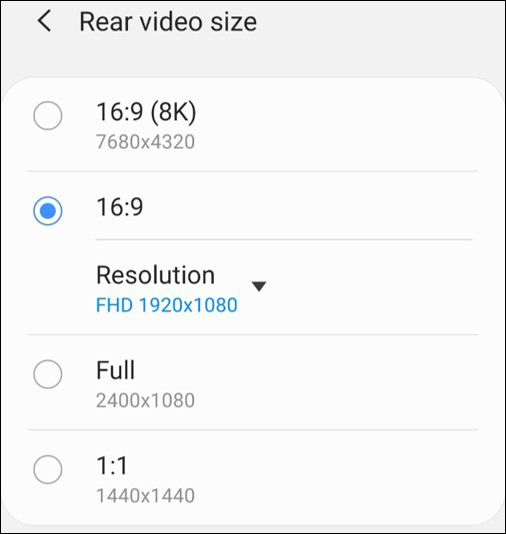
FIGURE 10-9: Your rear camera video size options.

FIGURE 10-10: The rear camera resolution options.

FIGURE 10-11: Your front camera video size options.
Messing with the AR Doodle option
When you tap the squiggly line in the corner of the viewfinder, you can have some fun. This brings up the screen shown in Figure 10-12.

FIGURE 10-12: The start screen for AR Doodle.
Here, you shoot video for about a minute. Then you’re offered some writing options. For example, feel free to draw a Snidely Whiplash mustache on your dad. Now that mustache will be flowing him around in the viewfinder.
Silly, but what good is all this elaborate technology if you can’t have some fun?!