Chapter 8
Creating a Custom App
IN THIS CHAPTER
Planning and creating a custom app
Adding new columns to a list app
Importing your spreadsheet as a list app
Discovering apps in the SharePoint Store
SharePoint ships with a number of very useful apps, including apps for calendars, tasks, pictures, links, announcements, contacts, discussions, issues, surveys, assets, and even reports, just to name a few. These apps are useful, but there comes a time when you need to create your own app for very specific data. To create a custom app based on a list, use the Custom List app.
Creating your very own SharePoint app may sound a little daunting. The good news is that creating and customizing an app couldn’t be easier. The easiest way to create your own app is to start with a Custom List app and then customize it for your particular need.
In this chapter, you find out how to create your own app. You see how to add columns to store data, create views into the data, validate data, and import data into your app. Finally, you explore the SharePoint Store, where you can search for and purchase third-party apps, and discover that your own organization can even have its own private SharePoint Store.
Planning Your Custom App
Capturing information is nothing new. Ancient civilizations (millennia ago) used stone or clay tablets, pre-computer organizations (decades ago) used typewriters, and many organizations still use Excel. Often, the problem with data is not in collecting it but in sharing and aggregating it.
Excel does a great job with data aggregation but not such a great job with sharing. SharePoint is all about sharing (hence the name). A SharePoint app is a centralized container of data that is easy to manage and maintain. In addition, by the very nature of a centralized web portal, the data is easily shared and viewed by anyone in the organization with access.
Creating an app specifically for your data needs is important. You need to determine the columns of data you will capture and how the data will relate to each other. In addition, you need to determine which data will be valid and which should be rejected.
Planning a custom list is similar to starting a new spreadsheet in Excel or a table in Access. In all cases, a little up-front planning saves time in the long run. Plan ahead so you know what order you want the columns to be in and what options you want in drop-down lists.
Creating a Custom App
You create a custom app using the Custom List app. The Custom List app creates a very basic list app that you can then customize for your particular scenario.
Follow these steps to create a custom app:
-
Click the Settings gear icon and select Add an App.
The Your Apps page is displayed.
-
Click the Custom List app on the Your Apps page, as shown in Figure 8-1.
The Adding Custom List dialog box appears.
-
Provide a name for the app in the Name text box.
To make things simple, you only need to give your new app a name. However, if you want to provide a description, you can click the Advanced Options link.
 The name you type here is used in the app’s web address. Avoid using spaces in the name when you create the app. You can change the app’s name to a friendlier name after you create it, as described in Chapter 7.
 -
Click the Create button.
SharePoint creates your new app and takes you automatically to the Site Contents page. Your new app has a green New! tag next to it to let you know it is a new app.
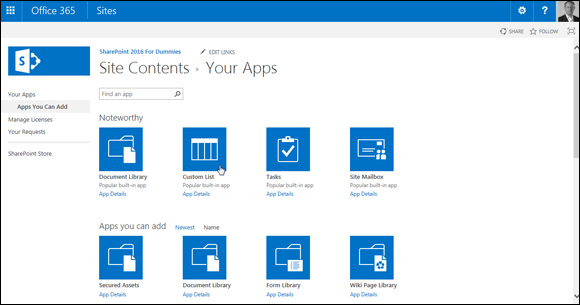
FIGURE 8-1: Selecting the Custom List app on the Your Apps page.
Adding Columns to Your App
A new custom app displays a single text Title column. The list also contains several behind-the-scenes columns that you can’t see, such as ID and Version. To make the custom app your own, you have to add columns to the app.
Columns are like fields in a database table. When you add a column to your app, a data entry field appears in the app’s New Form to give you a place to enter data into that column.
You can also add columns to the predefined SharePoint apps.
Follow these steps to add columns to your custom app:
-
With your app open in the browser, click the List tab on the Ribbon, and then click the Create Column button (see Figure 8-2) in the Manage Views group.
The Create Column window appears.
You can also add new columns with the List Settings page.
-
Type a name for your new column in the Column Name field.
The name you type is what users will see, so pick a name that’s concise but meaningful. We don’t recommend using spaces in your column names when you first create them. You can always add spaces later.
 Spaces entered in a column name become a permanent part of that column’s internal name in SharePoint. Some of these internal names can get quite lengthy and downright nonsensical, which makes referencing them a real pain.
 -
Select the type of information you want to store in the column.
The options given here are fairly intuitive — Single Line of Text, Number, Date and Time, and so on. See the later section, “Getting to know column types,” for details on selecting the column type.
 Make sure you determine what kind of data you have when you first create the column. Changing the data type later may result in loss of data, or you may not have as many options when you change the type.
 -
In the Additional Column Settings section, select the options that further define your column’s type.
The column type you select in Step 3 determines what options you have available for configuring the column.
- (Optional) If you want SharePoint to test the values entered into your column, use the Column Validation section to enter your formula.
-
Click OK.
SharePoint adds the column to your custom app.
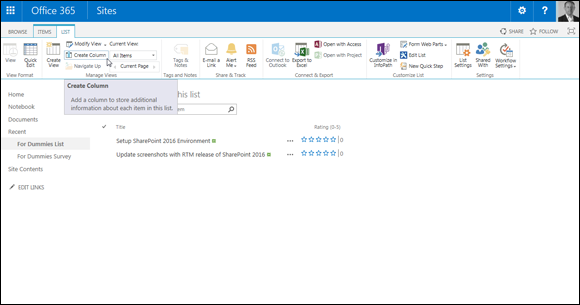
FIGURE 8-2: Add a new column to your list.
You can change the column properties later and rearrange the order of the columns by using the List Settings page.
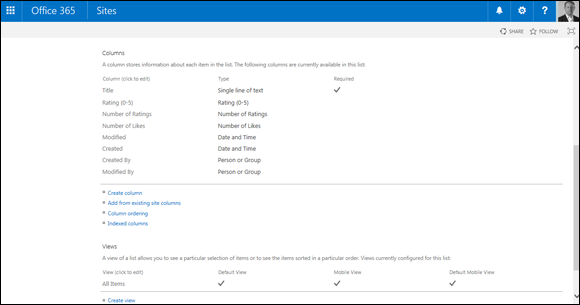
FIGURE 8-3: Columns section of the List Settings page.
Getting to know column types
Columns are used to store data, and unlike a spreadsheet, you need to define the type of column as you create it, as shown in Figure 8-4. For those who work with databases, this is a familiar concept. By defining the type of column, you gain extra functionality based on that type, and you help to control the type of information that can be entered into the column and how that information is presented onscreen. For example, users can enter only a number in a Number column; they can’t add miscellaneous text.
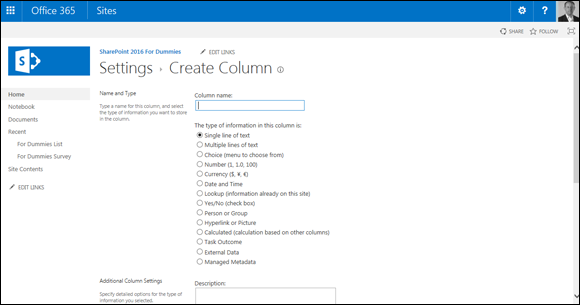
FIGURE 8-4: The Create Column page showing choices.
SharePoint provides a number of built-in column types that you can select for your apps, such as columns that know how to handle dates and URLs. Third-party companies and developers in your organization can also create custom column types that can be added to SharePoint. For example, if your company needs a column that handles a full zip code (the zip code plus four numbers), a developer could create it for you.
Table 8-1 lists common SharePoint column types and what they’re used for.
TABLE 8-1 SharePoint Column Data Types
Column Data Type* |
What It’s Used For |
Display on Form |
Single Line of Text |
Display text and numbers (such as phone or course numbers, or zip code) up to 255 characters. |
Single-line text box (the text box may not show all 255 characters). |
Multiple Lines of Text |
Display multiple lines of text. |
Select from Plain Text, Rich Text, or Enhanced Rich Text. Depending on the number of lines you select, this option shows as a text area of that size with additional toolbars to format text.** |
Choice*** |
A defined list of choices; for example, categories or departments. |
Drop-down list is the default and most common. |
Number |
Numerical values that can be used for calculations. |
You can identify a min/max value number with a choice of decimal options. |
Currency |
Numerical values that represent money. |
You can identify a min/max value currency. Includes options for decimal places and currency format. |
Date and Time |
Dates and times. |
Date and/or Time-Calendar Picker. |
Lookup |
Values from another list — for example, categories could be stored in a lookup list for document metadata. |
Drop-down list populated based on values from other list. |
Yes/No |
Boolean value of Yes or No. |
Check box. |
Person or Group |
Directory listing information from SharePoint. |
The person or group is shown as a hyperlink and can include presence information. |
Hyperlink or Picture |
Hyperlink (internal or external) or an image. |
Hyperlink or picture. |
Calculated |
Data that can be calculated by formula. |
Result of calculation; can be text or numerical. |
Task Outcome |
The outcome of a task such as Approved, Rejected, or Pending. |
The Task Outcome presents a list of choices that you can define when creating the item. |
External Data |
Data stored in a data source; for example, a table or view in an enterprise database. |
Usually filled in by the external source and not users. |
Managed Metadata |
Provides a common set of keywords and terms that can be used across the organization. |
Users can simply start typing, and the options will fill in based on their input. The options are pulled from the metadata managed by SharePoint. |
* Most columns also include property options for Required, Allow Duplicates, Default Values, and Add to the Default View.
** Although you may set a number of lines for editing, this isn’t a defined limit. Users can type or cut/paste a large amount of text into this control. You may want to use column validation to restrict the length.
*** Choice can also be shown on the form as radio buttons for a single choice or check boxes for multiple choices.
In addition to the column data types in Table 8-1, other data types, such as Publishing HTML (an even richer form of text), can be selected when creating site columns in publishing sites. Publishing sites are beyond the scope of this book, but we would encourage you to dig further if you are in a large organization and need to have granular control on who can publish to which portions of a page.
Validating data entry
Column validation options allow you to define additional limits and constraints for your data. For example, you may want to ensure that a value in one Date column occurs after another Date column. (So, for example, column validation can ensure that the date in the Date Finished column can’t be earlier than the date in the Date Started column — you can’t finish a project before it’s begun!)
To use column validation on your app:
- In your app where you want to validate data entry, click the List Settings button on the List tab of the Ribbon.
- Under General Settings, click the Validation Settings link.
-
Type a formula in the Formula text box, as shown in Figure 8-5.
The result of the formula must evaluate to
TRUEto pass validation. The formula syntax is the same as calculated columns, which is similar to Excel syntax. -
Enter a user message that you want to appear if the validation formula fails.
The message should give the user an idea of how the formula works and how to fix the problem. (See the example message in Figure 8-5.)
- Click the Save button.

FIGURE 8-5: Entering a formula for list validation.
When users enter data into your form, the validation formula is evaluated. If the formula evaluates to FALSE, your user message appears on the form, as shown in Figure 8-6.

FIGURE 8-6: A user message appears when validation formula equals FALSE.
You can add column validation to columns created at the app or site level. Validation created for site-level columns applies everywhere that column is used, although the formula can be overridden at the app where the site-level column is used.
Working with the Title Column
Unlike SharePoint’s predefined apps, your custom app has only one column when you first create it — the Title column. Unfortunately, you can’t delete the Title column or change its data type, but you can rename it, hide it, or make it not required.
To rename the Title column:
- Click the List Settings button on the List tab of the Ribbon.
- Under the Columns heading, click the Title hyperlink.
- Replace Title with your own title and make modifications to the other properties as desired.
The Title column is used by the list as a means to access the data entry forms to view and edit the list item. You can opt to hide the Title column so that it doesn’t appear on any of the app forms.
To hide the Title column:
- In your list, click the List Settings button on the List tab.
- If the Content Types section isn’t visible, enable management of content types by following these steps:
- Click the Advanced Settings link on the List Settings page.
- Select the Yes radio button under Allow Management of Content Types, and then click OK. The Content Types section becomes visible on the List Settings page.
-
In the Content Types section of the List Settings page, click the Item content type.
The List Content Type information appears.
If you want to change the Title column in a document library, you click the Document content type. The Item content type applies to custom apps only. In a predefined app, such as a Tasks app, you click the Task content type.
-
Click the Title column.
The Title column’s properties appear.
-
Under Column Settings, select the Hidden (Will Not Appear in Forms) radio button, as shown in Figure 8-7, and click OK.
The Title column doesn’t appear on forms.
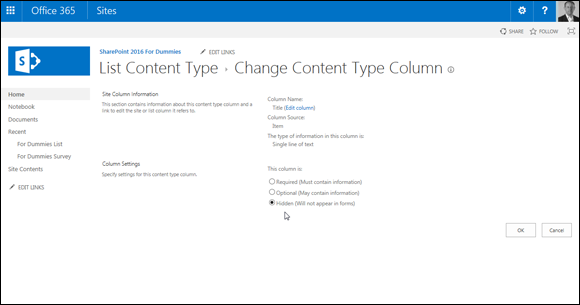
FIGURE 8-7: Hide the Title column.
Importing a Spreadsheet as an App
Already have data in a spreadsheet that you want to be a SharePoint app? You’re halfway there! Before you start, make sure you do the following:
- Clean the spreadsheet. Make sure your spreadsheet looks like a table, with no blank columns or rows.
- Make sure your spreadsheet has headers. All columns in the SharePoint app need to have a column title.
- Make sure your data is consistent. For example, if a cell has a comment in it, but it should contain a date, remove the comment text.
- Make sure your column heading in the first row is representative of the data. SharePoint reads the headings in the first row and makes assumptions about the information in those columns.
Figure 8-8 shows an example of a clean spreadsheet ready for importing.
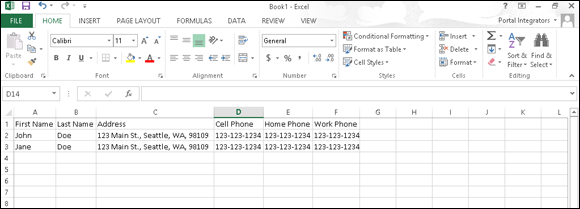
FIGURE 8-8: Cleaned spreadsheet ready for import into SharePoint.
To import your spreadsheet into a custom app:
-
Click the Settings gear icon and choose Add an App.
You can also click the Site Contents link on the Quick Launch toolbar and then click the Add an App icon.
 This feature requires the use of a browser that supports ActiveX. If you run into issues with this feature, such as seeing an unexpected error, then ActiveX Controls are not working properly with your browser.
 - Select the Import Spreadsheet App from the list of apps you can add.
-
In the Name text box, enter a name for your app.
Follow the naming conventions outlined in this book for app names: Keep them short and eliminate spaces.
- (Optional) In the Description text box, enter a description of the app.
-
Click the Browse button, browse to your spreadsheet, select it, and click the Import button.
A dialog box appears that asks how your range is designated. The default is Table Range, but other options are Named Range or Range of Cells. If you haven’t named the data as a range in Excel or set it as a table, select the Range of Cells option.
- If you chose the Range of Cells option, click the Select Range field in the dialog box, and then click your spreadsheet and highlight the desired cells.
- Click the Import button in the dialog box.
After you import your spreadsheet, verify the column types SharePoint chose for you. Generally, SharePoint assumes text, number, and dates. You may want to change some text fields to Choice, Yes/No, and so forth.
Taking Your App to the Next Level: Calculated and Lookup Columns
Calculated columns are especially powerful for automatically generating data. Don’t be intimidated — the web is full of great formula examples for SharePoint calculated columns. Some common uses include
- Adding days to a Date column to calculate an Expired or Due Date column
- Adding Number or Currency columns to get a total
- Using the Me function to automatically add the username to a field
Creating a calculated column
To create a calculated column, follow these steps:
-
Select the Calculated column type in the Name and Type options in the Create Column dialog box.
The Additional Column Settings area changes to support entering a calculation (see Figure 8-9) and specifying column options.
-
Type your formula using the proper syntax in the Formula text box.
If you’re basing your calculation on another column in the app, you can reference that column using the square brackets reference syntax.
For example, to calculate a Shipping Deadline value, add five days to the Order Date value in another column by entering [Order Date]+5 in the Formula text box.
-
Select the proper data type for the returned value and other data type property options, if available, from the Additional Column Settings section of the page.
 Not all return values are of the same data type as the input columns. For example, if you subtract one date from another, your returned value is a number (the number of days’ difference between the two dates).
Other examples include
- Adding the current username to a field. Simply type the constant [Me] in the Formula text box.
- Using today as a date in a calculation to create a new date by entering [Today]+7 in the Formula text box.
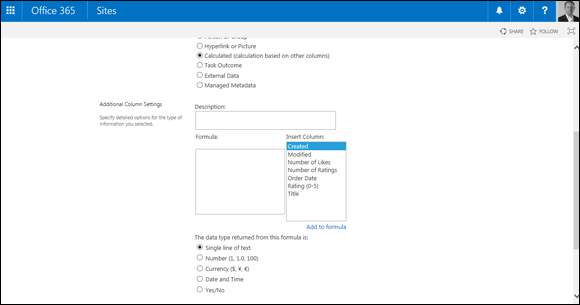
FIGURE 8-9: Column settings for a calculated column.
Using a lookup column
Maintaining all your options in a Choice field can be cumbersome and prone to error. SharePoint uses a similar model to relational databases by separating the lookup information from the transaction app. Think of all the lookup data that could be maintained in separate apps. For example, computer hardware inventory lookup apps could include hardware type, maintenance contract, and department location. These apps can be maintained independently of the transaction app — the inventory itself.
For example, you could create a Customer custom app with a single field — Title — and populate it with the names of customers. Then build an Order app (to track orders that customers place). Customer is a column in the Order app. Rather than build a Choice field, you could use the Lookup data type to connect to the Customer app and use the Title field as data for the Customer column in the Order app. The end result is that all your customers are separated from the orders. If a customer needs to change his or her name (maybe she got married, or his name was misspelled) you can just change the name in the Customer app instead of in every entry in the Order app.
You can also add other columns from the lookup app to the drop-down list to help users select the proper choice. When a user selects the value from the drop-down list, values for the additional columns also display. Figure 8-10 shows a scenario that uses a lookup column to display a customer’s sales territory. The customer’s name and sales territory are stored in one app and displayed in another app using a lookup column. Figure 8-10 also shows the use of inline editing in a Web Part.
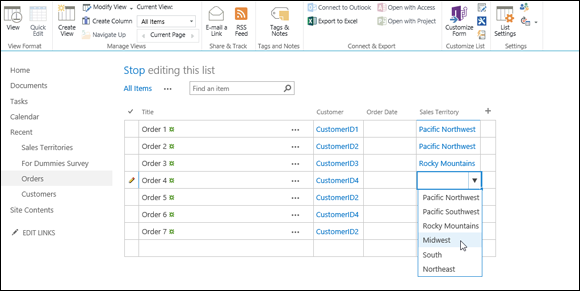
FIGURE 8-10: Selecting a value from a lookup column.
Downloading Apps from the SharePoint Store
In addition to the apps that come with SharePoint, you can also add apps from third parties. These third-party apps appear in the SharePoint Store. If you’re using SharePoint Online, then you have access to the full store. If you’re using SharePoint On-Premises, then your local IT administrators may have locked down the apps that you can add for security reasons.
The SharePoint Store can be found on the Your Apps page, as shown in Figure 8-11. You access the Your Apps page by clicking the Settings gear icon and then selecting Add an App. Take a look and see what SharePoint apps you have available in the store.
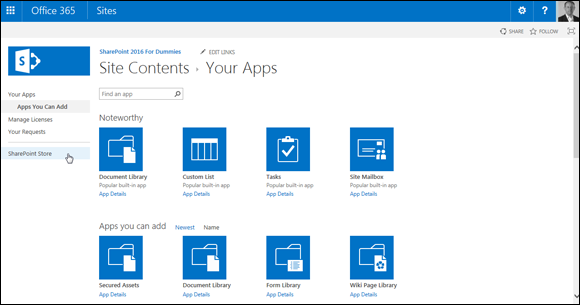
FIGURE 8-11: Accessing the SharePoint Store from the Your Apps page.
The SharePoint Store is shown in Figure 8-12.

FIGURE 8-12: The SharePoint Store.
You can choose to view all apps or only those that are free by selecting the Price refiner on the left side of the page. You can also sort apps by clicking a category link. If you want to purchase an app, click it and then click the Buy It button. After you click the Buy It button, you have to log in with your Microsoft account. If you already have a credit card on file with your Office 365 subscription, then you can purchase and download the app. Otherwise, you are prompted to enter your credit card information.
