Chapter 10
Getting Familiar with Site Settings
IN THIS CHAPTER
Getting familiar with the settings for your site
Figuring out how to access the Site Settings page
Understanding the different site settings categories
It used to be that website administration was done by the same web developer geeks that created the site. This made life simple for the information worker. If something was wrong with the site, call IT! If something needed to be changed, call IT! If a new site needed to be created and developed, call IT!
SharePoint has shifted the paradigm of website administration. No longer do you need to involve IT in your website administration. This relieves the pressure on IT and also empowers you to take control of your own site. Wasn’t it a line in Spider-Man, that with great power comes great responsibility? Well, the same is true with SharePoint. If you are a site administrator, you have great power at your fingertips. Just be prepared; the website users will now come to you instead of IT. No need to fear, though; SharePoint makes website administration straightforward. Everything is done using your web browser from a centralized settings page called Site Settings. Yes, you use SharePoint to administer SharePoint. How convenient!
In this chapter, you go through the settings available for a SharePoint site. You find out how to find the Site Settings page and gain familiarity with the many different settings categories.
Finding Site Settings
Thankfully, finding the Site Settings page is as easy as two clicks of the mouse. Click the Settings gear icon and choose Site Settings, as shown in Figure 10-1.

FIGURE 10-1: Opening the Site Settings page.
When the Site Settings page loads, you see a number of links all grouped into various categories, as shown in Figure 10-2. The Site Settings page can be daunting and overwhelming. Don’t worry, though. As you administer a SharePoint site, you will become familiar with all the various settings pages and become an expert before you know it.

FIGURE 10-2: The Site Settings page in SharePoint.
Different settings links appear and disappear, depending on your particular permissions and the type of site you are administering. For example, if you’re a site collection administrator, then you see the Site Collection Administrators link under the Users and Permissions section. If you’re not, then you won’t see this link or even the entire Site Collection Administration section.
 If you read about a settings page but can’t find it, then chances are you don’t have permissions or you are working with a site that does not have that particular setting. This can occur, for example, if the publishing feature is activated or not. In general, SharePoint shifts around links and names depending on how the site is set up.
Digging into Site Settings
The Site Settings page for a site based on the Team Site template contains seven settings categories: Users and Permissions, Web Designer Galleries, Site Administration, Search, Look and Feel, Site Actions, and Site Collection Administration.
Users and Permissions
SharePoint security is a broad topic. In SharePoint, you can create groups, add roles, and set permissions. You can add users to those groups and set permissions for sites and apps. The Users and Permissions section of the Site Settings page is where you administer SharePoint security. (Refer to Figure 10-2 to see the Users and Permissions category.)
The Users and Permissions section contains links to the following settings pages:
- People and Groups: Click to view settings for all the users in your site. Using the People and Groups settings page, you can create new groups, add and remove users from groups, and set permissions for groups.
- Site Permissions: Click to see a page where you can create groups, add roles, change access request settings, and view current roles. In addition, you can add, edit, view, and remove permissions from users.
- Site Collection Administrators: Click this link to set which users have site collection administrator permissions. Site collection administrators have permissions to all the sites contained in the Site Collection. This could be many sites, depending on how your SharePoint farm is set up. If you’re a site collection administrator, be very careful who you give this permission to. (This link does not appear if you’re not already a site collection administrator on the site.)
- Site App Permissions: Click to provide permissions to the site for SharePoint apps. This is important for third-party apps that you install on the site that need to access your data.
SharePoint security can take some time to comprehend. Sometimes things just don’t seem to work the way they should. Hang in there, though. We talk more about SharePoint security in Chapter 14.
Web Designer Galleries
A common theme throughout SharePoint is reusability. When you spend the time to develop something, you want to be able to use it over and over again. In SharePoint, reusability takes the form of things like data containers, templates, layouts, and solutions. The Web Designer Galleries is where you manage all these reusable components. The components are stored in galleries and are designed to hold the pieces you use when designing your websites. With that in mind, Web Designer Galleries is such a perfect name. (What a nice break from other horribly named technology and acronyms like XSLT, HTML, and CSS.)
The Web Designer Galleries section of the Site Settings page includes the following links:
- Site Columns: A gallery that contains columns you can use throughout the site. For example, you might create a column called Product Name that you could add to any app in the site. SharePoint ships with a number of existing site columns.
- Site Content Types: This gallery stores site content types (which are a collection of columns) so that you can use them throughout the site. For example, say you want to store all the information about a product. A product might contain many different data fields (called site columns) such as Product Name, Product Description, Product Bar Code, Product ID, and probably a lot more. You could create the site column for each data field and then group all of the data fields together into a content type. Now, rather than adding each data field to every app throughout the site, you can simply add the content type when you want to work with a product, and all the columns come along with it. SharePoint ships with a number of content types out of the box. The content types are grouped into categories for easy reference.
- Web Parts: The gallery where all Web Parts (both out of the box and third-party) are stored. Web Parts are functional components that can be added to pages. (Web Parts are covered in Chapter 6.)
- List Templates: The gallery where an app saved as a template is stored. (List Templates is a bit of a naming snafu. In SharePoint 2016, all lists and libraries are called apps, so this gallery would more aptly be named App Templates.) Each app based on a list has a link on the List Settings page. Under the Permissions and Management section is the Save List as Template link. When you save a list app as a template, it is then stored in the List Templates gallery. You can then take the template and upload it to this gallery on a different SharePoint site. After it’s uploaded, you see a new app type on the Your Apps page, and you can then create apps based on the uploaded template. This is handy when you spend a lot of time building a list app just the way you want it and need to transfer it to another location.
- Master Pages: This gallery contains all the master pages and page layouts. A master page is a template type page that provides a consistent look and feel throughout every page in the site. For example, notice how in every out-of-the-box SharePoint site, the navigation is on the left, there is a header at the top, and the pages are in the middle? That is all due to the master page that ships with SharePoint. (Creating custom master pages for your organization is best left to developers — master pages are a lot of work and can quickly turn into a nightmare project. SharePoint also requires the master page to contain certain things and behave in a certain way.) A page layout is a similar concept to a master page but is designed to be a template for a single page. (Page layouts are a feature of the publishing components of SharePoint and are covered further in Chapter 18.)
- Themes: A gallery that holds SharePoint themes. A theme is a collection of colors and fonts. When you apply a theme, your SharePoint site magically changes. A number of themes ship with SharePoint, and you can also have a web developer build your own custom themes. (Changing the look and feel of your site is covered further in Chapter 13.)
- Solutions: A gallery that stores custom SharePoint solutions. A SharePoint solution is a bunch of custom-developed functionality all packaged together. The entire package is called a Web Solution Package (WSP). A SharePoint solution might be developed by your in-house developers or purchased from a third party. For example, the company Portal Integrators has deveoped a number of SharePoint solutions for clients all over the world. When they send the final product to a client, they send them the WSP. One of these solutions is geared towards Human Resources. If you purchase it, you get a WSP with all sorts of SharePoint functionality designed for Human Resources. Upload the WSP to this gallery, and your Human Resources department now loves SharePoint.
- Composed Looks: A gallery that has to do with the look and feel of your site. A composed look is relatively new in SharePoint; it expands on the idea of themes and adds a background image and a master page. A number of composed looks ship with SharePoint (and are explored in Chapter 13). To give you a sneak peek, SharePoint ships with composed looks called Sea Monster, Breeze, and Immerse. You can look forward to spicing up your SharePoint site, if you so desire.
Refer to Figure 10-2 to see the Web Designer Galleries category.
Site Administration
The Site Administration section is where you manage options that are specific to this individual site. The changes you make in this section won’t affect other sites in the same site collection container. This is different than the Web Designer Galleries section of the Site Settings page. The Web Designer Galleries section includes components that are used throughout the site collection. So if you upload a solution, it will be available to other sites in the site collection.
 It’s easy to get confused about which site the Site Administration page affects. This is especially true if you manage multiple sites or are a site collection administrator. When working with the Site Administration settings, make sure you are on the correct site.
The Site Administration section contains a large number of settings, so many that we can’t cover them all in this book. We encourage you to explore these settings. Among the settings in the Site Administration section are Regional Settings, User Alerts, Workflow Settings, Term Store Management, Popularity Trends, and even Translation Status (which is only available when SharePoint Server Publishing Feature is active).
(Refer to Figure 10-2 to see the Site Administration category.)
Search
The Search section is where you manage all the search functionality for your site. Search can be an incredibly powerful productivity tool. It’s worth spending the time to discover the capabilities of SharePoint search.
The Search section contains the following links:
- Result Sources is a settings page where you define where SharePoint search should look for content. You can set sources to local SharePoint content, remote SharePoint content, Exchange, or any other external system that supports the OpenSearch protocol.
- Result Types is where you define how a result will look based on the type of content displayed. For example, you might want the results of a person to look different from the results of an Excel or Word file. A number of prepackaged types ship with SharePoint, and you can also define your own. For example, you might want all your products to display in a search result in a particular way. You might want the picture on the left and a description and price on the bottom. You might then want a link to the product page and also a link to the product documentation. You define this with a custom search result that uses a custom template. Building these isn’t simple, but it is possible with the right technical resources.
- Query Rules is a place where you can promote important content into search results. This is valuable because most people are looking for common content. The search engine doesn’t know the difference between an actual marketing template and a hundred other documents that might include the words marketing template. Using the query rules, you can let SharePoint know that the actual marketing template is what people are looking for when they search the term and that it should be displayed at the top. You can also show additional blocks of search results based on a search that you might think someone is trying to find. For example, if someone searches for sales decks, they might really mean sales PowerPoint documents. Query rules are very powerful, and it’s worth taking the time to figure out the capabilities to provide the best search experience.
- Schema is where you can manage properties and map the properties that the search engine uses when searching. A property is a piece of data about the thing that you search for. For example, if you search for a person, you might create a property to hold the person’s department. The search engine can then reference that property when you look for a person in a particular department. Managing properties is only available to site collection administrators.
- Search Settings is where you define the general search settings for the site. You can point the search results to a special site called a Search Center or a specific custom page you have developed to show search results. In addition, you can configure navigation for moving between search and the rest of the site.
- Searchable Columns is a where you define which columns you want the search engine to reference when you search. (Creating a new column is covered in Chapter 8.) You can use this settings page to let SharePoint know it should use a particular column of metadata when searching for content. The Searchable Columns link is available only when the SharePoint Server Publishing Feature is active.
- Search and Offline Availability allows you to ban the site content from appearing in search results, set fine-grained search permissions, and even allow items from the site to be downloaded to offline clients.
- Configuration Import lets you import a search configuration file. A search configuration file can contain all the settings and details that you have already spent the time to set up. You definitely wouldn’t want to go through the entire exercise on every site, so you can use configuration files to move settings between sites.
- Configuration Export is used to export a search configuration file after you have everything set up just how you want it. You can then use the Configuration Import setting to import on the new site.
SharePoint search is a very broad topic and it takes some time to get familiar with its capabilities. It is well worth the effort, however, because search can greatly improve your organization’s productivity. (We discuss SharePoint search in more detail in Chapter 19.)
(Refer to Figure 10-2 to see the Search category.)
Look and Feel
The Look and Feel section of the Site Settings page includes links for managing things like the color, title, and landing page. You can easily change a number of things to customize your site and make it your own.
 The Look and Feel section of the Site Settings page is a perfect lesson in SharePoint frustration. The links that appear in this section depend on whether you have the SharePoint Server Publishing feature activated. Not knowing this could cause you frustration because you may read about a settings link, but when you look at your own SharePoint 2016 site, that link is nowhere to be found. To make matters worse, the links are different depending on whether SharePoint Server Publishing is activated at the site collection level or the site level. For example, you could have SharePoint Server Publishing activated at the site collection level but not activated at the site level. You will still see the Navigation link in the Look and Feel section, as opposed to the Top Link bar and Quick Launch navigation links that appear if the publishing feature was deactivated at the site collection level. (Activating and deactivating SharePoint features is covered in Chapter 12.)
The Look and Feel section contains the following setting links (when the SharePoint Server Publishing feature is not active at the site collection or site level):
- Title, Description, and Logo is where you can change the title of your site, add or edit the description, and insert a logo. Just changing the title and logo is often enough to make a business site your own. With this simple change, your site looks professional and unique to your team or organization. You can then get on with the productivity benefits that SharePoint has to offer.
- Quick Launch enables you to configure the navigation on the left side of the page. You can add headings, links, and change the order.
- Top Link bar enables you to configure navigation at the top of the page.
- Tree View is where you enable or disable the Quick Launch (left navigation) or turn on a special type of navigation on the left side that shows a tree of the site’s content.
- Change the Look is where you choose the colors and design of the site. There are some exciting and outrageous looks such as Sea Monster and Immerse. The looks available to choose from are in the Composed Looks gallery (see the earlier section, “Web Designer Galleries”).
When you activate the SharePoint Server Publishing Infrastructure feature at the site collection and site level, the Tree View and Top Link bar setting links disappear and are replaced with a single Navigation link. In addition, the following settings links appear in the Look and Feel section.
- Design Manager is a web-based tool that you can use to create your own SharePoint site designs. The tool is wizard based and walks you through uploading design files, editing your master page, changing page layouts, and publishing and packaging your design.
- Device Channels enables you to specify certain characteristics of your site based on the device used to view the site. A channel can be optimized for the device to display the site in a specific way. For example, you can set up a channel for smartphones (such as an iPhone or Windows Phone). You could set up a different channel for the iPad or Surface tablets. And finally, you can set up a channel for laptops and desktop browsers.
- Import Design Package enables you to import a design package developed by a third party or in-house designer.
- Navigation enables you to manage navigation links and also change how the navigation behaves. You can configure global navigation (top of page) and also current navigation (left side of page). The Navigation settings page also enables you to change the sorting order of the navigational links and show and hide the Ribbon.
- Master Page is where you choose which master page the site uses and which master page the system uses. The system master page is for pages used by the system, such as when you view an app.
- Page Layouts and Site Templates enables you to control which page layouts and site templates are available for users of the site. All the page layouts are contained in a gallery (see the earlier section, “Web Designer Galleries”). This settings page enables you to limit the page layouts and site templates that users of the site can use.
- Welcome Page is the landing page for a publishing site. You can use this settings page to determine which page should be used for the landing page.
- Image Renditions is where you determine how images and video should render. You can choose a particular width and height for each type of image or video.
We cover changing the look and feel of your site in Chapter 13 and cover SharePoint navigation in Chapter 11.
The Look and Feel category, with the SharePoint Server Publishing feature activated, is shown in Figure 10-2.
Site Actions
The Site Actions section is where you manage the SharePoint features for the site. You can activate or deactivate particular features using the Manage Site Features link. This is important because some features show up only when certain features are active. For example, the Save Site as Template link and the Enable Search Configuration Export option show up when the SharePoint Server Publishing Feature is not active but disappear when it is active. In addition, you can reset the site to its original template definition or delete the site completely.
We cover activating and deactivating SharePoint features in detail in Chapter 12.
(Refer to Figure 10-2 to see the Site Actions category.)
Site Collection Administration
A site collection is a container for multiple sites. SharePoint allows organizations to delegate different levels of administration. For example, you might be a site collection administrator, and there might be an administrator for each site. This delegation of duty is important for offloading the work required to keep a large number of websites running smoothly.
The Site Collection Administration section of the Site Settings page is used to administer the overall site collection. The result is that any changes made to these settings pages affect all sites in the site collection. In addition, you can activate or deactivate a feature here to make it available or remove it from all the sites in the collection. The next step up in administration from site collection administrator is SharePoint farm administrator. A SharePoint farm administrator uses a tool called Central Administration, and the changes they make at the farm level affect all site collections in the SharePoint farm.
In order to see this section, you must be a site collection administrator.
There are over 30 links to settings pages in the Site Collection Administration section. Most of the links are similar in nature to the Site Administration section but affect all sites in the collection and not just the current site. Keep in mind that having a feature active or not causes links to appear or disappear. For example, activating the SharePoint Server Publishing Feature alters this settings page.
The Site Collection Administration category is shown in Figure 10-3.
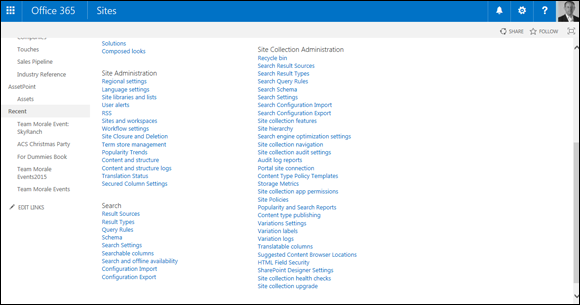
FIGURE 10-3: The Site Collection Administration category of the Site Settings page.