Chapter 14
Securing Your SharePoint Site
IN THIS CHAPTER
Managing groups in SharePoint
Handling security for apps, documents, and items
Giving access to administrators
Checking user permissions
SharePoint is a great tool for storing documents and managing calendars and contacts. But how do you know that your information is secure? Although your IT department makes sure that your network and servers are secure, managing the security for your SharePoint content falls on you as the site administrator.
When securing your site, you need to perform three basic tasks. We list them here in the order of the frequency you perform these tasks, from most often to seldom:
- Managing SharePoint group membership: When it comes to that dreaded time to manage SharePoint security, what you really need to be thinking is, “To which SharePoint group do I need to add this person?” If you don’t have an existing group and you find yourself descending into a morass of permission levels, inheritance, and other such incomprehensible stuff, back away from your browser. The reality is that assigning permissions — breaking inheritance and assigning groups — should be a rare event, if done right.
- Assigning permissions to sites, apps, or folders: Deciding which groups get access to what is an important task, and one you only want to think about infrequently — most usually at the time (or ideally before) you create your site. In other words, granting Read Only, Edit, and Delete permissions to the content in your site should be a set-it-and-forget-it task if you make those assignments to SharePoint groups. When these permission assignments are granted to your SharePoint groups, you only have to manage who is in each group.
- Managing administrative access: Even less frequently do you need to grant or revoke administrative access to your site.
In this chapter, we explain these three tasks.
Using SharePoint Groups
SharePoint uses groups to manage the process of granting someone access to the content in a site. Each SharePoint group maps to a set of permissions that define the tasks that a user can perform. Most users fall into one of SharePoint’s three default groups:
- Site Visitors: Grants read-only access to the site and allows users to create alerts. Users who need read access to a site but don’t need to contribute content are visitors.
- Site Members: Confers the Contribute permission level for users, which allows them to add, edit, and modify items and browse sites. Most end users fall into this category for a site.
- Site Owners: Grants full control. A site owner may or may not use the site on a regular basis, but the site owner can delegate administrative and design tasks to others. Also, a site owner may or may not be a technical person.
 Access to your site and its content is managed through group membership. Adding and removing users from SharePoint groups is the most efficient way of granting and revoking permissions.
A top-level site has a single set of Site Visitors, Site Members, and Site Owners. The actual names of the groups are determined by the name of the site. For example, if your site is named Sales, SharePoint calls your groups Sales Visitors, Sales Members, and Sales Owners.
These three groups are created and named when the top-level site is created. All the apps and subsites that are created below the top-level site use these groups and have the same set of people inside the groups. By default, all the content and subsites in your top-level site have the same permissions, dubbed permissions inheritance.
Adding users to a group
For people to access your site, you must share it with them by adding them to one of these default groups. For example, to add users to the Site Members group, follow these steps:
-
Log in to the site as a Site Owner, and then click the Share button in the upper-right corner of the page.
The Share dialog box appears, as shown in Figure 14-1.
 Alternatively, you can add users to groups on the Site Settings page by clicking the People and Groups link in the Users and Permissions section.
 -
Enter the names of the users you wish to add to the site.
You can enter names or email addresses of users that SharePoint can add to the site.
Type the names in the form of
domainaccount. For example, if your domain name isPORTALINTEGRATORSand the name isRosemarie Withee, type PORTALINTEGRATORS osemariewithee. You can also just type Rosemarie Withee, and SharePoint will try to resolve the name to the account.If you don’t know the names of user accounts, you can type the email addresses. SharePoint tries to map the email address for the account. For example, the email address
[email protected]resolves toPORTALINTEGRATORS osemariewitheein our domain. Chances are that you can use the email addresses from your address book in Outlook. -
Include a personal message that will be included with the invitation.
This step is optional. If left blank, users will be emailed a generic welcome message.
If you don’t see a dialog to enter a personal message, then email has not been configured for the SharePoint environment. - Decide if you want to send the users a welcome email message by selecting or deselecting the Send an E-mail Invitation check box.
-
Click Show Options to select the group where you want to add the users.
By default, the dialog box adds users to the Site Members group.
- Click the Share button to add the users to the SharePoint group and thus share the site with them.

FIGURE 14-1: The Share dialog box is used to add users to the site.
With Office 365, you have the ability to invite people to use your site who are outside your organization. We discuss using this functionality to create a client extranet in Chapter 23.
Understanding the permission structure
Members in the Site Owners SharePoint Group create the permission structure for a site. The Site Owner should have a pretty good understanding of which users need to access the site and what that access should be. This means that members of IT usually shouldn’t be Site Owners. Instead, you want members of the business departments to take responsibility for site ownership.
Permissions are contained within a site collection. Therefore, all the people, groups, and permission levels defined for a site collection are available to every site and app within the collection. Permissions inheritance is in place by default, so all the content and subsites in SharePoint inherit permissions from their parents.
Web sites, apps, folders, and list items are all securable with permissions in SharePoint.
When a subsite is created, all the content structures within the site inherit permissions from the site collection. For example, when you create a new site using the Team Site template (see Chapter 4), all the apps in the site inherit permissions from the site collection. The default permissions configuration for a site collection is as follows:
- The Site Owners, Site Visitors, and Site Members groups are created.
- The primary and secondary site collection administrators are added to the Site Owners group. These administrators are specified when the site collection is created.
The site collection administrator takes responsibility for planning the permissions. If desired, the site collection administrator can delegate the responsibility of implementing the permissions to the Hierarchy Managers group in publishing sites. In team sites, the owner has to create a new permission level that confers the Manage Permissions permission to those individuals and groups assigned to it.
SharePoint also provides the following set of specialized administrative groups for sites based on publishing templates that enable the site’s owner to delegate responsibility:
- Approvers: Enables Approve permissions, which allow users to approve items and override document check-outs.
- Designers: Grants permission to change the look and feel of sites with style sheets and themes.
- Translation Managers: Grants permission to change the translated text of a page. This role works in conjunction with the translation features, which are part of the Publishing Infrastructure Feature.
- Hierarchy Managers: Enables Manage Hierarchy permissions, which makes it possible to manipulate the site’s hierarchy and customize lists and libraries.
In addition to providing several kinds of administrative roles, SharePoint 2016 provides the following groups for restricting access:
- Everyone: Enables access for every SharePoint user.
- Excel Services Viewers: Enables users to view Excel documents in a page. This is required so that the page they are viewing can read the Library app where the Excel document is located.
- Quick Deploy Users: Moves content from one server to another, such as from a staging server to a production server. Available only when Publishing Infrastructure Feature is active.
- Restricted Readers: Enables users to view only items and pages but doesn’t show any item history.
- Style Resource Readers: Enables users to read from the master page gallery and style library. Available only when Publishing Infrastructure Feature is active.
There are a number of other specialized groups to choose from in addition to the primary groups mentioned here. You can view all of the groups in your site by clicking on the People and Groups link in Site Settings. You will see a list of groups in the left hand navigation. Clicking the More link at the bottom loads all of the groups into the main page so you can read about the group. Figure 14-2 shows common SharePoint groups, their permission levels, and their permissions.

FIGURE 14-2: The People and Groups page for a site based on the Team Site template.
Securing a site collection
After you know how to add new users and domain groups to a SharePoint group, finish setting up security for a site collection by doing the following:
-
Add user accounts or domain groups to the Site Visitors group.
The Site Visitors group has Read permissions, which enables this group to view the site collection’s content.
We suggest you add the Authenticated Users domain group to the Site Visitors group. This enables all your network users to access your site collection (assuming you want to allow them, of course).
-
Add user accounts or domain groups to the Site Members group.
Members of the Site Members group have Contribute permissions, which allow them to add content to the site collection.
-
Add users to the Hierarchy Manager and Designers groups in publishing sites.
You may want to create a separate permission level for consultants. SharePoint team sites don’t have these groups by default, but you can create similar groups if you need that kind of role.
-
Configure unique permissions for content structures in and below the top-level site.
You have to stop inheriting permissions from the top-level site before you can create unique permissions for subsites and apps. See the section, “Creating unique permissions for a subsite,” later in this chapter, for details.
-
Add subsites to the main site collection site.
You can inherit permissions or use unique permissions when you create the site.
Remember that everything in the site collection inherits from the site collection by default. Make sure your site collection permissions don’t grant too many people access.
Securing Apps, Folders, Documents, and Items
In theory, you could set up security once for a site collection and allow everything to inherit. In reality, you may not want everyone to have the same access. In order to create unique permissions for a site, app, folder, or item, you have to stop inheriting permissions from the parent.
Creating unique permissions for a subsite
You must be in a subsite to create unique permissions; the following steps don’t make sense otherwise.
To stop inheriting permissions in a subsite from a parent site, follow these steps:
-
Browse to the Site Permissions page for a site by clicking the Settings gear icon and choosing Site Settings and then clicking the Site Permissions link in the Users and Permissions section.
The Site Permissions page is displayed with a message reading
This website inherits permissions from its parent (<parent site name>).If you wish to change permissions for the entire site collection, click the <parent site name> link. -
Click the Stop Inheriting Permissions button in the Permissions tab on the Ribbon.
A message window appears reading, in part,
You are about to create unique permissions for this website. -
Click OK.
The Set Up Groups for this page is displayed. Choose the groups you want to use in the site. By default, the page uses the groups from the site collection.
- If you need your own groups for this site, then you should select the Create New Group radio button.
- Set groups for Site Visitors, Site Members, and Site Owners by selecting an existing group from the drop-down list.
-
Click OK to create the new unique groups for the site.
The main home page for the site reloads, and your site now has unique permissions. Repeat Step 1 to return to the Site Permissions page. You see that there is now a
This website has unique permissionsmessage. Any permissions changes you make on this site are now unique to this site. No other sites in the site collection will be affected.
 Be careful about adding users to SharePoint groups at the site or app level. You’re actually adding users to the entire site collection group. Individual subsites and apps don’t have their own SharePoint groups. This behavior causes a great deal of confusion. To drive the point home, do the following. When you stop inheriting site permissions and are on the page, to set up groups (Step 4 in the preceding list) choose to create new groups for the site. After you have finished, go to the Site Permissions page for the site collection. You see the groups you created in the site are in the site collection. This is because all groups in SharePoint are located at the site collection level, even if they are only used by a subsite that is set to use unique permissions.
To reinherit permissions from the parent site, choose Inherit Permissions in Step 2. Any changes you’ve made are discarded, and the site inherits the parent’s permissions.
After you stop inheriting permissions, the parent’s permissions are copied to the site.
Be extremely careful when deleting groups and permissions! If you are in a site that is inheriting permissions and you delete a group, you are actually taken to the site collection to delete the group. We have seen highly trained IT administrators make this mistake and wipe out the entire permission structure for the entire site collection. Before you delete a group, make certain that your site isn’t inheriting permissions and you’re not deleting all the permissions at the site collection level by deleting the group at the site level.
Removing existing permissions
Follow these steps to remove existing permission assignments:
- Browse to the Site Permissions page for a site by clicking the Settings gear icon and choosing Site Settings and then clicking the Site Permissions link in the Users and Permissions section.
-
Place check marks next to the permission assignments you want to remove.
Remember to leave yourself with permissions; otherwise, you won’t be able to access the site.
-
Click the Remove User Permissions button, and then click OK to confirm the deletions.
All the permissions are deleted for the selected permissions assignments.
Creating unique permissions for an app or document
Allowing a site’s content structures to inherit permissions from the site is usually sufficient. Don’t try to secure everything individually. But at times, you need to secure a folder in an app or limit access to an app. You may want to delegate ownership of an app, thus pushing administrative responsibilities for the app to an app administrator.
To manage permissions, the user must have the Manage Permissions permission. You must be a member of the Hierarchy Managers group to edit permissions.
To create unique permissions for an app, follow these steps:
- Browse to the app, click the Library or List tab of the Ribbon, and click the Library or List Settings button in the Settings group.
-
Click the Permissions for This Document Library link in the Permissions and Management section.
The Permissions page appears.
-
Manage the permissions as you would for a subsite by breaking inheritance and managing the permissions uniquely for the list.
Managing permissions on apps is the same as managing permissions for subsites — see the earlier section, “Creating unique permissions for a subsite.”
You can also give unique permissions for an individual document, folder, or list item. You do this by sharing the particular item with a person and selecting their level of permissions in the Share dialog box. Accessing the Share dialog box depends on the item you are sharing. For example, you can share a site by clicking the Share button in the upper right corner of the screen. Alternatively, you can share a document by using the Share button located in the ellipsis next to that document as outlined in the next procedure.
With SharePoint Online, you can even share a document without requiring the other person to log into your SharePoint site.
Follow these steps to give permissions for a document, item, or folder in an app library:
- Browse to the app where the item, document, or folder is located.
-
Click the ellipsis next to the item and click Share, as shown in Figure 14-3.
The Share dialog box appears.
- Enter the name, email address, or group, and then select the permission you wish to give — Can Edit or Can View.
- Click the Share button to give permissions.

FIGURE 14-3: Click Share for a document in a Library app.
For an item in a list app, the process is a bit different. For individual list items, you manage permissions separately in much the same way you would for a subsite. To access the permissions for the individual list item you want to manage, click the ellipsis next to the item and choose Manage Permissions from the Advanced drop-down. However, you cannot share out list items individually like you can actual documents because the list item is part of SharePoint, whereas the document is a file unto itself.
Managing permissions scenarios
Managing permissions is tricky, and the steps we outline in this section are our recommendations. These aren’t the only ways to manage permissions. Try a scenario to help you better understand permissions. Assume you have a site with the SharePoint groups we outline here.
SharePoint groups |
Members |
Site Members |
John, Bill, and Steve |
Site Visitors |
Mary, Sue, and Sally |
Everything in the site inherits from the top-level site. In this scenario, those in the Site Members group have Contribute permissions, whereas those in the Site Visitors group have Read permissions.
Assume you create a new subsite, and you only want your Site Members to access it. You don’t want Site Visitors to even know the subsite exists. In this case, you create unique permissions on the subsite and remove the Site Visitors group.
Assume you have an app for policy documents, and you want John and Sally to have Contribute permissions. We recommend creating a new Policy Reviewers SharePoint group at your top-level site and then adding John and Sally as members to the group. You aren’t done here, however. You haven’t actually granted the group permission to anything yet. You have to browse to the app, break inheritance from its parent, and then grant the Policy Reviewers SharePoint group the Contribute permission level.
Why not just add John and Sally to the app and grant them the Contribute permission level? That approach will certainly work, but it’s hard to manage. That approach obscures that John and Sally have some permissions granted outside the context of a SharePoint group. We like to be able to look at our SharePoint groups and have a good idea of what the role of that group is, based on their names on the site. If you start adding users individually to subsites, apps, documents, folders, and items, it becomes difficult to get a big-picture view of how your permissions for the site are configured.
Viewing a group’s permissions
You can easily check the permissions for a given group to see everything that group has been granted access to in your site. You must repeat these steps at each site in your site collection. To do so:
- Browse to the top-level site in your site collection.
-
Open the People and Groups page for the top-level site by clicking the Settings gear icon and choosing Site Settings, and then clicking the People and Groups link in the Users and Permissions section.
The list of SharePoint groups appears on the Quick Launch.
-
The list of groups is truncated. Click the More button at the bottom of the listing of groups in the Quick Launch.
The list of all SharePoint groups in the site collection appears in the main part of the page.
- Click the name of the group for which you want to view permissions.
-
Choose Settings ⇒ View Group Permissions.
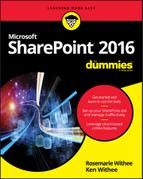
The View Site Collection Permissions window appears, as shown in Figure 14-4. All the sites, lists, and libraries that the group has permission to access appear in the list.
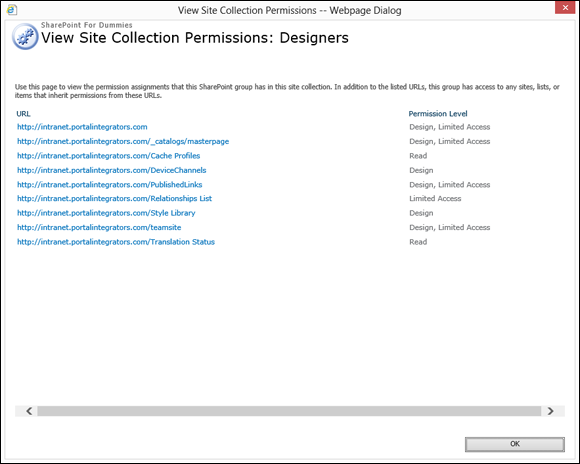
FIGURE 14-4: The View Site Collection Permissions window.
Everyone who is a member of the group has the permissions shown on the View Site Collection Permissions window.
Checking a user’s permissions
Sometimes, you just want to know who has permission to do what in a given site. SharePoint 2016 provides just such a method:
-
Browse to the site where you want to check a user’s permissions.
This command only checks permissions within a single site. You have to check each site manually.
- Browse to the Site Permissions page for a site by clicking the Settings gear icon and choosing Site Settings, and then clicking the Site Permissions link in the Users and Permissions section.
- Click the Check Permissions button on the Ribbon.
-
Enter the name of the user or group whose permissions you want to check for the current site in the User/Group field, and then click the Check Now button.
The permissions appear in the bottom of the window, as shown in Figure 14-5.
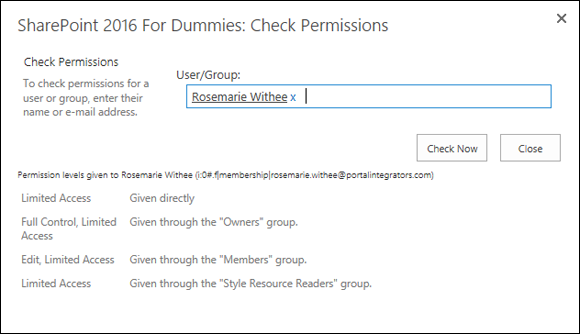
FIGURE 14-5: View a user’s permissions to the current site.
Granting Administrative Access
You’ll find a number of different administrator levels in a SharePoint deployment. Administrators usually have full access over the area they’ve been charged with administering. The levels of administrators in SharePoint are
- Server administrators: By virtue of having local administrator access to the physical server, a server administrator can do anything from the server console. Server administrators are usually members of the technical staff.
- Service administrators: Administration of SharePoint’s services, such as Search or User Profiles, can be delegated. This allows administrators to specialize.
- Site collection administrators: These administrators can access everything within a site collection. SharePoint allows you to appoint a primary and secondary administrator for each site collection, who both receive email notifications when the site hits its storage quota or is slated for deletion due to lack of use. Site collection administrators also manage all the features that affect the entire site collection.
- Site administrators: Members of the Site Owners SharePoint group are the site administrators. If subsites inherit permissions, a site administrator has full access to each site.
- App administrators: Permissions can be unique for an app, which allows for the delegation administration. Depending on the size of your department or team, you might have different people administer different apps.
- Document/item administrators: For extremely sensitive documents and items, you can use unique permissions that in effect enable someone to administer just that document or item.
In Office 365, the server administrator role is replaced by the SharePoint Online administrator. Microsoft Online manages the entire infrastructure for you, so you just have to manage SharePoint Online.
The primary and secondary site collection administrators are determined at the time the site collection is created. Additional site collection administrators can be added to the site collection itself.
To set the site collection administrators for a site:
- Browse to the top-level site in your site collection.
-
Open the Site Collection Administrators page by clicking the Settings gear icon and choosing Site Settings, and then clicking the Site Collection Administrators link in the Users and Permissions section.
The Site Collection Administrators page appears.
-
Add or remove users from the Site Collection Administrators box by typing in their names or deleting their names using the backspace key, and then click OK.
Users are separated by semicolons.
Assigning users to be site collection administrators is one time when it’s acceptable to use individual user accounts instead of domain groups.
Viewing Site Permissions
A site can have all the elements of an authorization model — people, groups, and permissions, in other words — but still not be secure. The deciding factor in securing SharePoint’s content lies with the permission assignments made on securable objects such as sites, apps, folders, documents, and items. A permission assignment consists of permissions, principals (users and groups), and securable objects.
Permissions are the smallest unit for managing security in SharePoint. Permissions confer rights a user may have, such as View Pages rights or Add Items rights. In SharePoint, you deal with following three permission types:
- App (List or Library): Permissions related to accessing apps, folders, documents, and items.
- Site: Permissions related to accessing sites, pages, and permissions.
- Personal: Permissions related to creating personal views of web pages.
When managed properly, you never have to work with permissions on a case-by-case basis because permissions are never assigned directly to principals. Rather, they’re assigned to permission levels, which are assigned to default SharePoint groups. You can also assign permission levels directly to user accounts or custom SharePoint groups you create.
Follow these steps to view a list of permission levels for a site:
-
Browse to the Site Permissions page for a site by clicking the Settings gear icon and choosing Site Settings, and then clicking the Site Permissions link in the Users and Permissions section.
A list of groups and their corresponding permission levels appears, as shown in Figure 14-6. Note that this shows up only when the Permission Levels button on the Ribbon is clicked (step 2 below).
If you’ve assigned permission levels to user accounts or domain group accounts outside SharePoint groups, you see them listed here.
Each site inherits its site permission assignments from its parent site or has its own unique permission assignments. -
Click the Permission Levels button on the Ribbon.
The Permission Levels page appears. You can use this page to create new permission levels or modify existing ones. You will only see the Permission Levels button in the Ribbon if you have broken inheritance. Otherwise, the site inherits permissions from the parent, and to see the Permission Levels button you need to go to the parent where those permissions originate.
-
Click a permission level, such as Contribute, to view or modify the permissions in the permission level, as shown in Figure 14-7.
Note: The permissions you see might not be the entire set of permissions available in SharePoint. The server administrator can limit the list of permissions available to a web application using Web Policies.

FIGURE 14-6: View the site’s permission assignments.
FIGURE 14-7: View permission levels.
Keep in mind that the Permissions Levels page doesn’t really show individual permissions. Instead, the page shows permission levels.
Table 14-1 lists the permission levels, the rights they grant, and the SharePoint group they’re assigned to by default. Note that the last four permission levels are specific to sites with the Publishing Infrastructure Feature active.
TABLE 14-1 Permission Levels
Permission Level |
Rights Granted |
SharePoint Group Assigned to by Default |
Full Control |
Wield administrative access |
Site Owners |
Design |
Change the site’s look and feel |
Designers |
Edit |
Add, edit, and delete apps as well as the items and documents contained within the apps |
Site Members |
Contribute |
Add and modify content |
Site Members |
Read |
View all content, including history |
Site Visitors |
Limited Access |
Open (same as guest access) |
Quick Deploy Users |
View Only |
View items and pages |
Viewers |
Approve |
Approve content |
Approvers |
Manage Hierarchy |
Manage the site’s structure and permissions (this is only available in the site collection when the SharePoint Server Publishing Infrastructure feature is active) |
Hierarchy Managers |
Restricted Read |
View and open |
Restricted Readers |
Restricted Interfaces for Translation |
Open apps and use remote interfaces |
Restricted Interfaces for Translation |
Managing SharePoint Designer Access
SharePoint 2016 allows you to configure which users can use SharePoint Designer to access your site. Before you jump to the conclusion that you don’t want anyone doing that, bear in mind that the role of SharePoint Designer has changed. SharePoint Designer is the primary tool used for developing workflow. Workflow has a number of powerful abilities that maximize processes.
SharePoint Designer 2013 is used to develop workflows for SharePoint 2016. Microsoft decided not to rebrand the SharePoint Designer tool. Speculation is that at some point they will move away from a separate tool, like SharePoint Designer, to a web-based app contained within SharePoint that workflow developers can use. There are also a number of really amazing workflow creation tools on the market such as those made by Nintex (www.nintex.com) and K2 (www.k2.com).
To grant a user the right to use SharePoint Designer with your site:
- Browse to the top-level site of your team site, click the Settings gear icon, and choose Site Settings, and then click the SharePoint Designer Settings link in the Site Collection Administration section.
- Select the options that you want to enable:
- Enable SharePoint Designer: Users who are Site Owners or who have Design permissions can use SharePoint Designer to access your site.
- Enable Detaching Pages from the Site Definition: We advise against allowing this unless you have a good reason to do so. Detaching pages can cause problems when upgrading later. We do this all the time when we’re developing, but then we implement our changes later in such a way that doesn’t require detaching from the site definition.
- Enable Customizing Master Pages and Page Layouts: This is fine for publishing sites, although not usually required for team sites.
- Enable Managing of the Web Site URL Structure: This allows users to see the folder hierarchy. We usually allow this unless we think it will overwhelm the user.
- Click OK to save your changes.