Chapter 16
Getting Social
IN THIS CHAPTER
Using the Ribbon to share and track sites
Talking on blogs, wikis, and discussion boards
Getting familiar with feeds
Subscribing and managing alerts
Using Skype for Business to reach out and connect
The folks at Microsoft got to thinking about how SharePoint is a lot like social networking communities on the web. Social networking services build online communities of people who share interests and/or activities and consist of services and sites such as instant messaging (IM), discussion boards, blogs, wikis, bookmarking sites, Facebook, LinkedIn, Flickr, Twitter, and so on (and on).
Some people use them all. We just can’t. And neither should you feel like you have to use all the social networking options in SharePoint. Focus on picking the right tool(s) for you and your team. You can still be cool (and productive) using just a few. There are good and specific reasons for using discussion boards, blogs, and wikis, and even more reasons for using alerts and feeds. And SharePoint even has a What’s Happening feature similar to the on-the-fly updates of Twitter.
SharePoint offers other social networking features that all site visitors can use and some features (such as wikis and discussion boards) that a site owner must set up for a team to use. SharePoint also offers social networking features with Newsfeed (see Chapter 15).
In this chapter, we discuss social networking tools that let individuals and groups communicate, collaborate, share, and connect. Depending on the culture of your organization and the projects you work on, these tools may find greater or lesser use; we encourage you to experiment with them all. Organizations generally experience some anxiety and growing pains around the less structured communications that social networking facilitates, but after a period of adjustment, we often find that those who were initially most reluctant become social networking advocates as they discover the value these tools can bring to productivity, collaboration, and morale.
Sharing and Tracking Using the Ribbon
The Ribbon in SharePoint 2016 features a Share & Track group that consolidates several common tasks for keeping track of useful SharePoint resources and sharing them with others. The Share & Track group is found on both the Files and the Library / List tabs. The components in the group depend on the tab you are viewing. There is no Share & Track group on the Items tab.
Figure 16-1 shows the Share & Track group for a document (on the Files tab of the Ribbon).

FIGURE 16-1: The Share & Track section of the SharePoint Ribbon.
The Share & Track group for a document has four buttons:
- Share opens a dialog box that lets you share the document with other people. You can invite people to view or edit the document, and you can also see who the document is currently shared with. If you are using SharePoint Online, you can also get a link that you can give to others so they can get to the document even if they are not part of your SharePoint environment.
- Alert Me allows you to set and manage your alerts to apps so that an email is sent to you when changes are made. Note that this is only visible when outgoing email is configured for your SharePoint environment.
- Popularity Trends allows you to export data into Excel and view trends about the document. This is a very handy feature to learn about data trends in content. Note that this is only visible when outgoing email is configured and the reporting feature is active for your SharePoint environment.
- Follow lets you follow a particular document so you can keep up to date with any changes.
The Share & Track group for a List or Library has four buttons:
- E-Mail a Link uses Outlook to send a link to a page to someone.
- Alert Me allows you to set and manage your alerts to apps so that an email is sent to you when changes are made.
- RSS Feed enables you to subscribe to an RSS feed. Each app in SharePoint 2016 publishes an RSS feed that you can subscribe to and view in your favorite RSS viewer.
- Most Popular Items provides a report showing how many edits and views have been made to the document recently and during the life of the documents. It also ranks the documents in the list and allows you to sort to see the highest and lowest documents in terms of popularity.
Tagging for Yourself and Others
Tags are keywords that you assign to content. Tagging pages to share with others is social bookmarking, and it’s very popular on the web. If you’ve ever used a site like Pinterest (https://www.pinterest.com), you already know how social bookmarking works.
As more people assign the same tags, tags become a way to navigate to similar content. The Tags and Notes group on the Ribbon lets you type your own tag keywords, so you can mark content with terms that are meaningful to you. This button also lets you access the Note Board, which you can use to leave publicly viewable comments on a document or page.
 Although you can still use tags and notes in SharePoint Server 2016, Microsoft has openly declared these features as deprecated. Deprecated means it is not getting any love or any new functionality from Microsoft, and you should expect it to go away in future versions of SharePoint. In fact, if you use SharePoint Online, then you won’t be able to use tags and notes. If you are using SharePoint On-Premises, however, then you can still use tags and notes. To learn about this announcement, type the following keywords into your favorite search engine: SharePoint Online Tags & Notes feature retired.
 The emphasis is on keyword in tagging. SharePoint doesn’t prevent you from typing longer tags, but we recommend you use, and train others to use, single words or very short phrases as tags. Otherwise, you defeat the purpose in using tagging as a fast, concise way to categorize information. If you need to make longer remarks, use the Note Board.
To tag content in SharePoint, follow these steps:
-
Browse to the page you want to tag.
To tag individual items or documents, you must browse to the app and click the row you want to tag. The Tags and Notes for individual items or documents is on the Items tab of the Ribbon.
- Locate the Tags and Notes group on the List or Library tab of the Ribbon to see your tagging options.
-
Click the Tags and Notes button.
The Tags and Note Board window appear, populated with recent tags you’ve applied.
-
In the My Tags text area, click an existing tag and/or type the tags you want to apply to the content.
Use a semicolon to separate tags.
- (Optional) To mark your tags as private so others can’t see them, select the Private check box.
-
Click the Save button to save your tags.
When you save your tags, they appear in the Suggested Tags section of the page. You can click any of the tags in this section to view the Tags Profile page.
To add a note to an item, follow these steps:
-
Click the Note Board tab and type your note in the text box.
Unlike tags, notes entered with the Note Board can’t be marked private and so are viewable by anyone else with the same access. Choose your words carefully. -
Click the Post button to post the note.
The note appears in the window, along with any other notes that have been entered. You can scroll through all the posts entered for this content using the Next and Previous buttons.
- To close the window, click the X in the upper-right corner of the window.
Information Sharing with Blogs and Wikis
Blogs are intended to be mainly one-way communication: An individual or group with an opinion or expertise creates posts that others read and subscribe to. Readers can comment, like, and email a link to the post, but the blog posts themselves aren’t collaborative. You often see executives in an organization maintaining blogs to communicate to employees, or IT departments creating a blog with helpful posts that address FAQs.
Wikis, on the other hand, are specifically collaborative efforts: Information is added to, and maintained by, a network of users. Perhaps the most well-known wiki is Wikipedia (www.wikipedia.org), a web encyclopedia of information about any topic imaginable, editable by anyone in the Wikipedia community. A wiki is a very flexible and democratic way for individuals to work together to share, refine, and collect information.
Good candidates for wikis include corporate encyclopedias, dictionaries, and training manuals so that many individuals can add their knowledge and examples.
Creating a blog site
To create a blog in SharePoint, you create a new site or subsite using the Blog template. Take the time to consider where this blog will be located in your site hierarchy.
Your Newsfeed app has an integrated blog specifically for you. You access the blog in the left navigation of the Newsfeed site. For more about the blog in Newsfeed, see Chapter 15.
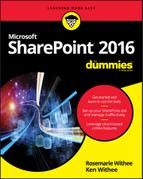
Although you can change permissions at any level, it may make more sense to have your president’s blog on the main site of your SharePoint intranet (and open to all users of the site hierarchy), but perhaps your manager’s blog should be created as a subsite of your team site (so that permissions can be inherited from the team site). See Figure 16-2 for an example of a blog site.
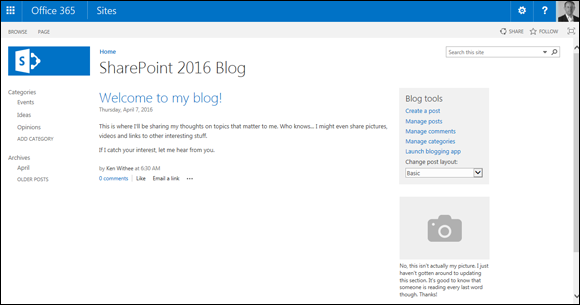
FIGURE 16-2: A SharePoint blog site.
To create a blog site:
-
Navigate to the Site Contents page by clicking the Settings gear icon and choosing Site Contents.
The Site Contents page appears, showing all the apps in the site.
- Scroll down to the bottom of the page to the Subsites section and click New Subsite.
- Type a name, description, and a URL for the site in the Name, Description, and URL text boxes, respectively.
-
In the Template Selection section, choose the Blog template located under the Collaboration tab.
Notice that there are different site templates to choose from. In Chapter 4, you used the Team Site template to create a team site.
-
Keep the default to use the same permissions as the parent site.
You can also choose unique permissions if you want to break the inheritance of permissions for the blog site. (To find out more about permissions and inheritance, see Chapter 14.)
-
In the Navigation Inheritance section, you can choose to use the same Top Link bar from the parent site or use a unique Top Link bar.
If you use the same Top Link bar of the parent, then you can navigate back to the parent site from within the blog. If you do not use the same Top Link bar, then the blog will appear isolated. You can always manually add navigation to the Top Link bar as well. (See Chapter 11 for more about SharePoint navigation.)
-
Click the Create button.
You see a message that SharePoint is working, and then your new blog appears.
-
Click the Create a Post button (under Blog Tools on the right side) to add a new entry to your blog.
The home page of the blog site shows a Welcome to Your Blog default post, a list of Blog tools for posting, a place for your picture, and RSS Feed and Alert Me buttons.
The site content includes a Photos app, Categories app, Posts app, and Comments app.
Posting to a blog
Creating a blog post, commenting on a post, and liking a post are pretty straightforward. A user with permissions to post can click the Create a Post link under Blog Tools and type his post (or copy and paste text from a text editor or Word). The dialog box where the post is typed also allows for adding one or more category labels to the posts.
Comments and likes (if any) are displayed below the blog post to which they apply. The Comments link and the Add Comment field allow users to comment on a post by titling their comment (optional) and adding body text. The Comments link also shows the current number of comments. The Like button creates a smiley face and shows the number of likes, along with an Unlike button if you change your mind. You can also click the E-mail a Link to send a link to the post, or you can click the ellipsis to edit the post (assuming you’re the author).
Other features of the Blog Site template are predefined links on the Quick Launch menu for post categories and archives, making it easy to see a filtered list of posts in one category or review older archived posts.
Using wikis to collaborate and coauthor
A wiki app is a library of pages that can be edited by any member (Contributor) of your site. As we describe earlier, encyclopedias, dictionaries, and training manuals are all good examples of wikis for an organization. These examples are entities that provide structure to what is being accomplished but benefit by input of a group.
One of the marketing mantras of SharePoint is wikis everywhere. A SharePoint 2016 team site is essentially a wiki with the capabilities to add additional kinds of apps. SharePoint 2016 includes the Enterprise Wiki site template, which is intended for collaborative content creation among larger groups of people, such as a division. The steps discussed in this section apply to wikis anywhere — that is, it doesn’t matter where you encounter wikis in SharePoint.
Creating a wiki app
A wiki app in SharePoint is a library of wiki pages. Create the wiki the way you would any other app, which we describe in Chapter 7, by selecting Wiki Page Library app.
Adding pages to a wiki
Two pages are created by default in your new wiki app, Home and How to Use This Wiki Library. Both provide predefined instructions that may be helpful when you first create the wiki. Most users change the home page content before launching the wiki, but you can keep the How to Use This Wiki Library page or delete it, depending on its usefulness.
To add other pages to your wiki, follow these steps:
-
Navigate to the home page of the wiki app by using the link on the Quick Launch menu, if available.
You can also navigate to the Site Contents page and open the app.
-
Click the Page tab of the Ribbon and click the View All Pages button located in the Page Library section.
You see the list of pages.
The Files and Library tabs appear on the Ribbon.
-
Click the Files tab and click the New button.
The New Item dialog box appears.
-
Type your new page name in the New Page Name text box, and then click the Create button.
The new page appears, ready for editing. Just click in the page, and then the Format Text tab appears.
You can now edit the page, or repeat the steps to create multiple pages before editing.
Alternatively, you can click the Settings gear icon and choose Add a Page from an existing wiki page to add a new page to the same wiki library.
Another easy way to create pages is to create a link to them first in a wiki page and then click that link. The new page is created automatically with the name found in the link. For example, type [[My New Page]] to create a link to the My New Page page. The link to an uncreated page appears underlined with dashes. If users click the link, the page is created for editing and the link turns into a normal hyperlink. To create a link to a page and have the name be different than the wording of the link, type a pipe character (|) after the page name and type the display text. For example, type [[Resources|Resources for You]] to create the Resources link that points to the Resources for You page.
Editing a wiki page
When you first create a wiki page, the page appears in Edit mode, as shown in Figure 16-3. When you want to come back to a wiki page and edit later, follow these steps:
- Access the page from the Quick Launch menu or Wiki Library Page list.
- Click the Page tab of the Ribbon and click the Edit button located in the Edit section.

FIGURE 16-3: A wiki page in Edit mode.
Like other documents, check out the page if you don’t want others to be able to edit at the same time and perhaps overwrite your work. See Chapter 18 for details.
Editing a wiki page is similar to working in a word processor. You can type or copy text, indent, make bullets, apply bold and italics, and insert all other types of content such as tables and images. To stop editing, click the Save button on the Format Text tab of the Ribbon. You need to check in your wiki as a separate step if you checked it out.
You can also find an Edit link in the upper-right corner of the wiki page. Clicking it moves you into Edit mode for the page.
You can also define your text layout. By default, text layout is one column (full page width), but you can change the layout by choosing one you like from the Text Layout drop-down list on the Format Text tab. (Note: You must be in Edit mode to see the Format Text tab.) Now you may have multiple text containers to work with.
You can switch layouts at any point. But be careful — if you switch to a layout with fewer containers than your current layout, SharePoint combines content in one container with content in another. You won’t lose the content, but you’ll probably have to make some edits to fix the combined content.
 Changing the text layout of a wiki page isn’t the same as changing the layout on a Web Part page or the page layout on a publishing page. Wiki pages, Web Part pages, and publishing pages all behave slightly different and have different purposes. See Chapter 5 for a more thorough discussion on SharePoint’s web pages. By the way, if you can articulate the differences among these three kinds of SharePoint pages, consider a career as a SharePoint consultant.
Communicating with Discussion Boards
Discussion boards, along with alerts, are the granddaddies of social networking services. Discussion boards have been around since before the World Wide Web and consist of text postings by individuals with others posting replies to the original subject or to other replies. A discussion board post and the responses to it are one thread.
One of the benefits of a discussion board (versus a long email chain, and you know what we’re talking about) is the ability to find and search posts easily for information. Threads provide a useful history of the comments on a topic. Users generally have various levels of expertise in organizing and searching their email, but SharePoint discussion views and search make it easy for users to both find and read posts.
One of the benefits of a team discussion board is (should be) the less formal approach in posting questions and answers — a discussion board exchange resembles a true discussion. Blogs and wikis are more formal, so discussion boards are generally where team members can ask questions and share thoughts. SharePoint 2016 also includes the approach of microblogging, which is blogging in just a couple of sentences at a time. Microblogging is discussed later in this chapter in the “Staying connected with feeds and microblogs” section.
Creating a Discussion Board app
Adding a Discussion Board app is a very straightforward process. You simply choose the Discussion Board app from the Apps You Can Add page.
You can add as many discussion boards to your site as you like. You might find it beneficial to create a discussion board for each functional area to keep the discussions on topic. On the other hand, you might find that it is better to just have a single discussion board for the team and to get people using it and interacting with their ideas. As with most things in SharePoint, the way you work with the functionality is up to you. SharePoint just provides the platform, and it’s up to you and your SharePoint consultant to determine the best way to use it.
To create a new Discussion Board app, follow these steps:
-
Click the Settings gear icon and choose Add an App.
The Your Apps page appears.
- Scroll down and click the Discussion Board App button.
- Type a name for the discussion board in the Name text box.
-
Click the Create button.
The new discussion board is added to your site and is accessible in the Quick Launch navigation on the left side. Congratulations! You’re ready to start a discussion.
Posting and replying to a subject
To create a new subject in a discussion board, follow these steps:
- Browse to your discussion board.
-
Click the New Discussion button.
The New Discussion dialog box appears.
-
Type a subject for the new discussion in the Subject text box.
This needs to be a short phrase that teammates can relate to as a topic.
-
Type the detail of your post in the Body text area.
You have all the editing options of Rich HTML in this area. Use the Editing tools to format your text with the toolbar and styles, as well as insert tables, images, and links. You can upload files using the Insert tab.
You also have spell checker in this dialog box!
- Select the Question check box if you’re asking a question.
-
When you’re finished with your post, click the Save button.
Your new post appears and shows the subject title, who created it, the amount of replies, and when it was updated last. Note that the amount of replies shows on the details of the discussion page.
The Discussion Board app shows a number of different views into the discussions: Recent, Unanswered Questions, Answered Questions, and Featured.
To reply to a subject or another reply, follow these steps:
-
Click the Subject Title link for the discussion.
The subject appears in Flat view with a Reply button. If you’re the owner of the discussion posting, you also see an Edit button. You can also click the ellipsis to be alerted to additional replies, mark the discussion as Featured, or delete the discussion.
-
Click the Reply button or click in the Add a Reply text box.
The Reply dialog box activates, and you can type your reply. By default, the Reply dialog box shows only a Body field.
-
Type your reply; if desired, use the Rich HTML features (as we describe in the preceding step list).
Remember that you can attach files, upload files, and add all sorts of text formatting.
- When you’re finished with your reply, click the Reply button.
Connecting with Others Using Feeds, Microblogs, and RSS
You can follow SharePoint feeds in your Newsfeed app. A feed is a stream of content that you follow. For example, whenever a user posts a status update on her Newsfeed page, she generates an item for the Everyone feed. You can also tune in to specific sites and documents by clicking the Follow button. The Follow button is in the upper-right corner of a site and in the drop-down list when you click the ellipsis next to a document.
The Newsfeed page includes the following feeds:
- Following: The updates of documents, sites, and people you follow.
- Everyone: All the updates from every person using SharePoint.
- Activities: All your activities within SharePoint.
- Likes: All the things you have liked. As the community rates content by clicking the Like button, you can begin to find the best content without having to go looking in every nook and corner.
- Mentions: All the posts where you were mentioned. Mentions are accomplished using the @ symbol and your username.
A different type of feed is called an RSS feed. An RSS feed is a feed formatted in a special way to be read by an RSS reader. As you can explore later in the “Viewing RSS feeds” section, every app has the ability to display its data using an RSS feed.
A feed in your Newsfeed and an RSS feed are different. Both are feeds of data, but an RSS feed is designed for external applications to view SharePoint data, and the Newsfeed is a place for you to aggregate and view communication happening within SharePoint.
We cover the Newsfeed app further in Chapter 15.
Staying connected with feeds and microblogs
Microblogging was made famous by Twitter. Using Twitter, you post a short message (140 characters or less) out to the world. You can follow other people and attract your own followers. You mention other people using the @ symbol followed by their name and can tag a topic using the # symbol (called a hashtag).
SharePoint 2016 provides microblogging to the corporate world. Twitter is great, but do you really want to post your company secrets and ideas to the world? SharePoint provides the same functionality as Twitter, but in a controlled environment that is only accessible by other SharePoint users at your organization.
In SharePoint, you post microblog updates from your Newsfeed app. To post a microblog update, follow these steps:
-
Navigate to your Newsfeed app by clicking the waffle menu in the upper-left corner of the screen (also called the app launcher) and clicking Newsfeed.
The Newsfeed page is displayed. If you do not see the waffle menu, then SharePoint has not been configured to include your personal space.
-
Click in the Start a Conversation text box, and type your message.
If you want to mention someone, type the @ symbol and choose the person from the drop-down list. If you want to provide a hashtag topic, type the # symbol followed by a topic name (without spaces).
-
At the top of the message box, click the drop-down list to decide who you want to share the message with.
By default, a message is shared with everyone. You can select the drop-down list and choose to share the message with a particular site.
- Click the Post button to publish your message.
You can see trending hashtag topics in the lower-right corner of your Newsfeed page. A trending topic is the most popular hashtag at the time. For example, if a bunch of people use the tag #CompanyMovieNight, then the tag will show up in the trending list. You can click the tag to see the related posts for that topic. You can also choose to follow the tag so that you will be updated whenever someone makes a new post about the topic. (The Newsfeed app is discussed further in Chapter 15.)
If you are not able to add a hashtag ( #cool_topic ) to your feed, then your administrator will need to create a Managed Metadata Service application. This can be done in Central Administration by clicking on the Application Management page, clicking the Manage Service Applications link, and then choosing Managed Metadata Service from the New drop-down menu on the left side of the Ribbon.
Viewing RSS feeds
Nowadays, virtually all web sites publish a syndication feed, or RSS feed, of their site’s content. SharePoint 2016 sites are no different. In fact, every app in SharePoint can publish an RSS feed. You can even create RSS feeds based on views, which means you can filter what gets published to the RSS feed. If you subscribe to the feed, you’re pulling the information. However, you can also subscribe to alerts to make SharePoint push updates to you.
RSS feeds are a popular way for people to keep track of updates to a website without visiting that site.
To use RSS feeds, they must be enabled for the app. If you see the standard RSS button in the app’s Ribbon as shown in Figure 16-4, RSS feeds are enabled. If RSS feeds are disabled, the button appears in the Ribbon but is disabled.
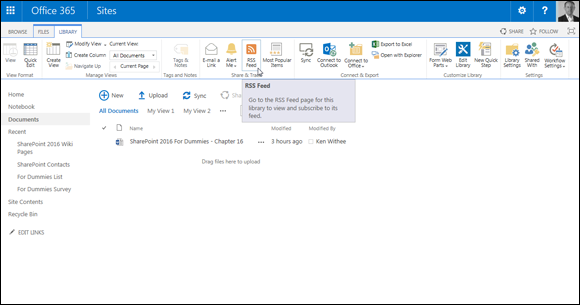
FIGURE 16-4: The RSS Feed button.
To enable RSS feeds for your List (or Library) app, follow these steps:
-
In your app, click the List tab of the Ribbon, and in the Settings group, click the List Settings button.
The List Settings page appears.
If you’re in a Library app, click the Library tab of the Ribbon and click the Library Settings button.
-
In the Communications section, click the RSS Settings link.
If you don’t see the RSS Settings link, RSS isn’t enabled for your site. You can enable RSS settings for your site by clicking the RSS link in the Site Administration section of the Site Settings page. RSS must also be enabled for your web application by the SharePoint farm administrator.
-
On the Modify RSS Settings page, select the Yes radio button under the Allow RSS for This List option.
You can also use this page to configure the settings for the apps default RSS feed, such as the feed’s title, columns, and item limit.
- After you finish configuring the default settings for your app’s RSS feed, click OK to save your changes.
 Each list and app has its own RSS feed. Therefore, you must configure RSS for each app where you want to use RSS.
After you enable RSS feeds for your app, you can view the RSS feed as follows:
-
Browse to the app where you want to view the RSS feed, click the List tab of the Ribbon, and click RSS Feed button on the Share & Track section.
Most browsers display the RSS feed using a built-in style sheet for formatting. Figure 16-5 shows an RSS feed for a SharePoint list in a web browser.
- Subscribe to the feed using your browser as a reader or paste the web address for the feed in the feed reader of your choice (see the section, “Reading RSS feeds with Outlook,” later in this chapter, for instructions).
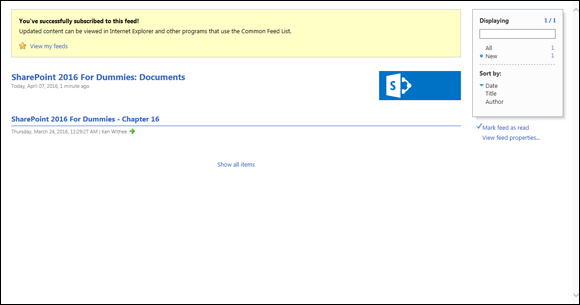
FIGURE 16-5: Viewing an RSS feed in the browser.
You can also view the RSS feed for a specific view in an app. (See Chapter 9 for details on creating a view.)
RSS must be enabled for the farm, site, and app. In other words, you can’t use RSS feeds if they aren’t turned on. You can also turn off RSS feeds for a given app or site if you don’t want people to use them. The default option is to allow RSS feeds. At the site level, RSS feeds are enabled in the Site Settings page. The RSS settings for an individual app are managed in the List Settings or Library Settings page for that app, respectively.
Reading RSS feeds with Outlook
Your email application, and specifically in terms of SharePoint integration, Microsoft Outlook, is still the bedrock of online communication for most business users. As in the past, you can still integrate Outlook with SharePoint calendars, contacts, and tasks using the Sync with Outlook button in the Ribbon of an app. You might prefer following a SharePoint app using RSS.
To add a SharePoint 2016 RSS feed to Outlook 2016, follow these steps:
- Open Outlook 2016 and on the Ribbon, click File, then Info, and then select Account Settings from the Account Settings drop-down menu.
-
On the RSS Feeds tab, click New.
The New RSS Feed dialog box appears.
-
Type the URL of the RSS feed (or press Ctrl+V to paste it).
You get the SharePoint app’s RSS feed URL by clicking the RSS Feed button in the Ribbon of your app.
-
Click the Add button.
The feed is added to the list of subscribed feeds on the RSS Feeds tab.
Displaying RSS feeds of other sites
SharePoint 2016 includes an RSS Viewer Web Part that allows you to display RSS feeds from SharePoint apps and public websites in your site. To use this Web Part, follow these steps:
-
Browse to the page where you want to add the RSS feed, click the Page tab of the Ribbon, and then click the Edit Page button.
The page is in Edit mode.
-
Click Add a Web Part in the layout zone in the page where you want the Web Part to appear.
The Insert tab appears on the Ribbon.
-
In the Categories section of the Insert tab, click the Content Rollup category.
A list of Web Parts appears.
-
Click the RSS Viewer Web Part.
A description of the Web Part appears.
The SharePoint Server Standard Site Collection feature must be activated to see the RSS Viewer Web Part. If you don’t see the Web Part, activate this feature. (See Chapter 12 for details on activating features.)
-
Click the Add button to add the Web Part to the page, as shown in Figure 16-6.
The Web Part appears on the page, awaiting configuration.
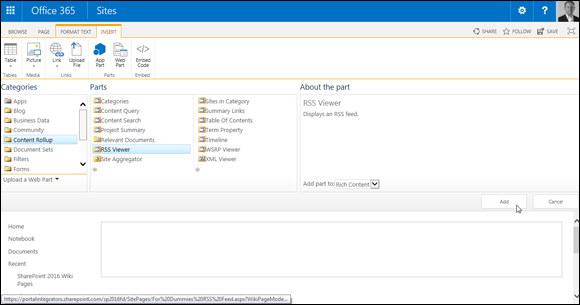
FIGURE 16-6: Add the RSS Viewer Web Part to your page.
To complete the configuration of the Web Part, you need to have the web address or URL for a feed you want to display in the Web Part. To add an RSS feed web address, follow these steps:
- With your Web Part on the page, place a check mark in the upper-right corner of the Web Part.
-
Click the Web Part tab of the Ribbon, and then click the Web Part Properties button.
The Web Part’s properties appear as a tool pane on the right side of the screen.
-
In the RSS Properties tab of the tool pane, enter the web address of the RSS feed you want to display in the RSS Feed URL text box, as shown in Figure 16-7.
In this example, we pasted in the BBC News Top Stories RSS feed web address.
- Click OK, and your RSS feed appears in the web page.

FIGURE 16-7: Enter the RSS feed web address.
You can click a headline in your Web Part to display the item’s details, as shown in Figure 16-8. You can also click the More link to open the items from the RSS feed.
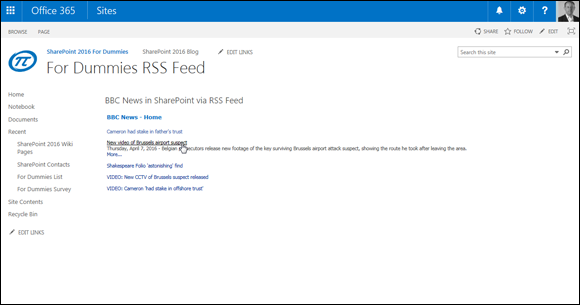
FIGURE 16-8: Click the BBC News headline to view details.
You can use the RSS Viewer Web Part to display RSS feeds from SharePoint apps; however, your SharePoint farm must be configured to use Kerberos authentication. If you receive an authentication error while attempting to use the Web Part, it is most likely a Kerberos problem. You will have to engage your IT folks for help.
You can modify the default XSLT (Extensible Stylesheet Language Transformations) template that the RSS Viewer Web Part uses if you want to change the output display. The XSLT template can be accessed from the Web Part’s properties pane. For example, you can change the template so that the headline links to the article instead of displaying the item’s details. You can use any XSLT programming or text editor to modify the XSLT template.
Alert Me
If RSS isn’t your thing, you can opt to receive email notifications when apps change by creating an alert. Alerts are a great way to keep track of the changes your teammates make to documents and items.
You need the Create Alerts permission to create alerts. This permission is granted usually with the out-of-the-box configuration of the Site Members SharePoint group. (See Chapter 14 for details on working with permissions.)
To create an alert to an app, follow these steps:
-
Browse to the app where you want to subscribe to an alert and then click the Alert Me drop-down button in the Share & Track section of the Library tab of the Ribbon (for a library-based app) or the List tab of the Ribbon (for a list-based app).
If you don’t see the Alert Me button, chances are your administrator has not configured outgoing email settings. If outgoing email settings are not configured in Central Administration, then the Alert Me button simply will not appear to users. If you are using SharePoint Online, however, then outgoing email has already been configured by Microsoft and you are good to go.
-
Choose Set Alert on this Library from the drop-down list.
The New Alert window appears.
You can subscribe to an alert for an item or document by selecting the item or document and choosing Alert Me on the Items tab of the Ribbon.
-
In the Alert Title text box, enter a name for the alert.
We suggest making the name something meaningful to you in your inbox, such as Documents Modified Today – Budget Team Site. Otherwise, you have no meaningful way to tell one alert from another.
-
In the Send Alerts To text box, enter the names of people in addition to you who should receive the alert.
That’s right, you can subscribe other people to an alert! You must have the Manage Alerts permission, which is granted by default to Site Owners.
Organizations and site owners may want to subscribe multiple users to an alert to make sure they get important updates, as well as encourage them to contribute to a discussion board, blog, or wiki. Users can still opt out by modifying settings in their Alert settings. -
In the Delivery Method section, select whether to receive alerts via email or text message to your cellular phone.
Text messaging requires that your SharePoint administrator configures this service through a third party, so you may not be able to send alerts to your phone.
-
In the Change Type section, select the option that matches the type of notifications you want to receive — All Changes, New Items Are Added, Existing Items Are Modified, or Items Are Deleted.
If you’re responsible for managing an app, we recommend receiving an alert any time items are deleted.
-
In the Send Alerts for These Changes section, choose when to receive alerts.
The options you see here vary based on the kind of app you’re working with. For example, a Tasks app allows you to receive an alert when a task is marked Complete or any time a high-priority task changes.
-
In the When to Send Alerts section, choose the frequency of your alert delivery.
You can receive them immediately, once a day, or once a week. We like to receive a daily summary; otherwise, we get too many emails.
- Click OK to create your alert.
Figure 16-9 shows an example of configuring an alert.

FIGURE 16-9: Receive an email when a list or library changes.
Any time users say they need a workflow to receive notification, try an alert first. You’d be surprised at how often alerts provide the options that are needed.
If your app has a personal or public view that includes a filter, you can subscribe to changes to just that view. For example, say you want to be notified via text message when an item in an Issue Tracking app has its priority set to High. You would create a view that filters the app for high-priority issues. Select the filtered view in the Send Alerts for These Changes section when you create your alert, and you will receive alerts when items meet the filter criteria.
You must have an email address configured in your SharePoint profile in order to receive alerts. If your SharePoint server is located in your network, that’s usually not an issue. However, Office 365 may not be integrated with your network and email information. In those situations, your administrator can either manually configure your email address or grant you permission to do so.
You can manage all your alerts from a single page instead of navigating to each list. To manage all the alerts you have on a given site and modify or delete them, follow these steps:
- Browse to an app where you currently subscribe to an alert.
- On the List tab of the Ribbon, in the Share & Track section, choose Alert Me ⇒ Manage My Alerts.
-
Select the proper alert name link.
The Manage My Alerts on this Site page appears with all the options you viewed when you first created the alert. Change the settings as desired.
Didn’t set the alert to begin with? You can still read through the settings and change the choices (see the preceding steps list). Your changes don’t affect the Alert settings for others if the alert was created for multiple users at the same time.
-
Click OK to modify the alert with your new settings or Delete to delete the alert.
Deleting an alert that was created for you doesn’t delete the alert from other users who are in the group the alert was created for.
If you’re the site administrator, you can manage the alerts of everyone on the site by clicking the User Alerts link on the Site Administration section of the Site Settings page.
When the event occurs that matches your alert — for example, the time or location of a calendar event change — you receive an email in your inbox. The email notification you receive is based on a template. These templates can be modified by your administrator, so they can provide for more detail.
Staying in Sync with Skype for Business
Skype for Business is an application that instantly connects with others in your organization. When Skype for Business is integrated with SharePoint, you have access to a user just by hovering the mouse cursor over his or her name in SharePoint, as shown in Figure 16-10.

FIGURE 16-10: Hovering over a user in SharePoint provides a Skype for Business pop-up window.
Skype for Business shows the status of the person and if he or she is available. For example, if a user is available, a green bar appears next to the user’s picture. Using Skype for Business, you can send an email, chat, call, schedule a meeting, or view the person’s profile.
Skype for Business is included with Office 365; however, if you’re using SharePoint On-Premises, then it is only available if the IT team configured it when setting up SharePoint.