
In the early days of the Internet, communication was strictly one-way. You visited a Web site and the site pushed information down to your browser. A few years later, HTML forms were introduced and for the first time, Web designers had a means of collecting information from those visiting their Web sites. Nowadays, almost every Web site uses HTML forms in one way or another.
Caution
Unless precautions are taken, providing forms on a Web site can be a security risk. In most cases, data provided by users via a form will be manipulated using code on the Web server. It is possible for a malicious user to provide data in a form that can be damaging to your Web site or the Web server on which it runs.
An HTML form consists of one or more form controls such as textboxes, dropdown lists, or buttons. Once information is selected or entered into the form, it is generally submitted to the Web server for processing.
Note
Some Web sites use forms to allow users to manipulate an existing page. In those cases, the Web server doesn’t process the data. Instead, the site designer typically uses JavaScript to determine what data was entered and what choices were made and then responds appropriately by changing the page’s content, by requesting a different page.
→ | For more information on manipulating a page using JavaScript, see “Client-side Scripting,” p. 415 (Chapter 24). |
To process form data on a Web server, code that runs on the Web server must be written. Technologies such as PHP, ASP, and ASP.NET are often used to process that form data. Expression Web allows you to connect an HTML form to server-side code for processing, but it also provides a few ways for you to process a form without writing any code at all.
→ | For more information on using ASP.NET to work with form data, see “Using Standard ASP.NET Controls,” p. 495 (Chapter 28). |
Form controls in Expression Web are located in the Toolbox. As shown in Figure 11.1, there are 16 form controls available.

Table 11.1 lists the form controls that are available.
Table 11.1. Form Controls
Control | HTML Tag | Details |
|---|---|---|
Advanced Button |
| Allows you to embed HTML content inside a button. Some browsers don’t display this control correctly. |
Drop-Down Box |
| Allows you to create a dropdown box of preset choices from which a user can make a selection. |
Form |
| Is the container control for all other form controls. This control also provides access to the form handlers provided by Expression Web. |
Group Box |
| Segments part of a form into a separate container. This is often used to avoid confusion on large forms and to make forms more accessible. |
Input (Button) |
| Creates a generic HTML button that can be used for JavaScript, and others. While buttons are most often used for submitting or resetting a form, this control is a generic button whose purpose is defined by the designer. |
Input (Checkbox) |
| Creates a standard HTML checkbox. The checkbox is typically used as a true/false control. |
Input (File) |
| Creates a textbox with a Browse button so a user of the form can browse for a file on his or her local computer to submit along with the form. |
Input (Hidden) |
| Creates a textbox that is not visible to the user. Hidden textboxes allow you to include data in a form that is not visible to the user. |
Input (Image) |
| Allows you to use an image as a button. |
Input (Password) |
| Creates a textbox that displays dots or asterisks in place of text when data is entered into it. These are commonly used for password fields. |
Input (Radio) |
| Creates a radio button. A form that uses this control will have at least two radio buttons grouped together, and only one of those radio buttons can be selected at a time. |
Input (Reset) |
| Creates a button that resets the form. Resetting a form causes all form fields to revert to the values they had when the page was originally loaded. |
Input (Submit) |
| Creates a typical button that submits the form. |
Input (Text) |
| Creates a standard HTML textbox. |
Label |
| Associates a text label with a form control. This control is typically used for accessibility. |
Text Area |
| Creates a multi-row and/or multi-column textbox. |
Expression Web allows you to easily save form results to a file, send results to an e-mail, or save form results into a database. We’ll cover each of these options in detail.
The obvious reason for including an HTML form on a page is so you can collect data from visitors to your Web site. After you’ve collected that data, Expression Web provides the capability of storing it in a file (such as a text file, an XML file, or an HTML file), sending the results to a specific e-mail address, or saving the results to a database.
Let’s create a simple form that will allow us to collect site feedback from users. To do that, you’ll want to create a new Web site or open an existing Web site. The site can be a disk-based Web site, but to test the form’s functionality, you’ll need to publish your Web site to a server running the FrontPage Server Extensions.
Note
If you’d prefer to work with a completed example, you can use the completed Web site located in the ExamplesCh11FilesWebsite folder on the CD that accompanies this book. Publish that Web site to a Web server running the FrontPage Server Extensions.
→ | For more information on publishing a Web site to a Web server with the FrontPage Server Extensions, see “Publishing a Web Site”, p. 41 (Chapter 3). |
Create a new HTML page.
From the Form Controls section of the Toolbox, insert a new
Formcontrol.Place the insertion point inside the form.
Insert a new table on the page. Set the table width to
550and select the In Pixels radio button. Leave all other settings at their defaults.Place the insertion point in the upper left cell of the table.
Enter the text “
Enter your e-mail:”.Press Tab to move to the next cell to the right.
From the Form Controls section of the Toolbox, add an
Input (Text)control.With the Input (Text) control still selected, locate the Name attribute in the Tag Properties task pane.
→
For more information on using the Tag Properties task pane, see “Editing Tag Properties”, p. 215 (Chapter 12).
Change the Name attribute to “
Email”.Locate the Style attribute in the Tag Properties task pane.
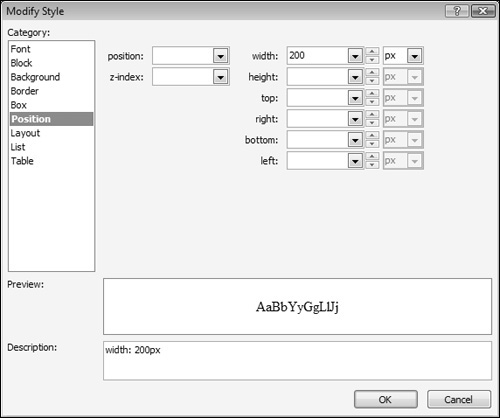
Click the button in the value column of the Style attribute to display the Modify Style dialog.
Select the
Positioncategory in the Modify Style dialog.Set the Width to
200px (shown in Figure 11.2) and click OK.→
For more information on using the Modify Style dialog, see “Managing CSS Styles”, p. 311 (Chapter 18).
Place the insertion point in the leftmost cell of the second row.
Enter the text “
Enter comment:”.Press Tab to move to the next cell to the right.
From the Form Controls section of the Toolbox, insert a
Text Areacontrol.With the Text Area control still selected, locate the Name attribute in the Tag Properties task pane.
Change the Name attribute to “
Comment”.Locate the Style attribute in the Tag Properties task pane.
Click the button in the value column of the Style attribute to display the Modify Style dialog.
Select the Position category in the Modify Style dialog.
Enter a value of
375px for the width and100px for the height and click OK.Select Table, Insert, Row Below to insert a new table row. (If the Insert menu item is disabled, click once on the Text Area control to select it first.)
Place the insertion point in the bottom right corner cell.
From the Form Controls section of the Toolbox, insert a new
Input (Submit)control.Press Ctrl+R to right-align the button in the table cell.
Your page should now look like Figure 11.3.

By default, a form created in Expression Web does nothing. When you browse the form and submit it, nothing happens. Let’s add some functionality to our feedback form by configuring it to save results to a file and an e-mail address.
Right-click on the form you created previously and select Form Properties from the menu to display the Form Properties dialog, as shown in Figure 11.4.

Three methods of saving form results are available in the Form Properties dialog:
Send To—. This option allows you to save form results to a file and/or send them to an e-mail address.
Send To Database—. This option allows you to save form results to a database. You can also have Expression Web create a Microsoft Access database for you.
Send To Other—. This option enables you to use a custom form handler.
You can configure options for each of these methods using the Options button shown previously in Figure 11.4. The options available differ depending on the method you choose.
Caution
If you change the selected method in the Form Properties dialog, any options configured will be reset to the defaults and cannot be retrieved. If you inadvertently change the method and lose your configuration, click Cancel in the Form Properties dialog. You can then go back to the Form Properties dialog and your previous options will be restored.
To configure a form to save results to a file and e-mail:
Select the Send To radio button (the first method).
Enter “
_private/results.txt” in the File Name textbox.Enter your e-mail address in the E-mail Address textbox.
Click the Options button to display the Saving Results dialog, as shown in Figure 11.5.

When using the Send To method of saving form results, the Saving Results dialog contains a series of four tabs.
The File Results tab provides options for saving results to a file. In addition to specifying the filename, you can also choose from many different file types, as shown in Figure 11.6. If you’d like to save results to two different file formats, you have the option of choosing a second file.

Caution
To save results to an XML file, the remote server must be running Windows SharePoint Services. Because Windows SharePoint Services are typically used in a corporate environment, most shared hosting companies don’t offer them. If you’re running your site in a shared hosting environment, check with your host to be sure.
Form field names can be included in your form results by checking the Include Field Names checkbox. If you choose not to include field names, only the data entered into the form field will be saved. When saving results to a text database file format, field names will be saved as a header row in the results file.
Tip
The text database formats are useful if you intend to import the form results into a database or spreadsheet later. To save your form results to a database directly, use the Send To Database form handler provided by Expression Web.
By default, the latest form results are appended to the bottom of the file to which they are saved. Some file types (XML and HTML file types) allow you to choose between appending results to the file or adding them to the top of the file via the Latest Results at End checkbox. If the checkbox is checked, results are appended to the bottom of the file; otherwise, they are added to the top of existing results.
Note

If the Latest Results at End checkbox is disabled, see “Latest Results at End Checkbox Disabled” in the “Troubleshooting” section of this chapter.
The E-mail Results tab (shown in Figure 11.7) provides configuration options for e-mail results.

Enter the e-mail address you would like form results sent to in the E-mail Address to Receive Results textbox. It would be nice to also be able to send a copy of the results to the user filling out the form, but there isn’t an automated way of doing that.
Tip
If you already entered an e-mail address in the Form Properties dialog, that e-mail address will already appear in the E-mail Address to Receive Results textbox.
Caution
Carefully check the e-mail address you enter. Expression Web does not check to be sure you enter a valid e-mail address.
Choose the format of the e-mail in the E-mail Format dropdown. The formatting options are the same as those presented in the File Results tab. If you’d like field names to be included in the e-mail, check the Include Field Names checkbox.
To specify a subject for the e-mail, enter it into the Subject Line textbox. You can also use the value of a form field for the subject. For example, if you had a dropdown field named “Subject” in your form that allowed users to select the subject of their comment, you could use the value from the dropdown as the e-mail subject by checking the Form Field Name checkbox and typing “Subject” in the Subject Line textbox. To configure a form with this capability, follow these steps.
Create a new page or open an existing page.
Add a new
Drop-Down Boxcontrol from the Form Controls section of the toolbox.Double-click on the
Drop-Down Boxcontrol to display the Drop-Down Box Properties dialog.Enter
Subjectin the Name textbox.Click the Modify button to modify the choice in the Drop-Down Box.
Enter
Web Site Feedbackin the Choice textbox.Select the Selected radio button.
Click OK to dismiss the Modify Choice dialog.
Click the Add button to add a new choice.
Enter
Company Feedbackin the Choice textbox.Click OK to dismiss the Modify Choice dialog.
Click OK to dismiss the Drop-Down Box Properties dialog.
You can now check the Form Field Name checkbox next to the Subject Line and specify Subject as the Subject Line in the Saving Results dialog.
The Reply-To Line textbox allows you to specify the e-mail address used when a recipient of the e-mail responds. You can use a form field value for the Reply To address by checking the Form Field Name checkbox and entering the name of the form field in the Reply To Line textbox.
Note
If you receive an error message asking if you’d like to remove the e-mail recipient when configuring a form to send results to e-mail, see “Asked to Remove E-mail Recipient” in the “Troubleshooting” section of this chapter.
When a user submits data in a form, he or she will see a default confirmation page, as shown in Figure 11.8. While certainly a functional confirmation page, it’s not very attractive and it likely won’t match the layout or appearance of your Web site.

If you have a page in your Web site that you’d prefer to use as a confirmation page, you can specify the URL in the URL of Confirmation Page textbox in the Confirmation Page tab (shown in Figure 11.9). A custom confirmation page gives a more professional appearance by matching the layout and design of your Web site. However, the confirmation page must be a static HTML page, which prevents you from displaying any customized content to the user such as confirmation of the data submitted.

If validation has been enabled on any of the form fields in your form, you can also specify the URL of a page to be displayed when validation fails. The validation failure page will only be displayed if validation takes place on the server.
Note
If the validation failure page textbox is disabled, see “Cannot Enter Validation Failure Page” in the “Troubleshooting” section of this chapter.
By default, Expression Web saves all form fields when a form is submitted. You can override this behavior using the Saved Fields tab, as shown in Figure 11.10.

As you can see in Figure 11.10, Expression Web is saving not only the two text fields from the form, but also the Submit button. If you’d like to remove the Submit button from the saved fields, simply delete “Submit1” from the list of saved fields and click OK.
Note
If you are saving the form results into a file and you plan on importing the data into a database at a later time, you may want to prevent the Submit button from being saved so as not to pollute your data.
You also have the choice of saving the date and time a form was submitted by choosing a date format and time format from the appropriate dropdowns. You can also choose to save the remote computer name, browser type, or username by checking the corresponding checkbox.
If you’d prefer to keep form results stored in a database, Expression Web provides you with the ability to send form results directly into a database when a form is submitted using the Send To Database form handler, as shown in Figure 11.11.
Let’s configure our HTML form to save results into a Microsoft Access database:
Open default.htm and save it as
database.asp.Right-click the form and select Form Properties.
Select the Send To Database option.
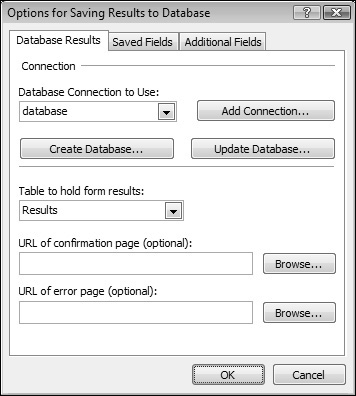
Click the Options button to display the Options for Saving Results to Database dialog, shown in Figure 11.11.
When the dialog is first displayed, there are no database connections available in the Database Connection to Use dropdown. You can create a new connection by clicking the Add Connection button, or you can click the Create Database button to have the FrontPage Server Extensions create a Microsoft Access database along with a connection to that database.
In this case, we want to let the FrontPage Server Extensions create a database for us, so click the Create Database button to generate a Microsoft Access database with a field for each form field.
Caution
The database that gets created is a Microsoft Access 2002 database. If you use Microsoft Access 2007 to edit the database, do not save it or convert it to a Microsoft Access 2007 database file. Doing so will prevent it from working correctly with your forms.
After the database has been created, the Database Connection To Use and Table To Hold Form Results dropdowns will be populated accordingly. You also have the option of choosing a custom confirmation page and an error page. The error page will be displayed if there is an error while trying to save results to the database.
Caution
When the FrontPage Server Extensions create the database for your form, they also add a global.asa and _fpclass/fpdbform.inc file to your Web site. Do not remove these files or it will break your form.
Tip
When saving form results to a database, the confirmation page must be an ASP page. ASPX and HTML pages will not work.
When a database gets created by the FrontPage Server Extensions, the form fields are mapped to appropriate fields in the database. If you’d like to review or modify the mappings, click the Saved Fields tab. As shown in Figure 11.12, each form field is currently mapped to a corresponding database field. To modify a mapping, select the form field in the list and click Modify. You can remove a mapped field by selecting the field in the list and clicking the Remove button.

Note
You won’t be able to access the Saved Fields or the Additional Fields tabs until you’ve created a database to store your form results.
Note
If none of the form fields is mapped in the Options For Saving Results To Database dialog, see “Form Fields Not Mapped” in the “Troubleshooting” section of this chapter.
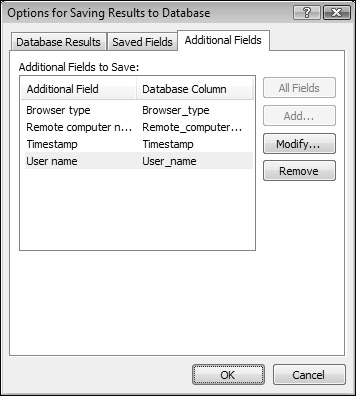
The Additional Fields tab provides access to several additional fields that can be saved with your form, as shown in Figure 11.13. These fields are also mapped to the appropriate database columns automatically.
If you add new fields to your form after the database has been created, you’ll need to add the new fields to the database. Expression Web will do this for you automatically.
Open
database.asp.Place the insertion point in the table row where the Submit button is located.
Select Table, Insert, Row Above to insert a new table row.
In the left cell of the new row, enter the text “
Your Web site:”.In the rightmost cell of the new row, insert a new Input (Text) form control.
Using the Tag Properties task pane, set the width of the control to
350px and the name to “URL”.Right-click on the form and select Form Properties.
Click the Options button.
Click Update Database.
Expression Web will automatically add the new field to the database and configure the mappings for you.
I’d like to save my form results with the latest results at the top of my file, but the Latest Results At End checkbox is disabled and I can’t uncheck it.
The following file types do not allow you to store form results at the top of the file.
Formatted Text
Text Database Using Comma as a Separator
Text Database Using Tab as a Separator
Text Database Using Space as a Separator
If you have selected one of these file types, the Latest Results At End checkbox will be checked and disabled. Choose a different file type.
When I click OK in the Form Properties dialog after configuring my form to send to an e-mail address, I am prompted that the server isn’t configured for e-mail and asked to remove the e-mail recipient.
If the Web site that is open in Expression Web is a disk-based Web site or if the server it is on is not configured to send e-mail via the FrontPage Server Extensions, you will receive this warning.
If you’re working with a disk-based Web site, e-mail should work after you publish the Web site to a server running the FrontPage Server Extensions. If you are using a Web site on a Web server, check with the hosting company or server administrator. They’ll need to configure e-mail support before you can send form results to an e-mail address.
I’m sending form results to a text file and would like to specify a custom validation failure page. However, I’m unable to click inside the textbox to enter the URL.
If none of the form fields in your form is configured to use validation, you’ll be unable to specify a validation failure page. Configure validation on your form first and you’ll then be able to specify a validation failure page.
I am configuring a form to send results to a database. For some reason, all my form fields are unmapped and I have to map them manually.
If you create a database and then click Cancel to exit the Form Properties dialog, the form fields will be unmapped. You’ll need to manually map them before you can continue.
All the forms we tested in this chapter dealt with form data that was visible to the user of the form. However, there may be times when you want to include data with your form that you don’t want users of the form to see. For example, suppose you have some client-side script that determines whether or not cookies are enabled in the user’s browser. When a user submits your form, you also want to submit “True” if cookies are enabled or “False” if they’re not. However, having a form field on your form that says “True” or “False” wouldn’t be appropriate.
Note
For details on how to manipulate cookies with JavaScript, read Special Edition Using JavaScript from Que Publishing.
In such cases, a hidden form field is a great solution. After you determine whether or not cookies are enabled, you can use client script to set the value of the hidden form field. That value will then be submitted along with the other form fields in your form.
Tip
A hidden form field doesn’t necessarily have to be configured using client script. You can hard-code a value in a hidden form field as well.
A hidden form field is just like a text input field except it’s not visible in the browser. The following HTML code creates a hidden form field called “cookies”:
<input type="hidden" name="cookies" value="false" />
To create a hidden form field in Expression Web:
Right-click the form and select Form Properties.
Click the Advanced button to display the Advanced Form Properties dialog.
Click the Add button to add a new hidden form field.
Enter a name and value for the form field.
Figure 11.14 shows a hidden form field called “cookies” configured in the Advanced Form Properties dialog.
