
There are millions of Web sites on the Internet today, and one thing they have in common is that they are each made up of pages that contain a lot of duplicated content. A typical Web site is composed of pages that consist of a common framework. That common framework plays an integral role in the success of a Web site because it defines the site’s identity.
Another trait of a successful Web site is freshness. Keeping a Web site updated is more than just adding new content. Every once in a while, it’s a good idea to change things around and give the site a fresh look. This is especially important as new Web technologies begin to emerge. If you want to be on the cutting edge, you’ve got to keep your site updated.
Updating your Web site is easy if you only have a few pages. However, if your site has been up for any length of time, you’ve likely accumulated a lot of content on many pages. Updating a Web site with many pages can be a big hassle, and not just because it can be time-consuming. Code that looks great on one page might appear slightly different on another page. This is especially true if you are using tables in your layout. The best way to prevent layout headaches is to use the exact same layout code for each page, but your site can then become a nightmare to maintain if you have to manually reproduce the layout on each page.
This kind of problem is exactly what Dynamic Web Templates were designed to address. A Dynamic Web Template allows you to create a master page (a Dynamic Web Template) that defines your layout. When you create the Dynamic Web Template, you create areas in the page (called editable regions) that contain unique content on pages that use the Dynamic Web Template. When a page is attached to the Dynamic Web Template, you are only allowed to add or edit content inside an editable region. All other areas of the page are locked and content for those areas is provided by the Dynamic Web Template.
→ | Dynamic Web Templates should not be confused with ASP.NET Master Pages. If you would like an ASP.NET template solution, see “Using ASP.NET Master Pages and User Controls,” p. 549 (Chapter 30). |
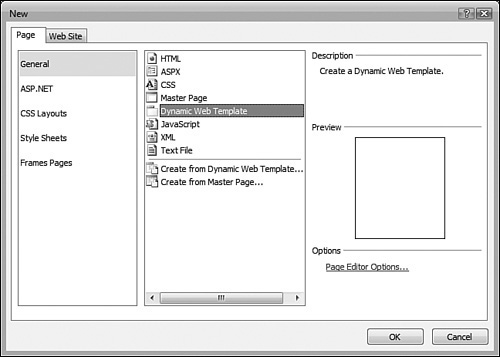
To create a Dynamic Web Template, select File, New, Page. In the New dialog, select Dynamic Web Template, as shown in Figure 21.1, and click OK.
When you create a page based off a Dynamic Web Template, you will only be able to add new content to editable regions defined in the Dynamic Web Template. All other portions of the page will be protected from editing. Because of that, you’ll want to define a layout for the Dynamic Web Template before you add any new editable regions.
Tip
A new Dynamic Web Template contains an invisible editable region called doctitle that surrounds the HTML <title> tag. This editable region allows you to change the title on pages attached to the Dynamic Web Template. Without that editable region, you wouldn’t be able to change the title of any of your pages.
The Dynamic Web Template contains the “chrome” for your Web site. Menus, logos, and other common page elements are added to the Dynamic Web Template. Next, editable regions are added as placeholders for content that will be unique from page to page.
To define a page layout:
Create a new one-page Web site and create a new Dynamic Web Template. Save the Dynamic Web Template as master.dwt.
Import the styles.css file from the ExamplesCh21FilesWebsite folder on the CD that accompanies this book into your Web site and attach it to your new Dynamic Web Template.
Select the existing editable region and delete it. (You can use the
<DWT:editable>Quick Tag Selector to select it easily.)Add a new table.
Set the number of rows to 4 and the number of columns to 1.
Set the cellpadding and cellspacing to 0.
In the top row, add a logo. Use the logo.jpg file in the ExamplesCh21FilesWebsiteImages folder on the CD that accompanies this book.
Select the second table row and add a class attribute with a value of horizRule.
In a real site, the second row would contain a menu. For this example, enter some text in place of the menu (see Figure 21.2).
In the third row, add a new table with 1 row and 1 column.
Set the width of the new table to 95%.

→ | For more information on formatting pages with CSS, see “Creating Style Sheets”, p. 289 (Chapter 17). |
You now have a basic layout for a Web site. Your Dynamic Web Template should look similar to Figure 21.2.
To add page-specific content, you need to define some editable regions for the Dynamic Web Template. Let’s add two editable regions:
Place the insertion point inside the third table row.
Select Format, Dynamic Web Template, Manage Editable Regions.
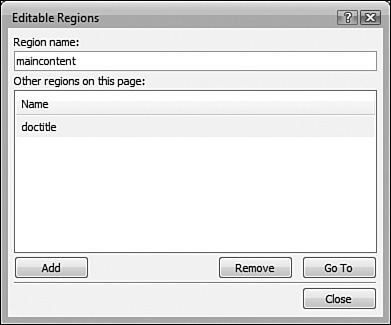
In the Editable Regions dialog, enter “
maincontent” for the region name and click the Add button, as shown in Figure 21.3.Click the Close button.
Right-click inside the fourth table row and select Manage Editable Regions from the context menu. (This is an alternate method of accessing the Editable Regions dialog.)
In the Editable Regions dialog, enter “
bannerad” for the region name and click the Add button.Click the Close button.
Save the Dynamic Web Template.
You now have two visible editable regions in the Dynamic Web Template. (The doctitle editable region is still on the page, but it’s not a visible editable region.) The maincontent editable region will be used for the main content and the bannerad editable region will be used for a banner ad that will appear at the bottom of the page. Your Dynamic Web Template should now look similar to Figure 21.4.

To use a Dynamic Web Template, you must attach it to a page. The page will then take on the appearance of the Dynamic Web Template. Custom content for that page can be entered into editable regions. All other content is protected and cannot be edited.
Let’s attach master.dwt to the default.htm page:
Open
default.htm.If you’re not in Design View, switch to it so you can easily see the effect of attaching the Dynamic Web Template.
Select Format, Dynamic Web Template, Attach Dynamic Web Template.
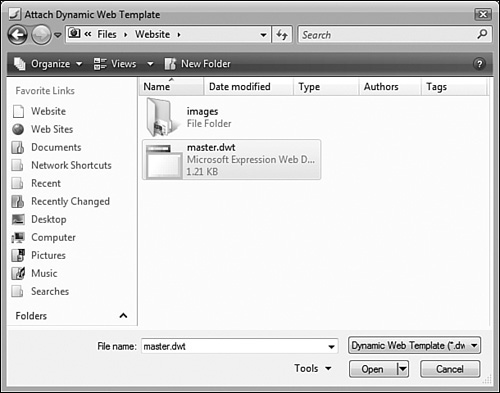
From the Attach Dynamic Web Template dialog, select the
master.dwtDynamic Web Template, as shown in Figure 21.5.Click Open to attach the Dynamic Web Template. Expression Web will warn you that this action will replace content, as shown in Figure 21.6.
Expression Web will display a dialog informing you that the file has been updated. Click Close to return to the
default.htmpage.

The default.htm page should now look like the Dynamic Web Template. However, you should notice that all content outside the editable regions is locked and cannot be edited.
Tip
You can provide default content for editable regions by adding content inside the editable regions in the Dynamic Web Template. When a page is attached to the Dynamic Web Template, the editable regions will contain the content from the Dynamic Web Template. That content can then be changed in individual pages.
You can attach a Dynamic Web Template to a page when the page is created.
Select File, New, Page.
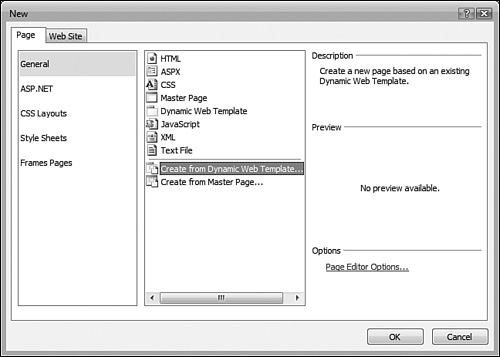
From the New dialog, select Create from Dynamic Web Template, as shown in Figure 21.7.
In the Attach Dynamic Web Template dialog, select the Dynamic Web Template you want to use.
Click Open to create the page.
One of the greatest advantages to using Dynamic Web Templates is that they make it easy to make site-wide changes by simply modifying the Dynamic Web Template and then performing an update on all attached pages.
When you save a modified Dynamic Web Template, Expression Web will notify you if there are any attached pages and ask if you’d like to update them, as shown in Figure 21.8. If you click Yes, Expression Web will automatically update all pages attached to the Dynamic Web Template.

Note

If the Dynamic Web Template menu options are disabled, see “Dynamic Web Template Menu Items Disabled” in the “Troubleshooting” section of this chapter.
Note
When you update a page attached to a Dynamic Web Template, none of the content in that page’s editable regions is modified. Only the content provided by the Dynamic Web Template is updated.
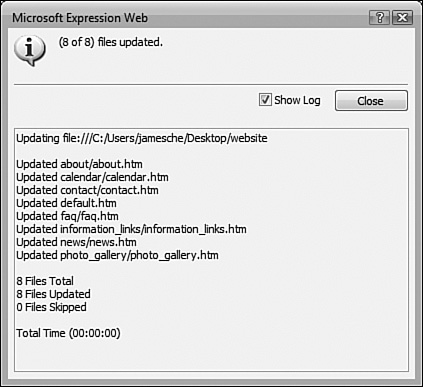
If you choose not to update attached pages when the Dynamic Web Template is saved, you can update them later by selecting Format, Dynamic Web Template, Update All Pages. When the update has completed, a dialog is displayed, showing a report of the update, as shown in Figure 21.9.
Caution
Updating all pages attached to a Dynamic Web Template cannot be undone. Before you choose to update all pages, be careful to ensure that you want to perform the update because Expression Web will automatically save any pages it updates without confirmation.
If you choose, you can select one or more pages and update only those pages by selecting Format, Dynamic Web Template, Update Selected Pages. Expression Web will then update only the pages you have selected. Alternatively, you can select or open a Dynamic Web Template and select Format, Dynamic Web Template, Update Attached Pages to update all pages attached to the selected or opened Dynamic Web Template.
Content in a page attached to a Dynamic Web Template can be edited in Design View only if that content is within an editable region. You can, however, edit other content in the attached page by switching to Code View and editing the code itself.
When you view a page attached to a Dynamic Web Template in Code View, Expression Web will highlight any code provided by the Dynamic Web Template in orange. When you make any changes to this code, switching views or saving the page will cause Expression Web to notify you that you have made changes to a non-editable region of the page, as shown in Figure 21.10. At that point, you have two choices:
Always restore non-editable content while editing this page—. When this option is selected, Expression Web will restore the original content from the Dynamic Web Template. Any future code edits outside an editable region will be restored without notification. The purpose of this option is to protect you from inadvertent code changes to content provided by the Dynamic Web Template.
Keep all changes—. Keeps your code changes, allowing you to modify code outside an editable region.
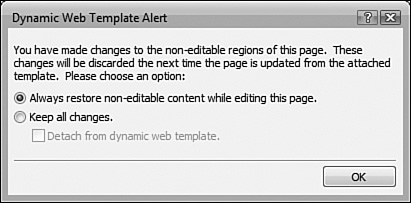
If you choose to keep your changes, you can also check the Detach from Dynamic Web Template checkbox to detach the page from the Dynamic Web Template. If you choose this option, the link between the page and Dynamic Web Template will be severed. You may want to choose this option if you don’t want the page to be affected by future changes to the Dynamic Web Template.
Caution
Before you detach from a Dynamic Web Template, be advised that if you decide to reattach the page to the Dynamic Web Template later, Expression Web will likely duplicate content on the page. Content on the page that originally was part of the Dynamic Web Template will be moved into an editable region and the content from the Dynamic Web Template will be re-added to the page.
Tip
When you select the option to always restore non-editable content, Expression Web will restore Dynamic Web Template code without notification. However, this setting only affects the current editing session. If you open the page later and make changes, the setting will reset and Expression Web will warn you if changes are made to protected code.
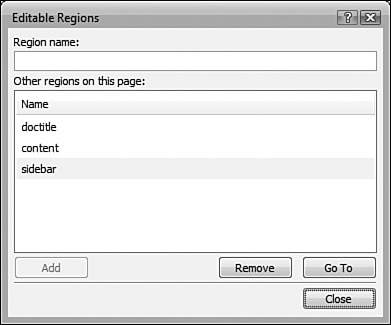
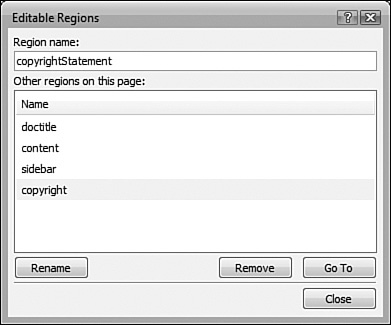
Editable regions can be added, renamed, or removed using the Editable Regions dialog shown in Figure 21.11.
Note
When adding or editing an editable region, the Dynamic Web Template must be open in Expression Web.
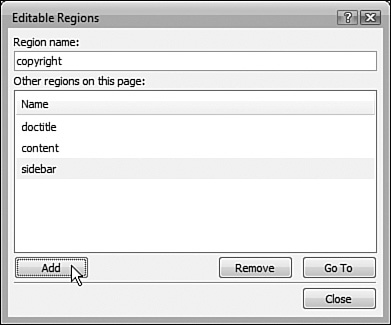
To add a new editable region, place the insertion point where you would like the new editable region and select Format, Dynamic Web Template, Manage Editable Regions to display the Editable Regions dialog. Enter a name for the new editable region and click Add to add it to the Dynamic Web Template, as shown in Figure 21.12.
When you save the Dynamic Web Template after adding a new editable region, Expression Web will ask if you want to update all the attached pages. When you do, the new editable region will be added to all attached pages.
Existing editable regions can be renamed easily by clicking inside of the editable region and then selecting Format, Dynamic Web Template, Manage Editable Regions to display the Editable Regions dialog. Enter the new name for the editable region and then click Rename, as shown in Figure 21.13.
Tip
Contrary to the way you would think it would work, to rename an editable region, you must first click inside of the editable region and then select Manage Editable Regions. Otherwise, Expression Web will try to add a new editable region using the new name.
Note
If there is no Rename button in the Editable Regions dialog, see “No Rename Button in Editable Regions Dialog” in the “Troubleshooting” section of this chapter.
You can rename another editable region by selecting it from the list of other editable regions, entering a new name, and clicking Rename.
When you rename an editable region and update attached pages, Expression Web will display the Match Editable Regions dialog (see Figure 21.14) so that editable regions can be matched. In most cases, Expression Web correctly maps editable regions to the corresponding content, but if it doesn’t, you’ll need to modify the mapping. In Figure 21.15, the copyright editable region has been renamed to copyrightStatement. Notice that Expression Web is assuming that the copyright editable region that currently exists on my pages should be mapped to the contentBlock editable region. In this case, the mapping will need to be modified.


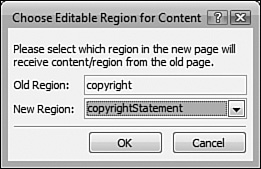
To remap an editable region, select the editable region from the Match Editable Regions dialog and click the Modify button. Select the correct editable region from the New Region dropdown, as shown in Figure 21.16, and click OK to remap the editable region.
If you’d like to remap the editable region on the current page later, click the Skip Current Page button on the Match Editable Regions dialog.
There are times when having a page attached to a Dynamic Web Template is too restrictive. In such cases, you can detach the page from the Dynamic Web Template.
You detach a page from a Dynamic Web Template by opening the page and then selecting Format, Dynamic Web Template, Detach from Dynamic Web Template. When you detach a page from a Dynamic Web Template, the connection between the page and the Dynamic Web Template is severed, but no content is removed from the page. Any changes made to the Dynamic Web Template from that point on do not affect the page.
All the Dynamic Web Template menu items are disabled. I’ve got a Web site open, but I can’t click on any of the Dynamic Web Template menu items.
It’s likely that the Web site you are using is hosted on a Web server running the FrontPage Server Extensions. You cannot use Dynamic Web Template features if the Web site open in Expression Web is using the FrontPage Server Extensions.
The best way to work around this problem is to design your Web site locally as a disk-based Web site and then publish the site to the Web server.
I’ve selected an editable region and then selected Manage Editable Regions so that I can rename it. However, when the Editable Regions dialog is displayed, there isn’t a rename button. Is this a bug?
It’s not a bug. In order to rename an editable region, you should click anywhere inside of the editable region first. If you select the entire editable region first, Expression Web will not allow you to rename it.
Dynamic Web Templates can make managing your Web site easier. Expression Web makes it easy to create editable regions for flexible page layouts, but some Web designers prefer to make changes in Code View for maximum control. Even if you spend the majority of your time in Design View, it’s still helpful to know how Dynamic Web Templates work under the hood.
Perhaps the easiest way to understand how Dynamic Web Templates work is to look at Code View after creating a new Dynamic Web Template. The code in Listing 21.1 is from a newly created Dynamic Web Template.
Example 21.1. Dynamic Web Template Code
<!DOCTYPE html PUBLIC "-//W3C//DTD XHTML 1.0 Transitional//EN"
"http://www.w3.org/TR/xhtml1/DTD/xhtml1-transitional.dtd">
<html dir="ltr" xmlns="http://www.w3.org/1999/xhtml">
<head>
  <meta http-equiv="Content-Type" content="text/html; charset=utf-8" />
  <!— #BeginEditable "doctitle" —>
  <title>Untitled 1</title>
  <!— #EndEditable —>
</head>
<body>
  <!— #BeginEditable "body" —>
  <div>
  </div>
  <!— #EndEditable —>
</body>
</html>
By default, every Dynamic Web Template contains two editable regions called doctitle and body, respectively. The doctitle editable region surrounds the <title> tag and the body editable region is inside the <body> tag. Expression Web determines the location of editable regions using the codes #BeginEditable and #EndEditable.
Tip
Because the Dynamic Web Template codes that Expression Web uses are not recognizable by Web browsers, they are enclosed in HTML comments so Web browsers won’t generate errors.
In Listing 21.1, the doctitle editable region code is as follows:
<!— #BeginEditable "doctitle" —>
  <title>Untitled 1</title>
<!— #EndEditable —>
Any code between the #BeginEditable and #EndEditable codes is inside the editable region and can be modified. In this case, the code inside the doctitle editable region is the HTML <title> tag.
You can use this knowledge of how Dynamic Web Templates work to tweak the position of editable regions in code. By moving the #BeginEditable and #EndEditable codes so that they enclose content you want to be editable, you can precisely control the page elements that appear inside an editable region.
For example, consider the code below:
<!— #BeginEditable "mainTable" —>
<div>
<table style="width: 100%">
<tr>
<td> </td>
<td> </td>
</tr>
<tr>
<td> </td>
<td> </td>
</tr>
</table>
</div>
<!— #EndEditable —>
This code defines an editable region called mainTable and the entire table is included within an editable region. Suppose you wanted to make the bottom row of the table an editable region but leave the top row protected. There’s no way to make that change in Design View, but you can do it easily by making a small code modification. The following shows the new code:
<div>
<table style="width: 100%">
<tr>
<td> </td>
<td> </td>
</tr>
<!— #BeginEditable "mainTable" —>
<tr>
<td> </td>
<td> </td>
</tr>
<!— #EndEditable —>
</table>
</div>
Notice that the #BeginEditable and #EndEditable codes are now enclosing only the second table row. Only content within that second row is inside the editable region. The rest of the table is protected content.