
The previous chapters on ASP.NET have shown how it’s possible to design some pretty impressive ASP.NET Web pages without writing any code at all. It may surprise you to know that you can also create some powerful data access pages in ASP.NET 2.0 without writing any code. The functionality for doing so is encapsulated within the ASP.NET data source controls.
ASP.NET data source controls provide robust connectivity to many different types of data sources simply by setting properties on a control using the Tag Properties task pane or by specifying properties for a control in Code View declaratively.
→ | For more information on setting ASP.NET control properties using the Tag Properties task pane, see “Using Standard ASP.NET Controls,” p. 495 (Chapter 28). |
Note
Data source controls do not display data on a page. As you’ll see later in this chapter, they are used in conjunction with other controls to display data.
Four data source controls are included in the Expression Web Toolbox. Each data source control is similar in functionality, but they are specialized for specific types of data.
Let’s go over the details of each data source control and then we’ll create some Web pages that use the AccessDataSource and SqlDataSource controls to connect to a database.
Note
Throughout this chapter, we will be using the Nwind.mdb database to build examples. If you don’t already have this database on your system, you can download it from www.microsoft.com/downloads/details.aspx?familyid=C6661372-8DBE-422B-8676-C632D66C529C&displaylang=en.
The AccessDataSource control provides data connectivity to a Microsoft Access database file. It includes some advanced features such as support for paging, sorting, filtering, and more.
Note
The AccessDataSource control cannot connect to a password-protected Access database. To connect to a password-protected database, use the SqlDataSource control.
To insert an AccessDataSource control onto a page, drag it from the Toolbox and drop it on the page. By default, Expression Web is configured to not show non-visual ASP.NET pages, so when you first insert any data source control, Expression Web will ask if you want to turn on the Visual Aid for ASP.NET controls. It’s recommended that you answer Yes to this prompt so you can work more easily with the data source control.
After you’ve inserted the AccessDataSource control, the easiest way to configure it is to click the Configure Data Source link in the Common AccessDataSource Tasks popup, as shown in Figure 35.1.

Note

If you are unable to see a data source control that you have placed on a page, see “Unable to See Data Source Control” in the “Troubleshooting” section of this chapter.
We’ll go over the details of configuring the AccessDataSource control and other data source controls later in this chapter. For now, let’s review some of the common properties used to configure the AccessDataSource control.
DataFile—. Specifies the location of the Microsoft Access database file used by theAccessDataSourcecontrol.DataSourceMode—. This property can be set to eitherDataSet(the default) or DataReader. In most cases, you’ll leave this property set toDataSet, but if you only need to display data in the database without sorting, filtering, and so on, you can set it toDataReaderfor better performance.SelectQuery—. Specifies the SQL query used to select data from the database. When theSelectCommandTypeis set toStoredProcedure, theSelectQueryproperty can be used to specify a stored query.Note
A discussion of creating SQL queries is outside the scope of this book. If you’d like more information on how to use SQL queries to work with databases, read Sams Teach Yourself SQL in 24 Hours, 3rd Edition from Sams Publishing, available at www.quepublishing.com/bookstore/product.asp?isbn=0672324423&rl=1.
UpdateQuery—. Specifies the SQL query to use when updating the database.DeleteQuery—. Specifies the SQL query to use when deleting records from the database.FilterExpression—. Filters data displayed by theSelectQueryproperty.FilterParameters—. Specifies the parameters used withFilterExpressionto filter the database results.
The SqlDataSource control can be used to connect to many different types of databases, but it contains performance optimizations that specifically target Microsoft SQL Server.
Note
Unless you’re working with an enterprise-level application, you may not notice the optimizations in the SqlDataSource control.
The SqlDataSource control shares many of the same properties with the AccessDataSource control. All the properties we discussed previously for the AccessDataSource control also apply to the SqlDataSource control.
To insert a SqlDataSource control on a page, drag it from the Toolbox onto the page. After inserting the SqlDataSource control, you can configure it using the Configure Data Source link on the Common SqlDataSource Tasks popup. We’ll cover the details of the SqlDataSource control later in this chapter.
The SiteMapDataSource control is a hierarchical data source control that is designed to work with the ASP.NET navigation controls. ASP.NET navigation controls are covered in detail in Chapter 29, “Using ASP.NET Navigation Controls,” so we won’t go into detail on this control here.
The XmlDataSource control provides data connectivity to XML files. To insert an XmlDataSource control, drag it from the Toolbox onto the page. You can then configure it using the Configure Data Source link on the Common XmlDataSource Tasks popup.
When configuring the XmlDataSource control, specify the XML data path, an optional XML transform file, and an optional XPath statement for filtering data, as shown in Figure 35.2.

Note
A discussion of using XML transforms and XPath is outside the scope of this book. For details on using these XML features, read Sams Teach Yourself XML in 10 Minutes from Sams Publishing, available from www.quepublishing.com/bookstore/product.asp?isbn=0672324717&rl=1.
There are several approaches to displaying data with ASP.NET. Which one you choose depends largely on the type of data you need to display and your purpose for displaying it. For example, to display a list of products and prices, a tabular display might be the best choice. On the other hand, to display information such as the name and address of one particular user, a data-bound form would be a better choice.
ASP.NET makes it extremely easy to display data using both methods described above, and you can do it without writing any code because the work is all done by the data source control.
A few ASP.NET controls specialize in displaying data in tabular form. The two most common controls are the DataList control and the GridView control. Of the two, the GridView is the easiest to use and offers the largest feature set.
Let’s create a new ASP.NET page to display data from the Northwind Traders Access database. You can download the sample Nwind.mdb file using the link provided earlier in this chapter if you don’t already have the Northwind Traders database.
Note
The completed examples from this chapter can be found in the ExamplesCh35FilesWebsite folder on the CD that accompanies this book.
We’ll need to create a new ASP.NET page so we can add and configure a GridView control to display our data.
Open an existing Web site or create a new Web site.
Note
The Web site can be either server-based or disk-based. If you use a disk-based Web site, the ASP.NET Development Server can be used for testing the site.
→
For more information on creating a Web site, see “Creating a Web Site,” p. 25 (Chapter 2).
→
For more information on the ASP.NET Development Server, see “Using the ASP.NET Development Server,” p. 485 (Chapter 27).
Create a new ASP.NET page and save it as
gridview.aspx.Drag a
GridViewcontrol from the ASP.NET section of the Toolbox and drop it on the page.Note
If the Toolbox is not visible, see “Toolbox Not Visible” in the “Troubleshooting” section of this chapter.
Import the
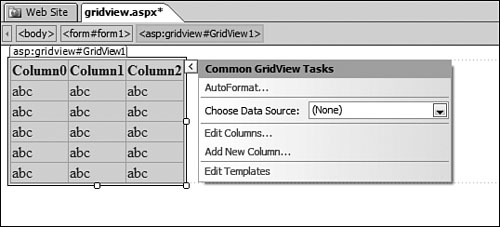
Nwind.mdbfile into the root of the Web site.If the Common GridView Tasks popup is not visible, click the arrow button to display it, as shown in Figure 35.3.
Select <New Data Source...> from the Choose Data Source dropdown.
Select Access Database in the Data Source Configuration wizard, as shown in Figure 35.4, and click OK.
Enter “
Nwind.mdb” in the Configure Data Source dialog, as shown in Figure 35.5, and click Next.Make sure that Specify Columns from a Table or View is selected.
From the Name dropdown, select Employees.
Check the EmployeeID, LastName, FirstName, Title, and HireDate checkboxes, as shown in Figure 35.6, and click Next.
Click the Test Query button to make sure you are successfully connecting to the database and then click Finish.


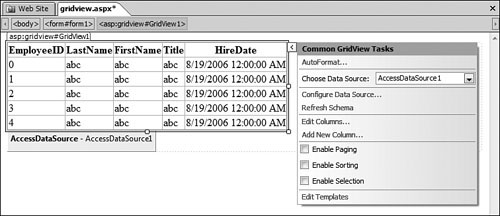
After you click Finish, you will see that the GridView control now displays the columns you selected. There are several more options available to you in the Common GridView Tasks popup, as shown in Figure 35.7.
Save the page and test it in your browser. Even though you haven’t written any code at all, you will see that the GridView control is pulling the employee data from the database and displaying it on the page, as shown in Figure 35.8.

Right now the employees are in employee number order. Let’s reconfigure the display so they are listed in order of last name and then first name.
Select the
GridViewand click the arrow button to display the Common GridView Tasks popup.Click the Configure Data Source link.
In the Configure Data Source dialog, click Next.
Click the Order By button shown previously in Figure 35.6.
In the Sort By dropdown, choose LastName.
In the Then By dropdown, choose FirstName, as shown in Figure 35.9.
Click OK.
Click Next and then Finish in the Configure Data Source dialog.

Save and browse the page. Notice that the grid is now sorted by last name. If any two employees with the same last name are ever added to the database, the grid will display them sorted by first name.
In a real-world application, it’s usually best to give the user a choice as to how to display the data. Let’s reconfigure the GridView control so the user can decide how to sort it.
Select the
GridViewcontrol.Click the arrow button to display the Common GridView Tasks popup.
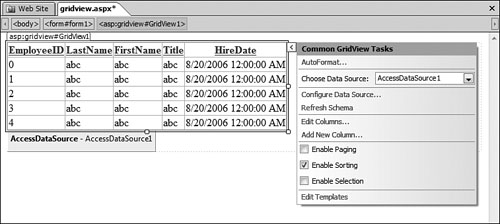
Check the Enable Sorting checkbox, as shown in Figure 35.10.
Save and view the page in your browser. Notice that the header on each column is now a hyperlink. Clicking a link will sort by that column in ascending order. Clicking the same link again will sort by that column in descending order.
In addition to binding data in a tabular fashion, you can also bind data in forms and other controls in a Web page. We’ll explore data binding in the Lagniappe section of this chapter.
Let’s create a page that will allow us to edit employee information and save updated information back to the database. The GridView control makes this convenient by providing the ability to switch a row into edit mode. When you switch a row into edit mode, the information in the row is presented in textboxes so you can make changes.
Open the gridview.aspx page and save it as edit.aspx. After you do that, you’ll need to reconfigure the data source to allow for updates and add a column to the GridView so users can switch a row into edit mode.
Select the
GridViewcontrol and click the arrow button to display the Common GridView Tasks popup.Click the Configure Data Source link to display the Configure Data Source dialog.
Click Next.
Click the Advanced button shown previously in Figure 35.6.
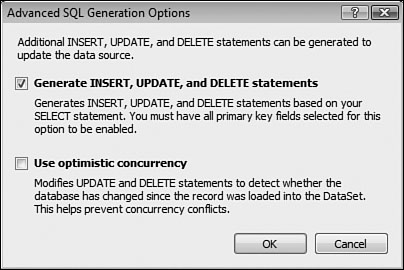
Check the Generate INSERT, UPDATE, and DELETE Statements checkbox, as shown in Figure 35.11. This will cause Expression Web to generate the necessary SQL statements to allow us to edit records from the database.
Click OK and then click Next and Finish to close the Configure Data Source dialog.
Now that the data source is capable of updating information in the database, the final step is to configure the GridView and add a new column so a specific row can be switched into edit mode.
I’m going to walk you through a long way of doing this because it will give you some experience in using some of the features of the GridView that you wouldn’t see otherwise. After you’ve configured the GridView, I’ll tell you an easier way to accomplish the same task.
Select the
GridViewand click the arrow button to display the Common GridView Tasks popup.Click the Edit Columns link to display the Fields dialog.
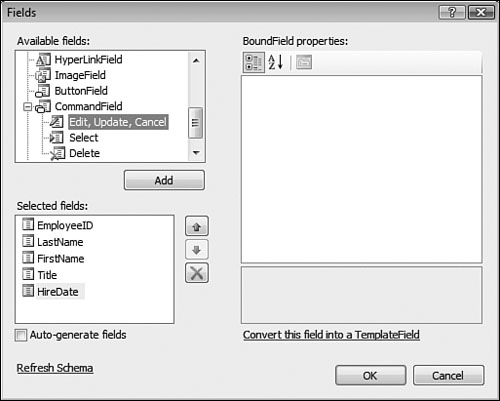
Scroll down in the Available Fields list and click the plus sign next to CommandField.
Select the Edit, Update, Cancel field, as shown in Figure 35.12, and click Add to add it to the
GridView.Select the Edit, Update, Cancel field in the Selected Fields list and click the up arrow button repeatedly to move it to the top of the list, as shown in Figure 35.13.
Click OK in the Fields dialog.

Your page should now look like Figure 35.14.

When I started this section, I said I would describe the easy way of configuring a GridView for editing the database. After you’ve configured the data source so it will generate the code necessary to update the database, new checkboxes will be added to the Common GridView Tasks popup, as shown in Figure 35.15. The easy way of configuring the GridView so records can be edited is to simply check the Enable Editing checkbox. When you do that, Expression Web will automatically add the Edit, Update, Cancel column to the GridView.

View the edit.aspx page in your browser. Click the Edit link next to the employee of your choice. When you do, the Edit link will change to an Update and Cancel link and all the data will be displayed in textboxes, as shown in Figure 35.16.

To update data in the database, enter the new information and click Update. Alternatively, you can choose to click Cancel and revert to the original data from the database.
Using the methods you’ve learned here, you can easily create a robust Web application that allows for not only the display of, but also the easy editing of data from a database. The example used in this chapter used an Access database, but the same methods apply to other databases as well.
There’s much more that you can do with data access and ASP.NET 2.0. The easiest way to learn how to take advantage of this powerful feature set is to explore it and experiment with creating data-enabled pages.
I’ve added a data source control to my page and I’m trying to configure it. I know it’s there, but I can’t see it in Design View.
You haven’t enabled the ASP.NET Non-visual Controls Visual Aid. By default, non-visual controls are not visible. To make them visible, select View, Visual Aids, ASP.NET Non-visual Controls.
In many cases, it’s preferable to display a small subset of data and allow users to drill down into more information. This kind of approach is typically called a master/detail view, and creating such an interface is quite simple using the ASP.NET 2.0 controls in Expression Web.
The master view will contain a subset of the Products table in the Northwind Traders database. We’ll use a GridView to display this data.
Create a new ASP.NET page and save it as
masterdetail.aspx.Add a
GridViewcontrol to the page and select the option to add a new data source from the Choose Data Source dropdown in the Common GridView Tasks popup.In the Data Source Configuration wizard, choose Access Database and change the ID for the data source to “MasterDataSource,” as shown in Figure 35.17.
Choose the
Nwind.mdbdatabase and click Next.Select the Products database from the Name dropdown.
In the Columns list, select the
ProductID,ProductName, andUnitPricecheckboxes as shown in Figure 35.18.Click Next and then click Finish.


We’ll need to use the ProductID field in order to determine which record to display in the detail view, but we don’t want the user to see the ProductID field. Therefore, we’ll need to make the ProductID field invisible to the reader.
Select the
GridViewand click the arrow button to display the Common GridView Tasks popup.Select the Edit Columns link and select the
ProductIDfield in the Selected Fields list.Change the Visible property to False as shown in Figure 35.19.
Click OK to dismiss the Fields dialog.
Check the Enable Paging and Enable Selection and textboxes in the Common GridView Tasks popup.

The next step is to create the detail view using a DetailsView control.
Unlike the GridView you added previously, the DetailsView control will display all of the fields for the selected record. Therefore, we’ll need to insert a new data source control for the DetailsView control, and we’ll need to configure the new data source to retrieve only the record that we select in the GridView.
Add a new
AccessDataSourcecontrol to the page.Click the Configure Data Source link in the Common AccessDataSource Tasks popup.
Click Browse and select the
Nwind.mdbdatabase in the first step of the Configure Data Source wizard. Click Next.Choose the Products table from the Name dropdown.
Place a check in the * checkbox, so that all fields are retrieved.
Click the WHERE button.
Select
ProductIDfrom the Column dropdown in the Add WHERE Clause dialog.Select = in the Operator dropdown.
Select Control in the Source dropdown.
Select GridView1 in the Control ID dropdown. The Add WHERE Clause dialog should now look like the one shown in Figure 35.20.
Click the Add button to add the new WHERE clause.
Click Next and then Finish to complete the Configure Data Source wizard.
Select the new
AccessDataSourcecontrol, if it’s not already selected, and change the ID property in the Tag Properties task pane to DetailsDataSource.

The changes you made in the Add WHERE Clause dialog cause the ProductID for the record you select in the GridView control to be passed to the query that retrieves the selected record from the database.
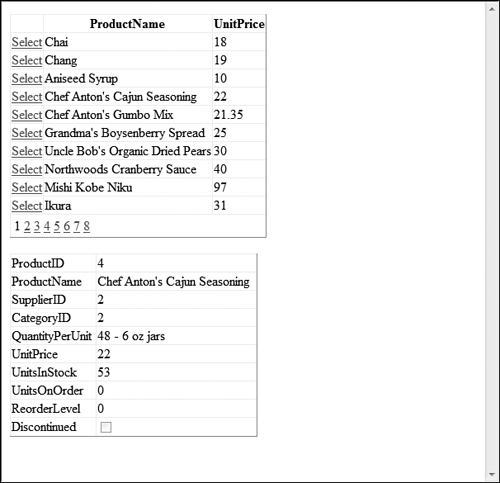
To complete the page, add a new DetailsView control under the existing GridView control. In the Choose Data Source dropdown on the Common DetailsView Tasks dropdown, select DetailsDataSource. If you want to improve the appearance of your page, you can drag the right side of the DetailsView control so that it’s about 300 pixels in width. After you’ve done that, save the page and preview it in your browser. When you click the Select link for one of the records in the GridView control, the details for that record are displayed in the DetailsView control as shown in Figure 35.21.
You can add additional features to this page by using server-side code to control when the DetailsView control is displayed, but doing so is outside of the scope of this book. However, hopefully you’ve learned enough about using the ASP.NET data controls available to you in Expression Web so that you can implement powerful database functionality in your own websites.