Think for a moment about your Internet viewing habits. When you are clicking links on a Web site, how do you determine if the information you are viewing is on the same Web site as the previous page? Most of you will probably agree that the most prevalent indicator is the style and layout of the Web site. In other words, if I’m viewing an article on the CNET Web site and I click a link, if the new page has the same layout and appearance as the previous page, my assumption is that it’s the same Web site. That is exactly why a common layout is vital to the success of your Web site.
There are many techniques used by Web developers to facilitate a common layout. One of the most common is the use of templates. Microsoft’s previous offering in this area is the Dynamic Web Template, which was introduced in FrontPage 2003. Dynamic Web Templates were the popular choice for inclusion in FrontPage because they were a tried and proven technique that was already in use by Macromedia (now Adobe) Dreamweaver.
Tip
Microsoft’s implementation of Dynamic Web Templates is, in fact, so close to Dreamweaver’s that the two are completely interchangeable. You can create a Dynamic Web Template in Expression Web and use it in Dreamweaver, and vice versa.
→ | For more information on Dynamic Web Templates, see “Using Dynamic Web Templates”, p. 363 (Chapter 21). |
A Master Page is a special kind of ASP.NET page that contains graphics, HTML code, ASP.NET controls, and code that is shared between pages.
ASP.NET 2.0 Master Pages are similar to Dynamic Web Templates in that they facilitate the development of a common user interface and a common look and feel. However, they also represent a substantial step up from Dynamic Web Templates because they fully support the ASP.NET code model and allow you to share not only user interface elements, but also code between pages.
Just like a Dynamic Web Template, you define areas where page-specific content will exist. When you create a page and attach it to a Master Page, you can add content on that page only in the areas that have been designated in the Master Page.
Note
For more information on developing ASP.NET applications, read Sams Teach Yourself ASP.NET 2.0 in 24 Hours, Complete Starter Kit from Sams Publishing (ISBN: 0-6723-2738-4).
In a Dynamic Web Template, the areas where page-specific content can exist are called editable regions. In a Master Page, two ASP.NET controls are used instead: the Content control and ContentPlaceHolder control.
Note
A Master Page has a file extension of .master. A Content Page, just like any other ASP.NET Web Form, has a file extension of .aspx. You cannot apply a Master Page to a page unless that page is an ASP.NET Web Form.
The ContentPlaceHolder control exists on the Master Page. Each ContentPlaceHolder control is mapped to a Content control on a page that is attached to the Master Page. That page is called the Content Page. A Master Page is not required to have ContentPlaceHolder controls on it, but without them, there is no way to add content to a page that uses that Master Page.
You can define all content in the Master Page if you wish. The Content Page can then provide its own content or simply use the content that the Master Page provides. Expression Web fully supports all aspects of Master Pages, so it’s not necessary to write any code to take advantage of this powerful feature.
To write server-side ASP.NET code for your Master Pages, you’ll want to use a tool made for that purpose such as Microsoft Visual Web Developer Express Edition. Because of Expression Web’s excellent support for ASP.NET 2.0, it’s convenient to use both Expression Web and an ASP.NET application development tool in combination to build full-featured ASP.NET applications.
→ | For more information on using Expression Web with Visual Web Developer, see “Using Expression Web with Visual Web Developer Express Edition”, p. 655 (Appendix A). |
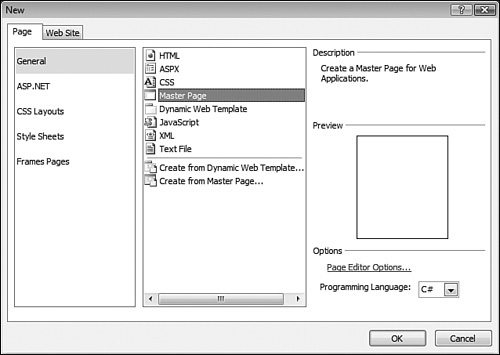
To create a new Master Page, select File, New, Page and select Master Page from the list of page templates, as shown in Figure 30.1.
Tip
You can select either General or ASP.NET from the list of page types in the New dialog. The option to create a new Master Page exists from either one of these choices and there is no difference in the two. It’s purely your choice.
After you’ve created a new Master Page, you should save it with a .master file extension. As I stated earlier, it’s not necessary that your Master Page contain a ContentPlaceHolder control, but if you save a Master Page that doesn’t contain a ContentPlaceHolder control, Expression Web will prompt you with a warning dialog, as shown in Figure 30.2.

Tip
I think the message in Figure 30.2 is poorly worded. By calling a ContentPlaceHolder a “content region,” Microsoft is making it easy to confuse ContentPlaceHolder controls with Content controls. Don’t fall into that trap. Content controls exist on Content Pages. When Expression Web says “content region,” what it really means is the ContentPlaceHolder control.
Let’s have a quick look at the <body> of a Master Page:
<body>
    <form id="form1" runat="server">


      <asp:ContentPlaceHolder runat="server" id="contentplaceholder1">
    <p style="vertical-align: Top">This is content from the Master Page.</p>
        </asp:ContentPlaceHolder>


    </form>
</body>
This Master Page contains one ContentPlaceHolder control named contentplaceholder1. I’ve added some text to that ContentPlaceHolder control. The text I’ve added will also appear on any Content Pages, but because the content is inside a ContentPlaceHolder control, I can use my own content for that section in my Content Page. To understand what I mean by that, let’s have a quick look at a Content Page.
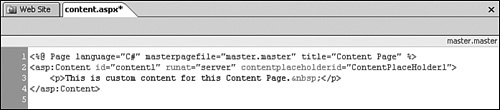
A Content Page is a special kind of page. It cannot have any content in it unless that content is inside a Content control. When you first look at the HTML code of a Content Page, it will seem quite odd to see it completely empty except for the standard ASP.NET directives.
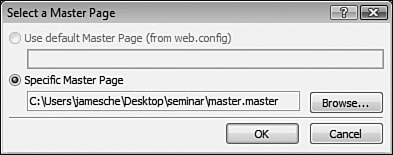
To create a new Content Page, select File, New, Page and then select Create from Master Page in the New dialog, as shown in Figure 30.3.

After you click OK, you will be prompted to select the Master Page, as shown in Figure 30.4.
Tip
You can define a default Master Page inside a special ASP.NET configuration file called web.config. We won’t cover much about the web.config file in this book. If you want more information on using the web.config file or other ASP.NET configuration files, read Sams Teach Yourself ASP.NET 2.0 in 24 Hours, Complete Starter Kit from Sams Publishing (ISBN: 0-6723-2738-4).
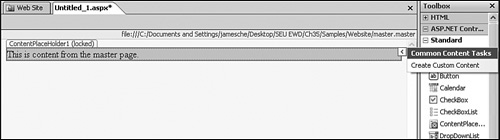
After you choose the Master Page and click OK, you’ll see the new Content Page along with all the content it has pulled from the Master Page, as shown in Figure 30.5.

Notice that the text that was in the ContentPlaceHolder control in the Master Page is now located in a shaded area on the Content Page. That shaded area is the Content control. At the upper left corner of the Content control is the ID of the ContentPlaceHolder control on the Master Page that is feeding the Content control.
Note that Expression Web displays “(locked)” next to the ID, indicating that the Content control is currently configured to display content from the Master Page. To override that setting so you can change the content in the Content control, click the button at the upper right of the Content control and select Create Custom Content from the Common Content Tasks menu, as shown in Figure 30.6.
When you click the Create Custom Content link, “(locked)” will no longer be displayed on the Content control and you can click inside it and add your own content.
Tip
Content controls will always take up the entire width of a page unless they are inside a table or other container. They are also not resizable in Expression Web. They will automatically resize themselves when a page is browsed.
If you want to manipulate the size of a Content control, insert it into a table cell. You can then resize the table cell to control the size of the Content control within it.
If you decide that you’d like the Content control to revert back to the content from the Master Page, you can simply click the button on the control to display the Common Content Tasks popup again and then click the Default to Master’s Content link. When you do, Expression Web asks you to confirm your choice.
Caution
If you change the content in a Content control and then later choose to revert back to the content from the Master Page, all the custom content for the Content control will be lost. Even if you then switch back to display the custom content, the previously entered content will be gone.
Make absolutely sure that you want to revert to the Master Page’s content before you confirm that choice. When in doubt, save the content to a temporary page first so you can recover it later if you change your mind.
Figure 30.7 shows the Content Page from Figure 30.5 in Code View. Notice that the only code that exists in the Content Page is code that ASP.NET uses to identify properties of this particular page. No other HTML code appears in the page. Also notice that the name of the Master Page to which this page is attached appears at the upper right corner of the page.

After custom content is defined for the page, Expression Web adds a Content control to the page and the HTML for the custom content is added inside the Content control, as shown in Figure 30.8.
Note

If you see a parser error when browsing a Content Page, see “Parser Error When Browsing Content Page” in the “Troubleshooting” section of this chapter.
Now that you have a good overview of how Master Pages work, let’s create a simple Web site using Master Pages.
Note
For this exercise, you will use the files in the Examplesch30files folder on the CD that accompanies this book. You’ll also find the completed Master Page site at that location.
The Master Page will contain a table that will control the layout of the Web site. To create the Master Page, follow these steps:
Create a new Master Page by selecting File, New, Page and selecting Master Page from the list of available page types.
Click
OKto create the Master Page.Click the
ContentPlaceHoldercontrol to select it and then delete it from the page.Click on Table, Insert Table.
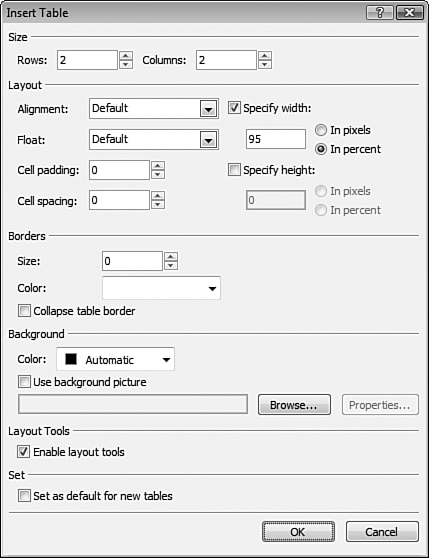
In the Insert Table dialog, configure the table as follows:
Set both the Rows and Columns to
2.Set the Width to
95and select theIn Percentradio button.Set both cellspacing and cellpadding to
0.Set the border size to
0.Check the
Enable Layout Toolscheckbox.
The Insert Table dialog should now look like Figure 30.9. Click
OKto insert the table.
Tip
The default ContentPlaceHolder control is deleted from the page at this point because anything that exists within a ContentPlaceHolder control can be customized by the Content Page. When you are creating a Master Page, it’s often preferable to delete the default ContentPlaceHolder control and then insert new ContentPlaceHolder controls after you have defined where you want custom content to exist. That’s the method we’ll use in this chapter.
→ | For more information on inserting and configuring tables, see “Using Tables and Layout Tables”, p. 149 (Chapter 9). |
The table you just inserted will hold the common user interface elements for the Web site. We need to add a logo and change a few of the table’s attributes.
Copy the file
logo.jpgfrom this book’s CD to your hard drive and insert it into the upper left cell.Hover over the border of the layout table until it turns green and then click it to select it.
Click the down arrow on the width indicator for the column containing the logo and select Change Column Width from the menu.
In the Column Properties dialog, change the width of the column to
161.Uncheck the
Clear Contradicting Widthcheckbox.Uncheck the
Make Column Autostretchcheckbox.Click
OK.Click the down arrow on the width indicator for the second column and select
Make Column Autostretchfrom the menu.
Your table should now look like Figure 30.10.

→ | For more information on working with images in Expression Web, see “Using Graphics and Multimedia”, p. 241 (Chapter 14). |
Note
If you configure the width of a column but it doesn’t seem to stay at that width, see “Column Width Doesn’t Stick” in the “Troubleshooting” section of this chapter.
At this point, save the page as master.master. When you do, Expression Web will prompt you to save the spacer image, as shown in Figure 30.11. When you configured the leftmost column to an explicit width of 161 pixels, Expression Web added a transparent spacer image into the table so that the column width wouldn’t change. Since we have a logo image already in the column, the spacer image isn’t really necessary, but we’ll leave it there in case we decide to remove the logo later.

We have a couple of other areas to configure for the Master Page. Next, we’ll add a menu down the left edge of the page and an ASP.NET AdRotator control in the top area.
Place the insertion point in the cell below the logo.
Insert the image
menu_top.jpginto the cell.Press Shift+Enter on your keyboard to insert a new line break after the image.
Insert a new table with a width of
95%,1column and1row, a border of0, and cellpadding and cellspacing values of0.Type
MENUinto the new table.Insert the image
menu_bottom.jpgunder the table you just created.Right-click in the cell with the menu images and choose Cell Properties from the menu.
Click the dropdown next to Background Color and select More Colors from the menu.
Click the
Selectbutton in the More Colors dialog as shown in Figure 30.12.Place the color dropper over the blue color on the logo and click to select that color.
Click
OKin the More Colors dialog to finish selecting the color.Click
OKin the Cell Properties dialog to apply the new color.

Your page should now look like Figure 30.13.

Note
The table you inserted into the menu cell prevents any menu text or control from extending beyond the width of the cell. Without the table in the cell, it’s possible that a menu would cause the cell to automatically widen. Because we’ve set a background color for the cell, having it extend beyond the width of the graphics would cause an unprofessional appearance.
Note
We won’t add a menu to the page in this example. Instead, we’ll use the word “MENU” as a placeholder. In a real-world application, you would add a menu, or possibly an ASP.NET Menu control, to the left side of this page.
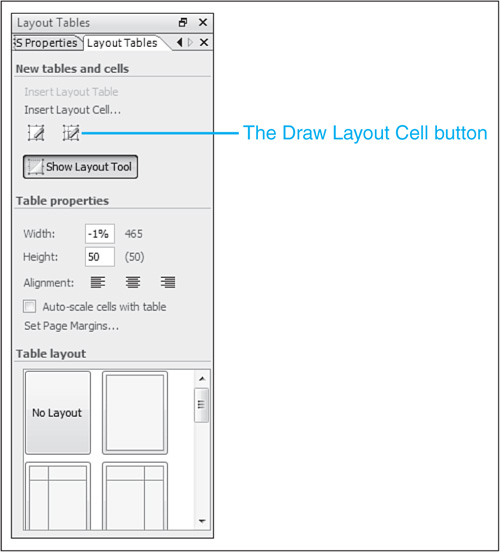
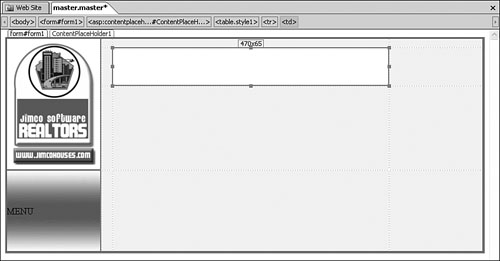
We’re now ready to configure the top row of the table. Remember that we want to add an ASP.NET AdRotator control to this page. We’ll use the standard banner size of 468 pixels wide by 60 pixels high. Let’s add a new layout cell now to contain the AdRotator control.
Click inside the upper right cell in the table.
If the Layout Tables and Cells task pane is not already visible, select Task Panes, Layout Tables and Cells from the menu to activate it.
In the Layout Tables and Cells task pane, click the
Draw Layout Cellbutton, as shown in Figure 30.14.Click and drag to draw a cell that is approximately 468 pixels wide and 60 pixels high in the center of the large top cell.
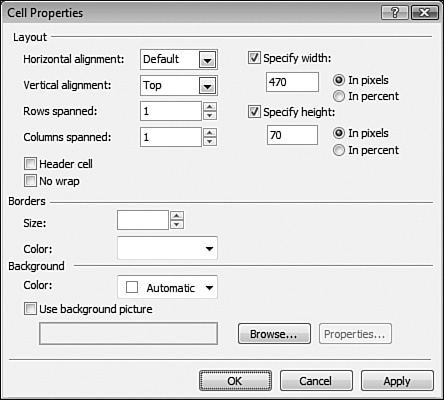
Right-click on the layout cell and select Cell Properties to display the Cell Properties dialog.
Change the cell’s width to
470and the height to70, as shown in Figure 30.15.Drag the layout cell so it is at the top left of the cell to the right of the logo, as shown in Figure 30.16.
Note
If you are unable to drag the new layout cell, see “Cannot Drag Layout Cell” in the “Troubleshooting” section of this chapter.
For more information on the layout tables feature in Expression Web, see “Using Tables and Layout Tables”, p. 149 (Chapter 9). |
→ | For more information on using the ASP.NET AdRotator control, see “Using Standard ASP.NET Controls”, p. 495 (Chapter 28). |
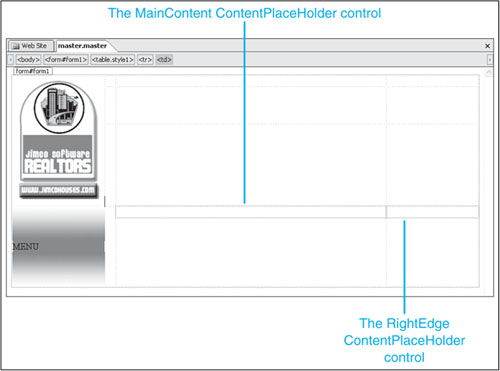
We now need to define the areas of the Master Page that we will allow to be customized by the content in the Content Page. In this set of steps, we’ll create two areas of customizable content: the main content area and an area along the right edge of the page.
Right-click in the cell just to the right of the menu cell and choose
Cell Propertiesfrom the menu.Change the vertical alignment of the cell to
Topand clickOK.From the Standard ASP.NET controls section of the Toolbox, add a new
ContentPlaceHoldercontrol to the cell.If the Tag Properties task pane is not visible, select Task Panes, Tag Properties to activate it.
If the
ContentPlaceHoldercontrol is not selected, click it to select it.In the Tag Properties task pane, change the ID of the
ContentPlaceHoldercontrol toMainContent.Right-click the cell at the right of the cell in which you just placed the
ContentPlaceHoldercontrol and choose Cell Properties from the menu.Change the vertical alignment of the cell to
Top.Change the horizontal alignment of the cell to
Right.Click
OK.Add a new
ContentPlaceHoldercontrol to the cell.In the Tag Properties task pane, change the ID of the
ContentPlaceHoldercontrol to RightEdge.
Your Master Page should now look like Figure 30.17. Save the Master Page.
Tip
We won’t add any default content to the ContentPlaceHolder controls on the Master Page. However, in a real application, you might want to add content (perhaps something like Google ads) to the right edge of the Master Page. That way, page developers using your Master Page can decide to leave your default content in place or define their own content.
We’re now ready to create a Content Page that uses the Master Page we just created.
Select File, New, Page and select
Create from Master Pagefrom the list of page types.Click
OKand select themaster.masterpage you just finished creating.Click
OKto create the new Content Page.
Notice that the images from the Master Page are not visible. Instead, you see the infamous red Xs, indicating that the image links are broken, as shown in Figure 30.18. Until you save the new Content Page, the image links will be broken. Go ahead and save the new Content Page now as default.aspx. After you’ve saved it, the relative links for the images will correctly point to the image files.

If you look at the Code View for the new Content Page, you’ll see that there is almost no code in it. At this point, the Master Page is defining all the content for this page. The only things that actually exist on the Content Page are the two Content controls that map to the ContentPlaceHolder controls on the Master Page.
Using the following steps, we will define some custom content for the new Content Page:
Click inside the
MainContentarea to select it.Click the button at the upper right of the control and select Create Custom Content from the Common Content Tasks popup.
Enter some text inside the
MainContentarea. As shown in Figure 30.19, theContentcontrol will resize accordingly as you enter content.

Notice that you are unable to edit any portion of the Content Page that falls outside a Content control. Master Pages are a powerful method of enforcing a common user interface while still allowing developers the flexibility to design content the way they want.
Note
Even though Expression Web labels this area as MainContent, you are not actually editing the MainContent ContentPlaceHolder control. Instead, you are adding content into a Content control that is mapped to the MainContent ContentPlaceHolder control on the master.master page.
Save the Content Page and browse it using the ASP.NET Development Server. Notice that the content you entered into the Content control is displayed along with the interface elements from the Master Page.
If you open the Master Page and make any changes to the layout or content, those changes will take effect immediately in all Content Pages that use that Master Page. Unlike Dynamic Web Templates, Master Pages do not require an explicit update of attached pages.
Gaining an understanding of Master Pages is valuable because it positions you to not only design your own Web sites using Master Pages, but also to contribute to a Web site development team that uses Master Pages. As previously mentioned, one of the primary reasons to use Master Pages is so that programmers can work independently from designers. With a firm knowledge of how Master Pages work, you can efficiently use Expression Web to take advantage of this powerful feature.
I’m browsing my Content Page and I get an error in the page that says “Parser Error Message: Only Content controls are allowed directly in a content page that contains Content controls.” What does this mean?
This error is poorly worded, but what it means is that you cannot have any content on a Content Page other than Content controls. If you are seeing this error, it means that you have text or an HTML tag that exists outside your Content controls.
Make sure that you don’t have any HTML tags such as <html> or <body> on your Content Page. These tags are provided by the Master Page and should not be included in your Content Page.
As a hint to what’s wrong, the error page you are seeing will usually highlight the offending code in red inside a large yellow box.
I’m changing the column width to a specific value in my layout table, but it doesn’t actually change the width. When I pull up the Column Properties dialog again, the width has reverted back to the original value.
Make sure you uncheck the Clear Contradicting Width and Make Column Autostretch checkboxes. Both of these checkboxes will allow Expression Web to resize the column as it sees fit. If you uncheck both of them, your column width adjustment should work fine.
I’ve inserted a new layout cell into my table. When I drag it, everything appears to be working fine until I release the mouse button. When I do that, the cell just pops right back to where it was in the first place.
If you are unable to drag your layout cell, the problem is most likely that you are dealing with a table and not a layout cell. It’s quite easy to accidentally insert a table instead of a layout cell, and if you do, when you attempt to drop the table in a new location, it will pop right back to where it was originally.
To fix this, remove the table and draw a new layout cell in its place.
Now that you’ve seen how cool Master Pages are, it’s possible that you are thinking about taking an existing Web site and converting it to a Master Page Web site. Doing that is not as hard as you might think.
As with the exercise we conducted in this chapter, the first step is to create the Master Page. You can either convert an existing template or pick a page and use it as the template for the Master Page. You’ll want to remove any content that is specific to the page. In place of that content, you’ll want to add one or more ContentPlaceHolder controls.
As you’re doing this, carefully evaluate any content for possible default content. For example, if you have some advertisements that appear in a table at the bottom of your page, you may want to just enclose those ads in a ContentPlaceHolder control. That way, anyone using your Master Page will get the ads by default and they can override them and provide their own content if they choose. You may also decide that you want those ads to appear on every page. In that case, you’ll want to leave the ads as-is, without putting them inside a ContentPlaceHolder control.
If your existing page is an ASP.NET Web Form, it will have an ASP.NET @ Page directive at the top of the page that looks similar to the following:
<%@ Page Language="C#" %>
You’ll need to change the @ Page directive to a @ Master directive. The new code should look like the following:
<%@ Master Language="C#" %>
If your page is just an HTML page, you will need to add the @ Master directive (as shown above) to the page before it will work properly as a Master Page. Then, save your page with a .master file extension.
To attach your existing page to the new Master Page, you’ll need to remove anything that will be provided by the Master Page. For example, if your pages have a table with your company logo and a menu system, remove them from the page you’re converting to a Content Page because those elements will be provided by the Master Page.
In almost all scenarios, it’s much easier to create a new Content Page and then copy and paste the content from other pages into the Content controls on the new Content Page. However, if you choose to go through the conversion process, just keep in mind that the Content Page cannot contain any code or text that is not within a Content control.
With a little work, you can convert an existing Web site to the Master Page model fairly easily. After the up-front work, you’ll be left with a Web site that is simple to maintain and update with a fresh new look with minimal effort.