If you’ve had any exposure to ASP.NET 2.0, you’ve been introduced to the power it provides without writing any code at all. However, if you really want to take advantage of the power of ASP.NET 2.0, you’ll need to back up your user interface with some ASP.NET server-side code.
Expression Web excels in user interface design for ASP.NET 2.0. It doesn’t, however, provide you with support for writing server-side code. That’s not to say that you can’t write server-side code in Expression Web. You can if you wish, but you won’t have the advantage of color-coding, IntelliSense, and other features that make the process easier. You also won’t have the ability to easily debug your code, and that alone can make writing ASP.NET 2.0 code in Expression Web an extremely frustrating endeavor.
If you really want to add significant ASP.NET functionality to your Web site, you’ll want to use an application development tool. Microsoft provides Visual Studio 2005 for just that purpose, but if you were to buy the professional version of Visual Studio 2005, it would cost you quite a bit of money. The Visual Studio product group at Microsoft realized that many developers needed a more affordable development environment, and to answer that need, they developed Visual Web Developer Express Edition.
Visual Web Developer Express Edition is a subset of the full-fledged Visual Studio 2005. Practically everything that you can do with ASP.NET 2.0 in Visual Studio can be accomplished in Visual Web Developer Express Edition.
You can download Visual Web Developer Express Edition (shown in Figure A.1) from http://msdn.microsoft.com/vstudio/express/vwd/. After you install it, you’ll be required to register with Microsoft within 30 days. However, registration comes with no strings attached. Visual Web Developer Express Edition is completely free—a fact that you will find increasingly hard to believe as you use the product.

Tip
The Visual Web Developer Express Edition installation allows you to opt out of downloading additional components such as MSDN documentation and SQL Server 2005 Express Edition. By choosing to not install these optional components, you can dramatically reduce the download size for Visual Web Developer Express Edition. However, even with the minimum installation, you’ll have to download about 40MB worth of data, so you’ll want to install Visual Web Developer Express Edition on a computer with a broadband Internet connection.
Note
As I was writing this book, Microsoft officially released an announcement that Visual Web Developer Express Edition will be free of charge permanently. The announcement can be found at http://blogs.msdn.com/danielfe/archive/2006/04/19/579109.aspx.
As shown in Figure A.1, the interface in Visual Web Developer Express Edition is similar to Expression Web. ASP.NET and HTML controls are located in the Toolbox, all files associated with your Web site are located in Solution Explorer, and properties for selected files or page elements are located in the Properties pane.
To create a Web site in Visual Web Developer Express Edition, select File, New Web Site to display the New Web Site dialog as shown in Figure A.2. You have the option of creating a Web site on the file system, on a Web server using HTTP, or at an FTP location using the Location dropdown.

Note
Visual Web Developer Express Edition requires the FrontPage Server Extensions for opening Web sites on a remote Web server. Even though the FrontPage Server Extensions are not required on the local Web server, if they are present on the server, Visual Web Developer Express Edition will use them.
Note
Creating and opening Web applications in IIS 7 has additional requirements. As of this writing, IIS 7 is still in beta. Please refer to the Que Web site at http://www.quepublishing.com for updated information on IIS 7 when it releases.
You can also choose a language (either Visual Basic or Visual C#) for your Web site using the Language dropdown shown in Figure A.2. Your language choice determines the language used for the default page that Visual Web Developer Express Edition creates when you create a Web site. Your choice does not lock you into any particular language. Visual Web Developer Express Edition allows you to mix languages inside of a single Web site, so you can have some pages that use Visual Basic and other pages that use C#.
Note
ASP.NET applications can also be developed using Microsoft’s Visual J#, a language that is similar to Java. However, Visual J# does not fully support the new architecture in ASP.NET 2.0, so support for developing in Visual J# is not included in Visual Web Developer Express Edition. (See http://www.asp.net/learn/withpss/module2.aspx?tabid=1 for more information on Visual J# and ASP.NET.)
If you would like to develop your ASP.NET applications using Visual J#, you’ll want to use Visual Studio 2005.
To open an existing Web site in Visual Web Developer Express Edition, select File, Open Web Site to display the Open Web Site dialog shown in Figure A.3. You can open Web sites on the file system, on a local IIS instance, on an FTP site, or on a remote Web server.

If you choose a local instance of IIS, Visual Web Developer Express Edition opens the Web site by directly accessing the IIS metabase, a file that contains details of the Web sites and Web applications in IIS. It displays the Web server’s structure in a tree view, as shown in Figure A.4. This is the same method that IIS itself uses to keep track of the Web server’s structure, so Visual Web Developer Express Edition will always give you an accurate representation of what’s on the Web server.

Because Expression Web doesn’t support the development of ASP.NET server-side code, it presents you with only a few options when creating a new page. Essentially, you choose from an ASP.NET page, an HTML page, or another file type. The choices end there.
In Visual Web Developer Express Edition, you are provided with some additional choices when creating Web pages because it is assumed that you will also be developing some server-side ASP.NET code to add functionality to the page.
To create a new file in Visual Web Developer Express Edition, select File, New File from the menu to display the Add New Item dialog shown in Figure A.5.

Note

If you see the New File dialog instead of the Add New Item dialog, see “Don’t See Add New Item Dialog” in the “Troubleshooting” section of this chapter.
The first thing you’ll likely notice is that there are a lot more file types to choose from in Visual Web Developer Express Edition than in Expression Web. Most of these file types are ASP.NET-specific and a discussion of them is outside the scope of this book. Therefore, we’ll keep our discussion limited to ASP.NET Web Forms.
→ | For in-depth information on developing applications in ASP.NET 2.0, read Sams Teach Yourself ASP.NET 2.0 in 24 Hours, Complete Starter Kit from Sams Publishing. |
→ | For more information about using ASP.NET Web Forms in Expression Web, see “Using Standard ASP.NET Controls”, p. 495 (Chapter 28). |
You’ll also be asked to choose a language for your ASP.NET code in the Add New Item dialog. As mentioned previously, your choices are VB and C#. ASP developers and other developers who are familiar with the syntax of VB will want to choose it. Developers who are more familiar with the syntax of JavaScript or C++ will want to choose C#.
Tip
If you choose the wrong language by mistake, you’ll need to delete the page and create a new one. Visual Web Developer Express Edition adds your language choice to the Web Form and also creates some code for you using the language you choose. There is no easy way to change languages once a page has been created.
→ | For more information on choosing an ASP.NET language, see “Using Standard ASP.NET Controls”, p. 495 (Chapter 28). |
Next to the language selection dropdown in the Add New Item dialog are two checkboxes: one that allows you to choose whether your code is in a separate file and another that allows you to choose a Master Page. ASP.NET has the ability to use server-side code that is actually part of the Web Form itself, or to use server-side code in a separate file called a code file. By checking the Place code in a separate file checkbox, you are choosing to use a separate code file for your ASP.NET code.
→ | For more information on using Master Pages, see “Using ASP.NET Master Pages and User Controls”, p. 549 (Chapter 30). |
Most ASP.NET pages are made up of a Web Form and server-side code. You can add server-side code to the Source View of the Web Form or in a separate code file. When code is embedded into the source of a Web Form, it’s referred to as inline code. When the code is in a separate code file, it’s referred to as code behind.
The code in Listing A.1 shows an example of inline server-side code added to the Web Form.
Example A.1. Inline ASP.NET Code
 1  <%@ Page Language="C#" %>
 2  <script runat="server">
 3      protected void Page_Load(object sender, EventArgs e)
 4      {
 5          Response.Write("Welcome to our Web site.");
 6      }
 7
 8  </script>
 9
10  <html xmlns="http://www.w3.org/1999/xhtml" >
11  <head runat="server">
12      <title>Welcome</title>
13  </head>
14  <body>
15      <form id="form1" runat="server">
16      <div>
17        <!— HTML Content for Page Here //—>
18  </div>
19      </form>
20  </body>
21  </html>
Notice that Line 2 in Listing A.1 is a <script> block with a runat attribute set to server. That designates this code as server-side ASP.NET code. When the page loads on the server (before it is ever seen by your Web site visitors), it will run the code in the server-side block. By the time a user sees your page in a browser, any server-side code has already executed.
Note
One thing that confuses both new and old ASP.NET developers is the page lifecycle. The page lifecycle begins as soon as a page is requested and ends just before the page is sent to the user’s Web browser. This means that after the user sees the page in the browser, the ASP.NET page lifecycle is over and all server-side code has completed execution.
The code in Listing A.2 is ASP.NET server-side code inside a code file.
Example A.2. ASP.NET Code Behind
1  using System;
2  public partial class Default : System.Web.UI.Page
3  {
4      protected void Page_Load(object sender, EventArgs e)
5      {
6          Response.Write("Welcome to our Web site.");
7      }
8  }
This code does the same thing as the code in Listing A.1 except it appears inside a separate code file. By default, the code file is named <page_name>.aspx.cs for C# and <page_name>.aspx.vb for VB. However, you can change this name to whatever you wish.
The Web Form and code file are connected via the CodeFile attribute that appears at the top of the Web Form. The following code connects a code file called Default.aspx.cs to a Web Form:
<%@ Page Language="C#" CodeFile="Default.aspx.cs" Inherits="Default" %>
Note
Notice that this code also specifies an Inherits attribute. I’m not going to go into the concept of inheritance in this book. Entire books have been written on that subject and you’re sure to find a good resource either in your local bookstore or online at www.InformIT.com.
When ASP.NET runs this page, it takes the code file and Web Form and combines them into one unit it can execute. This process is called compilation. In an ASP.NET application, the file that results from the compilation process is a DLL file, and it contains all the code necessary to execute the page.
Now that you are familiar with the two code models in ASP.NET 2.0, you might be wondering which you should choose. The main reason for separating the user interface defined in the Web Form from the code defined in the code file is so that the user interface can be developed separately from the code that implements functionality in the application. As a user of Expression Web, that’s likely to be the way that you will design ASP.NET applications. You’ll create the user interface elements and configure all of your styles in Expression Web and then use Visual Web Developer Express Edition to add code to make everything work. For that reason, using the code behind method is the best choice for Expression Web users, and it’s the model that we’ll use for the examples that follow.
In the past, Web developers using Microsoft tools such as FrontPage and Visual Studio .NET 2003 had to deal with learning a different skill set with each tool. Because Visual Web Developer Express Edition and Expression Web provide identical interfaces and methods for editing ASP.NET controls, that frustration has been eased considerably.
Figure A.6 shows an ASP.NET 2.0 CreateUserWizard control added to a page in Expression Web. Figure A.7 shows the exact same page opened in Visual Web Developer Express Edition. Notice that the interface is almost identical, and the way in which the control is configured is the same in both applications.


Figure A.7. The exact same page opened in Visual Web Developer Express Edition. Notice that the interface is almost identical to the Expression Web interface shown in Figure A.6.
The easiest way to learn to use Expression Web with Visual Web Developer Express Edition is to create a sample Web site. We’re not going to create a full-featured site by any means, but the techniques you’ll learn here will be sufficient to kickstart you into ASP.NET development.
Tip
If you prefer to learn by working with existing Web sites instead of starting from scratch, Microsoft provides an assortment of existing Web applications called Starter Kits that you can download for use in Visual Web Developer Express Edition. You can download them from http://msdn.microsoft.com/vstudio/express/vwd/starterkit/default.aspx.
We’ll create a file-based Web site and we’ll use the ASP.NET Development Server for testing. Both Expression Web and Visual Web Developer Express Edition support the use of the ASP.NET Development Server when developing against a file-based site, and by using it instead of IIS, we’ll avoid any possible configuration issues that may prevent you from working through the sample.
→ | For more information on using the ASP.NET Development Server, see “Using the ASP.NET Development Server”, p. 485 (Chapter 27). |
We’ll create an ASP.NET Web site in Visual Web Developer Express Edition. (That will allow us to specify the language that will be used for our ASP.NET code that we’ll add later.) We will then create the interface and apply the look and feel of the site using Expression Web. After the look and feel is to our liking, we’ll finish up by adding some ASP.NET code in Visual Web Developer Express Edition to add functionality to the page.
Create a new ASP.NET Web site in Visual Web Developer Express Edition by selecting File, New Web Site. Select the language of your choice. (Code samples I’ll provide later will be in both C# and VB for your convenience.) Now let’s add some ASP.NET server controls to the home page using Expression Web.
Open Expression Web.
Select File, Open Site and open the Web site you created in Visual Web Developer Express Edition.
Double-click on
Default.aspxto open it in the designer.Make sure you are in Design view and enter the text “
Please enter your first name:” at the top of the page.Press the Spacebar a couple of times.
Locate the
TextBoxcontrol in the Standard ASP.NET Controls section of the toolbox.Drag the
TextBoxcontrol onto the page to the right of where you entered text.Make sure that the
TextBoxcontrol is selected.Locate the ID property for the
TextBoxcontrol in the Tag Properties task pane.Change the ID of the
TextBoxcontrol totxtName.Place the cursor at the right of the
TextBoxcontrol and press Enter to create a new line.Enter the text “
Choose a car type:” on the new line.Insert a new ASP.NET
DropDownListcontrol next to the text you entered.Locate the ID property for the
DropDownListcontrol in the Tag Properties task pane.Change the ID of the
DropDownListtoddlCar.Click the
Edit Itemslink in the Common DropDownList Tasks popup, as shown in Figure A.8.Click the
Addbutton in the ListItem Collection Editor.Change the
Selectedproperty toTrue.Enter “
Choose a car” in theTextproperty.Enter
0in theValueproperty. The ListItem Collection Editor should now look like Figure A.9.Click Add in the ListItem Collection Editor.
Enter “
Toyota Highlander Hybrid” for theTextproperty.Enter
1for theValueproperty.Click Add again in the ListItem Collection Editor.
Enter “
Chevrolet Tahoe” for theTextproperty.Enter
2for theValueproperty.Click Add again in the ListItem Collection Editor.
Enter “
Mini Cooper” for theTextproperty.Enter
3for theValueproperty.Click
OKin the ListItem Collection Editor.

Before we finish this page, you need to understand how ASP.NET pages are designed to work. In almost all cases, a page will post back to itself. That means when you submit a form on a page, that same page consumes all the form’s data, processes it, and then presents the user with the result. This is a departure from what most Web developers are used to. Most developers are used to posting form data from one page to a different page.
Note
ASP.NET 2.0 added the ability to post form data from one ASP.NET page to a different ASP.NET page. However, for this example, we will use a single page to keep things simple.
We now need to add a Submit button to the form. We also need to add a control that will display the results of processing the ASP.NET server-side code. The final page will display an appropriate message based on the car the user selected in the DropDownList control. We’ll use an ASP.NET Label control to display that message.
Place the cursor at the right of the
DropDownListcontrol and press Enter to insert a new line.Add a new ASP.NET
Buttoncontrol to the page.Locate the
Textproperty of theButtoncontrol in the Tag Properties task pane.Change the
Textproperty of theButtoncontrol to “Give Auto Feedback”.Place the cursor at the right of the
Buttoncontrol and press Enter to insert a new line.Add a new ASP.NET
Labelcontrol to the page.Change the
IDproperty of theLabelcontrol tolblFeedback.Clear the
Textproperty of theLabelcontrol.
Your page should now look like Figure A.10.
Because we cleared the Text property of the Label control, nothing will display there until we set the Text property. Here’s how we want this page to work:
When a user browses the page, he or she will enter their first name in the textbox. The user will then select a car from the dropdown and click the Give Auto Feedback button. Based on which car was chosen, an appropriate message will be displayed to the user in the Label control.
ASP.NET is an event-based environment. Code is run on the server side based on events that take place during the lifetime of the Web Form. Some of these events take place every time the page is loaded. Other events only occur when certain conditions are met. For example, when the Button control on our Web Form is clicked, a Click event happens for the button. We’ll use that Click event to run the code that determines which car was clicked and display a message based on that choice.
If the Web site is still open in Visual Web Developer Express Edition, refresh the Default.aspx page by selecting View, Refresh. Otherwise, follow the steps below to see the changes made to Default.aspx.
Select File, Open Web Site from the Visual Web Developer Express Edition menu.
Browse to the location for the Web site, select the Web site folder, and click
OK.Double-click on
Default.aspxin Solution Explorer, as shown in Figure A.11.If
Default.aspxopens in Source View, click theDesignbutton, as shown in Figure A.11, to switch to Design View.

Notice that the page looks exactly the same in Visual Web Developer Express Edition and Expression Web. This is one of the strengths of using these two products together. You’ll write your ASP.NET code in Visual Web Developer Express Edition, but either application can be used for designing the interface and setting properties on controls.
Now we’re ready to add some ASP.NET code. Remember that we said before that we would write some code that runs when the button on the Web Form is clicked. Therefore, we want to write code in the Click event of the button. To write code that runs when a particular event occurs, the code has to be connected to the event.
The process of connecting code to a particular event is referred to as “hooking” the event. A detailed discussion of this is beyond the scope of this book, but fortunately, it’s not necessary for you to understand the particulars of this topic. Visual Web Developer Express Edition can do the work for you.
Tip
When you choose to place the code in a separate file, Visual Web Developer Express Edition displays the code file and Web Form together in Solution Explorer. If you click the plus sign next to the Web Form, you’ll see the code file.
Open the Default.aspx page. (If you’re not already in Design View, click the Design button to switch to Design View.) To add new code that will handle the Click event of the button, simply double-click on the Give Auto Feedback button. Visual Web Developer Express Edition will automatically add the code to handle the Click event to the code file.
Note
If the code for the Click event doesn’t get added automatically when you double-click on the button, see “Click Event Not Added” in the “Troubleshooting” section of this chapter.
Listing A.3 shows the code for the Web Form in VB and Listing A.4 shows the code in C#.
Example A.3. VB Code
1 Partial Class Default2 2 Inherits System.Web.UI.Page 3 4 Protected Sub button1_Click(ByVal sender As Object, ByVal e As System.EventArgs)Handles button1.Click 5 6 End Sub 7 End Class
Example A.4. C# Code
 1  public partial class _Default : System.Web.UI.Page
 2  {
 3      protected void Page_Load(object sender, EventArgs e)
 4      {
 5
 6      }
 7
 8      protected void button1_Click(object sender, EventArgs e)
 9      {
10
11      }
12  }
Note that I’ve omitted the using statements that appear at the top of the C# code file for the sake of clarity.
We will now add some code to the Click event of the button. Our code will change the text that is displayed in the Label control called lblFeedback. If you’re using VB, you will add the code at Line 5 in Listing A.3. C# developers will add the code at Line 10 in Listing A.4.
Listing A.5 shows the VB code for the Click event with the new code added. Listing A.6 shows the C# code for the Click event with the new code added.
Example A.5. VB Code
1 Protected Sub button1_Click(ByVal sender As Object, ByVal e As System.EventArgs)
Example A.6. C# Code
1  protected void button1_Click(object sender, EventArgs e)
2  {
3     string strFeedback;
4    strFeedback = "You chose " + ddlCar.SelectedItem.Text + ". Nice car, " + txtName.Text
 + "!";
5    lblFeedback.Text = strFeedback;
6  }
Note
Notice that Visual Web Developer Express Edition provides IntelliSense and color-coding while you enter code. It will also check your code while you enter it and will highlight any coding errors for you.
The code you’ve added here is simple, and you should be able to understand it even if you’re new to ASP.NET 2.0. The code displays a message to the user letting him or her know which car was chosen. It also adds a personal touch, using the name the user entered in the txtName TextBox control.
Go ahead and browse the page now and test it out. Figure A.12 shows my page in the browser after making my car choice.

Some of you may have noticed a couple of bugs in the page. First of all, it’s possible for a user to choose a car and click the button without entering a name. The second bug allows the user to click the button without selecting a car first. If you load the page and immediately click the button, the message you see will say, “You chose Choose a car. Nice car, !” This is obviously not what we intended.
The easiest way to correct these bugs is to simply add a couple of validation controls to the Web Form. It’s not necessary to switch back to Expression Web to do this. You can easily add the controls in Visual Web Developer Express Edition using the same skills you’ve already learned for adding validation controls in Expression Web.
→ | For details on using ASP.NET validation, see “Implementing Form Validation Using ASP.NET”, p. 595 (Chapter 32). |
Open
Default.aspxin Design View in Visual Web Developer Express Edition.Place the cursor just to the right of the
txtNametextbox and press the Spacebar once.Expand the Validation section in the Toolbox. The Toolbox in Visual Web Developer Express Edition is along the left edge of the application.
Double-click on the
RequiredFieldValidatorcontrol to add it to your page.In the Properties pane on the right side of Visual Web Developer Express Edition, change the
ControlToValidateproperty totxtName.Change the
ErrorMessageproperty to “Please enter your name”.Place the cursor just to the right of the
ddlCar DropDownListcontrol and press the Spacebar once.Double-click the
RangeValidatorcontrol to add it to your page.In the Properties pane, change the
ControlToValidateproperty toddlCar.Change the
MaximumValueproperty to3. This is the largest value that was entered when you added the items to the dropdown list earlier.Change the
MinimumValueproperty to1.Change the
ErrorMessageproperty to “Please select a car”.Save the page.
The RequiredFieldValidator you added will require the user to enter a name before he or she submits the form. The RangeValidator will only allow the form to successfully submit if the value for the DropDownList control is between 1 and 3.
Remember that we added four items to the DropDownList control when we created this page. The first item says “Choose a car” and the value that we entered for that item was 0. Therefore, the RangeValidator control will not allow a user to submit the form if he or she hasn’t chosen a car from the dropdown because the value for the DropDownList control will fall outside the range allowed by the RangeValidator control.
→ | For more information on using ASP.NET 2.0 validation controls, see “Implementing Form Validation Using ASP.NET”, p. 595 (Chapter 32). |
Test the page again. Try submitting the form before filling in your name or choosing a car. The validation controls we’ve added will prevent you from submitting the form unless it has been properly completed.
By taking advantage of the strengths of both Expression Web and Visual Web Developer Express Edition, you can easily create powerful ASP.NET applications. Best of all, you can do so after actually purchasing only one application because Visual Web Developer Express Edition is provided by Microsoft free of charge.
If you found the information presented in this appendix interesting, I encourage you to go pick up a good book on ASP.NET 2.0 and start learning how to take advantage of the more advanced features it offers. The only way to truly learn how to develop against a particular platform is to actually write code. The skills you’ve learned here will give you a good start to a fulfilling experience developing ASP.NET applications.
I’ve chosen File, New File from the menu in Visual Web Developer Express Edition, but I don’t see the Add New Item dialog. Instead, I see a New File dialog with a lot fewer options. What’s going on?
The Add New Item dialog is only available if you have a Web site open in Visual Web Developer Express Edition. Make sure that you have a Web site open before selecting File, New File in Visual Web Developer Express Edition.
I’ve double-clicked the Button control in Design View, but Visual Web Developer Express Edition hasn’t added any code to my code file. It does show me the code, but there is no new code added.
This usually indicates a permissions problem. Make sure you have full permissions on the directories that contain the Web site’s content.
If you’re an administrator on the computer, you should already have full permissions. However, if you’re not, you’ll need to have an administrator change the permissions for you.
In a perfect world, you would write ASP.NET code and it would work perfectly the first time. In the real world, things often don’t work out quite the way they’re supposed to.
When bugs turn up, you’ll need to debug your code to find out exactly what went wrong. In the most general sense, debugging is the practice of connecting to a particular process running on a computer and looking into the internal workings of that process.
Before you start debugging, you’ll want to place one or more breakpoints into your code. A breakpoint is a position at which code execution will stop. When the debugger sees a breakpoint, it will stop and highlight the line of code on which the breakpoint exists. You can then use the debugging tools to examine the state of the application. You can also step through code line by line to check for bugs.
To set a breakpoint in Visual Web Developer Express Edition, place the cursor on the line where you want the breakpoint to appear and press F9. You’ll see a red dot appear in the left margin of the page at that point. If you want to test this out, place a breakpoint on the Click event for your Button control.
To debug ASP.NET code in Visual Web Developer Express Edition, you simply select Debug, Start Debugging from the menu. Alternatively, you can press the F5 key. When you first start debugging, Visual Web Developer Express Edition will inform you that debugging is not enabled by displaying a dialog asking you to add a configuration file to enable debugging, as shown in Figure A.13.

Make sure that the Add a new Web.config file with debugging enabled option is selected and click OK in the Debugging Not Enabled dialog to enable debugging.
Notice that Visual Web Developer Express Edition warns you that debugging should not be enabled on a production Web site. If you open the Web.Config file that Visual Web Developer Express Edition creates when you first debug an application, you’ll see debugging enabled in the following line of code:
<compilation debug="true"/>
Before you publish this Web site to a remote Web server, you’ll want to change that line to disable debugging. You do that by changing the line to the following:
<compilation debug="false"/>
Tip
For details on the detrimental effects of leaving debugging enabled on a production Web site, read my blog post at http://blogs.msdn.com/jamesche/archive/2005/12/20/506195.aspx.
Visual Web Developer Express Edition automatically debugs the first page added to the application by default. If it starts up the wrong page for you, you can simply right-click on the page you want to debug inside Solution Explorer and choose Set As Start Page from the menu.
If you’re working along with the examples in this book, you should now see Default.aspx loaded in the browser. If you set a breakpoint on the Click event of the button earlier, you’ll be able to hit that breakpoint by clicking the button. Fill in your name, select a car, and click the button. You should see Visual Web Developer Express Edition stop on the Click event. It will highlight the line on which it has stopped and display an arrow in the left margin pointing to the current line of code, as shown in Figure A.14.
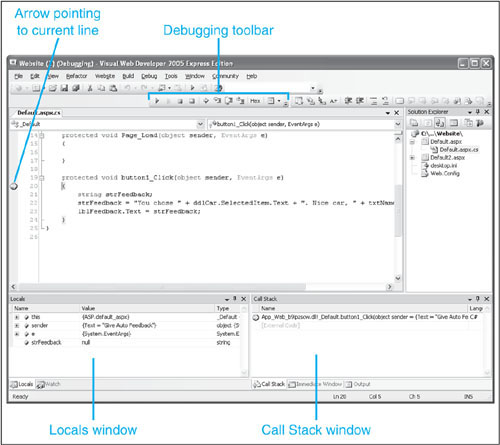
At this point, you can take many different approaches. You can use the Debugging Toolbar shown in Figure A.14 to step through the code. You can also use the Locals Window shown in Figure A.14 to look at the value of any local variables. As you step though the code, this window will update automatically.
There are many other debugging tools available in Visual Web Developer Express Edition. Many of them are accessible from the Debug menu. For a full description of debugging and other features of Visual Web Developer Express Edition, see Microsoft’s excellent documentation at http://msdn.microsoft.com/vstudio/express/vwd/learning/default.aspx.