The task of developing the Spring MVC application is incomplete without packaging, deploying, and using it. In this recipe, we will look at how a Roo-generated Spring Web MVC application is packaged, deployed, and run.
Delete the contents of ch04-recipe sub-directory inside the C:
oo-cookbook directory.
Copy the ch04_web-app.roo script into the ch04-recipe directory.
The Execute the ch04_web-app.roo script that creates the flight-app Roo project, sets up Hibernate as the persistence provider, configures MySQL as the database for the application, creates Flight and FlightDescription JPA entities, and defines many-to-one relationships between the Flight and FlightDescription entities. If you are using a different database than MySQL or your connection settings are different than what is specified in the script, then modify the script accordingly.
Start Roo shell from the C:
oo-cookbookch04-recipe directory.
For packaging, deploying, and using a Roo-generated Spring Web MVC application follow the given steps:
- Execute the
controllerallcommand to create controllers and views corresponding to JPA entities in theflight-appproject, as shown here:roo> controller all --package ~.web - Package the
flight-appweb application using theperformpackagecommand of Roo:roo> perform package - Executing the
performpackagecommand will create a WAR file namedflight-app-0.1.0.BUILD-SNAPSHOT.warin thetargetdirectory of yourflight-appproject. You can now deploy the WAR file to your application server. - If you want to directly run the
flight-appproject as a dynamic web application in an embedded Tomcat instance, then exit the Roo shell and execute the following maven command:..ch04-recipe> mvn tomcat:runNow, you can access the
flight-appapplication by accessing the following URL:http://localhost:8080/flight-appIf you see the following web page, then it means you have successfully deployed the
flight-appapplication on the embedded Tomcat instance: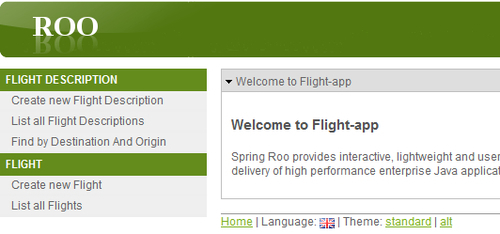
- Create a new Flight Description by selecting the Create new Flight Description option from the menu and entering values the for Origin, Destination, and Price into their relevant field, as shown in the following screenshot:

Save the entered Flight Description by clicking the Save button.
- Now, select Create new Flight option from the menu and select Departure Date and Arrival Date, as shown in the following screenshot:
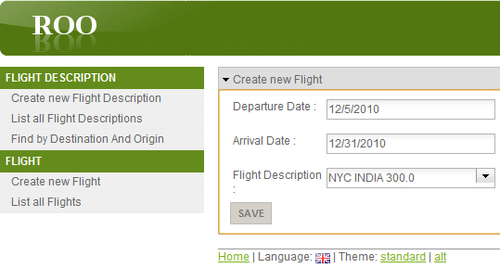
As the Departure Date and Arrival Date fields are date type fields, a popup calendar is shown to simplify entering dates for these fields. You may notice that the Flight Description field is a drop-down field, which shows all Flight Descriptions that you have created. Roo shows a drop-down of Flight Descriptions because there exists many-to-one relationships between
FlightandFlightDescriptionJPA entities.Now, save Flight details by clicking the Save button.
- You can view the newly created Flight Description and Flight details by clicking the List all Flight Descriptions and List all Flights menu options, respectively. You can also search for a Flight Description, based on origin and destination, by clicking the Find by Destination And Origin menu option. The Find by Destination And Origin option is available because we had defined a finder method (refer
ch04_web_app.rooscript) for ourFlightDescriptionJPA entity. - By default two themes are installed in the Roo-generated
flight-appapplication:standardandalt(represented by thestandard.propertiesandalt.propertiesfiles of theflight-appproject). The default theme of theFlight-appapplication isstandard. You can change the theme of theFlight-appapplication by selecting thealttheme, as shown in the following screenshot: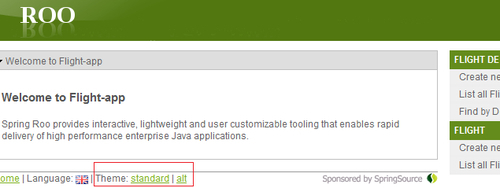
- As the screenshot shows, selecting the
alttheme moves menu options to the right and the main content of the page is moved to the left. As mentioned earlier, theme selected by a user is saved in the browser cookie; therefore, if you close the browser and reopen it, you will find that thealttheme is applied by default on the web pages of theFlight-appapplication.
The perform package command runs maven's package command, which does the packaging of the project. The project is packaged as a WAR file because the packaging (as per the <packaging> element the in pom.xml file) specified for the flight-app project is war. It is important to note that when the perform package command is executed, tests are not executed. It executes maven's package command and specifies that the tests are skipped, as shown here:
..ch04-recipe>mvn package -Dmaven.test.skip
As mentioned earlier, the perform command of Roo can be used to execute maven commands. You can execute maven's package command (and execute tests) from the Roo shell, as shown here:
.. roo> perform command --mavenCommand package
Tip
Don't run an embedded Tomcat instance from a Roo shell
You can run the flight-app project as a web application in the embedded Tomcat instance using Roo's perform command, but you should not do it because it will result in the creation of a different process, which you can't stop using CTRL-C and also you can't execute Roo commands from the Roo shell.
The flight-app project's pom.xml file configures Tomcat Maven Plugin (http://mojo.codehaus.org/tomcat-maven-plugin/index.html), which makes it possible to run the flight-app project as a dynamic web application in an embedded Tomcat instance. The following XML fragment shows the configuration of the Tomcat Maven Plugin:
<plugin>
   <groupId>org.codehaus.mojo</groupId>
   <artifactId>tomcat-maven-plugin</artifactId>
   <version>1.0</version>
</plugin>
You can configure the plugin to affect the behavior of the embedded Tomcat instance. For instance, if you want to change the default 8080 HTTP port to 8090, then you can do so by supplying the maven.tomcat.port system property when running the project on the Tomcat instance, as shown here:
..ch04-recipe> mvn tomcat:run –Dmaven.tomcat.port=8090
Roo also provides a perform assembly command, which executes an assembly goal of Maven Assembly Plugin
(http://maven.apache.org/plugins/maven-assembly-plugin/, configured in the pom.xml file of the Roo project). You should use the perform assembly command only if you want to distribute your project as an archive, such as ZIP, TAR, WAR, JAR, and so on. This distributable archive contains configuration files, project documentation, and runtime dependencies of the project.
The Roo configures the Jetty Maven Plugin
(http://docs.codehaus.org/display/JETTY/Maven+Jetty+Plugin) in the pom.xml file to support running the Roo project as a web application in an embedded Jetty container. To run the flight-app project in an embedded Jetty container, all you need to do is to execute the jetty:run goal of the plugin from the directory containing your project's pom.xml file:
..ch04-recipe> mvn jetty:run
If you want to change the default 8080 HTTP port to 8090 on which the Jetty container listens for HTTP requests, then you can configure it by specifying the jetty.port system property, as shown here:
..ch04-recipe> mvn jetty:run –Djetty.port=8090
- Refer to the Modifying Roo-generated views recipe for details about the JSPX views generated by Roo and how you can customize its layout.
- Refer to the Adding or modifying themes generated by Roo recipe to see how you can customize default themes installed by Roo and how to add new themes to the Roo-generated web application
- Refer to the Internationalizing Roo-generated web applications recipe, for the internationalization support that Spring Roo provides