In most application scenarios, you'd like to modify the layout of the views generated by Roo or to change the placement of different form elements or add new form elements to the view. In this recipe, we will look at how you can modify the home page of the flight-app application.
The following screenshot shows the modified home page of the flight-app application:
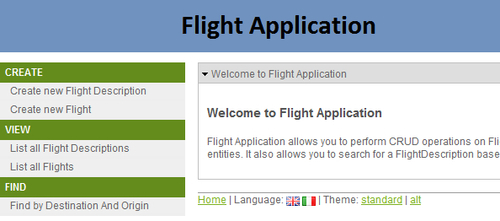
The following are the modifications that we'll be doing to the Roo-generated flight-app application to display the home page, as shown in the given screenshot:
- Change the home page of the web application to show the name of the application as
FlightApplication - Change the home page of the web application to describe the flight Application in detail, instead of the benefits of Roo.
- Change the banner image that shows up at the top of every web page
- Change the categorization of the menu to show the Create new Flight Description and Create new Flight options under the CREATE category, the List all Flight Descriptions and the List all Flights under the VIEW category, and the Find by Destination and Origin under the FIND category.
Delete the contents of the ch04-recipe sub-directory inside the C:
oo-cookbook directory.
Copy the ch04_web-app.roo script into the ch04-recipe directory.
Execute the ch04_web-app.roo script that creates the flight-app Roo project, sets up Hibernate as the persistence provider, configures MySQL as the database for the application, creates Flight and FlightDescription JPA entities and defines many-to-one relationships between the Flight and FlightDescription entities. If you are using a different database than MySQL or your connection settings are different than what is specified in the script, then modify the script accordingly.
Start the Roo shell from the C:
oo-cookbookch04-recipe directory.
Execute the controller all command to create controllers and views corresponding to the JPA entities in the flight-app project, as shown here:
.. roo> controller all --package ~.web
As many dependencies are added to the pom.xml file of the flight-app project during the processing of the controller all command, execute the perform eclipse command of Roo to update the .classpath file of the eclipse project.
.. roo> perform eclipse
Now, import the project into your Eclipse IDE.
To modify Roo-generated views follow the steps given here:
- Open the
SRC_MAIN_WEBAPPWEB-INFi18napplication.propertiesand modify the value of theapplication_nameproperty fromFlight-ApptoFlightApplication, as shown here:application_name=Flight Application
Now, add the following properties to the
application.propertiesfile:menu_category_create_label=Create menu_category_view_label=View menu_category_find_label=Find
- Open the
SRC_MAIN_WEBAPPWEB-INFviewsmenu.jspxfile and perform the following changes:- Add a new
<menu:category>tag (inside the<menu:menu>tag) with thec_createas theidattribute value, as shown here:<menu:category id="c_create"></menu:category> - Move the
<menu:item>with theidattribute valuesi_flightdescription_newandi_flight_newinside the newly added<menu:category>tag, as shown here:<menu:item id="i_flightdescription_new" messageCode="global_menu_new" url="/flightdescriptions?form" z="DFDc4F2kZR5ysns4ZeMk5pr3E84=" /> <menu:item id="i_flight_new" messageCode="global_menu_new" url="/flights?form" z="opwPKDFqpdHotAZ0M/SeEslICC4=" />
- Add a new
<menu:category>tag withc_viewas theidattribute value as shown here:<menu:category id="c_view"></menu:category> - Move
<menu:item>with theidattribute valuesi_flightdescription_listandi_flight_listinside the newly added<menu:category>tag, as shown here:<menu:item id="i_flightdescription_list" messageCode="global_menu_list" url="/flightdescriptions?...." z="cvk+gcfsrOjH0bM6HiDsKdYX2gY=" /> <menu:item id="i_flight_list" messageCode="global_menu_list" url="/flights?...." z="sxdeS3ThjFWc2xKcFfdI4iiZms4=" />
- Add a new
<menu:category>tag withc_findas theidattribute value, as shown here:<menu:category id="c_find"></menu:category> - Move
<menu:item>with theidattribute valuefi_flightdescription_destinationandorigininside the newly added<menu:category>tag, as shown here:<menu:item id="fi_flightdescription_destinationandorigin" messageCode="global_menu_find" url="/flightdescriptions?find=...." z="SiTmEGC8Kg6mdn8j47EUsKdsOn4=" /> - Add a new attribute
renderand set its value tofalsefor existing<menu:category>tags with theidattribute valuesc_flightdescriptionandc_flight, as shown here:<menu:category id="c_flightdescription" z=".." render= "false"/> <menu:category id="c_flight" z=".." render="false"/>
- Add a new
- Open the
SRC_MAIN_WEBAPPWEB-INFi18nmessages.propertiesand modify thewelcome_textproperty value, as shown here:welcome_text=Flight Application allows you to perform CRUD operations on Flight and FlightDescription JPA entities. It also allows you to search for a FlightDescription based on origin and destination.
- Copy
banner-graphic.png(from the files that accompany this chapter) to theSRC_MAIN_WEBAPPimagesdirectory. - As of Spring Roo 1.1.5, changes to the JSPX files are not actively monitored by the Roo shell; therefore, restart the Roo shell. You will now find the value of the
zattribute of the<menu:category>tags with idsc_flightdescriptionandc_flightis changed touser-managed.
Roo-generated web application makes use of the messages.properties
and the application.properties
resource bundles to support internationalization of the web user interface. The application.properties file contains labels for menu and form fields that are displayed on various web pages of the Roo-generated web application. The labels contained in the application.properties file are derived from the name of JPA entities and their fields. Also, the name of the web application, as displayed on the home page of the application, is contained in the application.properties file. The messages.properties contains generic messages which are applicable to all Roo-generated web applications and are not specific to a single web application. For instance, labels for the Save button and Reset button are specified in the messages.properties file. Refer to the Internationalizing Roo-generated web applications recipe for details on how you can use these property files to internationalize or localize Roo-generated Spring Web MVC applications.
Not all files generated by Roo are managed by Roo when changes occur in your JPA entities. For instance, the application.properties file is modified by Roo only when you add new JPA entities to your domain model or add new fields to them. Removing a field or a JPA entity will not automatically remove the label properties corresponding to the field or the JPA entity from the application.properties file. But modifying the name of a field in a JPA entity will result in adding new properties to the application.properties file. As Roo never tries to manage existing label properties defined in the application.properties file, you can safely change them. The messages.properties file contains generic labels; therefore, it is never managed by Roo once it is generated.
The menu.jspx file and the JSPX files contained inside the WEB-INF/views folder is managed by Spring Roo. If you add, modify, or delete fields from JPA entities, then Roo is responsible for updating the corresponding JSPX views (inside the WEB-INF/views) to reflect the change. The menu.jspx file is managed by Roo to ensure that when new Spring Web MVC controllers are created or finder methods are added to a JPA entity for which a controller already exists, additional menu options are added to menu.jspx.
Let's now look at how we achieved the modified home page based on the actions that we performed on the Roo-generated flight-app project:
To change the application name and welcome text, we first need to find the JSPX view, which shows the home page of the web application and then find the property in the application.properties file, which is used by the JSPX view to show the application name and welcome text. Alternatively, you can look at the property keys of the labels that you want to change in the application.properties file, followed by using your IDE to search for JSPX files, which make use of those property keys.
Let's first find the JSPX view that shows the home page of the flight-app application. In the webmvc-config.xml file, the following <view-controller> element suggests that when the request is received at the web application root /, then the view name is index:
<mvc:view-controller path="/" view-name="index"/>
Now, the following UrlBasedViewResolver in webmvc-config.xml suggests that we need to find the tile definition named index in the tiles definitions XML file to find the view:
<bean class="org.springframework.web.servlet.view.
     UrlBasedViewResolver" id="tilesViewResolver">
   <property name="viewClass"
      value="org.springframework.web.servlet.view.
           tiles2.TilesView"/>
</bean>
The following TilesConfigurer configuration in webmvc-config.xml suggests where to look for tiles definitions XML to find tiles definition named index:
<bean class="org.springframework.web.servlet.view.
    tiles2.TilesConfigurer" id="tilesConfigurer">
    <property name="definitions">
      <list>
        <value>/WEB-INF/layouts/layouts.xml</value>
        <value>/WEB-INF/views/**/views.xml</value>
      </list>
    </property>
</bean>
A quick scan of XML configuration files specified by TilesConfigurer shows that the index tiles definition is defined in the SRC_MAIN_WEBAPP/WEB-INF/views/views.xml file, as shown here:
<definition name="index" extends="default">
  <put-attribute name="body"
      value="/WEB-INF/views/index.jspx" />
</definition>
As we'll see in the Adding static views to Roo-generated web application recipe, the <put-attribute> element refers to the JSPX file responsible for showing the main content (which excludes the header, footer, and menu) of the page. So, the /WEB-INF/views/index.jspx is the file, which shows the home page of the flight-app application.
The following code shows the contents of the index.jspx file:
<div xmlns:spring="http://www.springframework.org/tags"
    xmlns:util="urn:jsptagdir:/WEB-INF/tags/util" .. >

  <spring:message var="app_name" code="application_name" .../>
  <spring:message var="title"
     code="welcome_titlepane" arguments="${app_name}" .../>

  <util:panel id="title" title="${title}">
    <h3>
      <spring:message code="welcome_h3"
          arguments="${app_name}" />
    </h3>
    <p>
      <spring:message code="welcome_text" />
    </p>
  </util:panel>
</div>
The <message> tag of Spring's tag library retrieves messages and labels from the resource bundle, which are Roo-generated application.properties and messages.properties files in case of the flight-app application. The code attribute identifies the property key whose value needs to be obtained from the resource bundle. The var attribute identifies the variable to which the returned property value is assigned. The arguments attribute specifies the arguments that need to be passed to the <message> tag, which are typically used by the <message> tag implementation to fill placeholders specified in the message or label retrieved from the resource bundle.
The <panel> tag is one of the custom tags installed by Roo when the controller all command was executed. The <panel> tag is used to show a collapsible panel. To see the implementation of the <panel> tag, refer to the /WEB-INF/tags/util/panel.tagx file.
The following table shows the properties file in which the messages and labels, as specified by the <message> tags in the index.jspx file, are located and their value:
|
Code |
Property value |
|---|---|
|
|
Defined in Value: |
|
|
Defined in Value: |
|
|
Defined in Value: |
|
|
Defined in Value: |
The {0} in the value of the welcome_titlepane and the welcome_h3 represents a placeholder, which is filled by the value specified in the arguments attribute of the <message> element.
The given table shows that if we change the application_name property, then it will change the application name as shown on the home page. And if we change the welcome_text property, then it will change the default welcome text.
The menu.jspx file shows the menu options in the Roo web application. The following table describes the tags that make up the menu.jspx file:
|
Tags |
Description |
|---|---|
|
|
The |
|
|
The |
|
|
The |
The following attributes are applicable to all the tags installed by Spring Roo (which includes the <menu>, <item>, and <category> tags for menu):
id: Theidattribute is used by Roo to check existence of elements in JSPX files. For Roo-generated views, the value of theidattribute is derived from the JPA entity name and field names. For example, the menu item Create new Flight Description, created by the<menu:item>element, has theidattribute valuei_flightdescription_new, and is derived from the name of theFlightDescriptionJPA entity. If you remove the<menu:item>element withidi_flightdescription_new, then Roo finds out that the element has been removed and adds it to the JSPX file again.In some cases, the value of the
idattribute is also used by tag implementations to determine the message or label that should be used in the implementation of a tag. For example, if themessageCodeattribute is not specified,i_flightdescription_newidof the<menu:item>element is used by theitem.tagximplementation to find the label associated with the menu item.render: Therenderattribute specifies whether the contents of the tag should be rendered or not. By default, the value of therenderattribute istrue, that is, the contents of the tag, including enclosing tags, should be rendered. Set the value tofalse, if you don't want the contents of the tag and its enclosing tags to be rendered.z: Thezattribute is used internally by Spring Roo to check if the developer has made any modifications to the tag. It is this,zattribute that allows Roo to perform round tripping. The value of thezattribute represents a hash key for a tag used in the JSPX file and is calculated based on the tag name, attributes present in the tag, and their values. Thezattribute is never used in the calculation of the hash key. Also, the order in which the attributes are specified in the tag is not considered for the hash key calculation.- If you make any modification to a tag (by adding attributes, modifying attribute values, or deleting an attribute), then Roo finds this out because the hash key of the tag now will not match with the Roo calculated hash key for the tag. In case of a mismatch, Roo simply sets the value of
ztouser-managed.
Let's consider the following element in menu.jspx to understand the relevance of the z attribute:
<menu:item id="i_flightdescription_new"
  messageCode="global_menu_new"
  url="/flightdescriptions?form"
  z="DFDc4F2kZR5ysns4ZeMk5pr3E84="/>
The given <item> element shows a menu option labelled Create new Flight Description. The url attribute of the <item> tag identifies the web controller responsible for handling the web request when the Create new Flight Description menu option is clicked. As the url attribute value is /flightdescriptions?form and it matches the value of the @RequestMapping class-level annotation of the FlightDescriptionController (refer to the FlightDescriptionController.java file), the FlightDescriptionController handles the request when the Create new Flight Description menu option is clicked. If you change the url attribute (and the corresponding @RequestMapping class-level annotation in the FlightController.java) to, let's say, /fds?form, then Roo will automatically update the <item> element's z attribute value to user-managed, which means Roo no longer manages this element. Later in this recipe, we will look at how you can switch an element back to the Roo-managed mode from the user-managed mode.
Let's consider the /WEB-INF/views/flights/create.jspx view, which shows the form for creating the Flight entities. The following code shows the content of create.jspx:
<div xmlns:field="urn:jsptagdir:/WEB-INF/tags/form/fields" xmlns:form="urn:jsptagdir:/WEB-INF/tags/form" xmlns:jsp="http://java.sun.com/JSP/Page" xmlns:spring="http://www.springframework.org/tags" ..>

   <form:create id="fc_sample_roo_flightapp_domain_Flight"
       modelAttribute="flight"
       path="/flights" render="${empty dependencies}"
       z="/JE8B/QGFrFLKszYDOjyDJjnTPc=">
      <field:datetime
         dateTimePattern="${flight_departuredate_date_format}"
         field="departureDate"
         id="c_sample_roo_flightapp_domain_Flight_departureDate"
         z="BtcAuQvStTt55J3J6zFybfhkSxA="/>
     ....
      <field:select field="flightDescription"
         id=".." itemValue="flightDescId"
         items="${flightdescriptions}"
         path="/flightdescriptions" required="true"
         z="MPt8rEJwJ7fZPqUZPDn6K7+A8OE="/>
   </form:create>
   ....
</div>
A couple of interesting things to notice about the create.jspx file generated by Roo are as follows:
- The
<create>custom tag (refer to/WEB-INF/tags/form/create.tagx) is used for creating an HTML form. If you look at thecreate.tagxfile, you will find that it makes use of Spring'sformtag library to create a form. Therenderattribute specifies that the form should not be rendered if there are certain dependencies that we need to create before creating theFlightentity. Soon we will see from where thedependenciesvariable is coming from. - The
<datetime>custom tag (refer to/WEB-INF/tags/form/fields/datatime.tagx) is used to create a text field for entering departure the date of the flight. Thefieldattribute identifies theFlightJPA entity's field for which the text field has been created. The text field is associated with adijit(Dojo's UI JavaScript library) date calendar to simplify entering a date into the field. - The
<select>custom tag (refer to/WEB-INF/tags/form/fields/select.tagx) is used to create a drop-down box for selecting the flight description associated with the flight that we are about to create. Again, thefieldattribute identifies theFlightJPA entity's field for which the drop-down box has been created. Therequiredattribute specifies whether or not it is mandatory to select a flight description for creating aFlightentity. As the value of therequiredattribute istrue, you must select a flight description from the drop-down to create theFlightentity.
As we can see, Roo intelligently decided that the <datetime> tag should be used for creating fields corresponding to the Date type, such as the departureDate field of the Flight entity. Roo also interpreted the @ManyToOne relationship between the Flight and FlightDescription JPA entities and created a drop-down box (using the <select> tag) for selecting flight descriptions. As the @ManyToOne relationship between the Flight and FlightDescription entities is also annotated with @NotNull (JSR-303 annotation), Roo translates that dependency on the user interface side by setting the required attribute to true for the <select> tag.
Now, let's look at how the dependencies variable is used by the <create> tag to decide whether to render the create Flight form or not. One of the things that you will notice when you go about creating a Flight entity is that it will ask you to first create FlightDescription, as shown in the following screenshot:
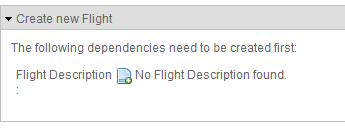
As shown in the screenshot, instead of displaying the Create new Flight form, the web application displays a note saying that we need to first create flight descriptions. The decision to show the note is taken by the dependencies variable, as shown again here:
<form:create id="fc_sample_roo_flightapp_domain_Flight"
       modelAttribute="flight"
       path="/flights" render="${empty dependencies}"
...
The dependencies variable is added to the request by the FlightController. The FlightController identifies the dependencies of the Flight JPA entity based on the relationships in which it participates. As the Flight entity has a not null many-to-one relationship with the FlightDescription entity, the FlightController adds it as a dependency in the dependencies variable, as shown here in the contents of the FlightController_Roo_Controller.aj file:
@RequestMapping(params = "form", method = RequestMethod.GET)
   public String FlightController.createForm(Model model)
   {
      model.addAttribute("flight", new Flight());
      addDateTimeFormatPatterns(model);
      List dependencies = new ArrayList();
      if (FlightDescription.countFlightDescriptions() == 0)
      {
         dependencies.add(new String[]{"flightDescription",
            "flightdescriptions"});
      }
      model.addAttribute("dependencies", dependencies);
      return "flights/create";
   }
The createForm method is responsible for rendering the form for creating the Flight entity instances. The given code shows that if no FlightDescription entity instances are found, the createForm method adds a String[] to the dependencies model attribute. The dependencies attribute contains the dependencies, which are not currently available for creating the Flight instances. The form for creating Flight entities is rendered only if the dependencies attribute is empty, something which we have already seen.
We saw earlier that we can switch an element in the JSPX file from the Roo-managed mode to the user-managed mode. In some scenarios, you may want to switch back from theuser-managed mode to the Roo-managed mode. Let's look at how we can do so:
We saw that Spring Roo does a lot of heavy lifting to create the user interface of the web application. This includes creating JSPX files, installing custom tags, creating Spring Web MVC controllers, creating web application context XML file, creating the web application deployment descriptor, creating tiles definitions, installing themes, and so on. We also saw that the value of the required attribute of the <select> tag for showing flight descriptions was set to true because the Flight JPA entity participates in a not null many-to-one relationship with the FlightDescription entity.
Let's assume that we want the text field of the departureDate field also to be mandatory to create the Flight entity. You have the option to annotate the departureDate field of the Flight JPA entity with @NotNull JSR-303 annotation and let Roo take care of setting the required attribute's value to true for the departureDate text field. Let's further assume that we don't want to make any changes to the Flight entity and a date must be entered in the departureDate field when creating the Flight entity from the user interface. We can do this by simply setting the required attribute's value to true, as shown here:
<field:datetime
   dateTimePattern="${flight_departuredate_date_format}"
   field="departureDate" required="true"
   id="c_sample_roo_flightapp_domain_Flight_departureDate"
        z="BtcAuQvStTt55J3J6zFybfhkSxA="/>
As we have changed the default value of the required attribute from false to true, we have effectively modified the element; therefore, Roo will go ahead and set the value of the z attribute to user-managed. A user-managed element in Spring Roo doesn't participate in round tripping; therefore, if you make any modifications to the departureDate field of the Flight entity, then Roo will not make any corresponding modifications to the departureDate element in the create.jspx file. For instance, if you remove the departureDate field from the Flight entity, then Roo will not remove the departureDate element from create.jspx. If you want your modified form element to be Roo-managed again, all you need to do is set the value of the z attribute to ?. The value of ? instructs Roo to re-calculate the value of the z attribute based on the current attributes and their values, making it possible for Roo to figure out if changes happen to the form element in the future.
As we just discussed, you can take control of Roo-managed form elements in JSPX views by adding or modifying one or more attributes. It is recommended that after you make changes to a form element, revert back to the Roo-managed mode by setting the value of the z attribute to ?. In Roo-managed mode any modification to the JPA entities is taken care of by Roo, saving the effort to make adjustments to the views.
- Refer to the Round-tripping support in Spring Roo for web controllers and views recipe to see examples of round tripping support in Roo
- Refer to the Adding static views to Roo-generated web application recipe to find out how you can add your custom web pages to Roo-generated web applications
- Refer to the Creating a Spring MVC controller for a specific JPA entity recipe for details on how you can instruct Roo not to generate views for certain functionalities.