This recipe extends on the previous recipe and shows a fully-functional Flight Booking application developed using Spring Web MVC that makes use of Spring Security to implement web request and method-level security. We'll look at modifications or additions that we need to make to configurations and artifacts generated by the security setup command to create a security-aware Flight Booking application.
Let's first take a quick look at the security requirements of the Flight Booking application before we delve into the details of how these requirements are met using Spring Security.
The Flight Booking application users are authenticated against Apache Directory Server, which contains application users, details and their role information. An authenticated user of the Flight Booking application can either have the role of ROLE_ADMIN_USER or ROLE_APP_USER. Access to application functionality is granted or restricted based on the authenticated user's role.
Web request security requirement of Flight Booking application restricts unauthorized access to menu options. The following screenshot shows the main menu of the Flight Booking application:
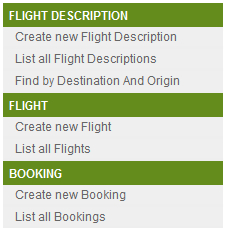
The following table defines the access permissions for each menu option (shown in the given screenshot) based on role:
|
Menu option |
Accessible to role |
|---|---|
|
Create new FlightDescription List all Flight Descriptions Find by Destination And Origin Create new Flight List all Flights |
|
|
Create new Booking List all Bookings |
|
As the given table shows, an application user with the ROLE_ADMIN_USER role can access web pages for Flight, FlightDescription, and Booking JPA entities. An application user with the ROLE_APP_USER role can only access web pages corresponding to the Booking JPA entity.
Even though the Create new Booking and List all Bookings links are accessible to both ROLE_APP_USER and ROLE_ADMIN_USER roles (as shown in the preceding table), the following security requirements (which will eventually translate into method-level security requirements) must also be met by the application:
- A user with
ROLE_APP_USERrole can create a newBookinginstance, but can't edit or remove an existingBookinginstance - A user with
ROLE_ADMIN_USERrole can edit or remove an existingBookinginstance, but can't create a newBookinginstance
Extract the contents of the ch06-ldap-security.zip file into the C:
oo-cookbook directory. This will create the ch06-ldap-security directory in C:
oo-cookbook. The ch06-ldap-security directory contains a flightapp-web web project that represents the security-aware Flight Booking application. This flightapp-web project is an extension of the flightapp-web project that we created in the previous recipe. It contains modifications to Spring Security generated artifacts, and a couple of additional changes to the address web request and method-level security requirements of the Flight Booking application.
If you are using a different database than MySQL or your connection settings are different than what is specified in database.properties file of flightapp-web project, then modify the database.properties file accordingly.
Open the command prompt and go to the C:
oo-cookbookch06-ldap-security directory.
To configure security settings with the Spring application, follow the steps given here:
- Deploy the
flightapp-webproject as a dynamic web application in an embedded Tomcat instance:..ch06-ldap-security> mvn tomcat:runThis will download the dependencies defined in the
pom.xmlfile of theflightapp-webproject. Now, you can access theflightapp-webapplication by accessing the following URL:http://localhost:8080/flightapp-webIf you see the following web page, then it means you have successfully deployed the
flightapp-webapplication on the embedded Tomcat instance: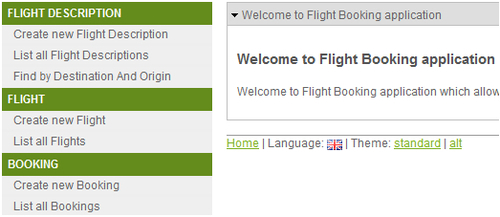
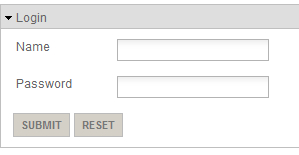
- Select the Create new Flight Description menu option, which will show you the login screen of the Flight Booking application, as shown here:
- Enter admin in the Name labeled field, admin in the Password labeled field, and click the Submit button to log in to the application. The admin user has
ROLE_ADMIN_USERrole.The admin user is associated with the
ROLE_ADMIN_USERrole; therefore, the admin user is shown the form for creating a newFlightDescriptioninstance, as shown here: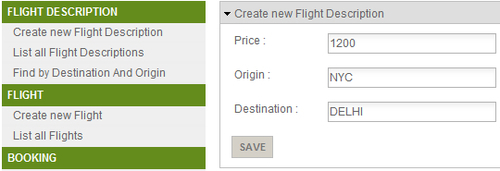
- Enter flight description details as shown in the screenshot and click the Save button to create a new
FlightDescriptioninstance. - Now, select the Create new Flight menu option to view the form for creating a new
Flightinstance, as shown here:
- Set the date in the Arrival Date and Departure Date fields, and select the newly created
FlightDescriptionfrom the combo box labeled Flight Description. Set the value of the Flight Number field to MYFLT-101. Now, click the Save button to create the newFlightinstance in the database. - In the given form, you may notice that in the Roo-generated Flight Booking Spring Web MVC application we can set arrival and departure dates but can't set time of arrival or departure of flights. This is because Roo-generated Spring Web MVC applications make use of the
dijit.form.DateTextBoxcomponent of the Dijit library to renderjava.util.Datetype fields of a JPA entity in JSPX views. You can modify this behavior by either modifying Roo-installeddatetime.tagxtag (refer to theWEB-INF/tags/form/fieldsdirectory offlightapp-web) or by creating your own custom tag that renders ajava.util.DateJPA field as a form field, which makes use of bothdijit.form.DateTextBox(for selecting date) anddiji.form.TimeTextBox(for selecting time). This allows users to select both date and time values for the field. - As we have already created the
FlightDescriptioninstance and associatedFlightinstance, it's time to create a booking on theMYFLT-101flight. Select the Create new Booking menu option to view the form for creating a newBookinginstance, as shown here: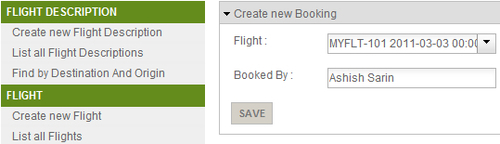
- Select
MYFLT-101flight number from Flight field and enter a name in the Booked By field. If you now click the Save button to save theBookinginstance, you'll receive an Access denied to admin message, as shown here: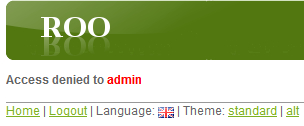
The access denied message is shown because a user in the
ROLE_ADMIN_USERrole doesn't have access to invoke thepersistmethod of theBookingJPA entity. Select the Logout hyperlink to log out from the Flight Booking application. - Now, select the Create new Booking option from the menu option. The Flight Booking application will ask you to log in because all menu options are accessible only to authenticated users. Log in with name as ashish and password as ashish. The user ashish has the
ROLE_APP_USERrole. - Create a new
Bookinginstance, as described in the fifth step. This time the Booking instance is created successfully becauseROLE_APP_USERhas the permission to invoke thepersistmethod of theBookingJPA entity. - Now, select the Create new Flight Description menu option. This will show the Access denied to ashish message, as shown here:
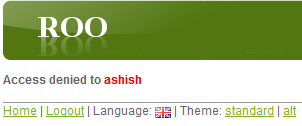
The access denied message is displayed because web request security of Flight Booking application restricts users from accessing menu options related to
FlightandFlightDescriptionJPA entities. Also, if you are logged in as ashish and attempt to modify or delete an existingBookinginstance, then you'll be denied access by the application. The reason for this is that the permission to invokemergeandremovemethods of theBookingJPA entity is only with users withROLE_ADMIN_USERrole.
In the Configuring Spring security for your application recipe, we discussed Spring Security configuration generated by the security setup command. As the security setup command created configuration was only helpful in getting us started with adding security to our application, this recipe extends the configuration created by security setup command to demonstrate how authentication and authorization can be quickly incorporated into Roo-generated web applications. In this section, we'll look at what modifications or additions we made to configurations and artifacts generated by security setup command to create a security-aware Flight Booking application.
Let's start with how we set up Apache Directory Server as the authentication source for the Flight Booking application.
Spring Security namespace provides an <ldap-server> element that configures the location of an external LDAP server against which authentication is to be performed. It can also be used to create an embedded Apache Directory Server instance. If the url attribute of the <ldap-server> element is specified, then it means that an external LDAP server is being used for authentication. And, if the url attribute is not specified, then an embedded instance of Apache Directory Server is created.
The applicationContext-security.xml file of the flightapp-web project configures embedded Apache Directory Server instances, as shown here:
<ldap-server ldif="classpath:application_users.ldif"
      root="dc=sample,dc=com" />
The ldif attribute specifies the location of the LDIF (LDAP Data Interchange Format) file, which contains user information loaded by the embedded LDAP server. You'll find the application_users.ldif file in the WEB-INF/classes directory of the flightapp-web project. The root attribute specifies the root of the LDAP directory tree.
The following figure shows the LDAP directory tree defined by the application_users.ldif file:
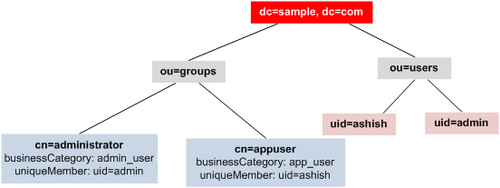
The given figure shows that user groups administrator and appuser are defined under ou=groups, and application users admin and ashish are defined under ou=users. The DN (Distinguished Name) of user ashish is uid=ashish,ou=users,dc=sample,dc=com, and DN of user admin is uid=admin,ou=users,dc=sample,dc=com. DN of administrator group entry is cn=administrator,ou=groups,dc=sample,dc=com, and DN of appuser group entry is cn=appuser,ou=groups,dc=sample,dc=com.
The uniqueMember attribute(s) of an entry defined under ou=groups identifies the application user who belongs to that group. For instance, in the cn=administrator entry, the uniqueMember attribute value is uid=admin,ou=users,dc=sample,dc=com (DN of user admin), which means that the admin user belongs to administrator group. Similarly, ashish belongs to appuser group.
The businessCategory attribute of an entry under ou=groups identifies the role of the users belonging to that group. As the given figure shows, the role of user admin is admin_user and the role of user ashish is app_user.
As Flight Booking application makes use of the embedded Apache Directory Server, the following JAR dependencies have been added to the pom.xml file of the flightapp-web project:
apacheds-protocol-sharedapacheds-protocol-ldapapacheds-core-entryapacheds-coreapacheds-server-jndishared-ldap
Note
As Spring Security supports version 1.5.5 of embedded Apache Directory Server, all the given JAR files belong to version 1.5.5.
As we are using Spring Security's LDAP support, spring-security-ldap JAR dependency is also added to the pom.xml file.
Let's now look at configuration, which instructs Spring Security to authenticate against the embedded LDAP server.
To authenticate against the embedded LDAP server, the following configuration has been added to the applicationContext-security.xml file:
<authentication-manager>
  <authentication-provider>
    <ldap-user-service group-search-filter="uniqueMember={0}"
       group-search-base="ou=groups"
       user-search-base="ou=users"
       user-search-filter="uid={0}"
       group-role-attribute="businessCategory" />
  </authentication-provider>
</authentication-manager>
The <ldap-user-service>
configures LdapUserDetailsService (an implementation of UserDetailsService that we discussed earlier), which loads user details containing username, password, and roles from the LDAP server. Authentication is performed by comparing the user entered password with the user details loaded by the LdapUserDetailsService instance.
The <ldap-user-service> element accepts the following attributes:
user-search-base: Specifies the part of the directory tree under which search for users is performed. The valueou=usersmeans that the search will be performed on entries that are defined under DN, which areou=users,dc=sample,dc=com.user-search-filter: It specifies the filter criteria used for searching users in the directory tree. The valueuid={0}means that search is made for the user entry where value ofuidattribute is equal to username entered by the user in the login form. The value{0}is replaced by the username entered by the user in the login form.group-search-base: It specifies the part of the directory tree under which search for groups is performed. The valueou=groupsmeans that the search will be performed on entries that are defined under DN, which areou=groups,dc=sample, anddc=com.group-search-filter: It specifies the filter criteria used for searching groups in the directory tree. The valueuniqueMember={0}means that a search is made for group entries, where the value of theuniqueMemberattribute is equal to the DN of the user.If user
ashishattempts to log in to the Flight Booking application, then the value of theuser-search-baseanduser-search-filterattributes will be used for searching the user. This will result in returning the entry whose DN isuid=ashish,ou=users,dc=sample,dc=com. Now, the value of thegroup-search-filterandgroup-search-baseattributes will be used to search for the group entry whoseuniqueMemberattribute value isuid=ashish,ou=users,dc=sample,dc=com. This will return thecn=appuser,ou=groups,dc=sample,dc=comentry because it contains theuniqueMemberattribute with valueuid=ashish,ou=users,dc=sample,dc=com.group-role-attribute: It specifies the attribute of the group entry, which is used as the role name. As the value ofgroup-role-attributeisbusinessCategory, if the group entry returned for the authenticating user iscn=administrator,ou=groups,dc=sample,dc=com, then the role of the user isadmin_user—the value of thebusinessCategoryattribute of the entry.
It is important to note at this point that Spring Security's LDAP authentication mechanism by default prepends ROLE_ to the name of the role returned after authentication. So, if the admin user authenticates with the Flight Booking application, then instead of admin_user role, it gets the role ROLE_ADMIN_USER. Similarly, user ashish gets the 'ROLE_APP_USER' role.
Let's now look at how web request security is configured for the Flight Booking application.
The following <http> element of security namespace shows how web request security is configured in the applicationContext-security.xml file of the flightapp-web project:
<http auto-config="true" use-expressions="true">
  <access-denied-handler error-page="/accessdenied" />
  <form-login .../>
  <logout logout-url="/resources/j_spring_security_logout" />

  <intercept-url pattern="/flights/**"
    access="hasRole('ROLE_ADMIN_USER')" />

  <intercept-url pattern="/flightdescriptions/**"
    access="hasRole('ROLE_ADMIN_USER')" />

  <intercept-url pattern="/bookings/**"
    access="hasAnyRole('ROLE_APP_USER','ROLE_ADMIN_USER')" />

  <intercept-url pattern="/accessdenied/**"
    access="hasAnyRole('ROLE_APP_USER', 'ROLE_ADMIN_USER')" />
 </http>
As in the previous recipe, we discussed the <http> element of the Roo-generated applicationContext-security.xml file; but here we'll only focus on configuration elements specifically added for meeting flightapp-web application's web security requirements. In the given code, the following are the elements that we added to configure web request security for the Flight Booking application:
<access-denied-handler>: It configures the error page that is shown to the user if access is denied to the requested page. Theerror-pageattribute specifies the URL of the error page. The<mvc:view-controllerpath="/accessdenied"/>entry inwebmvc-config.xmlconfiguresParameterizableViewController, responsible for rendering the access denied page—accessdenied.jspxin the/WEB-INF/viewsdirectory.<intercept-url>: It defines the URL pattern and the corresponding access permissions for the Flight Booking application. Let's look at each of the<intercept-url>elements defined for the Flight Booking application:<intercept-url pattern="/flights/**" access="hasRole('ROLE_ADMIN_USER')" />- The pattern
/flights/**refers to all the web pages that are specific to managingFlightJPA entity instances. ThehasRole('ROLE_ADMIN_USER')expression specifies that pages specific to managingFlightJPA entity instances are accessible only to users with theROLE_ADMIN_USERrole.<intercept-url pattern="/flightdescriptions/**" access="hasRole('ROLE_ADMIN_USER')" /> - The pattern
/flightdescriptions/**refers to all the web pages that are specific to managingFlightDescriptionJPA entity instances. ThehasRole('ROLE_ADMIN_USER')expression specifies that pages specific to managingFlightDescriptionJPA entity instances are accessible only to users with theROLE_ADMIN_USERrole.<intercept-url pattern="/bookings/**" access="hasAnyRole('ROLE_APP_USER','ROLE_ADMIN_USER')" /> - The pattern
/bookings/**refers to all the web pages that are specific to managingBookingJPA entity instances. ThehasAnyRole('ROLE_APP_USER','ROLE_ADMIN_USER')expression specifies that pages specific to managingBookingJPA entity instances are accessible only to users with theROLE_ADMIN_USERorROLE_APP_USERrole.<intercept-url pattern="/accessdenied/**" access="hasAnyRole('ROLE_APP_USER', 'ROLE_ADMIN_USER')" /> - The pattern
/accessdenied/**refers to the web page that shows Access denied message. ThehasAnyRole('ROLE_APP_USER','ROLE_ADMIN_USER')expression specifies that the access denied page is accessible to users with theROLE_ADMIN_USERorROLE_APP_USERrole. This is important because the access denied page should not be accessible to anonymous users.
Let's now look at how method-level security is configured in the Flight Booking application.
- The pattern
Method-level security in the Flight Booking application is enabled by the <global-method-security> element in the applicationContext-security.xml file, as shown here:
<global-method-security mode="aspectj"
   secured-annotations="enabled"/>
The mode attribute value specifies whether Spring AOP (which proxies the target object) or AspectJ (in which Spring's AspectJ security aspect is weaved into the class at load-time or compile-time) is used for securing methods. As Booking JPA entity is created outside the Spring container, to use Spring's @Secured annotation (discussed in the next section) to secure methods defined by Booking JPA entity, you need to use AspectJ. The value aspectj of the mode attribute instructs Spring to weave AnnotationSecurityAspect (available in the Spring Security's spring-security-aspects JAR file) into classes that make use of the @Secured annotation. The secured-annotations attribute specifies if the use of the @Secured annotations is enabled or disabled for the application context. The value enabled means that Spring Security will secure all methods that make use @Secured method-level annotation. Spring also supports using JSR-250 security annotations, security expressions (like hasRole, hasPermission, and so on), and the <protect-pointcut> sub-element of the <global-method-security> element to implement method-level security. You can use a combination of different approaches to implement method-level security in your application.
As we are using AspectJ mode for implementing method-level security in the Flight Booking application, dependency on spring-security-aspects JAR has been added to the pom.xml file, and the AspectJ compiler plugin configuration in the pom.xml file has been updated to include spring-security-aspects, as shown here:
   <plugin>
    <groupId>org.codehaus.mojo</groupId>
    <artifactId>aspectj-maven-plugin</artifactId>
    ...
    <configuration>
     <outxml>true</outxml>
     <aspectLibraries>
      <aspectLibrary>
       <groupId>org.springframework</groupId>
       <artifactId>spring-aspects</artifactId>
      </aspectLibrary>
      <aspectLibrary>
       <groupId>org.springframework.security</groupId>
       <artifactId>spring-security-aspects</artifactId>
      </aspectLibrary>
     </aspectLibraries>
     ...
    </configuration>
   </plugin>
The <aspectLibrary> element specifies the JAR files that contain aspects. The spring-aspects JAR contains aspect for weaving @Transactional support and spring-security-aspects JAR contains aspect for weaving @Secured support in classes.
Note
You may also notice that Spring Security version 3.1.0 RC1 has been used in the Flight Booking application because spring-security schema prior to version 3.1 didn't support mode attribute for <global-method-security> element.
Now that we have seen how method-level security is configured for the Flight Booking application, we are ready to annotate Booking JPA entity methods with the @Secured annotation.
Spring Security's @Secured annotation can be used at method-level to secure methods from unauthorized access. @Secured annotation specifies the user roles that are authorized to invoke the method.
Adding Spring Security's @Secured annotation to JPA entity methods in Roo-generated applications is a bit of an involved process. Roo defines JPA entity methods in the *_Roo_Entity.aj AspectJ ITD file, which is not recommended to be modified by application developers. To add the @Secured annotation to a JPA entity method, perform push-in refactoring (refer to Chapter 7) to move the method to the entity's Java class or simply copy the methods from the AspectJ file to entity's Java class. For instance, in the case of the Booking JPA entity, the persist method is copied from the Booking_Roo_Entity.aj file to the Booking.java file, as shown here:
@RooEntity(identifierColumn = "BOOKING_ID")
public class Booking {
    @PersistenceContext
    transient EntityManager entityManager;
    ...
    @Transactional
    @Secured("ROLE_APP_USER")
    public void persist() {
        if (this.entityManager == null)
           this.entityManager = entityManager();
        this.entityManager.persist(this);
    }

    public static final EntityManager entityManager() {
        EntityManager em = new Booking().entityManager;
        ...
        return em;
    }
}
The given code shows that the persist method is copied from Booking_Roo_Entity.aj to the Booking.java file. The @Secured annotation is added to the persist method to make it secure.
It is important to note that copying a method from AspectJ ITD to a Java file doesn't require moving dependent methods and attributes also. For instance, moving persist method from Booking_Roo_Entity.aj to Booking.java doesn't require moving entityManager attribute and entityManager() method, as shown in the code.
It has been done to simplify understanding the code.