Automated web application testing is an important part of any web application development effort. Spring Roo provides supports for auto-generating Selenium tests for the Spring Web MVC controllers. In this recipe, we'll look at how to generate Selenium tests for web controllers using Roo and how to use the Selenium maven plugin to execute them.
Delete the contents of ch04-recipe sub-directory inside the C:
oo-cookbook directory.
Copy the ch04_web-app.roo script into the ch04-recipe directory.
Execute the ch04_web-app.roo script that creates the flight-app Roo project, sets up Hibernate as the persistence provider, configures MySQL as the database for the application, creates the Flight and FlightDescription JPA entities and defines a many-to-one relationship between Flight and FlightDescription entities. If you are using a different database than MySQL or your connection settings are different than what is specified in the script, then modify the script accordingly.
Start the Roo shell from the C:
oo-cookbookch04-recipe directory.
Execute the controller all command to create controllers and views corresponding to the JPA entities in the flight-app project, as shown here:
.. roo> controller all --package ~.web
Execute the perform eclipse command to update the project's classpath settings, as shown here:
.. roo> perform eclipse
Now, import the flight-app project into your Eclipse IDE.
Install the Firefox web browser, which is used by default for executing Selenium tests. If you want to use any other web browser, then refer to the How it works... section of this recipe.
The following steps demonstrate how to create Selenium tests:
- Execute the
seleniumtestcommand to create the Selenium test forFlightDesciptionController, as shown here:..roo> selenium test --controller ~.web.FlightDescriptionController --name testFlightDescriptionController --serverUrl http://localhost:8080/ Created SRC_MAIN_WEBAPPselenium Created SRC_MAIN_WEBAPPselenium est-flightdescription.xhtml Created SRC_MAIN_WEBAPPselenium est-suite.xhtml Managed SRC_MAIN_WEBAPPWEB-INFi18napplication.properties Managed SRC_MAIN_WEBAPPWEB-INFviewsmenu.jspx Managed ROOTpom.xml
- Execute the
seleniumtestcommand to create the Selenium test forFlightController, as shown here:..roo> selenium test --controller ~.web.FlightController --name testFlightController --serverUrl http://localhost:8080/ Created SRC_MAIN_WEBAPPselenium est-flight.xhtml Managed SRC_MAIN_WEBAPPselenium est-suite.xhtml
- Exit the Roo shell and run the
flight-appproject inside the embedded Tomcat (or jetty) instance, by executing thetomcat:rungoal:.. recipe> mvn tomcat:run - Open another command prompt and execute the
selenium:selenesemaven goal to execute the Selenium tests, as shown here:.. recipe> mvn selenium:selenese
The selenium test command creates the Selenium test for a web controller. The following table describes the arguments accepted by the selenium test command:
When the selenium test command is executed for the first time, Roo performs the following tasks:
- Creates the
SRC_MAIN_WEBAPP/seleniumfolder, in which all Selenium tests are created - Creates the
test-<JPA-entity-name>.xhtmlfile, which represents the Selenium script for testing the web controller. The<JPA-entity-name>is the name of the JPA entity managed by the web controller. - Creates a
test-suite.xhtmlfile, which contains the collection of Selenium tests that form part of the web application. - Adds a new label property to the
application.propertiesfile with the value ofSeleniumTests. The label is used by themenu.jspxfile to show a menu category under which you'll find a hyperlink Test Suite. Clicking the Test Suite link shows the list of all the Selenium tests that form part of the web application. - Updates the
pom.xmlfile to configure the Selenium maven plugin. The following XML fragment shows the configuration of the Selenium maven plugin:<plugin> <groupId>org.codehaus.mojo</groupId> <artifactId>selenium-maven-plugin</artifactId> <version>1.1</version> <configuration> <suite>srcmainwebappselenium est-suite.xhtml</suite> <browser>*firefox</browser> <results> ${project.build.directory}/selenium.html</results> <startURL>http://localhost:4444/</startURL> </configuration> </plugin>The
<configuration>element configures settings for the Selenium maven plugin. The<suite>element identifies the Selenium test suite, which is executed when you run theselenium:selenesegoal. The<browser>element specifies the web browser to use for executing Selenium tests. The value*firefoxindicates that the tests are executed using the Firefox web browser. If you want to use IE for executing the Selenium tests, then specify*iexploreas the value of the<browser>element. If you want to use any other browser, then specify*customas the value. The<startURL>identifies the URL where the Selenium server is running. The Selenium server acts as a proxy between the browser running the selenium tests and the web application being tested. Theselenium:selenesegoal starts the Selenium server, executes tests defined in the test suite and stops the server when the execution of tests completes. The<results>element specifies the location where the Selenium test results are stored. The${project.build.directory}variable refers to thetargetdirectory of your project.When you execute the
selenium:selenesegoal, the Firexfox web browser is automatically opened and tests defined in thetest-suite.xhtmlare executed. The result of the execution is saved in the/target/selenium.htmlfile.
Let's now look at the XHTML files (representing Selenium test scripts) that were created when we executed the selenium test command:
The Selenium scripts are simple HTML files. The following listing shows the content of the test-flightdescription.xhtml script:
<html ..> .. <title>testFlightDescriptionController</title> .. <table border="1" cellpadding="1" cellspacing="1"> .. <tbody> <tr> <td>open</td> <td> http://localhost:8080/flight-app/flightdescriptions? form&lang=en_IN</td> <td></td> </tr> <tr> <td>type</td> <td>_origin_id</td> <td>someOrigin1</td> </tr> .. <tr> <td>clickAndWait</td> <td>//input[@id='proceed']</td> <td></td> </tr> .. </html>
The HTML test script of Selenium consists of multiple table rows (that is, <tr> elements) and each row has three columns (represented by <td> elements). There is a specific semantic associated with each column. The first column identifies the Selenium command to be executed. For instance, the open command instructs Selenium to open a URL and the type command enters a value in an input type HTML element. The type command may also be used for selecting a value in a drop-down box, selecting a checkbox, and so on. The clickAndWait command instructs Selenium to perform a click action and waits for the new page to load in response to the click action. The second column in the table row identifies the target of the Selenium command. For instance, the test-flightdescription.xhtml, open command opens the following URL:
http://localhost:8080/flight-app/flightdescriptions?form&lang=en_IN
The given URL opens the web page for creating the FlightDescription JPA entities. This is the same form, which opens up when you select the Create new Flight Description menu option in the flight-app web application.
The type command shown in the test-flightdescription.xhtml enters value for the input field with the id value as _origin_id. The id attribute's value of the Origin field on the HTML form for creating the FlightDescription entity is _origin_id. The clickAndWait command makes use of XPath expression to instruct Selenium to click the button whose id attribute's value is proceed. The id attribute's value of the Save button on the form for creating the FlightDescription entity instances has the value proceed.
The third column of the table row in the Selenium script specifies the value that is used by the command for performing its action. For instance, in the test-flightdescription.xhtml file, the type command sets the value of the input field with the id _origin_id to the value someOrigin1 (the value specified in the third <td> element). Depending upon the command, the second and third columns of a table row might be empty. For instance, in the case of the open and clickAndWait commands, the third column of the table row is empty.
If you look at the test-flightdescription.xhtml script in its entirety, it is opening the form for creating new FlightDescription entities, entering values for the input fields in the form and clicking the Save button. This means, a successful execution of test-flightdescription.xhtml means a FlightDescription JPA entity is created in the database. Similarly, the test-flight.xhtml script creates a Flight JPA entity instance.
The test-suite.xhtml file created by Roo in the SRC_MAIN_WEBAPP/selenium folder specifies the tests that are executed by the Selenium maven plugin. The following listing shows the contents of the test-suite.xhtml file:
<html xmlns="http://www.w3.org/1999/xhtml" lang="en" xml:lang="en">
  ..
  <tr>
    <td>
     <a href="http://localhost:8080/flight-app
        /resources/selenium/test-flightdescription.xhtml">
        testFlightDescriptionController
     </a>
    </td>
   </tr>
  <tr>
    <td>
     <a href="http://localhost:8080/flight-app
       /resources/selenium/test-flight.xhtml">
       testFlightController
     </a>
    </td>
   </tr>
  </table>
 </body>
</html>
In the test-suite.xhtml, each <td> element specifies a Selenium test script that is executed as part of the test suite. The important point to notice is the URL used to specify the location of the test scripts. The test-flightdescription.xhtml and the test-flight.xhtml are served statically by the ResourceHttpRequestHandler handler, which is configured in the webmvc-config.xml via the resources element of the mvc schema, as shown here:
<mvc:resources location="/,
   classpath:/META-INF/web-resources/"
   mapping="/resources/**" />
Refer to the Auto-generating Spring MVC controllers and JSPX views from JPA entities recipe for more information on the configuration of the <resources> element.
It is important to note that Selenium tests are executed in the order they are specified in the test-suite.xhtml file.
You can view the details of tests that form part of the test suite by deploying your Roo-generated web application and selecting the Test Suite menu option under the SELENIUM TESTS category, as shown in the following screenshot:
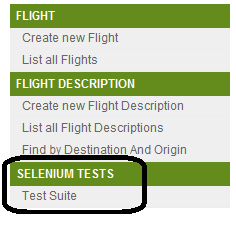
In the case of the flight-app application, selecting the Test Suite option shows the test-suite.xhtml, which in turn you can use to view details of the test-flightdescription.xhtml and test-flight.xhtml files.
The following are some of the important points to notice about Selenium tests generated by Spring Roo:
- The round-tripping support is not available for Selenium tests generated by Spring Roo. For instance, if you add, remove, or modify an attribute of the
FlightJPA entity, then the corresponding Selenium test scripttest-flight.xhtmlis not modified by Roo. You can remove the Roo-generated Selenium test scripts and regenerate them using theseleniumtestcommand. - As we saw, Roo generates Selenium tests only for creating the form-backing object exposed by the controller. So, you can't create a Selenium test for a controller, which doesn't support creation of form-backing objects, that is, the value of the
createattribute of the@RooWebScaffoldannotation in the controller isfalse. If you execute theseleniumtestcommand against a controller that specifies the value of the@RooWebScaffold'screateattribute asfalse, then the Roo complains that the creation of the Selenium test is not supported by the controller. - Roo doesn't generate Selenium tests for manually created controllers. So, if you generate a controller, which doesn't have a
@RooWebScaffoldannotation, then you can't use Roo to generated the Selenium test for it. If you execute theseleniumtestcommand against a controller, which isn't annotated with the@RooWebScaffoldannotation, then Roo complains that the controller doesn't seem to be a Roo-generated controller. - Roo generates the Selenium tests by introspecting the properties of the form-backing object (which is a JPA entity in case of the Roo generated controllers) exposed by the Roo-generated controllers. The generated Selenium test assumes that the form for creating the JPA entity (exposed by the web controller as a form-backing object) will always be displayed, which is not always the case. For instance, if you access the Create new Flight menu option, then it will not show the form to create the
Flightinstance if we haven't already created one or moreFlightDescriptioninstances. So, iftest-suite.xhtmlspecifies execution oftest-flight.xhtmlbefore thetest-flightdescription.xhtml, then thetest-flight.xhtmlexecution will fail if noFlightDescriptioninstances have already been created.
The Spring Roo generated Selenium test doesn't perform a thorough testing of the Roo-generated web application functionality; it only tests the controller functionality that creates the JPA entity instance. It is recommended that you use the Selenium-IDE (available as a Firefox plugin) to record and execute test scripts. If you are looking for a more sophisticated testing approach, then you can use the Selenium-IDE to create a test script, save it as a JUnit4 or TestNG test, modify the test to address specific testing requirements (like, verifying if the JPA entity instance was saved successfully by retrieving it from the database) and execute the JUnit4 or TestNG tests using the maven Surefire plugin.
- Refer to the Creating integration test for persistent entities recipe of Chapter 2 for details on how Roo supports auto-generation of integration tests for JPA entities