Chapter 15
The Ship Hits the Fan: Shipping Your Items
In This Chapter
![]() Buying shipping supplies
Buying shipping supplies
![]() Packaging your item with care
Packaging your item with care
![]() Finding a shipper (both domestic and international)
Finding a shipper (both domestic and international)
![]() Creating a shipping profile
Creating a shipping profile
![]() Choosing delivery confirmation and insurance
Choosing delivery confirmation and insurance
![]() Printing shipping labels
Printing shipping labels
![]() Closing the order in Etsy
Closing the order in Etsy
The moment you receive payment for your piece (and, if applicable, the check, cashier’s check, or money order has cleared), it’s time to begin the difficult process of letting your piece go. As hard as it may be to say goodbye — after all, you slaved over its creation and gave it the best care possible — the time has come to send it on its way. In this chapter, you discover everything you need to know to pack and ship your item to its new happy home.
The Right (Packaging) Stuff: Obtaining Shipping Supplies
Imagine a Venn diagram with one circle representing Etsy users and another representing people who love the environment. Odds are, the part where those circles intersect is pretty huge. This duality no doubt explains why so many Etsy sellers prefer to use recycled shipping materials — boxes, bubble wrap, envelopes, packing paper, and the like. Some even go the DIY route, crafting their own mailers and packaging materials from their or others’ detritus — for example, running old wrapping paper and magazine sheets through a shredder to create cushioning for fragile items.
Of course, you can also purchase shipping supplies for your Etsy shop. Even the most devoted recyclers may need to buy some shipping supplies, such as packing tape or the occasional mailer. Whether you seek boxes, bubble wrap, ribbon, or tissue, you can find what you need at these sites:
![]() ULINE:
ULINE: www.uline.com
![]() Paper Mart:
Paper Mart: www.papermart.com
![]() Nashville Wraps:
Nashville Wraps: www.nashvillewraps.com
Needless to say, you can also visit your local office-supply store (think Office Max, Office Depot, Staples, and the like) to stock up on shipping supplies. Note, however, that higher prices may somewhat offset the convenience of shopping for supplies at these bricks-and-mortar retailers.
One more piece of advice: Invest in a postal scale. You’ll need it to weigh your packages if you plan to ship from home. Also keep a flexible tape measure on hand, in case your carrier charges by box size instead of weight. (See the section “Stay First Classy: Surveying Shipping Options,” later in this chapter, for more information.)
Package Deal: Showing Your Love and Care with Packaging
Yes, everyone knows that it’s what’s on the inside that counts. But that truism doesn’t mean that what’s on the outside isn’t also important. Translation: When shipping your piece to your buyer, be sure to package it with care. In the following sections, we discuss wrapping different sorts of items, using attractive and brand-friendly packaging, and including goodies.
Wrapper’s delight: Wrapping any kind of item safely
It goes without saying that you must take steps to ensure that your piece will arrive in one, er, piece. When it enters your buyer’s home, it needs to be in excellent shape (think Jillian Michaels). To that end, consider the following guidelines:
![]() Be sure to pack fragile items carefully. Use cushioning materials such as bubble wrap or shredded paper to prevent breakage, and employ plenty of sturdy packing tape to ensure that your package isn’t tattered en route. (We talk about supplies in more detail earlier in this chapter.)
Be sure to pack fragile items carefully. Use cushioning materials such as bubble wrap or shredded paper to prevent breakage, and employ plenty of sturdy packing tape to ensure that your package isn’t tattered en route. (We talk about supplies in more detail earlier in this chapter.)
![]() Pack bendable booty — such as art prints and the like — with a firm, flat backing.
Pack bendable booty — such as art prints and the like — with a firm, flat backing.
![]() If, like the Wicked Witch of the West, your item is moisture averse, slip it into a sealed plastic bag before sending it on its way.
If, like the Wicked Witch of the West, your item is moisture averse, slip it into a sealed plastic bag before sending it on its way.
Nice package! Using attractive, brand-friendly packaging
Strive to delight your buyer not only with your piece, but also with your packaging. Don’t just toss your lovingly crafted item in an envelope and plop it in the post; instead, develop packaging that, in addition to protecting your item, looks good. You don’t have to wrap your packages in expensive gift paper with hand-curled ribbon (although some Etsy sellers do); most buyers are perfectly satisfied with a package that has been carefully and securely wrapped with clean, plain, environmentally friendly paper.
In addition, make sure your packaging reflects your brand. For example, if your brand is frou-frou, your packaging needs to be, too. On the flip side, if your brand is all modern minimalism, you want to ensure that your packaging is similarly under-the-top. Also, invest in stickers or a stamp with your shop’s logo for use in your packaging. (You find out more about developing your brand in Chapter 16.)
Goody-goody: Including extras in your parcel
It goes without saying that your package needs to include the item your buyer purchased. Beyond that, you may include any or all of the following:
![]() A handwritten note: If you want to make your buyer’s day, include a handwritten note in your packaging. It doesn’t have to be a 40-page opus; just a few lines thanking the buyer for his purchase and wishing him well will do. (Be sure to address him by name — it’s so much more personal.) You might also use this opportunity to ask your buyer to leave feedback about you on Etsy.
A handwritten note: If you want to make your buyer’s day, include a handwritten note in your packaging. It doesn’t have to be a 40-page opus; just a few lines thanking the buyer for his purchase and wishing him well will do. (Be sure to address him by name — it’s so much more personal.) You might also use this opportunity to ask your buyer to leave feedback about you on Etsy.
 Consider investing in special note cards or postcards that reflect your brand — or, better yet, make your own! For example, you may design a note card that includes your shop logo. Alternatively, if you sell art prints, you may design a postcard with one of your best-selling images.
![]() Business cards: To make sure that your buyer remembers you and your store, slip two business cards into your package — one for your buyer and one for her millionaire best friend.
Business cards: To make sure that your buyer remembers you and your store, slip two business cards into your package — one for your buyer and one for her millionaire best friend.
![]() An invoice: Unless the package is a gift and it’s being sent directly to the recipient, include a printout of the invoice in your package. This is especially important if your buyer lives abroad; it’ll keep the package from being held up clearing Customs. To print an invoice, open it as described in Chapter 14 (make sure you’ve marked the item as paid if the person paid by check or money order); then click the Print Order link (see Figure 15-1) and choose your print settings as normal.
An invoice: Unless the package is a gift and it’s being sent directly to the recipient, include a printout of the invoice in your package. This is especially important if your buyer lives abroad; it’ll keep the package from being held up clearing Customs. To print an invoice, open it as described in Chapter 14 (make sure you’ve marked the item as paid if the person paid by check or money order); then click the Print Order link (see Figure 15-1) and choose your print settings as normal.
![]() Care instructions: If the item you’re sending requires special care — for example, maybe it needs to be washed by hand — include appropriate instructions in your package.
Care instructions: If the item you’re sending requires special care — for example, maybe it needs to be washed by hand — include appropriate instructions in your package.
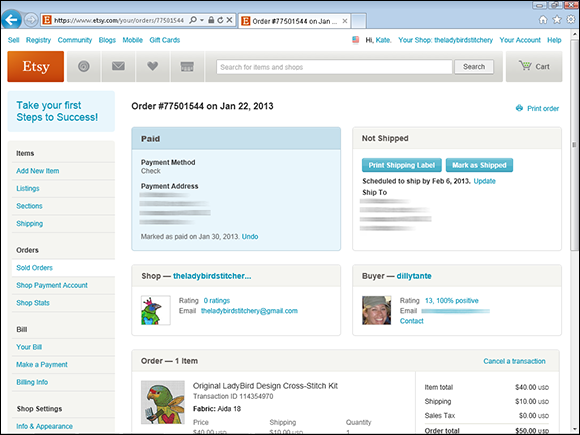
Figure 15-1: Print a copy of the invoice to include in any package.
![]() A coupon: Including a coupon — or, more specifically, a coupon code — in your packaging is a great way to generate sales. For help with creating coupon codes, see Chapter 16.
A coupon: Including a coupon — or, more specifically, a coupon code — in your packaging is a great way to generate sales. For help with creating coupon codes, see Chapter 16.
![]() A freebie: Some Etsy sellers include freebies in their packaging — small, lightweight items tossed in at no additional cost. The best freebies reflect your brand or your inventory in some way — for example, buttons, bookmarks, stickers, or magnets with your shop logo, or samples of new or favorite products in your line. Another approach is to include freebies that complement the item purchased. For instance, if you specialize in hand-sewn dog collars, you might toss in some Scooby Snacks. Or if you spin yarn, you may include a printout of a simple pattern you designed.
A freebie: Some Etsy sellers include freebies in their packaging — small, lightweight items tossed in at no additional cost. The best freebies reflect your brand or your inventory in some way — for example, buttons, bookmarks, stickers, or magnets with your shop logo, or samples of new or favorite products in your line. Another approach is to include freebies that complement the item purchased. For instance, if you specialize in hand-sewn dog collars, you might toss in some Scooby Snacks. Or if you spin yarn, you may include a printout of a simple pattern you designed.
Ship Shop: Choosing a Shipping Carrier
When it comes to shipping carriers, you have loads of options — truth be told, an overwhelming number. To figure out which carrier is right for you, you need to do a bit of legwork. Here are a few places to start:
![]() USPS:
USPS: www.usps.com
![]() UPS:
UPS: www.ups.com
![]() FedEx:
FedEx: www.fedex.com
![]() DHL:
DHL: www.dhl.com
As you research carriers, assess the following:
![]() How long they take to deliver
How long they take to deliver
![]() What shipping options they offer
What shipping options they offer
![]() How much the various shipping options cost
How much the various shipping options cost
![]() Whether such services as insurance and delivery confirmation are included (see the later section “Insure Thing: Insuring Your Parcel” for details)
Whether such services as insurance and delivery confirmation are included (see the later section “Insure Thing: Insuring Your Parcel” for details)
![]() Whether they pick up outgoing packages from your place
Whether they pick up outgoing packages from your place
![]() What they do if a package gets lost
What they do if a package gets lost
Stay First Classy: Surveying Shipping Options
After you’ve selected a carrier, you need to give more thought to various shipping options based on speed and price. For example, if you’ve opted for USPS, you need to decide whether you want to go with First Class or Priority Mail. In general, First Class, which is the less expensive option, is handled in the same way as Priority Mail, but it’s put on the truck last — meaning that if the truck is full, the First Class mail has to wait for the next truck, which may affect delivery time. Unless it’s a particularly busy time of year (Christmas, we’re talking about you) or your packages typically weigh more than 13 ounces each (the First Class cutoff), First Class may suffice for your needs.
You also need to decide whether you’re willing to offer expedited shipping — for example, USPS Express Mail for overnight delivery (for an added charge, of course).
1. Go to http://ircalc.usps.com.
The Postage Price Calculator page opens.
2. Click the Select a Destination drop-down list, and choose the country to which you want to ship the item.
3. If you’ve selected the United States, type your zip code in the From Zip Code field; then type the recipient’s zip code in the To Zip Code field.
4. If you’ve selected the United States, enter the mailing date and time.
5. Note the flat-rate price that applies to your package.
To see whether a different option is cheaper, select the shape that best matches that of your package.
6. If you opt against the flat-rate price by selecting a shape, enter the package’s weight in the Pounds and Ounces fields.
7. Click Continue.
A list of delivery options appears.
8. To view all delivery options together, click the Display All Options check box.
Crafters without Borders: Shipping Internationally
Although you can certainly limit your Etsy business to domestic buyers, part of the fun of selling on Etsy is connecting with international customers. First, however, you need to get a feel for the ins and outs of shipping internationally. Keep a few points in mind:
![]() Items shipped to some countries, such as Canada and countries in the European Union, may be subject to duties or taxes. Make sure that the buyer knows he’ll be responsible for these. A good way to do so is to include language to that effect on your shop’s Policies page.
Items shipped to some countries, such as Canada and countries in the European Union, may be subject to duties or taxes. Make sure that the buyer knows he’ll be responsible for these. A good way to do so is to include language to that effect on your shop’s Policies page.
![]() If your package contains "potentially dutiable contents" (that's post office speak for items subject to duties or taxes), you need to include a Customs form — period, end of story. (If you're not sure whether your item is "potentially dutiable," read the next bullet.) To figure out what type of form you need, check with your carrier or go to
If your package contains "potentially dutiable contents" (that's post office speak for items subject to duties or taxes), you need to include a Customs form — period, end of story. (If you're not sure whether your item is "potentially dutiable," read the next bullet.) To figure out what type of form you need, check with your carrier or go to http://webapps.usps.com/customsforms/helppickaform.htm. Be sure to fill out the form thoroughly, to keep it from being held up at Customs.
![]()
 Shipping certain items — think food products, plant and animal products, precious jewelry, and so on — is prohibited in some countries. To find out whether your item is prohibited, check out the Individual Country Listings page on the USPS website (
http://pe.usps.com/text/imm/ab_toc.htm). You'll see a list of countries; click the link for the country in question to view a list of restricted and prohibited items. (Note that these prohibitions and restrictions apply regardless of the carrier you use.)
Don’t indicate that the item is a gift, even if your buyer asks you to. It’s not cricket, and it can get you into trouble. Besides, even gifts may be subject to duties and taxes.
If you’re just getting started, consider shipping to just a few countries — say, Canada, Mexico, Japan, Australia, and European Union (EU) countries. Then, when you’re more comfortable with the procedures involved, you can expand to ship everywhere. Just don’t indicate that you’re willing to ship anywhere on Earth unless you’ve done the research to find out how much that will cost!
Ship Happens: Creating a Shipping Profile
Suppose you stock your shop with items of a similar size — say, jewelry, magnets, greeting cards, or stuffed patchwork wiener dogs. In that case, it may behoove you to create a shipping profile. A shipping profile is simply a collection of shipping-related settings that you can apply to item listings in one fell swoop instead of entering them one by one.
Before you create a shipping profile, you want to sort out how much it costs to ship your item based on its size, weight, and shipping method. If you plan to ship internationally, you need to get a handle on how much that method will cost as well. For help, contact your shipping provider. Note that you want to factor in any costs associated with packaging your item when calculating your shipping charges.
To create a shipping profile, log in to your Etsy account and follow these steps:
1. Click the Your Shop link along the top of any Etsy page.
2. Click the Shipping & Payment link, under Shop Settings, on the left side of the page.
The Shipping & Payment page opens, with the Shipping Profiles tab displayed (see Figure 15-2).
3. Click the Create New Profile button.
The Create Shipping Profile page opens (see Figure 15-3).
4. In the Profile Name field, type a descriptive name for your profile.
For example, if the profile is for items in your jewelry line, type Jewelry.
5. Click the Processing Time drop-down list, and specify how long it will take you to process each order.
6. Click the Items Ship From drop-down list, and choose your country of residence.
7. If you want to set shipping rates on a country-by-country basis, click the Country Specific Shipping drop-down list and choose a country; then click the Add button.
The Country Specific Shipping area expands to include a Cost field and a With Another Item field.
8. Enter the shipping cost for buyers in the selected country in the Cost field and then type the cost for shipping for purchases sent with another item in the With Another Item field.
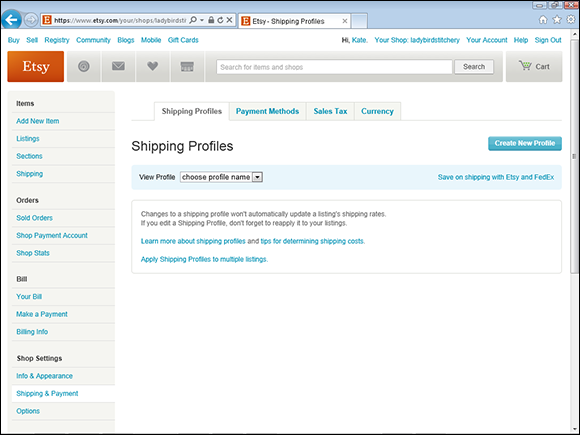
Figure 15-2: Create a shipping profile here.
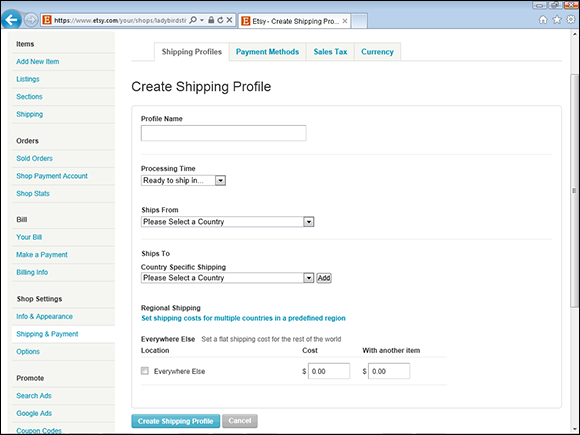
Figure 15-3: Enter the profile details on this page.
9. Repeat steps 7 and 8 to add more countries to your shipping profile.
 Don’t forget to add your own country of residence in the Country Specific Shipping area!
10. To quickly set options for an entire region, such as the EU, click the Set Shipping Costs for Multiple Countries in a Predefined Region link.
The Regional Shipping area expands to include a drop-down list.
11. Click the Regional Shipping drop-down list and choose the region for which you want to set shipping options; then click the Add button.
The Regional Shipping area expands further to include a Cost field and a With Another Item field.
12. Enter the shipping cost for buyers in the selected region in the Cost field, and then type the cost for shipping for purchases sent with another item in the With Another Item field.
13. If you’re willing to ship anywhere in the world, click the Everywhere Else check box to select it.
14. Enter the shipping cost for buyers in all other countries in the Cost field, and then type the cost for shipping for purchases sent with another item in the With Another Item field.
15. Click the Create Shipping Profile button.
Etsy saves your shipping profile.
Insure Thing: Insuring Your Parcel
Remember that movie Castaway, with Tom Hanks? He plays a FedEx employee who hitches a ride on a cargo plane stuffed with packages, which crashes, marooning him on a desert island with only a volleyball for company. This storyline just goes to show you that sometimes FedEx planes crash, jettisoning their cargo to the bottom of the sea. If the piece you so lovingly crafted and packaged is onboard, chances are, it won’t reach your buyer — unless she’s the Little Mermaid.
To ensure that you’re covered if your package goes astray, you may want to opt for insurance from your shipping carrier — especially if your item is on the pricey side. (Insuring packages containing less expensive pieces may be prohibitively expensive; you have to decide whether it’s worth it to you.) You can also opt for delivery confirmation — it’s free with USPS Priority shipping.
Print It to Win It: Printing Shipping Labels on Etsy
If you use USPS as your shipping carrier, and you’ve signed up for Direct Checkout or your shop has been open and active for a certain number of months, you can print your shipping labels right from Etsy. When you print your label from Etsy, delivery confirmation is included automatically; insurance is also available if you want it. You’ll be billed for labels on your Etsy bill. (For info on paying your Etsy bill, see Chapter 18.)
To print a shipping label on Etsy, follow these steps:
1. Click the Your Shop link along the top of any Etsy page.
The Your Shop page opens.
2. Click the Sold Orders link, under Orders, on the left side of the page.
3. Click the Open tab.
The Open Orders page opens, displaying a list of items that you’ve sold but not yet shipped.
4. If necessary, click the Not Shipped tab (see Figure 15-4).
5. Click the Print Shipping Label button.
A page outlining how this feature works appears.
6. Click the Continue button.
The Confirm Default Ship From Address page appears.
7. Confirm that the Ship From address is correct (or make changes as needed); then click the Continue button.
The Buy Postage page appears (see Figure 15-5).
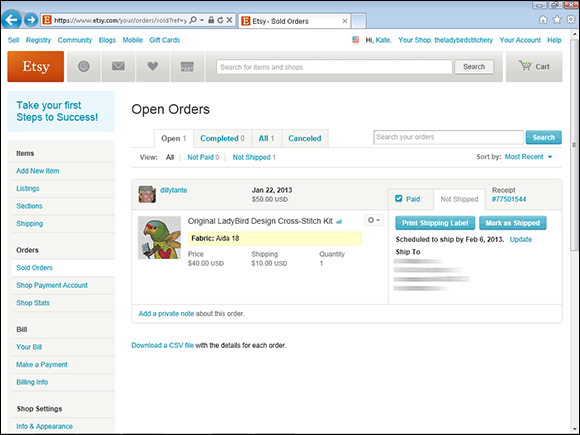
Figure 15-4: Find the item for which you want to print a label on this page.
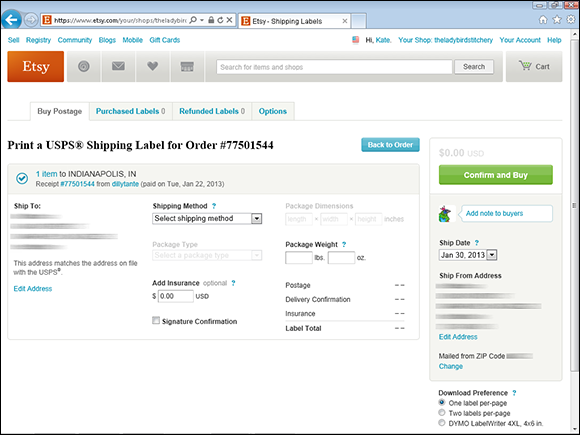
Figure 15-5: Buy your postage here.
8. Click the Shipping Method drop-down list and choose the desired method — for example, USPS First Class Mail or USPS Priority Mail.
9. If prompted, enter the package dimensions.
10. If prompted, click the Package Type drop-down list and specify the package type — say, Package/Thick Envelope, Irregular/Unusual Package, or what have you.
11. Enter the package weight in the appropriate field.
12. Optionally, type a dollar amount indicating the value of the item in the Add Insurance field to insure the package.
13. If you want someone to sign for the package, click the Signature Confirmation check box to select it.
14. If necessary, click the Ship Date drop-down list and specify the day on which you plan to ship the item.
15. Click the Confirm and Buy button.
Etsy displays a confirmation dialog box, indicating the number of labels purchased and the price.
16. Click the Buy and Send Notification button.
Etsy creates the label and notifies you that it’s ready for download.
17. Click the Download Shipping Labels button.
Etsy displays the label as a PDF (see Figure 15-6). Print it as you would any other similar file.
After Etsy creates your shipping label, it updates the invoice and receipt to show that it has been shipped (see Figure 15-7), essentially closing the order. The item also appears on the Completed Orders tab, which you access by clicking the Completed tab on the Sold Orders page.
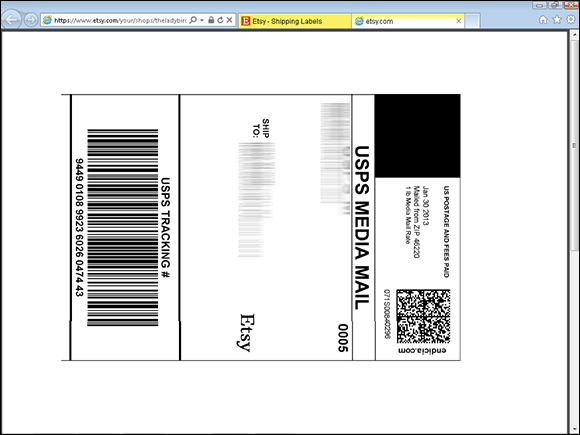
Figure 15-6: Print your shipping label.
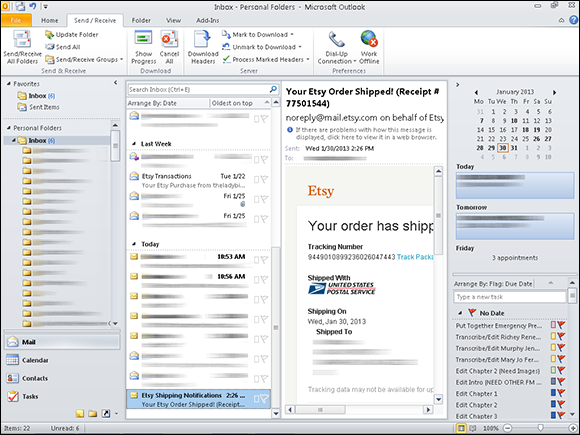
Figure 15-7: Etsy marks the item as shipped.
Be aware: Etsy allots each shop a “shipping label budget.” When you reach the limit set by your shop’s budget, you’ll need to pay your Etsy bill before you’re allowed to purchase and print more shipping labels. Each time you pay your Etsy bill, your shop budget will increase.
1. Click the Shipping Labels link in the Orders section of Your Shop.
2. On the Buy Postage tab, select the items for which you want to purchase shipping labels and fill in the necessary info for each one.
3. Review the order.
4. Purchase the labels by clicking the Confirm and Buy button.
5. Click the Buy and Send Notification button.
Etsy will process your labels and send shipping notifications to your buyers.
6. Click the Download Shipping Labels button, and print them as normal.
Deliverance: Sending Your Package on Its Merry Way
After you securely affix your shipping label to your package (if you opted against an adhesive backing, use clear packaging tape, taking care to avoid obscuring the label bar code), you're ready to send it. One option is to request a free carrier pickup from the USPS website (www.usps.com/pickup); alternatively, you can hand it off to your regular carrier, take it to your local post office, or drop it in a collection box.
Marky Mark: Marking the Item As Shipped in Etsy
If for whatever reason you opted out of printing your shipping labels through Etsy — maybe you don’t accept Direct Checkout (meaning Etsy’s print shipping labels feature isn’t currently available to you) or you prefer a different shipping provider over USPS — you’ll need to manually mark your item as shipped once you’ve sent it on its merry way. This essentially closes the order. Follow these steps:
1. Click the Your Shop link along the top of any Etsy page.
The Your Shop page opens.
2. Click the Sold Orders link, under Orders, on the left side of the page.
3. Click the Open tab.
The Open Orders page appears.
4. Click the Mark as Shipped button in the listing for the item you just shipped.
Etsy updates the listing to show that it has been shipped (refer to Figure 15-7). The item also appears on the Completed Orders page, which you access by clicking the Completed tab.
 An Add Shipping Notification option appears — click it to open a window that enables you to send a message to your buyer, letting him know the package is on its way and informing him of the delivery confirmation number. (This note is optional, but it’s a nice way to reconnect with your buyer.) You can even save the text from your note and reuse it for later transactions.

 How you package your items says something about you and your Etsy shop. Make sure it doesn’t say, “I’m lazy and careless!”