Chapter 8
Man-Made Modifiers
Light strikes a surface. It reflects away from it. The light takes that surface’s characteristics and shares it, wherever it goes. Take that same principle and apply it creatively to all that you photograph. Reflect what you see and share it.
Some brilliant minds have been at work developing a fascinating series of tools that assist you in manipulating light to your advantage. There are portable modifiers that harness the sun. Others are indispensable lighting instruments for artificial light sources.
These are the tools that photographers share with Hollywood, broadcast news and sports, and even at times retail display designers. Light modifiers are in the studio; they are on location. They form a commonality between the portrait studio and commercial photography. Just about any profession that creates images involving a lens must master the versatility of light modifiers.
Some are small enough to fit in your camera case and others grow to something larger than your car.
Because so many image-making professionals have integrated these tools into their day-to-day workflow, you need to master them as well, if you want to produce professional-grade photographs.
Our only warning about light modifiers is that if you have not worked with them, before, once you have welcomed them into your photographic undertakings, you are going to be less than pleased with some of the photos you have made in the past. They’ll change the look of all the photos you take, for the better.
Nature Modifies Light
As we showed on pages 240 & 241, we used the power of a granite wall to bounce fill light onto the shadows of an otherwise harsh natural sidelight.
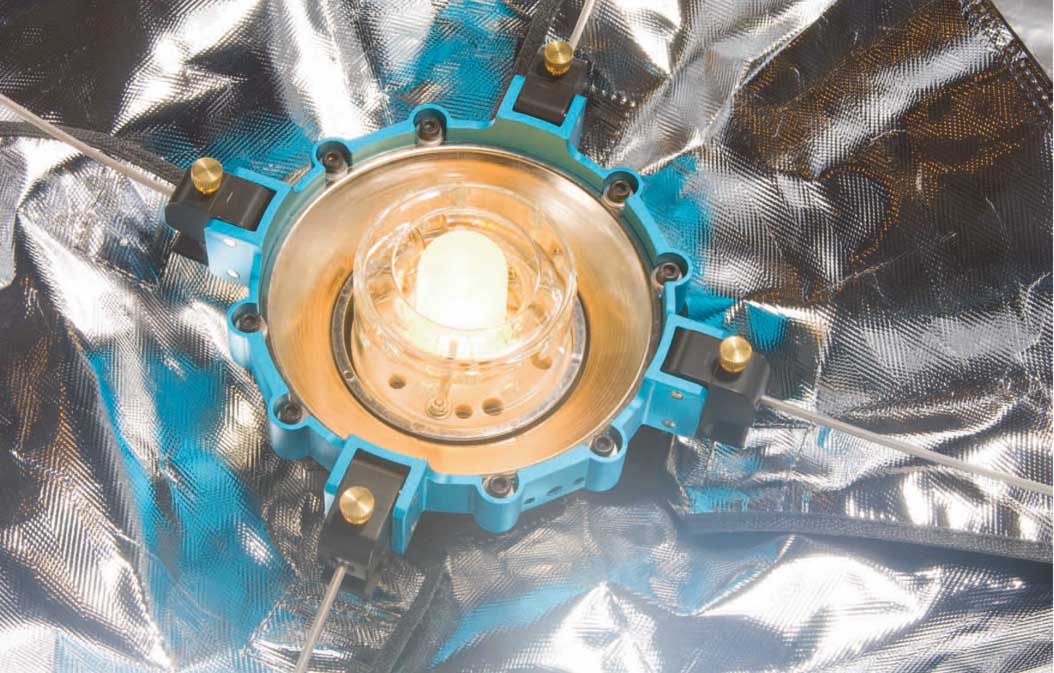
The best known reflectors of light are freshly fallen snow and white sand on a sunny day. Their reflective proficiency is so great that it can take our eyes a while to adjust.
White works well. It’s clean.
The green reflections of grass are not always as welcome. They can taint the coloration of the subject. (Green chins don’t always appear healthy, for some reason).
Study Reflections
When on location, study what the light is doing and plan on how you are going to modify it, to your advantage.
If you have not read page 28 on the angles of incidence and reflection, now is a good time to do that.
Study how unwanted reflections could mar your photo and make plans to overcome them.
The next twelve pages will help you to take what you’ve learned about ambient light and apply light modifiers to give your outdoor photography the polished professional look that you desire.
Once you get comfortable with using them in an outdoor environment, you’ll want to bring them indoors, too.

Tech Specs
Photographer
Brian Stoppee
Stylist
Tracey Lee
Illustrator
Janet Stoppee
Camera
Nikon D2x - ISO: 100 · Shutter Speed: 1/250 Manual Mode
Lens
Micro-Nikkor 200mm f/4 IF 35mm Focal Length: 300mm @ f/4
Support
1 - Gitzo Explorer
1 - Gitzo Off Center Ball Head
Software
Adobe Bridge, Camera Raw, and Photoshop Corel Painter
Reflect Light
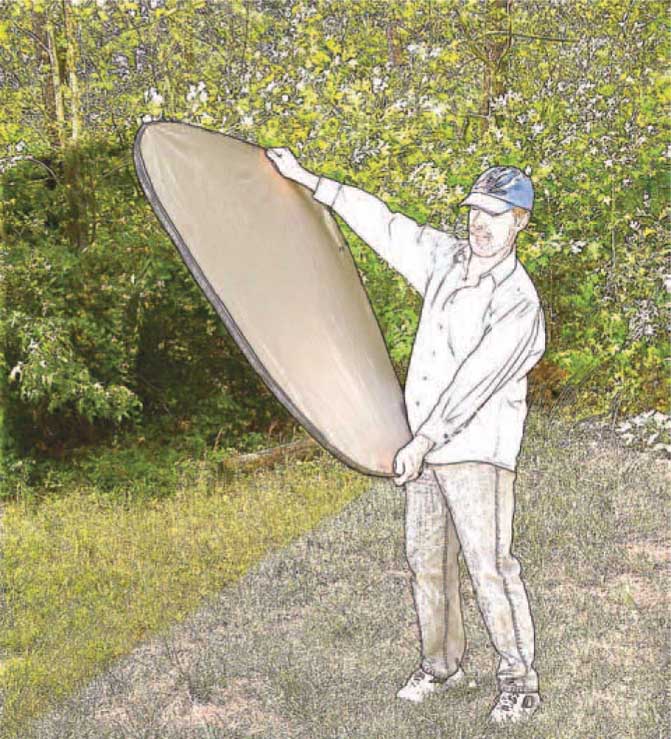
It’s simple, once you get the hang of it. You find the direction of the light source. You position the reflector material so that you direct the harvested light onto your subject.
As simple as that may sound, the best person, we have ever known to master it, in less than sixty seconds, was seven years old.
Reflector materials come in all shapes, sizes, colors, and surfaces. It seems like we have tried to collect them all, and not one of them has suffered from neglect.
Westcott has an excellent reflector series called “Illuminator” that magically pop into a far larger shape than when you take them out of their cases. Not only is there one surface on one side and another on the opposite, but they unzip and become reversible, so that you have four surfaces in one. These options gives you such qualities of light as silver, gold, white, and a more neutral sunlight look. They run in sizes from a cute little 14″ to the kite-like 52″.
Matthews, the grandfather of Hollywood cleverness, has a 24″ hand reflector that fits onto a stand. It’s supported by a yoke so that the reflector has a mirror-like surface on one side and it flips around to become a diffused surface on the other. It holds its position well.
The Westcott Illuminators usually require an assistant to position them for us. Sometimes models or their guardians pitch in to try their hands at it.
Rosco, the king of gels for the theatrical and motion picture universe, has some excellent reflective materials that come in rolls of 24″ × 15’ to 48″ × 30’. They’re intended for display merchandising. With the Matthews support materials that we discuss in the next chapter, you can position them for in studio use, or clamp them to the mountable hand reflector.
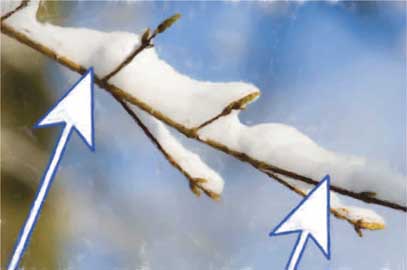
Harvest sunlight with a Westcott Illuminator and reflect it back unto your subject. In the example to the right, reflected light fills the side of Paris’s face.

Our crew tests how a Westcott Illuminator will work, as a reflector panel, before placing the talent into the photograph, at a marina.

Diffusers
So you don’t want to reflect light and you don’t want to flag it, either. That’s not a problem. We have Plan C: Diffuse!
Who Uses It?
Diff using light is one of the most frequently used methods for manipulating ambient light that’s in the professional lighting designer’s tool kit. Hollywood popularized the term “silks” for the diffusion fabrics used on sets.
Our previous use of the words “frequently” and “professional” refers to how extensive the marketplace is for products that can accomplish this high-demand means of modifying light.
On the next two pages we explore scrims and frames, the most sought-after way to diffuse light for sports commentators, at an outdoor event, or the making of a motion picture. This too has become a mainstay of the still photographer.
Whether indoors or out, on location or in the studio, we, like thousands of our fellow professional image-makers, rely on methods of diffusion.
How It Works
In the most simple terms, the diffusion material comes between the light source and the subject. The density of the fabric determines the degree of diffusion. Many manufacturers of diffusion materials have different ways of grading them. Our chart on page 265 tries to sort all of that out.
Needless to say, these manufacturers use fabrics that are free of anything which would alter the color temperature of the light.
It’s worth noting, again, that this is very different than using an old bed sheet.
Not only do standard fabrics come with their own color issues, and reflect more light than they diffuse, but to work safely you need some sort of sturdy support system so that your big kite does not take flight.
On pages 262 & 263 we discuss making frames.


Tech Specs
Photographer
Brian Stoppee
Stylist
Tracey Lee
Illustrator
Janet Stoppee
Camera
Nikon D2x - ISO: 100 · Shutter Speed: 1/250 Manual Mode
Lens
AF-S Zoom-Nikkor 28-70mm f/2.8 IF-ED @ 28mm 35mm Focal Length: 42mm @ f/4.5
Lighting
1 - Westcott 72″ × 72″ Scrim Jim Kit
Light Meter
Gossen Starlite
Support
1 - Gitzo Explorer
1 - Gitzo Off Center Ball Head
2 - Novatron Heavy Duty Stands
1 - Matthews 25 lb. Water Repellant Sandbag
1 - Matthews Boa Bag - 15lbs.
Software
Adobe Bridge, Camera Raw, and Photoshop Corel Painter
Talent
Cindy Sedan
Reflection and Diffusion Tools
The multi-purposed Westcott Illuminator 4-in-1 and 6-in-1 kits contain hand held reflectors, diffusers, and flags.
The diffuser, in the Illuminator kit, is something like a hand-held version of the big frame we discussed on the previous two pages and show how to build on pages 262 & 263.
The diffuser removes the harsh edges of daylight and converts them into soft flattering tones, with an even, natural appearance.

The Westcott Illuminators start out small. A 4-in-1 kit of 4?” reflectors and diffusors comes in a case that’s just 18″ wide.
Once you get them out, they magically pop into place at their full size.


Reducing the size of a Westcott Illuminator is an amazingly simple process. It just takes a little special wrist action. Grab the outer edges and twist inward. The flexible frame almost knows what to do. It starts going back into place. Work it down to three layers. It’s easy to reshape.
The little 14″ Sunlight reflector, below, collapses down to just around 5″.

Flagging Light and Subtractive Reflectors
Sometimes reflecting the existing light is not the issue. The talent is squinting because there is too much sunlight. Your light maybe perfect for a background, but it’s way too hot for the subject.
Flagging
Other times, you may wish to blow out a fair portion of the background.
Blocking light from the subject helps with this. You meter for the subject. If the background is lit with the same intensity as the subject, the background will be hotter if there’s less light on the subject.
These techniques of blocking light, are known as “flagging.” Be sure to see page 264 on the Matthews Road Rags and their Lighting Control Kits.
Subtractive
Doesn’t it sound counterintuitive to say that a reflector could be subtractive? But, that’s exactly what a black reflector is: it’s reflection in reverse.
Just as a bright white object keeps nearly none of the light that comes its way, the blacker an object gets, the more it absorbs the light that strikes it, reflecting nearly none.
For that reason, one available side of a Westcott Illuminator is black. It’s a subtractive reflector, better known as a “flag.”
When shooting in a dark space and looking for deep shadows, place a black Illuminator on the opposite position of your light source. Assuming that the source of illumination is as contained as possible and that your subtractive reflector is of sufficient size, very little light, if any, will be reflected back to your subject. The lighting will be very directional.
Sometimes it is best to completely hold back the light that is falling on a subject. This is known a flagging light. An Illuminator kit includes a black panel.
Photofoil
No ready-for-anything assistant is complete without a roll of Rosco Matte Black Photofoil. It comes in 10’ long rolls that are 12″ or 24″ wide. This is the kid brother of Cinefoil, which is up to 48″ wide. This lighting sponge molds into just about any shape that comes to mind. It’s rigid enough to hold its form. Use it to absorb light or to flag it.
Unzipping a 6-in-1 Illuminator kit reveals a second diffuser panel, on the inside. It also allows the black and sunlight panels to be reversed making them gold and silver.

The Framework of Scrims
Chimera calls them “panels” and “frames.” To Matthews they are “overheads” and “butterflies.” Westcott has their own brand name, “Scrim Jim.” They’re a rigid framework that’s covered by diffusion materials.
They’re as small as Chimera’s 24″ × 24″ and as hefty as the Matthews 144″ × 144″.
No matter what their size, they collapse and fit into a relatively small duffle bag. They’re part of a whole system that has to have sufficient strength to hold up in breezy conditions. The framework must have flexibility while being lightweight.
We pack a pair of stands in their bags to go with the framework, a set of fabric options, and a pair of grip devices that connects the framework to the stands and permits us to angle the frame in the needed direction.
Again, safety is an important factor. If you have set up one of these in a darkened studio, using a black, semi-see-through bobbinette fabric, it’s just begging for someone to trip over it. On location, outdoors, you have constructed an inland sail boat. In the next chapter, we explore weighting systems.
Indoors or out, you need to be sure that these are secure.
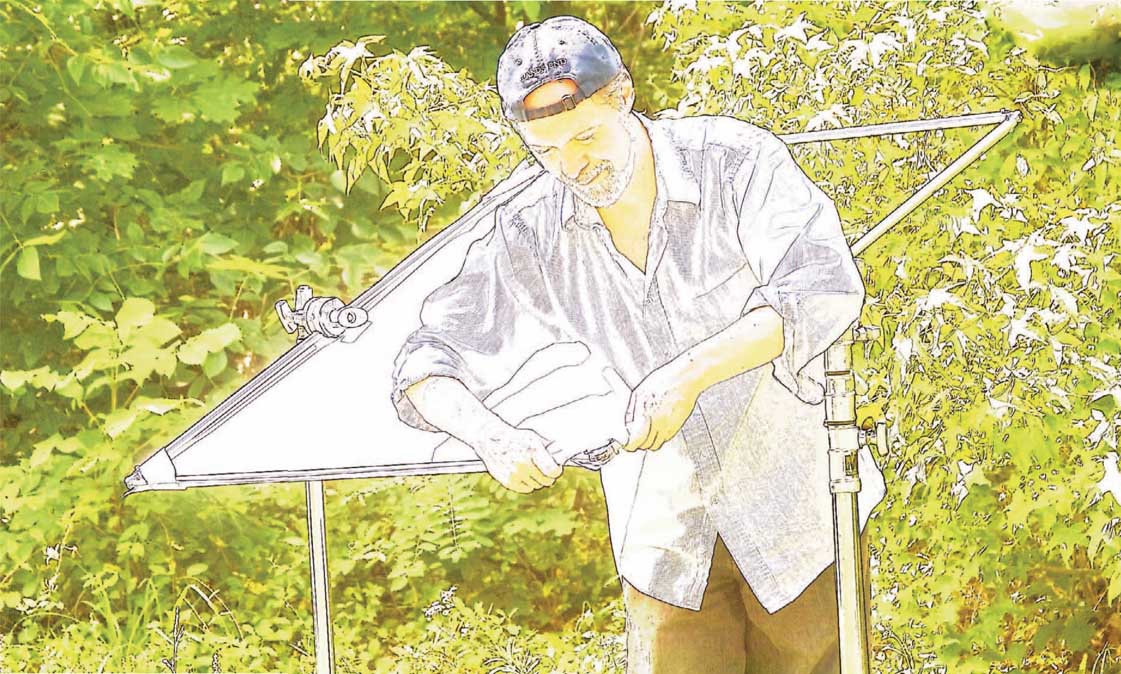
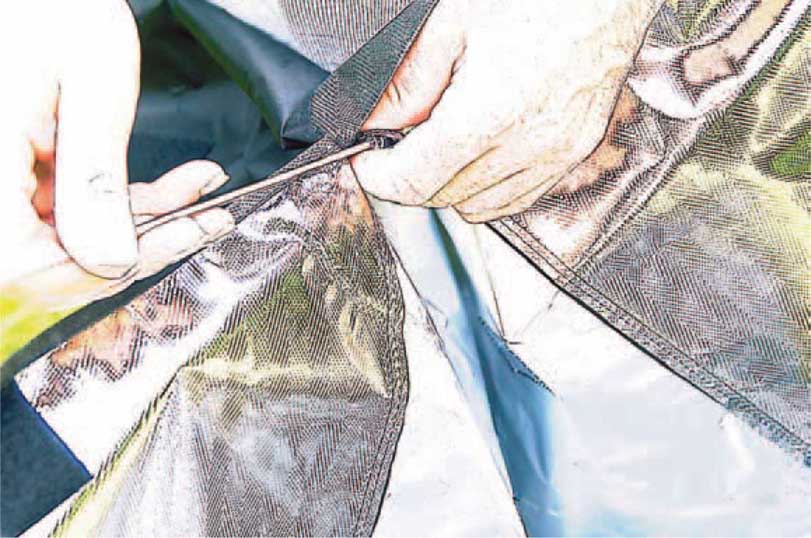
The Chimera is the easiest to set up.
In the illustration (right) we are putting together the smallest of the Chimera frames.
The Chimera system comes with two Matthews Grip Heads. These are perfect for slipping the frame into. Just place the Grip Heads on top of two stands and pop the frame into the Grip Heads. The head allows the frame to pivot 360°.
Once the frame is in place, simply stretch the fabric over it. The fabric easily fits over each corner without any pulling or tugging.
This is great for rapidly switching out scrim materials. If a minor diffusion works at this hour, as the sun’s angle varies, a different degree of diffusion could work better. Change out fabrics as fast as you change angles.
Who Has the Best One?
You need to get into a store and try them out. Each one is very different. This is something that you have to like. Set them up. Time yourself. See how long it takes. Did it go together as fast as you thought? Now that it’s together, do you like how it operates? How long does it take to collapse? Do you like one system’s fabrics more than the?
We have found that photographers who agree on cameras, computers, software, and a host of other things may have differing opinions on scrim systems.
One thing that everyone agrees on is that they have to have them.
Fabrics, Road Rags, and Lighting Control Kit
Matthews is the leader in products with funny names. We feel good about being in such a technology-laden business that has a sense of humor.
RoadRags
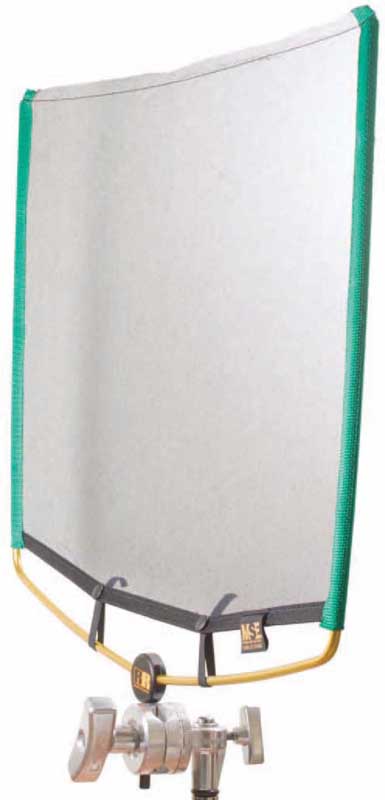
The Matthews RoadRags kit is a great place to get started with professional diffusion and flag materials. What comes in a 9″ × 21″ × 2″ thick package creates 18″ × 24″ diffusion frames in four fabric choices. There’s a 24″ × 36″ version, too. These can be placed on an arm extending from a lighting instrument to diffuse some of the illumination. They’re also great for softening or flagging natural illumination on small subjects.
Open-End Frames
A problem with some flags is that they leave a visible line on the subject. The Matthew RoadRags have an open end. They create a soft edge that is unnoticeable.
Fast Flags
Westcott has a similar 24″ × 36″ collapsible frame, “Fast Flags.” Fabrics change quickly.
Fabrics Chart
We’ve assembled a road map to the various fabrics that various manufactures use for diffusion materials. We find it to be a valuable guide as to how much light each product diffuses and how that affects the f-stop of each lighting setup.
Grip Supports
All of these wonderful widgets need even more widgets to position them securely. Please see the next chapter for how all the arms and Grip Heads and Knuckle Heads work.
What’s a “Grip?”
It’s a “who” not a “what.” The term “grip” comes from theatrical stagehands. It’s a more popular term in the film industry or on television production sets for various crew positions who move things around and set up equipment. It’s not strictly a grunt work job. Grips have a vast knowledge of technology and possess the clever, problem-solving minds that are essential in their craft.
They know their widgets!
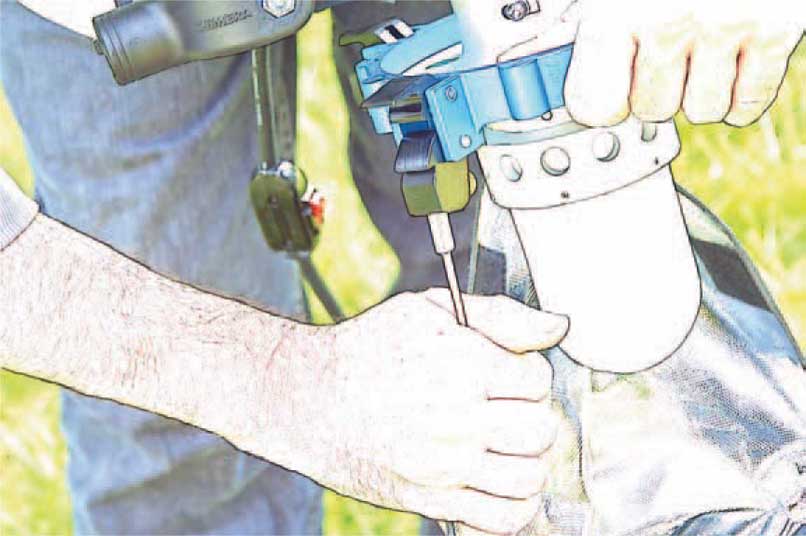
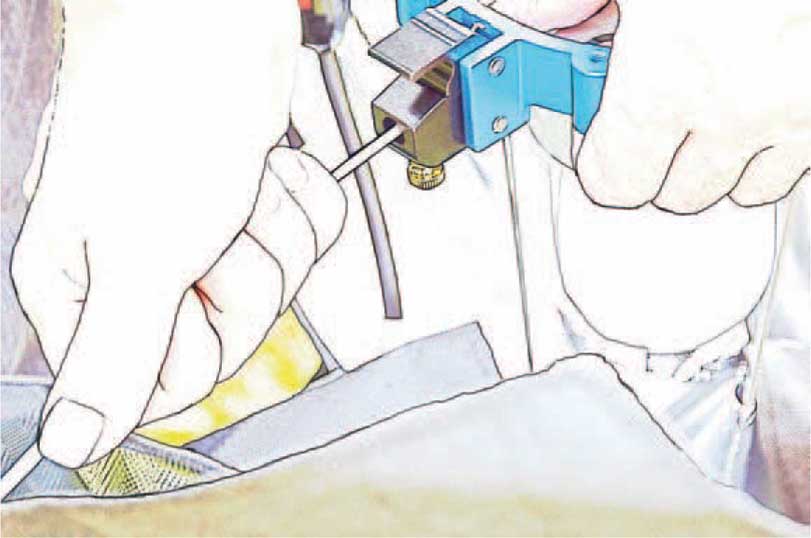
This diffusion material from the Matthews Road-Rags Kit assembles much like a Chimera light bank, with rods that pop into place.
Diffusion Material Fabrics
Like the Matthews RoadRags Kits, the Matthews Light Control Kits include a series of similar diffusion materials, though they are in a rigid form unlike the collapsible RoadRags.

Tents
Not everything in lighting is done on a grand scale. Some of the most admirable work is done at a very small size. Light needs to be controlled with even more precision on tight shots of products.
Jewelry isn’t an easy subject to photograph. Watches and rings have plenty of shiny surfaces. They pickup reflections from everything around them (including the photographer and camera).
A tent is something like a big fabric cone. It’s zippered so that there is enough room for a lens’s front end to peep in on the subject. Because the white of the tent surrounds the subject, the reflections are even.
This doesn’t mean that the lighting is flat and uninteresting. The lighting options are limited only to your imagination. Surround the tent with light banks or umbrellas for even illumination, or keep your light directional, with only one soft light source, or use lighting instruments without modifiers for a more crisp look, or… well, you get the idea.
Westcott has three tents in 21″ × 20″, 54″ × 40″, and 48″ × 60″. When working in macro proportions, light-source-to-subject distance becomes extremely critical. Match the right size tent to the scale of the subject.
Dots and Fingers
Tiny subjects require tiny reflectors and diffusers. Some of the most commendable work that photographers do is managing those highly refined touches of light. Just as we need reflectors that are as tall as the ceilings in most homes and equally wide, when working on small subjects, we need reflectors that are only a few inches wide by a few inches tall.
Dots
These circular light modifiers resemble a lollipop. They have a spring steel frame with a pin that extends from the base. The mounting pin fits into a Grip Head or Flex Arm, which is then attached to a lighting stand or some other support.
Their frames are covered with scrim material, reversible reflectors, diffusion, or black. Matthews has them as small as 3″ or as big as 10″, with 6″ in between.
Fingers
Something of a dot, but in rectangular form, Matthews has Fingers in all the same materials but in 2″ × 12″ or 4″ × 14″ sizes.
Barn Doors and Snoots
So much of our light modification technology still has its roots in theatrical illumination and its candle-powered efforts. As time went by, these lighting masters of the stage created the forerunners of today’s ingenious tools.
Barn Doors and Gel Holders
How we shutter down light with barn doors goes back to theatrical origins. In theater, lights hang from a series of metal poles above the stage, known as “electrics.” The “first electric” is closest to the stage’s proscenium arch and main curtain. The numbered electrics progress as the poles go back, or as it’s called going “upstage.” To contain the light, so that it will not “spill” in places where it doesn’t belong, four-way barn doors are placed over the lighting instruments. The four doors black metal panels held to a frame with hinges, are adjusted until the light is contained. Many barn doors are also gel holders, so that colored material can be placed in front of the light source.

That’s still exactly how it works with barn doors for photographic lighting. Instead of “hanging” lighting on electrics, we place lights on stands.
Barn doors are often used on instruments intended for back lighting. It provides a three-dimensional quality, but they’re available for wherever your creativity sends you.
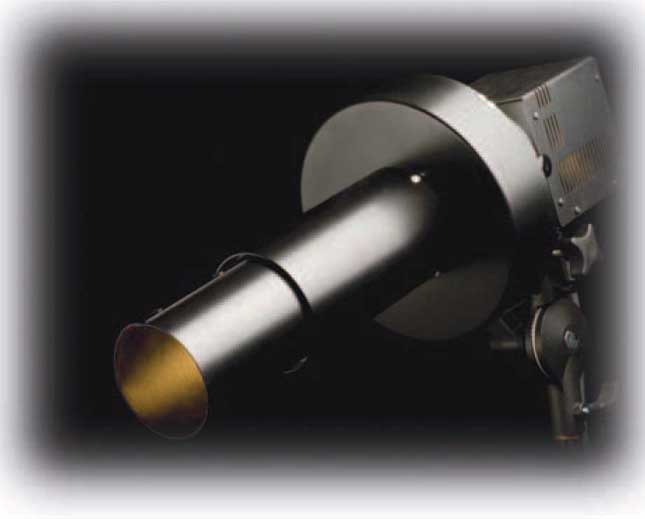
Snoots
The cylindrical tube that we call a “snoot” goes back to the theatrical term “top hat.” Some of this light modifier covers a portion of the light source. Other snoots are somewhat conical, as if they are funneling the light rather than limiting it.
In portrait photography, the snoot is a very popular instrument for hair light. It’s a great means of skimming just a little bit of light over the back of the head.
Many snoots have something of a zoom feature that allows you to extend the snoot, to maximize the focusing of the light to a very limited soft-edged spot.
When a snoot is combined with a grid (see the opposite page), the focus of light becomes even tighter. This tool creates great little pools of light for commercial photography.
Grids and Spots
The grid is another fabulous tool for limiting how much light is directed and how much light spills where it’s unwanted.
These tools work on small instruments as well as on huge light banks.
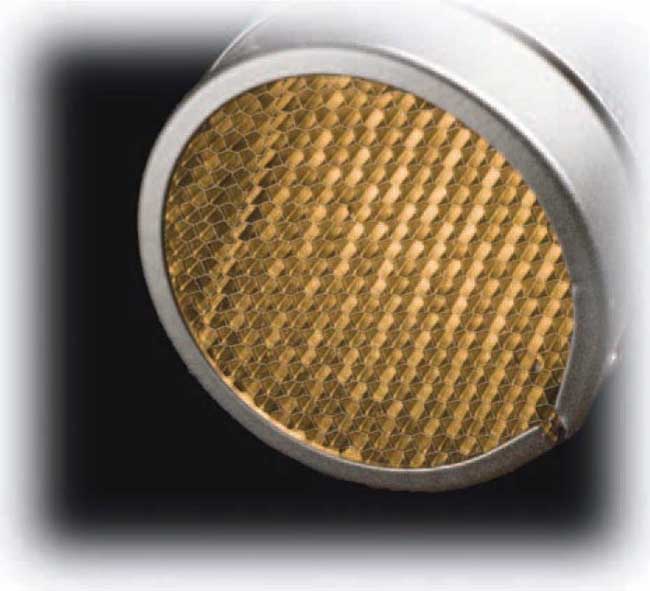
Grids are available in a few varying degrees, in the literal sense. A tight grid would be at 20°, whereas a broader one gets out to around
90°. Because of their shape, these light modifiers are also known as “honeycombs.”
When a honeycomb is placed over a snoot, the resulting light is a very tight pool.
Some lighting instruments have optical spot attachments.
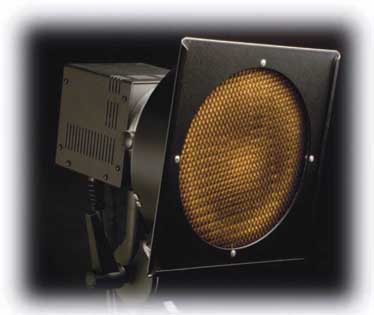
This allows for a very tight, very focused light. (Please see Chapter 11, “HMI,” for more on this.)
Though most grids are intended to fit over lighting instruments, as does the Novatron grid (left), the grid above fits over the snoot on the opposite page.
The grid, for the snoot, is excellent for tiny spots of light in portraiture or product photography.
What Umbrellas Do
There is no single lighting tool associated with any branch of the photographic profession today. At one time, umbrellas were related with portrait photography. Many portrait studios used one as a key light and another as a fill. Silver and white used to be the standards. The belief was that silver provided a more contrast-oriented light and white was the better choice for flattering images. That’s what photographers thought customers would buy the most.
Big Light
Umbrellas take a small light source and create a big soft pool of light. The parabolic shape of the umbrella allows light to strike the back and sides of its surfaces and scatter light all over the place. Because it is scattered, it softens the illumination.
Everything from big studio flash to smaller battery-operated flashes work in an umbrella.
The Color of Umbrella Light
As with other light modifiers, the surface of the modifier dictates the characteristics of the light. If the surface is gold, the light is warm. White should be as pure as the light source. A silver umbrella creates a sharper light than a white one. An observant photographer studies the subject and the mood and selects the umbrella that expresses the moment the best. In a multiple-light-source shot, white, silver, and gold can share duties.
Umbrella Efficiency
Because the umbrella tosses light all over the place, the upside is a beautifully soft light. The downside is that what starts out as a highly powerful light source has probably lost more than one stop of efficiency.
A metallic surface is more efficient than a white one.
Smaller umbrellas direct more of the light than larger ones. So the small umbrella makes the most efficient use of the light.
To prevent light from spilling all over the place, reflecting light off of unwanted colors and surfaces, use an umbrella with a black back cover. These are removable.
The Umbrella Toolkit
Westcott is the reigning king of the photographic umbrella. They have been in the umbrella business for over 80 years. Westcott private labels umbrellas under some of the best-known names in the lighting business. We have been using their umbrellas exclusively for over a third of their history.
The umbrella is one of the cheapest light modifiers available. Any self-respecting professional photographer will have a huge supply of umbrellas in many sizes and colors in their treasure chest.
Make it your goal to personalize each image to your subject’s best appearance.
If you shoot with umbrellas, custom-tailor each photograph to make your subject look their absolute best.
The umbrella’s parabolic shape allows the light to scatter over a wide area. The color of the umbrella, as well as its size, determines the color and contrast of the light that is produced.

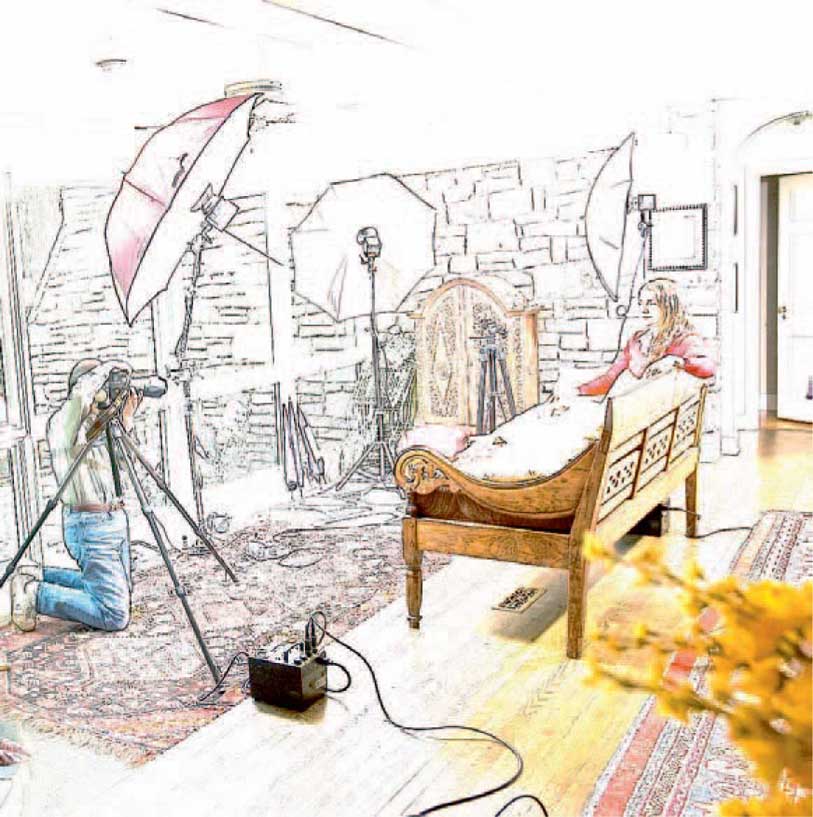
Multiple Umbrellas for Soft Light
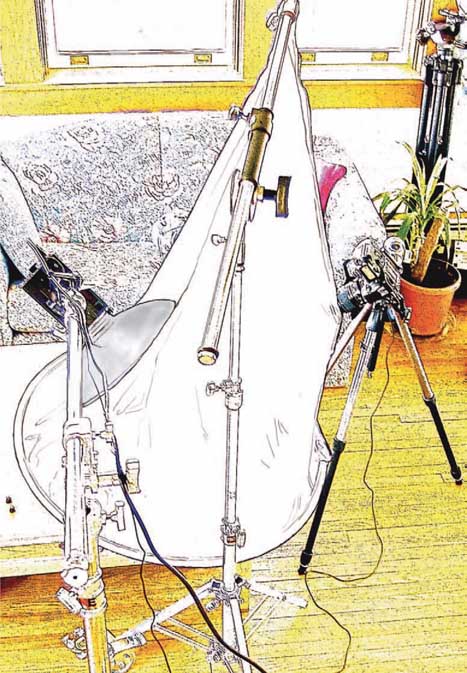
In the image to the right, we have employed three umbrellas. One is our key, the other a fill, and the third one floods the background. Each umbrella is unique and has a special purpose. This commercial-oriented image was once considered to be the wrong environment for umbrellas. Today, nothing could be further from the truth.
Another three-umbrella technique is to form a triangle of umbrellas over the lens. The softness and flood of light wraps itself around the subject with more visual flattery than most subjects will ever know.
The use of three umbrellas provides a key light, a fill light, and background light, to gain three dimensional qualities.
We have placed the three light sources to provide a fair amount of general illumination as well in this ample shooting space. Because of the white ceiling, there’s a fair amount of bounce.
Westcott has some impressively large umbrellas, too. It takes a little rigging, but their 86″ optical white oversized umbrella is a full-length shooter’s dream come true.

Tech Specs
Photographer
Brian Stoppee
Stylist
Tracey Lee
Illustrator
Janet Stoppee
Camera
Nikon D2x - ISO: 100 · Shutter Speed: 1/250 Manual Mode
Lens
AF-S Zoom-Nikkor 28-70mm f/2.8 IF-ED @ 70m 35mm Focal Length: 105mm @ f/4.5
Lighting
2 - Novatron 1,000 Ws Digital Power Packs
3 - Novatron Fan-Cooled Bare Tube Flash Head
1 - Westcott 45″ Silver Umbrella
1 - Westcott 45″ Gold/White Umbrella
1 - Westcott 45″ Silver/White Umbrella
Light Meter
Gossen Starlite
Support
1 - Gitzo Explorer
1 - Gitzo Off Center Ball Head
3 - Novatron Heavy Duty Stands
Software
Adobe Bridge, Camera Raw, and Photoshop
Corel Painter
Talent
Justin Mabrie
The New Umbrellas
Some umbrellas don’t look like umbrellas anymore. Westcott’s Apollo and Halo are good examples of this.
Our key light, in the image to the right, was shot with a Halo. It looks more like a light bank than an umbrella. The round Halo and four-sided Apollo have not lost sight of their umbrella frames. Unlike a light bank, they mount on a flash head’s umbrella opening, without the need for speed rings. They’re quick to set up and strike. These forward-focused designs spread light at 104° to 140°.


Another Westcott innovation is the Master’s Brush which provides variations of the Rembrandt and butterfly lighting that many accomplished portrait photographers strive to create. The complete kit includes a multilayered front panel and barn door, plus a unique internal baffle that self-feathers light between the center and the outer edges, over a 2-stop range.

Tech Specs
Photographer
Brian Stoppee
Stylist
Tracey Lee
Illustrator
Janet Stoppee
Camera
Nikon D2x - ISO: 100 · Shutter Speed: 1/250 Manual Mode
Lens
AF-S Zoom-Nikkor 28-70mm f/2.8 IF-ED @ 70mm 35mm Focal Length: 105mm @ f/11
Lighting
1 - Novatron 1,500 Ws Digital Power Pack
2 - Novatron Fan-Cooled Bare Tube Flash Heads
1 - Novatron M600 MonoLight
1 - Westcott 54″ Round Halo Mono
2 - Westcott 12″ × 36″ Strip Banks
2 - Westcott Novatron Bare Tube Speed Rings
Light Meter
Gossen Starlite
Support
1 - Gitzo Explorer
1 - Gitzo Off Center Ball Head
3 - Novatron Heavy Duty Stands
Software
Adobe Bridge, Camera Raw, and Photoshop Corel Painter
Talent
Richard Spencer
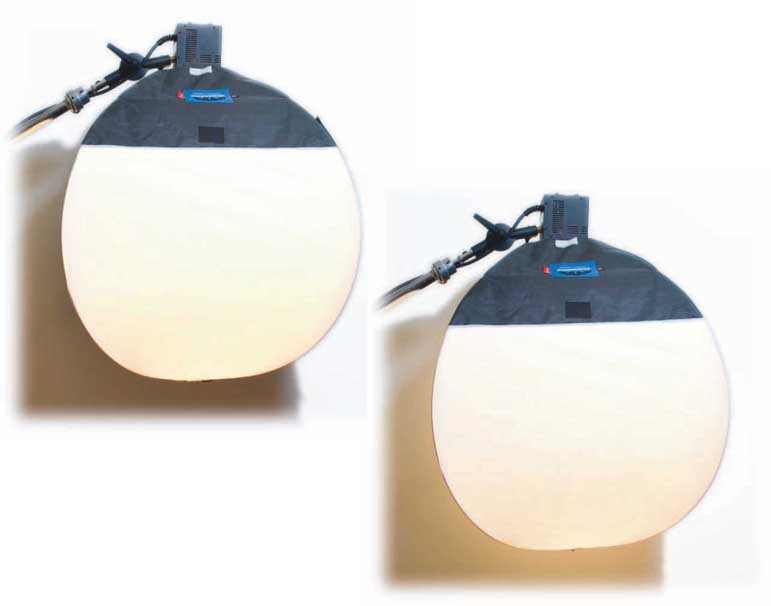
Light Bank Technology
A well-designed light bank produces a quality of illumination that resembles the softness that comes through a window.
This window-light look has been attempted by some using foam or card stock and some duct tape. This creates a hot box. It not only endangers the life of the lighting instrument that’s in the box (a costly error) but could cause a fire situation or the heat could just cause the thing to fall apart and damage something, or worse, injure someone.
Nevertheless, that’s the sordid history of the light bank. Many commercial photographers a few decades back became enamored with the light that their homemade contraptions could create. Over time, an entrepreneurial photographer or two created the commercially available light bank and wise professional photographers retired their favorite fire-traps once they were beyond being held together with another patching of duct tape.
What to Look For
Unless you are a studio-bound photographer and plan to set up your light bank and not take it down until you move from that address, when choosing light banks, you want ones that are easy to assemble and strike. If you shoot on location, you have to be comfortable in making that happen quickly. Though many days (months) go into designing a great light bank it should require only a few minutes to assemble.
How It Works
There are plenty of lousy light banks available. The rods are flimsy. The fabric is thin. The speed rings are cheap. They’re not designed for light efficiency. Things just don’t fit together very well. Heat builds up and the fabric feels hot. Light spills where it isn’t supposed to go. Illumination isn’t even, with the center hotter than the edges. The whole system seems not ready for professional use.
On the next two pages, we’ll get into speed rings and how to set up a light bank.
Unlike an umbrella, where the light source faces away from the subject, in a light bank, the light source is pointed directly toward the subject; yet in a great light bank, the light is very even. Why?
Light not only travels through two diffusions screens before exiting the bank, but it is also reflected off the back and scattered in many directions. Additionally, less than 100% of the light is transmitted through the internal baffle. Some is bounced back, creating an even softer light. Once the light does exit the exterior diffusion material, the bank’s front panel is recessed enough to create a black lip that prevents unwanted light spill and possible lens flare. The lip also permits the installation of accessories, such as grids or barn doors.
The interior baffle is removable to add a little more power output.
One Size Does Not Fit All
Light banks range in size from Chimera’s and Westcott’s 12″ × 16″ to Chimera’s 15’ × 40’ F2.
Interior surfaces are available as white or silver, from either company.
Smaller banks are able to focus light into a specific area. A 24″ × 32″ bank is perfect for small-product photography or people shots where the light needs to be soft but directional. Choose a 36″ × 48″ for head shots and larger products or product photography where the light needs to surround the subject.
For full-length people shots and large product, you probably want a 54″ × 72″.
As difficult as it is to imagine shooting an entire car with a 24″ × 32″ bank, it’s tough to understand photographing a mouse pad with a 54″ × 72″. Again, it comes down to having the right tool for the right job.
In many situations, we use a smaller bank as a key light and a larger one as a fill. We have more on this size discussion for you on pages 282-285.

Speed Rings
The speed ring is the core of the light bank. It’s where the light source attaches and the place where the rods connect. That’s why we believe that a speed ring has to be strong. Not only does it hold together the whole bank, but it has to withstand the weight of the light source, which can be quite heavy and places a great deal of stress on the ring, when dangling from an extended boom arm.
Start by inserting the rods into the pockets of the light bank. Be sure that they are going in the right direction. Check the light bank’s directions.
Next, insert the rods into the speed ring.
Chimera has speed rings for all sorts of light sources ranging from on camera flash units, to bare tube flash heads, to small HMI continuous lights, to some of the most monstrous lighting instruments that the motion picture industry knows.
Westcott, too, has quite a range of available speed rings.
The Bones of the Bank
The rods, which are inserted into the bank’s sleeves, give the entire instrument its structure and form. Usually, these are four poles, but for special products, like the OctaPlus, it needs eight rods.
As strong as the longer metal rods may be, they are able to be pulled apart and doubled over for convenient storage.
On the Chimera Quick Release Speed Ring you can tighten down the rods with thumbscrews.

Quick Release
Chimera’s patented Quick Release Speed Ring is the one to love. The insertion points for the rods drop down 90° from the speed ring. It’s easy to insert the rods in them, secure the rods to the ring with the thumbscrews and then snap the whole thing into place.
When it’s time to strike the set, wait for the light source to cool and remove it. Then, just pull up on the release tabs, and the connection block holes drop back down. There’s no tugging and pulling on the rods.
Please follow the diagrams to the left.
Finally, pull the rods upward and the quick release clips will pop into place. When you’re done, pull up the quick release tabs and the rods will drop down.
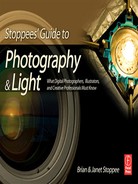
Light Bank Primer - Triolet
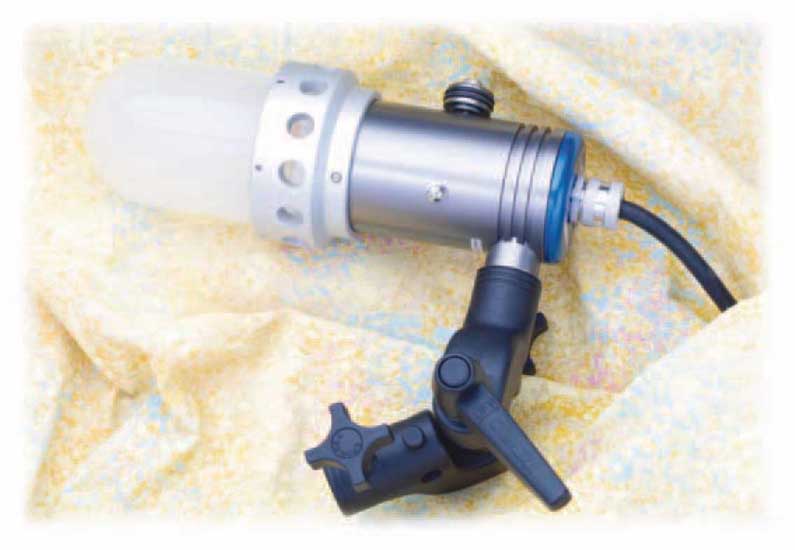
If you’re new to light banks and fine artificial light sources in general, Chimera has a way for you to get started by investing in something that will last your entire career and primarily be there for you as you expand into more powerful light sources, too.
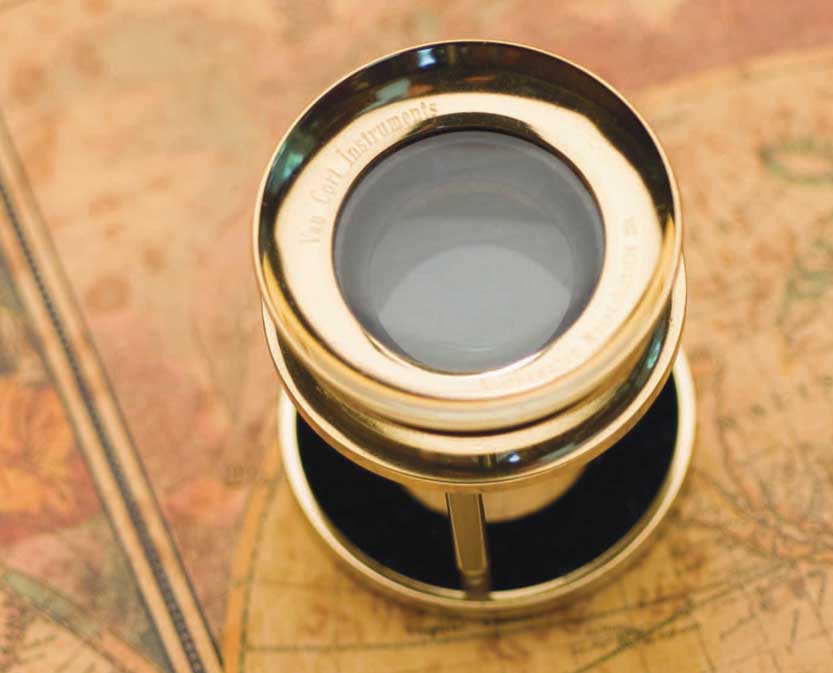
The handsome Triolet (pronounced like “try o lay”) works with three different styles of lamps. There’s the standard household base, a base for 650 watt 2-pin lamps, and the big Mogel base, for 500 or 1,000 watt lamps. An attractive protective glass dome assembly ought to be used with 2-pin lamps.
You’ll want plenty of power, so the 1,000 watt option is probably the best way to go, unless you like the comfort of the protective dome, which is smaller than the big Mogel lamp. The 650 watt 2-pin lamp sacrifices at least two-thirds of a stop over the 1,000 watt, though. Either choice gets you started with what’s called a “hot light.” Add something like a 24″ × 32″ Chimera Video Pro bank, light stand, and boom arm (see the next chapter for information on support systems), and you have an instant little tabletop photography studio.
The only downside of the Triolet is that hot lights are not the best choice for people photography. There’s just not enough power to capture movement, and it can require either a shallow depth of field or a slower shutter speed. However, for still life, you can mount your camera to a tripod and go for longer shutter speeds.

We suggest the light bank designed for video, because it’s tested for up to 1,200 watts of hot light power, but if you wanted to get into flash later, the video bank is just fine when you expand your system.
After careful consideration, we did the shot to the right without over-enhanced reflections on the upper right side of the loupe, feeling that the darker areas gave it depth and popped it out of the background.
Tech Specs
Photographer
Brian Stoppee
Illustrator
Janet Stoppee
Camera
Nikon D200 - ISO: 100 · Shutter Speed: 1/125 Aperture Priority
Lens
AF Micro-Nikkor 60mm f/2.8D 35mm Focal Length: 90mm @ f/2.8
Lighting
1 - Chimera Triolet - 1,000 watt Mogel Base
1 - Chimera 24″ × 32″ Video Pro Plus One - Small
1 - Matthews 2″ × 12″ Silver Finger
Support
1 - Manfrotto Tripod
1 - Gitzo Center Ball Head with Quick Release
1 - Matthews Baby Jr. Double Riser Stand
1 - Matthews Baby Boom
1 - Matthews Magic Finger
1 - Matthews Gaffer Grip
1 - Matthews 20lb. Saddle Bag
Software
Adobe Bridge, Camera Raw, and Photoshop Corel Painter
The Big Bank
We love working with large light banks, even on location. They setup in minutes.
Playing It Safe
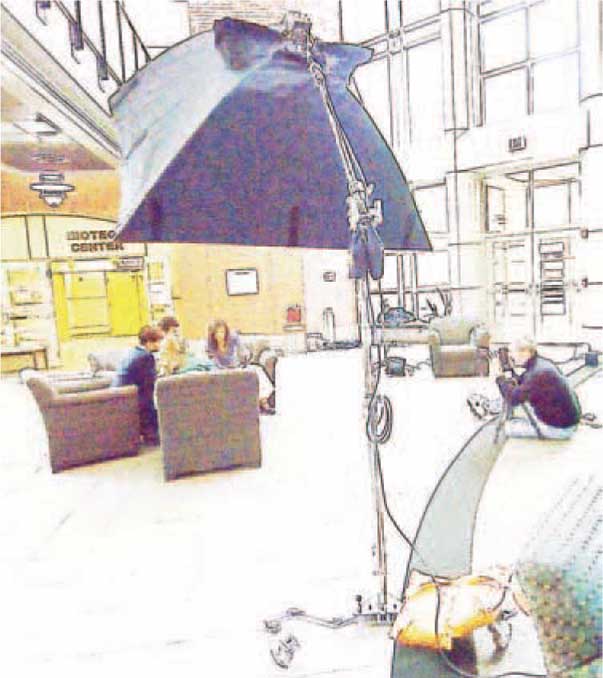
Though we were at the indoor lobby of a biotech park building, we still balanced the Matthews Magic Stand’s Runway Base with one of their 25 pound sandbags. We then hung a Matthews 15 pound Boa Bag from the back end of the boom arm, to keep everything stable. Additionally, in whatever direction the boom is pointing, we position the base so that the boom arm has a wheel, directly under it. That prevents it from tipping over.
We wanted the look of medical professionals conversing in a big space and the sense of their professional rapport. Rather than flood the space with light, we chose just one Chimera 54″ × 72″ Super Pro Plus - Silver. It keeps the lighting soft. The shadows are not unattractive, but the darker background gives the sense that they are working within the confines of their highly specialized field. We wanted the look to say something about the medical profession helping others. To add to this, we shot from the floor, looking slightly up, to provide a little more of a power position.
With a light-source-to-subject distance of approximately 6’ above the talent’s head, we had a very even spread of light. This worked well in containing the light to the main action with just enough fall-off as to not spill elsewhere in the room.
When shooting indoors or out, always secure lighting instruments and cables. Create a safe working environment for everyone. This is important in a public space. When hanging a large instrument from a boom arm, properly balance and weight it.
We try to shoot two stops down from the 1,000 watt-second power pack’s full power. This provides plenty of recycling time when working with people. (Please see Chapter 13, “Digital Studio Flash,” for more on this.)

Tech Specs
Photographer
Brian Stoppee
Stylist
Theresa Lent
Illustrator
Janet Stoppee
Camera
Nikon D2x - ISO: 100 · Shutter Speed: 1/250 Manual Mode
Lens
AF-S Zoom-Nikkor 28-70mm f/2.8 IF-ED @ 28mm 35mm Focal Length: 42mm @ f/4.5
Lighting
1 - Chimera 54″ × 72″ Super Pro Plus - Silver
1 - Chimera Novatron Bare Tube Quick Release Speed Ring
1 - Novatron 1,500 w/s Digital Power Pack
1 - Novatron Fan-Cooled Bare Tube Flash Head
Light Meter
Gossen Starlight
Support
1 - Gitzo Explorer
1 - Gitzo Off Center Ball Head
1 - Matthews Magic Stand with Runway Base
1 - Matthews 25 lb. Water Repellant Sandbag
1 - Matthews Boa Bag - 15lbs.
Software
Adobe Bridge, Camera Raw, and Photoshop
Corel Painter
Talent
Sherrie Hagan
Peggy Jackson
Jay Pearson
Elizabeth Prom Wormley
When Smaller’s Better
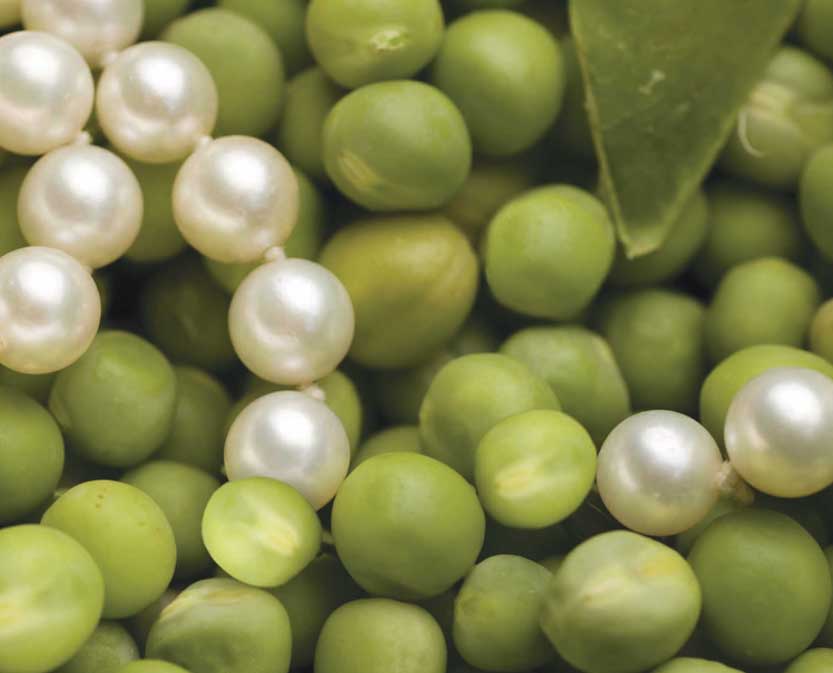
To properly light our peas and pearls we needed the perfect-sized light bank. One that is too large would flood the pearls, spreading highlights over the gems. A smaller bank would give us harder highlights. We needed to balance proper exposure for the peas and pearls at the same time. The Chimera 36″ × 48″ Shallow Plus Bank was the perfect candidate for the job.
Styling to Perfection
This is where so much of the shot is made by an ingenious stylist who has the props to make it happen at hand. Moving things a little this way and a little that way, while the photographer is watching in the viewfinder, is critical. Keeping the peas intact is a bit of a balancing act, whereby careful movement is necessary for the set to look fresh.
Light Source Size for Highlights
The light source is one bare tube head with a 250 watt modeling lamp. The fan-cooled head and the light bank allow the head to vent to the back. So the set remains cool.
In a tabletop environment like this, big flash power is not needed. We wanted a shallow depth of field so that the focus was on the spheres in the foreground, allowing the peas that are deeper down to fall out of focus.
We had to dial the 1,000 watt-second power pack way back. A 600 watt-second monolight would have been more than sufficient.
Choose a lighting instrument that provides the quality of illumination to fit your vision. Specular highlights mirror the light source. The size of the light bank determined the size of the highlights.

The Right Lens
A 60mm macro lens is perfect for this situation. We’re shooting with a Nikon D2x, so the equivalent focal length for 35mm film is 90mm. It’s close to a 105mm macro lens. At f/6.3, we have enough telephoto compression to slightly flatten the perspective on the little white and green orbs.
Tech Specs
Photographer
Janet Stoppee
Stylist
Tracey Lee
Illustrator
Janet Stoppee
Camera
Nikon D2x - ISO: 100 · Shutter Speed: 1/250 Manual Mode
Lens
AF Micro-Nikkor 60mm f/2.8D 35mm Focal Length: 90mm @ f/6.3
Lighting
1 - Chimera 36″ × 48″ Shallow Plus Bank
1 - Chimera Novatron Bare Tube Quick Release Speed Ring
1 - Novatron 1,000 Ws Digital Power Pack
1 - Novatron Fan-Cooled Bare Tube Flash Head
Light Meter
Gossen Starlite
Support
1 - Manfrotto Tripod w/Quick Release Head
1 - Matthews Baby Jr. Double Riser
1 - Matthews Baby Boom
1 - Matthews Boa Bag - 15lbs.
Software
Adobe Bridge, Camera Raw, and Photoshop
Corel Painter
OctaPlus Banks
Not all soft banks are rectangular. The Chimera OctaPlus Banks double the sides, but the OctaPlus 57 keeps changing in size.
5’ Now; 7’ Later
This eight-sided light bank converts from a 5’ OctaPlus into the 7’ one. The OctaPlus 57, with tools, uses a unique expansion kit to become two banks in one. Striking a median between white and silver, this bank’s soft silver interior has an exclusive graduated baffle. The spread of light is both even and highly efficient.
Just as there are light banks for flash and others for hot lights, the OctaPlus takes the heat at up to 1,200 watts.
This 60″ or 84″ super-soft umbrella also has a 36″ fixed-size kid sister, who, when compared to some umbrellas, is a not so small child. All of them are great for people shots. The big kids are fantastic for full-length, especially fashion and groups. This is one of those rare occasions when one size (that’s really two) practically fits all.
The standard Chimera speed ring doesn’t work here, because this has eight poles instead of the usual four. Use the special OctaPlus speed rings for these creatures.
Follow how the OctaPlus 57 goes together and converts, to the right.
This five foot OctaPlus easily expands into a seven foot eight-sided light bank.

A special designed internal baffle ensures an even illumination.

That internal baffle can be retained after extending the bank to seven feet.

The five foot bank grows to seven feet with the simple extension system.

When extended to seven feet, the adjustment easily adheres.

Lanterns, Pancakes, and Skirts?
Proving that Matthews does not have exclusive providence to funny names, Chimera has yet another clever lighting instrument that would appear to have been inspired by frequent visits to a Japanese beer garden.
The Lantern
The lantern is another light bank that doesn’t look like a light bank and takes on many lives.
For the photographer, the Lantern is an overhead soft light, hanging from a serious boom arm, like the Matthews Junior Boom, which extends to over ten feet. The Lantern can be a single source light or a light source that others are built around. It’s a big interior shooting space fill light.
It’s best with bare tube flash heads, so that the light spreads all over the place.
It’s great for HMI soft light heads, too.
Pancakes
All of these Chimera specialty light banks work with flash or hot (cakes) lights.
The 20″ diameter Lantern is 16″ deep and the 30″ Lantern is 26″ deep. A 21″ diameter Pancake is only 12″ deep. Its 35″ and 48″ cousins have similar diameter-to-depth ratios.
The Lantern has a reflective back panel, like a standard light bank, whereas the Pancake is open on all four sides. This works well in some applications but spills light all over the place in other uses. Obviously, it needs to be controlled.
Skirts
Chimera has given the controlling authority over that spilling light to a skirt.
Quite logically, a skirt is a removable, zippered panel. It allows you to manage the light’s fall-off, much as you would with a barn door on other lighting instruments.
How to Go Horizontal
Because photographers like the look of the Lantern’s or Pancake’s light, when they’re parallel the ground, first you probably need to mount it on a boom and then straighten it out. Please see the Drop Downs and Magic Fingers discussion on pages 310 & 311.
Creative Lighting Design
To put all of this into maximum use, you need to open your creative mind to full throttle. You can’t think in terms of standard lighting instruments. Instead, you have to be like the photographers who made their own light banks out of suboptimal materials a few decades back. Consider these tools and imagine the possibilities.
For some applications Chimera’s Lantern and Triolet are a perfect combination.
In the photo, above, the Lantern has the reflective back panel attached. In the image to the right, there is no panel in use. Notice the difference in the intensity of the shadow, that we purposefully created.
Filter Basics
There’s something magical about being able to change the color of light in a dozen different ways, in less than a minute simply by placing sheets of colored plastic in front of the light source. Once you get over the thrill, it becomes a studied, creative expression that you can fine-tune through exploration.
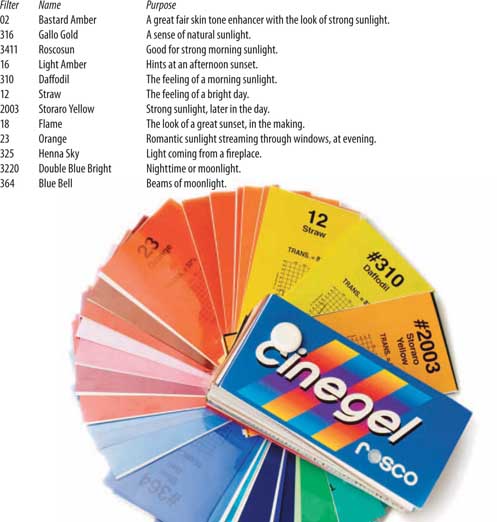
The Swatch Book
To get started, pick up a colored media swatch book. These are available for free, from select photo retailers, theatrical supply houses, or directly from the manufacturer.
The longstanding name synonymous with gels and filters for stage and film is Rosco. They have a huge catalog of media.
Their Cinegel line is extensive, and even though it is the grandfather, Rosco regularly adds new colors. Their swatchbook is more than a hand full of pretty colors, it includes valuable technical information for each gel.
How Gels Work
A colored gel is something of a gateway for wavelengths of light. It permits the transmission of some spectral energy and absorbs the rest. Going back to the red, green, blue color models, imagine a red filter permitting the wavelengths relative to red to pass through the filter and onto the event, with the blue and green ones being refused admission to the lighting party.
Stability and Safety
On initial examination of filters, “stability” is not a word that immediately comes to mind. It’s a thin flexible medium. These big beautiful sheets of color are so inexpensive and easy to cut into pieces that at first they either seem disposable or too precious to ever want to mar. Gels are fun.
Lousy gels are serious business. The absorption of energy builds heat. Poor heat stability not only degrades the quality of the filter, but can also be a fire hazard.
Even the best filters need room to breathe. Not only does the filter absorb some of the light energy if improperly adhered to a lighting instrument, but it also prevents the light from being able to perform with proper coolness.
Stable cool media lasts a long time in total safety, so it’s not to be feared. Consider the gelled lights in theaters, where shows run more than once a day with the same color media and operate without a hitch.
Spectral Energy Distribution
Each color in the Rosco swatchbooks have a little piece of white paper behind them. It helps you see the color more plainly, but it has some good information on it, too. There’s both a transmission percentage and a graphic.
The baseline of the graph represents the wavelengths of light expressed in nanometers (nm), running from left to right and from blue to green to red (in the most simple terms). The top to bottom side of the graph shows how much of the wavelength transmits.
Transmission Percentage
Even if the graph doesn’t rev you (though it should), check out the transmission percentage of each color, which has quite an effect on the success of the image you want to create.
A mainstay of theatrical lighting is Rosco 02 Bastard Amber: 78% of the light is transmitted through this color. There’s not a preponderance of light intensity that is lost.
Something as vibrant as 65 Daylight Blue, however, transmits only 35%.
If you had two lighting instruments with one of each of those gels in front of them, your light meter would measure more light from the amber than it would the blue.
Bastard Colors
Much of the available color media are blends of color, rather the pure chroma. The colors are based on market demand. We are often looking for light that appears neutral and natural. That’s what is achieved when the predominant color is blended with a little bit of a complementary color. A bastard orange is a pure orange with a minor amount of blue worked into it. The result is a pleasing warm color tone.
Gelatin?
Most gels are no longer a gelatin. When Rosco got started in 1910, they did make colored gels. By the 1950s color filters, like the Roscolux, went onto a polycarbonate base. It’s a durable polymer.
This has taken the fun out of asking overconfident assistants to wash off a beat-up color gelatin carefully, in warm water, and watch the look on their faces when it returns to a liquid state.
Today, dyes are introduced to their polymer bases by either surface-coating, deep-dying, or creating a material with the color in the body of the material.
Surface-coating basically paints a color on a piece of plastic. It’s inexpensive to manufacture and uses no heat, so it’s not a heat-resistant filter. It’s easy to figure whether you have one of these: put a little nail-polish remover on the color and it will dissolve.
Rosco’s Cinegel line is deep-dyed. The color is suff used to the polymer and more heat-resistant.
Roscolux, at 4 mil thickness, has a color base that is sandwiched between resins melted together at close to 600°F. The result is a high-performance color medium.

Lighting Designer Color Tricks
Broadway’s stellar lighting designers, who have a few Tony awards to call their own, have a few standard tricks that they do with color filters. Hollywood uses some of these, too.
We know very few professional photographers who employ these color conventions in their photography. Those photographers who do employ these little secrets create a very special look to their images that you may not be able to point to and instantly exclaim, “Ah ha! 305 Rose Gold!” but you can tell that their light has beautiful tones of color that resemble nature’s colors.
Create Color Moods
Please carefully study the charts to the right. They are a quick guide to some of the commonly used filters for warm and cool moods, plus accent colors and colors that imitate natural conditions.
The best way to sort these out is to quickly knock out a bunch of test shots with similar color tones and examine the effect. Keep the transmission numbers in mind, because as you hold these up to the light source, a color that reduces the light’s transmission by a third of an f-stop will look different than one that reduces it by a full stop.
It’s a reason to pop a Cinegel swatchbook in the bag with your light and color meters.
Diffusion Materials
As we have been discussing, there are many ways to diffuse light. Sometimes the quickest remedy is to place diffusion material over the lighting instrument, much as if it were a filter.
There is not a universal diffusion material that answers all needs. As with choosing filters, these materials are so inexpensive that there’s no good reason for you to not have a library of them to choose from, as the needs arise. Again, pop them into the frame of a barn door or gel holder and test a few.
Tough Diffusion?
Rosco uses the term “tough” to denote that their diffusers are heat resistant. The base material is a polyester. It even works safely on high-wattage lighting instruments.
Tough Spun
This group of three diffusers feathers the edge of the light’s beam while smoothing the field, allowing the shape of the beam to be retained without causing the angle of illumination to spread dramatically.
As with any diffuser, contrast will be reduced, but with the tough spun group, the degree of diffusion is minimal.
These are more flash oriented than for HMI, as the HMI can make the texture of the diffuser visible in its beam.
For photographers, these are available in two grades from the more intense to the less diffuse: 3006 Tough Spun and 3007 Light Tough Spun.
Tough Frost
Tought Frost is the most popular diffusion material among photographers. Unlike the tough spun group, which resembles a fabric, the tough frost materials look more like colorless frosted filters. Their diffusion characteristics range from slight to moderate. Therefore they have a moderate beam spread. They offer some contrast reduction as well.
For photographers the most popular include 3008 Tough Frost, which diffuses and has a “warm” center. 3010 Opal Tough Frost is excellent for HMI, with minor transmission loss. 3040 Powder Frost has only a moderate amount of diffusion.
Tough White Diffusion
This group offers a moderate to significant diffusion, in three even grades: 3026 Tough White Diffusion, 3027 Half Tough White Diffusion, and 3028 Quarter Tough White Diffusion. It’s named for the white pigment that is included in its manufacturing process. These diffusers reduce the shadow from the instrument’s beam.
Though Rolux
The two Rolux diffusers, 3000 Tough Rolux and 3001 Light Tough Rolux, are used to take two light sources and offer the appearance of one beam of light, because of their wide beam spread and shadowless effects. Their reduction in contrast is noticeable.
Grid Cloth
Rosco has 48″ wide rolls of grid cloth that is a reinforced woven polyester material in three grades: 3030 Grid Cloth, 3032 Light Grid Cloth, and 3034 Quarter Grid Cloth. The contrast reduction is considerable. It’s so rugged that it can be sewn and grommetted. It also comes in 60″ wide rolls of a similar material that is noiseless in windy conditions.
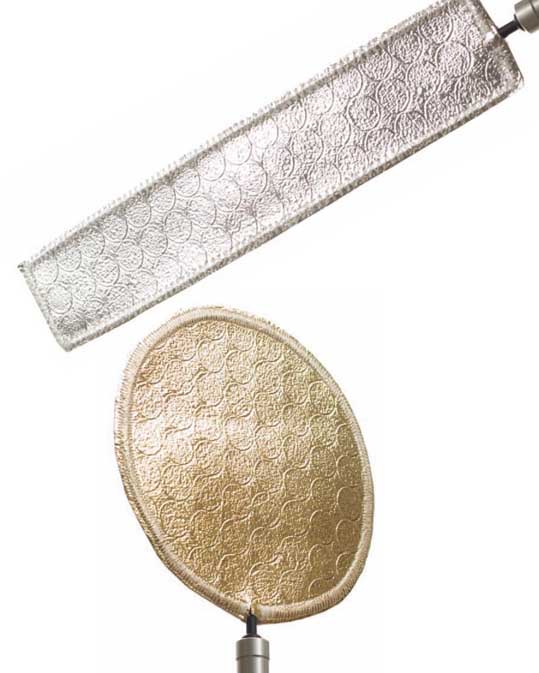
Reflection Materials
Take one reflection panel, like the Matthews Aluminum Hand Reflector, and give it many purposes by clamping different reflection materials to it.
Rosco has some great reflector materials. The letters in their product names indicate how much surface texture they have and the light quality of their reflection:
3801 Roscoflex M (mirror)
3802 Roscoflex H (hard)
3803 Roscoflex S (soft) - pictured top
3804 Roscoflex SS (supersoft)
3805 Roscoflex G (gold) - pictured 2nd
3808 Featherflex S/W (silver or white)
3812 Featherflex S/G (silver or gold)
3813 Thin Mirror S (silver)
3814 Thin Mirror G (gold)
3809 Roscoscrim (textured/perforated) - pictured 3rd
3830 Spun Silver (spun silver foil) - pictured 4th.

Polarizers
One of the most magical filters you will ever put over a light (or two) is a polarizer.
The polarizer reduces glare from a subject. It is not a replacement for the polarizing lens that you put on your camera, but the principle is the same. Using polarizing filters on a couple lights, in conjunction with a polarizing filter on your lens, is known as “cross polarization.” Unfortunately, it can produce a more deeply saturated image, so it’s not a panacea.
This method requires a bit of experimenting to optimize its effectiveness. You have to develop a sense for how much reflection you want to reduce.
Try rotating the polarizing filter on the lighting instrument.
Rosco’s 17″ × 20″ sheets are perfect for use on a 16″ pan reflector. Experiment with two lights at around 45 to 55° from the subject.
This approach works on crystal, metal, high-gloss surfaces, and even water. It’s an excellent solution to the hot spots that these reflections produce. With the filters, you can keep dialing out the reflections as you rotate them.
Fire off a few variation shots.

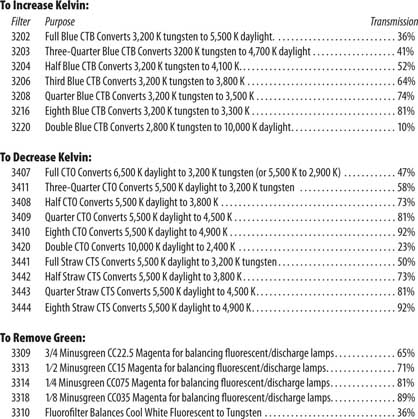
Color Correctors
Sure, you can accomplish plenty with the white balancing controls of your digital camera. However, when you are deal with mixed light sources that are unwanted, your only response is to correct the light source.
Crafty photographers, like cinematographers, rely on filters and a little tape.
A kitchen’s concealed fluorescent tube wrapped in Rosco 3309 3/4 Minusgreen converts the green of cool white fluorescent to daylight. Only 65% of the light is transmitted. However, with Rosco 3313 Half Minusgreen, there is not as much correction, but 71% of the light is transmitted.
If you have white balanced to tungsten, use a 3310 Fluorofilter over the fluorescent tube.
You can do the same with tungsten lamps.
When you have many fluorescent fixtures, you have a challenge that’s impractical to resolve by filtering all of them. Make it easy. Add 3309 to your flash instruments and white balance your camera to fluorescent
Use the handy chart to the right to balance light in just about any situation. Be careful of the transmission percentages.
Remember to allow the fixture that you are covering enough space to breathe.
Blue and Green Screens
We’ve all seen pictures of a broadcast news studio with the meteorologist delivering the weather segment in front of a green wall. Of course on our televisions, we see the same person standing in front of animated maps of radar and satellite imagery.
Color
This green or blue screen technology is generally referred to as “digital compositing” or “chroma key.”
Whether the screen is green or blue is not as important as the subject not wearing clothing of the same color. That makes it tougher to knock the background out of the image. Have you ever seen a meteorologist wearing a bright green tie? If so, you would see the map where his tie appears.
Lighting
Even illumination of both the subject and the background makes it easier to remove the background color in postproduction and replace it with something else. The typical lighting setup is similar to what we discussed for polarizing filters, two pages back.
If the subject is too close to the screen, they can cast a shadow on it, making postproduction more cumbersome, or the screen’s color will reflect back on them. (Green and blue highlights on flesh are rarely considered to be a healthy look.) Making this quick and painless is the trick to chroma key.
Having the background image in hand is helpful in planning how to light the subject. For it to look natural, the light quality and angle of illumination need to match.
This a good job for light banks.
Try to have as much light on your background as on your subject. This is best at a 1:1 lighting ratio. If you meter your subject at f/8, light your background to f/8 too.
DigiComp Media
To make this all the more fun and to rev both your technical and creative imaginations, Rosco has introduced a slew of products they call “DigiComp.” They have paints, tapes, and fabrics, in red, green, and blue. (Red isn’t used much in chroma key with people, because it too closely resembles flesh tones.)
These tools allow you not only to use a big roll of the fabric as a background, but you can also paint things the same color and knock them out as well in post.
If your model is to be holding something of incredible weight, in one hand, a DigiComp blue object and matching background makes it all possible without too much postproduction time.
The paints are a flexible vinyl acrylic binder, so they adhere well to many surface types and clean up with ease. Unlike some tapes, these do not leave behind any sticky residue. The fabrics are 100% cotton and impregnated with color.
Having the entire system match is crucial to making this work.
Postproduction
If it’s done right, by the time you get to Photoshop, a simple Select > Similar should do the job after choosing a portion of the background. Because you want to be sure that the new photo that is merging with the existing one works, you’ll want to be able to see a test of the composited image, right away.
