Chapter 13
Digital Studio Flash

The AC powered flash system has been the lighting tool of choice for professional photographers over the past few decades. It has continued growth in the digital age, making the flash equipment of the previous century appear obsolete.
The advantages of these big light sources are significant.
A good flash system should produce light with a color temperature around 5,500 Kelvin. It must balance beautifully indoors or as a supplemental light source outdoors.
Technology has reduced the size of the lighting instruments. The light-making devices that were once the proportions and weight of a crate of apples can fit in a camera bag today. No longer do photographers have to fear blowing the circuit breaker while on location because their power pack demands 20 amps of power.
AC flash produces enough light to get great depth of field and stop action, as well. For the tabletop shooter looking for f/22, this is the answer.
Additionally, it offers some good recycling time. For people shots, this lets you knock out shot after shot as you see the action happen before your camera’s eye. Whether you’re shooting fashion or kids, the time is now.
Today, accurately adjusting power in increments of a tenth of a stop allows the photographer to fine-tune a photo and repeat it, again and again.
There’s no good technological reason for it, but photographers just love that “big pop” when the flash fires. It has some sort of “I’m in the big time!” feel about it. The talent gets into it, too. It has come to define the rhythm of some photo sessions.
The System
Part of what photographers love about studio flash is that it’s part of a big system.
There are many interchangeable components, so you are able to customize the system to your own needs.
It’s much like a camera system. You want to choose a line that you like. Flash heads that work with brand A do not work with brand B, so this is an important decision.
There are plenty of new, unproven players in this game. Stick with a line that has a few decades of history.
The digital image-making world is a new one. You don’t want to build a system only to find that it’s no longer being made or serviced.
Look for a dealer and service network, too. If you are starting a system, you want to know that new components are readily available from many sources and that if something ever happens to it, there are many service outlets.
Some photographers travel and rent additional packs or heads when they arrive at their location. They like to know that their line of flash equipment is available in just about any city where they work.
Power Packs and Heads vs. Monolights
It used to be that one side of the aisle swore that a system of power packs and flash heads were the only way to go. The other side argued that carrying around two components to do one thing made no sense. They felt that it was best to combine the two as a single, integrated flash source that is often generically referred to as a “monolight.” Some manufacturers had just the packs and heads and others only did the monolights.
With time, the market changed. The pack and head photographers, who may have been studio-bound had to be able to grab-and-go to do location shoots. The pack and head suppliers responded to the market need and began to supply both.
Power Packs
The pack is the central control unit for the flash heads. Usually, three or four (or more) heads plug into the pack. Some packs parcel out the power to heads much like an audio or video mixing console.
Power packs convert AC energy to DC using a transformer. The energy is then stored in a bank of capacitors, just as with a battery-operated flash. The only difference is that the power pack needs to generate plenty of energy, so these electrical storage tanks can be quite large.
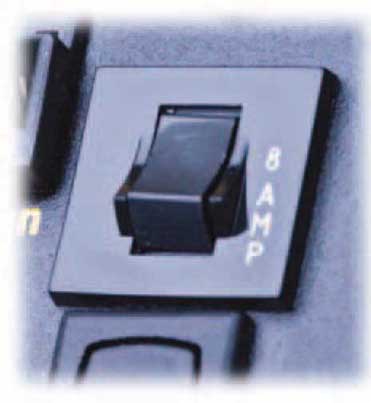
The voltage is in the 300 to 900 range. Sometimes it’s more. As we regularly stress, this is plenty of power and it must be respected. Never attempt to service any part of the system yourself.
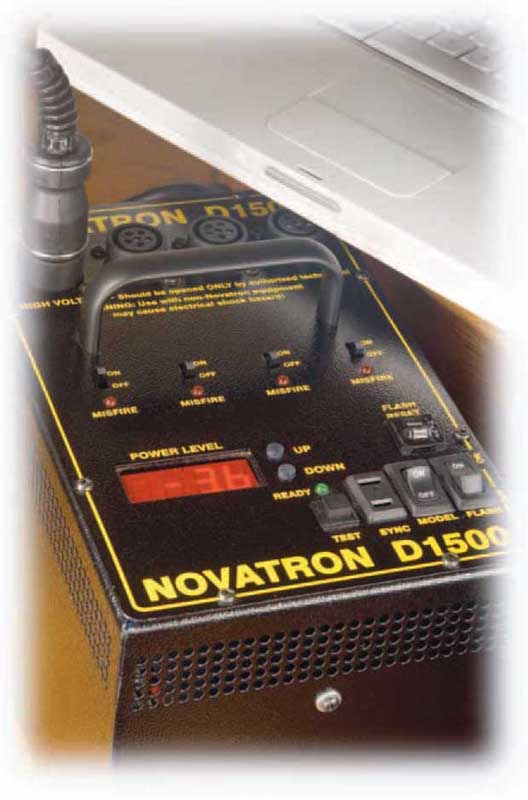
Size and weight are considerable factors when choosing a brand of flash lighting. Above is a top-of-the-line Nikon camera, with a significant lens on it, parked in front of Novatron’s largest power pack, the one to the left, under a Mac laptop.
Another high-voltage system uses two banks of capacitors, one feeding the other as needed. Not needing a big transformer reduces weight.
A single brand of studio flash usually has a variety of power packs to choose from. They vary in power output. The less powerful one usually weighs less, too.
Some photographers have big power that they keep at the studio, and take the smaller, lighter packs with them on location.
Shooters who exclusively do portraits have no need for the industrial-strength power that some big packs offer. If you work with umbrellas and always shoot around f/5.6 or f/8, you can save some money and some back strain, too.
However, if you shoot commercial photography and need f/22 from a large light bank, you have no choice but to get what the big boys use.
The packs are often rated in watt-seconds. We’ll explore that further on page 384.
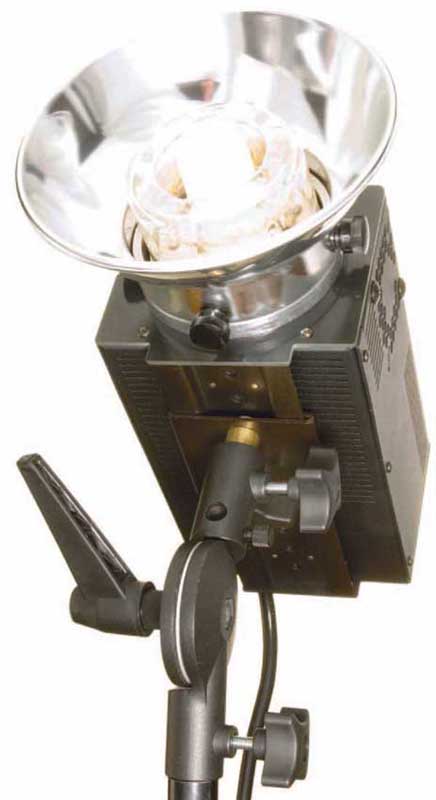
Flash Heads
The energy from the power pack is delivered to the flash head, on demand.
The heart of the head is the flash tube where a brief gas discharge takes place. Photographers love the daylight Kelvin temperature of the flash head.
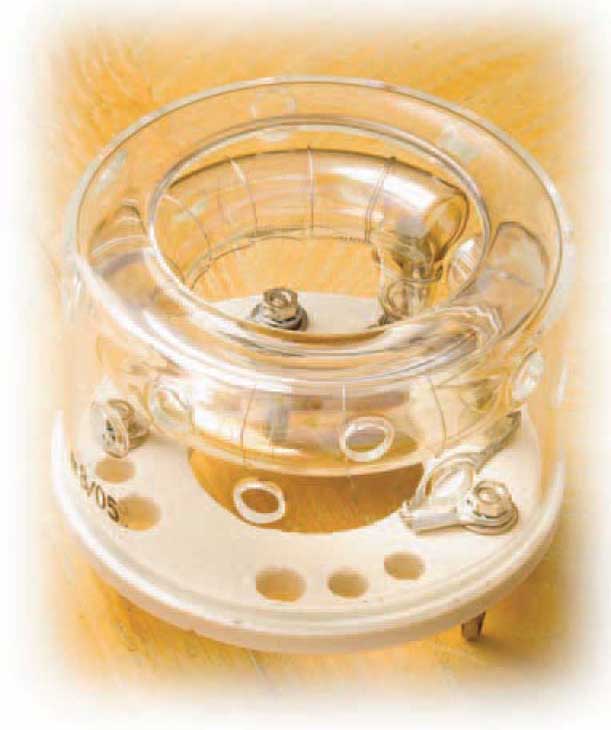
The often incomplete doughnut-shaped quartz glass flash tube is filled with a xenon gas With electrodes on either side of it. When a triggering electrode applies a pulse, it ionizes a gas path. The capacitor’s voltage is then discharged and the bright light is emitted.
Flash heads, like power packs, usually come in various shapes and sizes. Some brands have some smaller units with a built-in reflector to keep things compact. Other manufacturers have designed flash heads with more than one flash tube for their huge power packs.

We shoot exclusively with fan-cooled bare tube flash heads. We get deeper into the reasons for this on page 392.
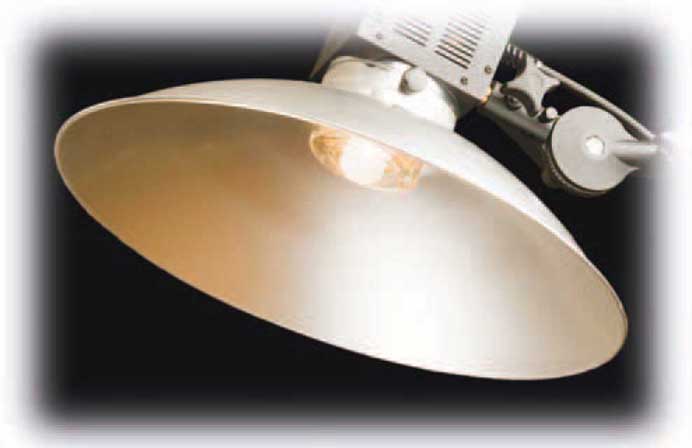
Modeling Light
Photographers want to visualize what they are going to see when the flash fires. To assist with this, the flash head includes a modeling light. These are often in the 250-watt range and are nestled in the center of the flash tube’s doughnut shape, in an effort to provide some resemblance to the light that the flash will create.
The modeling light should have a similar effect with the reflector, umbrella, light bank, or other accessories as will be seen by the flash tube.
Additionally, the modeling light creates its own ambient illumination. This prevents the human subjects from having dilated pupils when the flash fires.
Modeling lamps should remain at constant levels. For some reason, there are brands of flash systems that have the modeling lamp go out after the flash fires. Some feel that the bright light of the flash, followed by a second or more of total darkness, is not a good idea for the subject’s eyes. Others feel that the darkness makes children uncomfortable.
The Monolight Advantage
Monolights have some pluses over the pack and head route. They are pretty much a power pack and flash head fused together as one. You now have something of a flash head with all of the power pack’s controls on the back of it. A few of the reasons that we hear from photographers who love them include:
• They set up and strike fast.
• There are no cables running from the power pack to the flash heads.
• Just toss one or two of them in a case, grab some support, and you’re ready to go.
• There’s no need to share power with other flash heads.
The Monolight Downside
The minus column for the Monolight lists such things as:
• When you need to buy another light source, it’s more expensive than a flash head.
• The controls of the monolight are not sitting next to the photographer. If the monolight is on a boom, it’s tough to get to, unless there’s a remote control, which is another expense.
• They weigh more than a flash head, making a setup more top-heavy.
• They’re not available with the kind of big light output that high-end power packs offer, preventing a big burst of illumination from a single light source.
Our Take on Monolights
We integrate them into the entire system. Sometimes we use them as standalone light sources. Other times we have them sharing duty with the power packs and heads.
If a photographer already has a power pack or two and a few flash heads, adding a monolight or two is a great way to expand a system. They all should share the same accessories, so once you have gotten into one part of a system, everything from that same brand ought to work with it.
It’s all a matter of planning. We know if we’re going to need plenty of power or if we’re shooting light. If we can get away with not hauling out the big power, we leave it back at the studio.

What’s a Watt-Second?
There’s some unique jargon used in relationship to AC flash. Sometimes it does not make sense. Maybe the problem isn’t with you. Maybe it has everything to do with how the terminology is used.
Watt-Second?
You’ll hear photographers and the professional photo retailers use the term “watt-second” to describe the power of their flash systems.
When the utility company bills you for the electricity that you have used, they tell you that you have consumed X number of kilowatt-hours this month.
A watt-second is simply a smaller unit of the kilowatt-hour. It’s an expression of the electrical power that the flash unit consumes.
So what?
That’s a good question.
Why’s This Useful Math?
The reason this has become useful is because it helps you do some simple math. If you now own a 250 watt-second (Ws) power pack and it’s giving you f/8 in a setup that you use regularly, and you wish you could have one more f-stop, then double the watt-seconds and add a 500 Ws pack to your wish list. In the exact same setup, if you swapped a 250 Ws pack for a 500, you’d have f/11. If you need f/16, you guessed it, go for a 1,000 watt-second unit. If f/22 makes your heart sing, prepare to shell out a few dollars for the big 2,000 watt-second pack.
How else do you get more power? Get two power packs.
When Watt-Seconds Don’t Work
That seemed simple enough, but it becomes confusing when you’re trying to compare brand A with brand B.
Just because you have a very compact 1,000 watt-second power pack that’s faithfully providing f/16, won’t another 1,000 Ws pack from another brand also give you f/16? Chances are pretty small that you’ll find that to be true.
All brands of power packs are engineered differently. They work at different voltages. Some use smaller more efficient flash heads. Others know that the end user needs a bigger flash head crammed with a bigger flash tube.
Some power packs practically come up to your knee, but may produce less light than the one you can hold in your hand.
Does that mean the big unit is poorly designed? It might, but it might not. The brand of that bigger pack just consumes more watt-seconds so it has a bigger number.
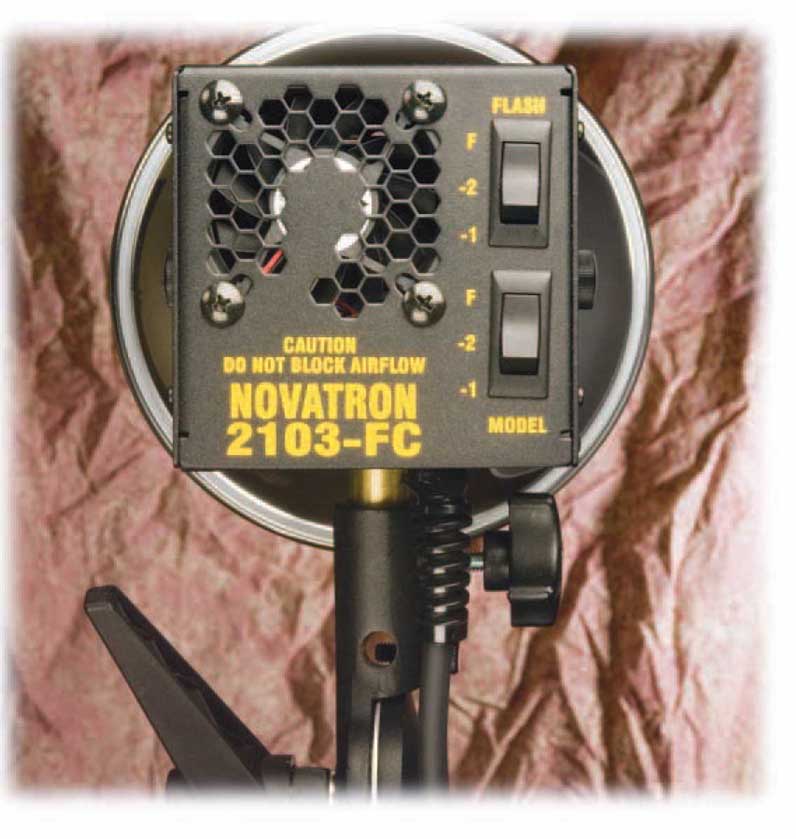
A few older style power packs, like the one below, still use watt-seconds on their control panels. Some photographers like that.
You need to become an informed consumer. Visit your professional photo retailer and do some testing with a good light meter. That should tell you all you need to know.
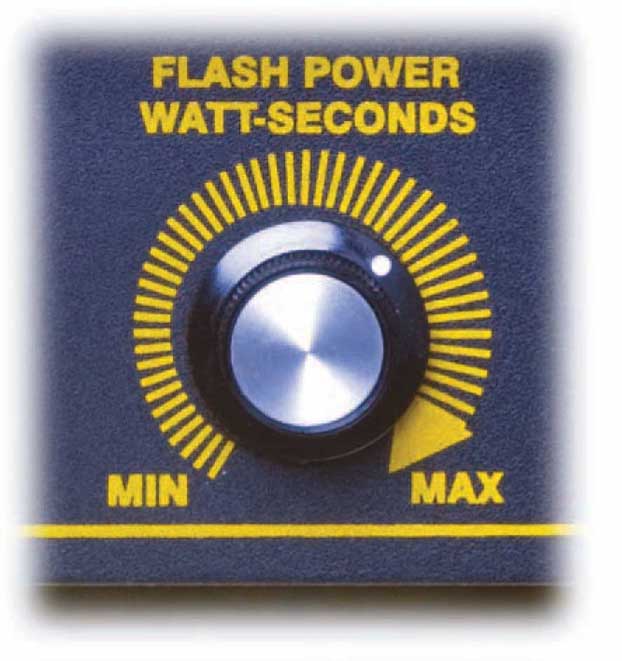
Light Output in Digital Increments
One of the many great joys of flash lighting in a digital environment is that once you have purchased your equipment, you can forget the whole watt-second thing until you need to expand your system.
Tenth-Stop Increments
Today, many digital flash systems work with something that we photographers know: the f-stop.
You can digitally adjust these power packs and monolights in increments of just a tenth of a stop. It’s completely accurate and it’s completely repeatable, day after day.
Not all brands have entered the digital environment. As your mother may have told you, “Don’t play with them.”
A great place to get started, with digital flash, is just one flash unit. That might be just one power pack and one flash head or it could be a monolight.
The Novatron 1,000 and 1,500 watt-second power packs allows you to adjust the light output over a 5.7 f-stop range, in tenth-stop increments. That means there are fifty-eight possible power level settings running from full power to -5.7 f-stops.
At full power, with a 600 watt-second monolight eight feet from the subject, if your flash meter measured f/22, you could adjust the full-stop light output as follows:
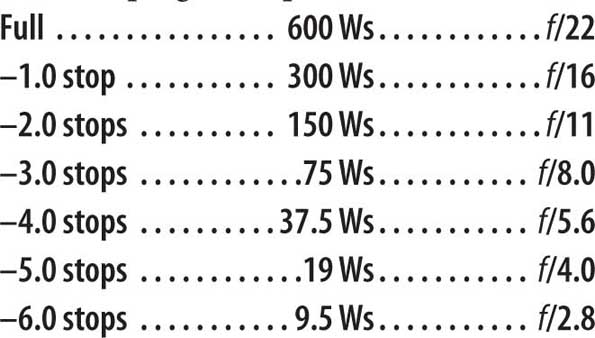
The amount of light that falls on a subject depends on many factors, such as the size of the space, the color of surrounding surfaces and their texture, the height of the ceiling, and so on. The numbers in our 600 watt-second sample are based on a monolight that is no longer in production but it is an excellent representative of how digital studio flash works.
As you make these adjustments your options change the LED display reading things like: -1.1, -1.2, -1.3, -1.4, and so on. These match your flash meter’s readings of f/11.9, f/11.8, f/11.7, f/11.6, and so on.
These packs are easy to adjust. Increase the output in by pressing the “up” button once, or hold down that button to fly through the complete increased output range until you get to “Full.”
Decrease output in the same way with the “down” button.
After you have selected the power you want, press the control panel’s test button to fire the flash head once, and your setting is locked-in.

Sync Cables and Going Wireless
When you press your camera’s shutter release button, the flash must fire in synchronization with the lens’s aperture and shutter.
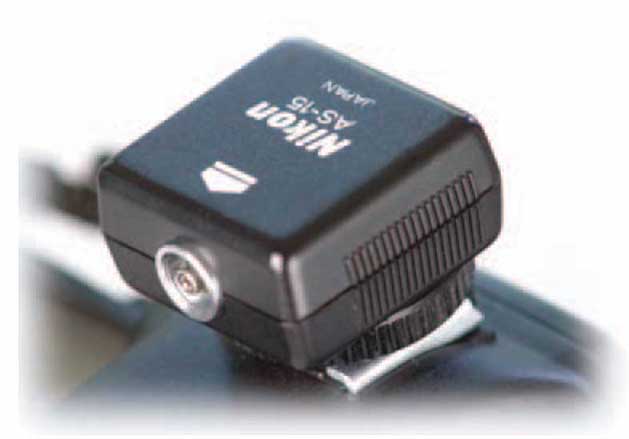
It used to be that photographers were tethered to the power pack or monolight through a sync cable. Around 15’ long, the sync cable runs from the power source to your camera’s flash sync terminal. If your camera doesn’t have such a terminal, there’s probably an adapter that slips into the accessory shoe intended for the on-camera flash unit.
On the opposite side of the sync cable, flash brands differ. There’s the traditional “household” (named for its similarity to a household A/C wall outlet) and the “phone” (which takes its name from the audio plug used for microphones and headsets).
Sync Cable Caution
Please be careful that no one plugs your sync cable into an AC wall outlet. Don’t allow children to play with these cables.
Reverse the Polarity
Sometimes a sync cable doesn’t allow the system to fire. Chances are good that there’s nothing wrong with it.
Flip the household side 180° so that the prong that was on the right is now on the left. Try it again. It may fire now.

Going Wireless
As with most things, wires are a thing of the past. Many professional photographers gave up on sync cables a long time ago.
The cable between the camera and the flash generator can be dangerous. If someone trips over the cable, the camera can be pulled from your hand or the tripod that’s holding it toppled to the ground.
Photographers prefer a digital wireless flash and camera trigger. It’s a very simple yet necessary system.
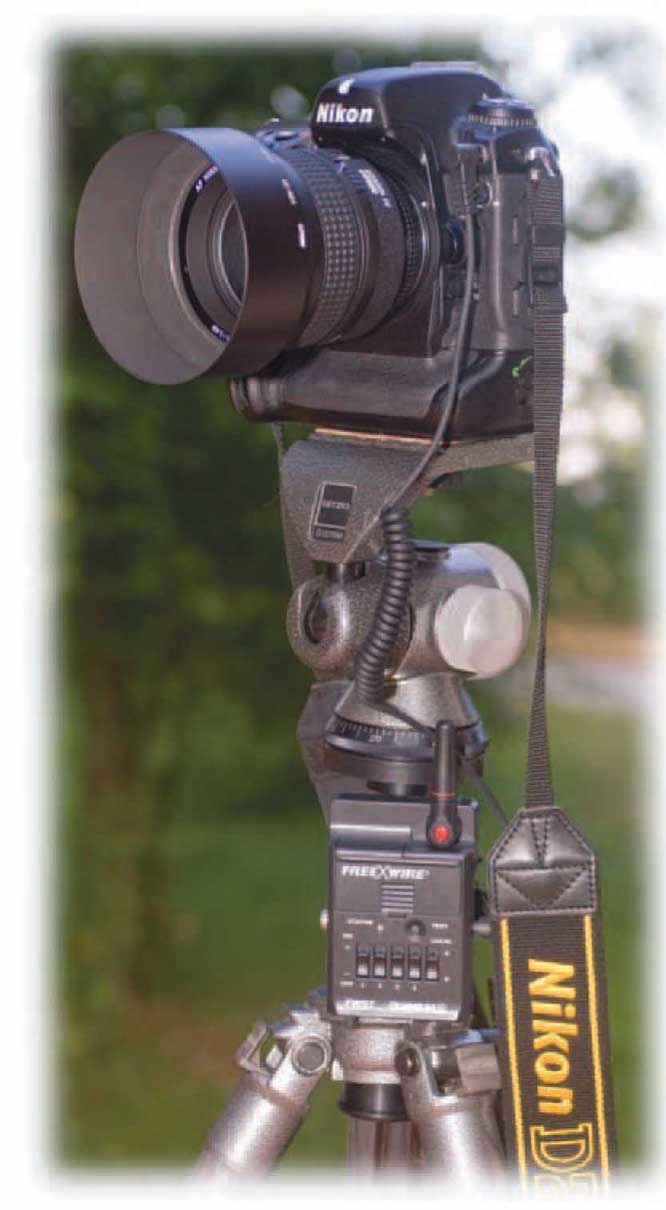
The Transmitter
On the camera side, once the shutter is released, a signal must be sent to the flash generator. Just like attaching the sync cable to your camera, a short wire needs to run from the camera’s flash sync terminal to the transmitting device.
So that it transmits flawlessly, our Quantum FreeXWire needs a unique channel code. Just flip at least one channel switch up on the back panel.
You can mount the transmitter on a power bracket or tripod.
Many photographers prefer to use an optional hot shoe adapter, which does away with the wires, placing the transmitter on top of the camera. Quantum provides this free of charge when you register.
The receiver side of the Quantum FreeXWire system plugs into the light generator. With multiple transmitters, one camera can fire many light sources.

The Receivers
Set the receiver to the same channel as the transmitter and run a sync cable from the receiver to the flash generator.
Here’s where it gets even more fun. We shoot with plenty of power. We often need to hot-wire one power pack to another.
Skip that.
Add an extra receiver. As long as it’s on the same channel, the transmitter triggers two packs or monolights simultaneously.
Great for Multiple Photographers
We have shot more than one project in studio at a time. This makes traditional slave units impossible. When one photographer’s flash fires, the other shooter’s fires, too.
Quantum’s FreeXWire transmitter plugs into the camera’s sync outlet and straps to the tripod. Should your camera not have a sync outlet, it’s available as an accessory that slides into your camera’s hot shoe.
This is made worse for those who cover events where many flashes are going off simultaneously, such as weddings, sports, and news stories.
We often shoot with two photographers who are making images at the same time. We have worked with as many as four at a time.
If everyone is set to a separate channel combination, they all work independently. Though there are just four switches plus the local, this creates quite a few combinations.
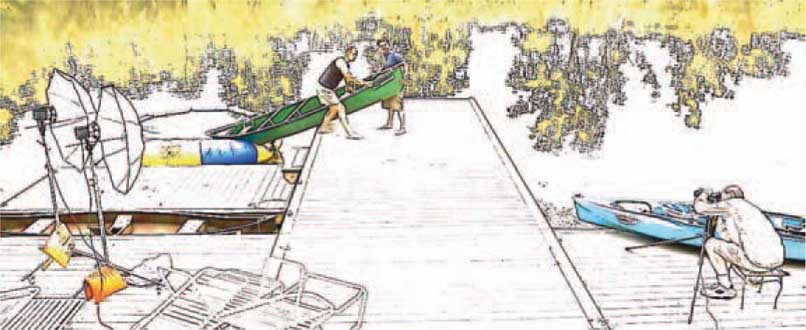
Wireless is perfect for shots like the one on this chapter’s divider (pages 378 & 379). The fewer wires on a set, the safer it is for everyone.

Recycling Time vs. Power Output
A flash unit is fully recycled when the capacitors that hold the energy have been completely restored.
Usually, a single burst of light only consumes a small portion of the available energy. While the “caps” are being recharged, the photographer can continue to knock out image after image. During this time, the recycling is happening in the background unnoticed by the shooter.
Minimal Power = Fast Recycle
When a small portion of the energy is consumed, the recycling procedure happens quickly. If you set the unit to full power, you drain off plenty of the supply.
Minimal power output equals fast recycling. Big power usage results in slower recycling times.
Recycling and Local Conditions
Your line voltage can vary based on what the local utility company is delivering and the power constraints of where you’re shooting. Local conditions can result in faster or slower recycle times.
How Fast?
Under good power supply conditions with a well-engineered power generator, something like this would be typical:

Admittedly, these are more impressive numbers than we see with most AC flash sources. Keep that in mind. This is not the norm. Full recycling in 2 seconds is not usual, especially with older units.
Practical Application
How do you apply this to your day-to-day photographic needs? If you shoot tabletop photography, you probably could care less. The still life that you shoot isn’t going anywhere in the next 2 seconds. You can go full power in one shot and shoot the next one in a couple seconds later.
Should you be an action people shooter, you have other needs.
You have to ask yourself how quickly you are shooting. Open a recent shoot’s unedited collection in Adobe Bridge. Check the time the image was made to the second. Are you shooting more than one image per second? If so, how many?
If you are regularly knocking out two per second, the data in the column to the left tells you that you need to shoot down two stops or less. Combine this with the data on page 385 and you get a sense for how much power that you need.

Manage Flash Duration
The Consequences
We have worked with some photographers who have just blown off the recycling time factor and shot as fast as they could.
What happens to them?
After a while, there is not sufficient power and the light output is compromised. The exposures are usually too dark to be usable.
Sooner or later, the flash generator usually overheats and the unit’s circuit breaker blows. You have to wait a few minutes for it to cool down and the whole shoot goes on hold. Sometimes, no one notices that the flash has stopped firing and that portion of the shoot is lost.
Isn’t “flash” coupled with “duration” somewhat oxymoronic?
That flash of light happens so quickly. How can there be a time component to factor in?
Flash Duration in Shutter Speed Numbers
You are used to your camera’s shutter speed settings. They might run from as long as a few seconds to maybe as fast as 1/8,000 of a second (0.000125).
When you are shooting hand-held, there can be camera blurs at 1/15, 1/30, or even 1/60 of a second.
Flash duration also varies with the power settings that you choose. In full mode, a Novatron monolight has a flash duration of 0.0068 of a second (1/147). As the power output is reduced, the flash duration lessens. At the minimum power setting (–6.0 stops), flash duration is only 0.0006 (1/1,668).
This is something that you must factor in when planning to capture an image where freezing motion is important.
Do you think that this is only for photographers who take pictures of bullets flying through space and time or a lightbulb bursting as it impacts the ground? Then you must not be in the business of photographing many children. We confess to losing more than one shot to short flash duration.
The Give and Take
Here’s another example of needing to weigh your options.
To get a faster flash duration, you need to go for a smaller light output. When you have the power pack in full mode, the flash duration is the slowest. When there’s the least power output, you have the best chance of freezing motion.
This concept can be deceptive.
The obvious response is that the more powerful the power pack, the more you can reduce the output and get a faster flash duration. However, most flash sources have engineering personalities of their own.
The most powerful power source that a brand sells may not provide the fastest flash duration. As products are engineered, new technology opportunities arise.
Unfortunately, the flash duration specifications are not always available from manufacturers. This can be frustrating.
To learn more, you may need to contact the manufacturer’s technical assistance department to get the facts.
Many of these people are eager to help you with this sort of thing and more than happy to discuss the specs.
Contrast Ratios
There are many ways that contrast ratios are handled on the hardware side. Every brand seems to have its own scheme.
For many, the power pack is the sole command center. There’s nothing to do on the flash head.
The Symmetrical Ratio
When a 1,000 watt-second power pack is at full operation, if there’s just one flash head in use, all 1,000 watt-seconds are sent to that singular head.
If a second flash head comes to the party, now 1,000 Ws is evenly distributed to both flash heads. Each of them gets 500 Ws.
If this is for a key light and one fill light, that might not be ideal if they are equal distance to the subject with identical light modifiers. However, if the key is in a medium silver zebra umbrella and the fill light fires into a large white umbrella, everything is fine.
At the hardware level, the light ratio is 1:1. It’s in symmetrical ratio before the light modifiers get their hands on it.
Asymmetrical Ratios
often, that’s not good enough for some photographers. They want to send so much power to this flash head and so much less to that one.
This is often dealt with on the power pack, or is not addressed at all.
Novatron has had a unique approach. They alter light ratios on the flash heads.
What they call a “three-way switching head” permits light to be used at full power, down 1-stop, or down 2-stops.
One head in the system has to be at full power or problems can occur with the flash head’s circuitry.
Modeling Light Ratios
You want to be able to visualize that same ratio with your modeling light. The flash heads provide the same switching to do that.
When you reduce the flash power by one stop, reduce the modeling light by one stop as well. This is “tracking” in its most simple terms.
See pages 398 & 399 on how tracking works on a monolight. Some manufacturer’s power packs have this cool trick, too.
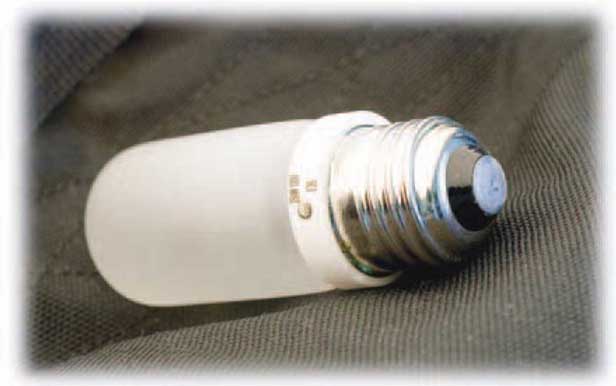
Quartz Modeling Lamp
The quartz modeling lamp is one of the great underappreciated heroes of flash illumination.
It reduces red-eye by keeping the pupils open properly. Dilated pupils always make the subjects look like they are doing drugs.
Too Much of a Good Thing
At times, the modeling light can work against you, depending on its output.
If you have chosen a very low flash power, the modeling light can be so intense that it is no longer about the flash and is more about the modeling light. Instead of a lean 5,500 K, for which you have set your camera’s white balance, your primary light source is the 3,400 K of the 250-watt modeling lamp.
In this case, use the modeling lamp reduction switch on the back of the flash head to reduce the incandescent light pollution.
Monolight Modeling Light
Because monolights live a solitary existence, unlike the flash heads that share a power pack home base, they need a means of providing a previsualization when used with other monolights or in conjunction with a pack and head system.
As it’s not a perfect union of equals when you join one 600 watt-second monolight with four flash heads on a 1,000 watt-second power pack, we have to be glad for what we have and live with it.
Here’s the problem: at 1,000 Ws, even with one flash head, both the 1,000 Ws head and the 600 Ws Monolight provide you with 250 watts of modeling light. To your eye, it appears as if the two light sources are equally balanced. However, they are practically a full stop difference in flash power. You don’t get a sense from the modeling light as to what the entire scene will look like when the flash fires.
Video Use?
Some photographers report that they have used the modeling light on their flash heads as a low-cost resource for occasional video lighting. This says something about the power of 250 watts. We have not heard from any professional videographers looking at this as a solution.
Frosted or Clear
Modeling lights come with all sorts of base sizes. Some have the same base as a household lamp; others have a more unique base.
The lamps come frosted or clear. We depend on the manufacturers’ testing that the modeling lamp provides the best representation of how the scene will appear when the flash fires.
Replacements
We have heard from photographers looking for an inexpensive route to replace their burnt-out modeling lamps. That’s possibly a dangerous solution. The exact size, shape, and heat endurance of the modeling lamp was considered when the light source was designed. A great deal of engineering expertise went into selecting the best lamp.
Play it safe and choose the proper replacement lamp.
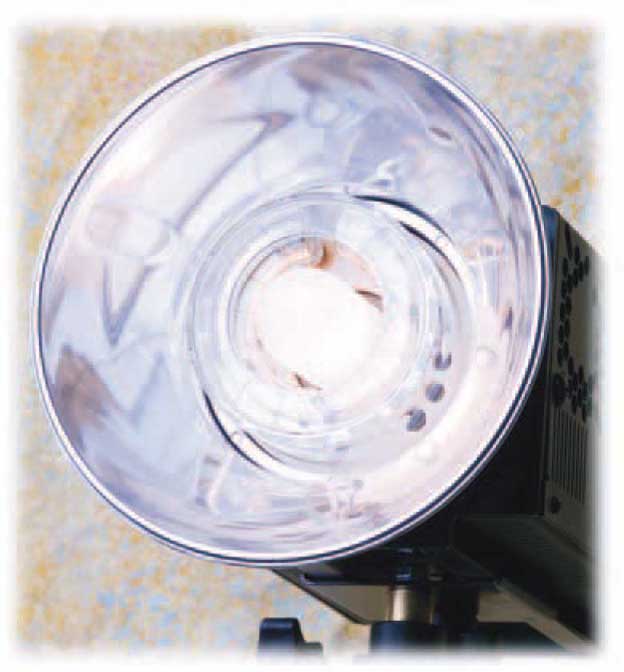
The Flexible Bare Tube
The bare tube head is our AC flash source of choice. For years we just had flash heads with built-in reflectors, but nothing compares to the flexibility of the bare tube. We like to have as many options available to us as possible.
Bare Tube vs. Built-in reflector
Some argue that a flash head with a built-in reflector has a little more efficiency to it, and we concede that point, but it’s a tenth of a stop or so.
The built-in reflector crowd likes having a few less setup steps. Some lighting manufacturers have slightly smaller flash heads when you choose the permanently attached reflector. However, if you need barn doors, snoots, grids, and other accessories, you can’t interchange them with the larger flash heads.
Many of these ready-to-go flash heads do not offer fan cooling. These heads are supposedly designed for convection cooling, but that makes us a little uncomfortable about putting them in a confined space such as a light bank.
Because heat is a factor, these heads are often designed for use with lower-wattage modeling lamps. Some are intended to be used with only 100 watts. For us, that’s just not enough light.
Plug-in Flash Tubes
Some flash heads have the flash tube soldered into the head. If the tube breaks, it needs to go to a repair station.

Flash tubes do not burn out. However, as photography is an on-the-go sort of business, accidents happen. Being able to pull out one flash tube assembly and pop in another is the best solution. Professional photographers either bring an extra flash head with them or pack a spare flash tube.
The flash tube is an amazing design and engineering feat. The flash tube is within a rugged glass cover. If the assembly encounters any impact damage, there’s a chance that the outer cover will protect the flash tube.
The flash tube assembly is quite durable and color-corrected with a UV coating. This helps it provide you with 5,500 K.
If you look carefully at the flash tube’s incomplete ring, the part of the ring that does not come together at the top goes on the top of the flash head. If you ever need to unplug the flash tube, play it safe. As a precaution, unplug the flash head from the pack or the monolight from the wall outlet first.
Making Connections
Many professional photographers and assistants “hot patch” flash heads. They plug them into a power pack that’s on.
In theory, this should be safe. However, we have heard too many war stories of how electricity has arced across the contacts when this happened.
That would be frightening to witness, knowing how many volts of power is involved. Never plug or unplug a flash head while the power pack is on. It only takes a few seconds to turn the pack off, make changes and turn it on again.
reflectors
We get into this in great depth on the next two pages. But let us add these words of caution. Many photographers secure the reflector to the flash head with two thumb screws. Plenty of reflectors are designed for that. However, many bare tubes are designed for up to four thumb screws to be used. Use all of them. Yes, it takes a few extra seconds, but the safety is worth it.
We never encourage anyone to modify their equipment, but if the flash head provides for four thumb screw attachments and you have an older reflector that has only two openings, think about carefully drilling two extra holes in it.
The Perfect Light Bank Companion
The best match for a light bank is a bare tube head. Just like the bare tube receives a reflector, it attaches to a light bank’s speed ring.
If you have not yet read pages 276 & 277 on speed rings, you’ll want to check back there, to see how easy it is to attach the head.
Balancing and the Bracket
The bare tube head and most monolights are from the same family and share many of the same body features. We cover the use of the bracket and how to balance the lighting instrument on pages 398 & 399.

reflector Options
The ability to adapt your bare tube head to have various light qualities by simply popping off one reflector and attaching another is one of the great benefits of this flash head.
Good designers carefully craft their reflectors with computer-aided software tools to perfect the shape and surface to provide the most efficient use of the flash tube. The goal is to provide the same illumination in the center of the beam that there is close to the edge of it before the light falls off.
Test this in your professional photo retailer’s showroom. Take a meter reading with the meter’s dome facing directly into the path of the light. Take another one a couple feet to the right. Try a reading a few more feet to the right. Are the readings the same? As long as the test space is free and clear of obstructions, they should not vary.

reflector Types
Admittedly, one of the weak points of the Novatron system is its very limited family of reflectors. There are only two.
This is not a high-demand product, unfortunately. It seems as if many professional photographers have not discovered what reflectors can do. They’re happy with the one that comes with bare tube or they’re just not aware of their options.
The 6.5″ reflector that comes with the Novatron bare tubes and monolights easily removes. There are four screw pins spaced evenly around the reflector. Just loosen them up a bit and then twist the reflector counterclockwise (as you’re looking into the reflector) and pull it toward you. It has a polished surface for maximum efficiency.
Their 16″ pan reflector is great for a broader, softer light. It renders the subject sharp, but not with any pronounced highlights. The surface is purposefully dulled. We like using this with diffusion frames.
What More Could You Want?
Two doesn’t do it for us. Some other flash systems offer a narrow beam reflector. That confines the light to around 30°. The pool of light is quite concentrated and great for low-key lighting. Because the beam is tight, it’s very efficient use of light.
On the other side of the coin is a reflector that provides a super soft flood of light, to 120° with a white surface and a reflector that covers the flash tube and bounces the light back to the reflector.
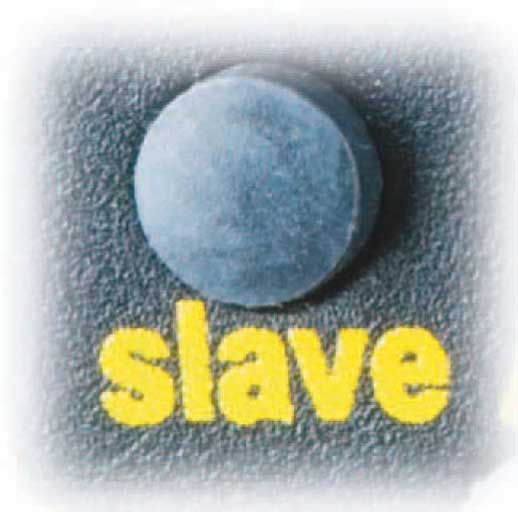
The Slave Eye
If you have more than one flash generator, you need a slave trigger.
On the Power Pack
This very simple, inexpensive electronic marvel fires one flash source when it sees the other flash fire. It’s all as simultaneous as your camera’s eye can detect.
Just plug the little slave trigger into the second pack’s port for the sync cable. First test-fire the main pack and watch to see whether the slaved unit fires, too. If not, you may need to reverse the polarity of the slave. Just unplug it, flip it around 180°, and testfire it again.
These things have a pretty long range. If it still isn’t firing, the slave may need to be placed more in sight of the main flash source.
With the Monolight
It is usually assumed by monolight designers that their self-contained flash units will be enslaved to other flash sources at more than one time in their lives. They usually have built-in trigger slaves, as do some power packs.
As great as it is to have on-board slave capabilities, it can be an annoyance, too, if someone else’s flash is triggering your flash sources.
Turn the built-in slave off and on with the “slave” button. On a Novatron, when you press the slave button, the LED responds With either “Son” or “SoFF.”
These slaves are a must-have for photographers who build a whole system of just monolights. The first flash is the key light and the second one provides fill illumination. Another one can light a background. A fourth flash might add dramatic highlights to the back of the subject (such as a hair light on a portrait, which really pops out the three-dimensional look).
Copying Flat Art
We once owned what’s known as a “production studio.” We’d open our doors, at 8:30 a.m., Monday through Friday, and a flow of commercial work would come tumbling in from off the street.
Some of the needs seemed quite basic, but they came with a fair number of challenges.
Subjects Under Glass
People would bring us some unruly “flat art” that would not lie as flat, as its name implied.
Our response was to place it under a heavy piece of plate glass.
To the photographer unfamiliar with that technique, it seems like we made the difficult even worse. Now we have the reflection of the glass to deal with.
With the camera directly over the flat art, and all the lights off, except two on either side of the art, we made the reflections disappear. One of the two tricks has to do with using the polarizing filters that we discussed on page 295. The other trick puts into practice the angles of incidence and reflection that we explored on page 28, which we’ll recap here.
Light Angle in Copying
If you place a glossy piece of paper on the wall and perfectly line up your camera so that you are pointing right at it, you have won only a portion of the battle. The war with reflection will be lost if you light this with a single source of illumination from above the camera. The light will be projected from the single light source, strike the glossy surface, and return to the camera an excellent mirrored image of your light, making a big white glitch.
Two Is Better than One
The best way to light flat art is to apply your knowledge of the angle of incidence equaling the angle of reflection.
If your light sources are at a 45° angle to the art, the light comes to it, illuminates the surface, reflects off at the opposite 45° angle, and you’re free of reflection. Use two light sources and place them equidistant to the art.
Make sure that your light is even. If it’s not, you will be unable to faithfully reproduce the artwork. To assure an overall evenness, take five meter readings to be sure that your setup is on the money. Measure light in the center of the art as well as in each corner. If all five readings are not the same, adjust your lights until they’re in harmony.
Wall reflection
With these principles understood, fight one more possible battle that could prevent your success with this.
Experienced production photographers know that a white wall is not an ideal place to shoot copy art.
If you place a dark piece of flat art on a white wall and light it perfectly, it’ll get a white buzz around it from the wall.
Place a gray card on the wall and carefully adhere your art to the gray card. Use the Lasto Lite 30″ Ezy Balance Grey/White Card that we discussed on page 139.
The Right Light
This is not a job for a narrow-beam, polished reflector any more than its a call for a pair of light banks. A tight light source is difficult to control. Using a softer illumination fails to provide the sharp image that you need.
We use Novatron’s 16″ Pan reflectors for this, on a pair of bare tube heads.
When Four is Better than Two
Most professional copy setups come with four light sources. This prepares the workspace for larger pieces of art.
It’s possible to get too much of a good thing. If you have even illumination with two lights, don’t make you life more complex. It’s easier to balance two lights than it is four. Sometimes two or more pools of light overlap, giving the copy area nasty hot spots.
Not much space is required for a basic copy setup. Angle your lighting instruments at approximately 45°, to reduce reflections.
Use polarizing filters, over the lights, if needed. We use the Novatron 16″ Pan reflectors for a broad light source that is neither too hard or too soft.
Avoid white wall flare-back by placing the flat art on a gray card.

Monolight Simplicity
For someone getting into AC flash, a good professional digital monolight is the perfect place to start. You won’t outgrow it. No matter how much your system grows, it will always fit in as an important component. It’s the start of an integrated system.

The monolight is an easy starting place. Add a flash meter, a stand, an umbrella, a light bank, and an interchangeable reflector panel and you have a little studio. (You might want to get a camera and a computer, too.)
Single Light Source
Start practicing with tabletop setups before you jump into people shots. See what the light can do.
Some of the examples on the following pages are a good place to start.
See how you can adapt the examples in a few of the daylight fluorescent and HMI chapters, too, along with those in the chapter on man-made modifiers.
A Quick Tour
Let’s take a quick tour of some of the features that we have not yet covered on the Novatron monolights. They’re very professional and the digital display makes it simple to adjust your exposure, as we covered on page 385.
Mounting Monolights and Bare Tube Heads
Powerful MonoLights have a little weight to them. Properly mounting them on a stand or boom is important.
Many of the products that we have been discussing in this book come with near identical brackets. They’re extremely sturdy and versatile. after Westcott introduced them on their Spiderlites, Novatron started using them, in 2005, for their bare tube heads and M600 MonoLight. We have hung bare tube heads on them for days, supporting Chimera’s largest light bank. The whole rig never drifted a fraction of an inch. The bracket attaches to a rugged brass stud at the base of the instrument. On the Novatron units, the screw tightens against a flat portion of the stud.
The segment of the bracket with the hole in it is for inserting the shaft of an umbrella. That’s the bracket segment that installs closest to the lighting instrument’s base.
This bracket’s large lever, when loosened, allows the light to tilt up and down. When the lever is tightened, it’s sturdy enough to resist freely tilting out of the locked position.
Once you have a secure mounting to a support, it’s possible to gently open up the support-side bracket knob and swing the unit from side to side to refine the setup. Please be careful when doing this, especially if your lighting instrument is now supporting the weight of an umbrella or a light bank. These get heavier than you think.
The Sliding Mount
A sliding mount moves the flash unit backwards and forwards on a stand or boom. This is important in balancing the weight of a large umbrella or light bank.
Audio Confirmation
Some photographers find it helpful to hear a confirmation that the monolight has fully recycled, that the monolight is having its power increased or decreased, that the modeling lamp mode is being changed, and so on. Pressing the audio button causes the LED panel to display “A on” if audio was just enabled or “AoFF” if you just disabled it.

Modeling Light Tracking
Some flash units offer three modeling lamp modes to assist you with the best shooting options.
On some Novatron units one button cycles through all the modes. As you press the button, one mode at a time, the red, yellow, or green LED illuminates:
Green: Full 250 watts
Yellow: Tracking Varies w/Light Output
Red: Modeling Lamp Off
In tracking mode, the modeling lamp’s illumination changes as you raise or lower the light output. This is effective in visualizing the entire scene when using more than one identically powered monolight.
For some shots with longer shutter speeds, you may not want any modeling light at all. This is great for multiple exposures or special effects shots.
One Light Source
There’s both beauty and simplicity to working with just one light. It mimics our natural light source.
If the one light is large enough, it’s a great workspace for the talent. Though it’s not as efficient as a smaller light source, a large umbrella of light bank fills a large space, so the models can move about freely.
The more energized the talent becomes, the more great shots we get. So a nice-sized working space is a big plus.
On Their Mark
We talk to our models about their “mark,” the area they can work in. The more they understand about their light, the more they play to it. If we point out the area they have to stay in, they’re very good about it. Many of the models we work with are actors and are used to the term “downstage,” meaning the area closest to the camera, as opposed to “upstage,” which is the background.
Just about everyone we’ve worked with has been anxious to please. They take direction well and we have a great deal of fun.
Measuring Light Fall-Off
Of course, there’s a limit as to how large the talent’s workspace can become. The light’s fall-off dictates that.
Meter the talent’s work area so you know the limitations. Holding to a half-stop change from center to edge works for us in most circumstances. However, there is no hard and fast rule. Every lighting setup is different. often, you can use fall-off areas to keep some talent upstage. With less light on the background talent, the downstage talent becomes the focus of attention.
Talent Direction and Light Quality
Our young models to the right, Morganne and David, are excellent examples of talent well-versed in the acting world. We give them a little direction and they jump into it, get into character, and play the part.
These characters that they play permit them to have some fun and step away from their real selves. It creates a good comfort level for them and we get the emotional responses that work.
We were shooting in a conservatory and had the appearance of being outdoors. With glass all around us, there was plenty of ambient light. The one large umbrella created a soft enough illumination to fill in some shadow areas. Using a reflector assisted in kicking back some of the natural light, acting as a fill light source. Some would be bothered by the shadows between them. It was our intent.
Tech Specs
Photographer
Brian Stoppee
Stylist
Sherrie Hagan
Illustrator
Janet Stoppee
Camera
Nikon D2x - ISO: 100 · Shutter Speed: 1/125 Manual Mode
Lens
AF-S VR Zoom-Nikkor 70-200mm f/2.8G IF-ED @ 180mm 35mm Focal Length: 270mm @ f/5.6
Lighting
1 - Novatron 1,000 Ws Digital Power Pack
1 - Novatron Bare Tube Head w/6.5″ reflector
1 - Westcott 45″ Silver/Black Backing Umbrella
Light Meter
Gossen Starlite
Support
1 - Gitzo Mountaineer Tripod
1 - Gitzo Off-Center Ball Head
1 - Matthews 40″ C Stand w/Sliding Leg
Software
Adobe Bridge, Camera Raw, and Photoshop Corel Painter
Talent
Morganne Wilbourne
David Wilbourne

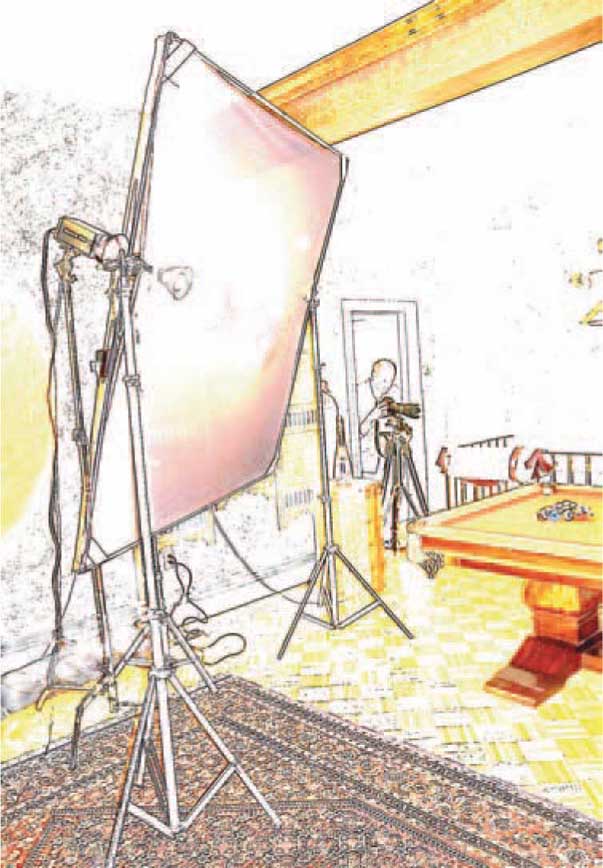
Panel Frames for Floods of Light
Another way to produce a great deal of light in a large workspace is the panel frame.
The Benefits
Once the frame is erected, multiple light units can be placed behind it to boost power output. This is a very different light source than a light bank or an umbrella. It affords the opportunity to use many different fabrics, to determine the degree of diffusion.
The Downside
A light bank diffuses the light source using its back and side shape plus up to two diffusion fabrics before the light emerges. This is a very soft illumination. The umbrella takes advantage of its parabolic shape to diffuse light.
The frame has none of those advantages.
The Setup
To make the most of a diffusion frame you need to know the source of the light.
For our shot, we have two monolights with 6.5″ reflectors, one for each of the two photographers. We are attempting to illuminate fully the billiard table with fairly even light all around. Work with your angle of light. Determine the best distance from your flash head to the diffusion material. Consider wider reflectors.
The even light wrapped around Sherrie speaks for the illumination quality. It flaunts the beautiful contours of her face and arms, keeping the highlights and shadows soft.
A diffusion frame provides soft, even illumination spread over a broad area, permitting numerous light sources for extra power. Adjust your flash head’s distance and fabric quality for the desired results
Tech Specs
Photographer
Brian Stoppee
Stylist
Sherrie Hagan
Illustrator
Janet Stoppee
Camera
Nikon D2x - ISO: 100 · Shutter Speed: 1/250 Manual Mode
Lens
AF-S VR Zoom-Nikkor 70-200mm f/2.8G IF-ED @ 70mm 35mm Focal Length: 105mm @ f/9.0
Lighting
1 - Novatron M600 MonoLight
1 - Chimera Panel Frame - Large w/Scrim Material
Light Meter
Gossen Starlite
Support
1 - Gitzo Mountaineer Tripod
1 - Off-Center Ball Head
1 - Matthews Preemie Baby Stand
2 - Matthews Hollywood - 2-1/2″ Grip Heads
2 - Novatron Heavy Duty Stands
Software
Adobe Bridge, Camera Raw, and Photoshop Corel Painter
Talent
Sherrie Hagan

Create Sunlight
Making a unique space really pop takes some ingenuity. This is where you need to get clever with your lighting design.
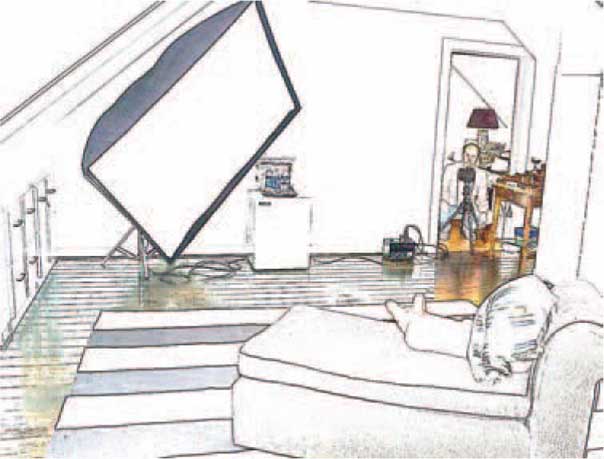
General Illumination
To fill a renovated attic office space with light, we had to inundate the room with an overall illumination. A light bank was an easy choice for this. Its light output, however, is only one of four considerations we must factor in.
Incandescent and Natural Light
Two factors over which we have little control are how much light is naturally streaming through the windows and the overhead lights in the main room plus the track lighting in the room behind it.
We make the most of them by planning to make an extended exposure. We take ambient meter readings without the light bank to determine the length of our shutter speed.
Artificial Sunlight
To add some drama we placed a flash head with a 1?” pan reflector on a boom arm, stretched out over the roof, flooding light in through the dormers.
This side light appears as if the sun is rising through the dormers.
Filter Enhancements?
We tested this with golden filters, which had a beautiful effect. However, the color took on the role of a major player in the photo. If this image were not intended for sales material about the property, we would have stuck with the colored filters. However, this was a story about the room and not our creative interpretations. The image’s end use gets priority.
Tech Specs
Photographer
Brian Stoppee
Stylist
Tracey Lee
Illustrator
Janet Stoppee
Camera
Nikon D2x - ISO: 100 · Shutter Speed: 1/13 Manual Mode
Lens
AF-S DX Zoom-Nikkor 18-70mm f/3.5-4.5G IF-ED @ 18mm 35mm Focal Length: 27mm @ f/6.3
Lighting
2 - Novatron 1500 Ws Digital Power Packs (1-w/slave)
2 - Novatron Bare Tube Heads (1-w/16″ Pan reflector)
1 - Chimera Novatron Bare Tube Quick Release Speed Ring
1 - Chimera 54″ × 72″ Super Pro Plus - White
Light Meter
Gossen Starlite
Support
1 - Gitzo Explorer Tripod
1 - Gitzo Off-Center Ball Head
1 - Matthews Preemie Baby Stand
1 - Matthews Magic Stand
1 - Matthews Boa Bag - 15lbs.
Software
Adobe Bridge, Camera Raw, and Photoshop Corel Painter
To create some lighting drama, drag the shutter to pick up the natural illumination, use a light bank for general lighting, and project light in, from outside..
Glamour Lighting
Many photographers create some gorgeous tributes to the human form. Their creations go back many centuries to the masters of canvas and oil on exhibit everywhere from the world’s most renowned museums to the collections of the Vatican.
The image to the right is the one and only glamour shot that our studio has done this century. It’s just not our thing.
Proper Decorum
Heather, a dedicated wife and mother, is one of our all-time favorite models, with ties to our studio since she was a teenager. As you can see from the illustration, she wore a towel until we did the shoot, never exposing herself to us.
We want our talent to feel very comfortable and dignified. That’s important to us.
The Matthews Matthellini Clamp and Baby Extendable Offset Arm support the background.
Glamour Light?
We’re hard pressed to define glamour light. Is it a soft, flattering illumination? Is it just an appropriate light for the subject?
The late great Mike Pocklington conceived the lighting for this shot, testing Rosco diffusion materials and the exact light positioning for the shot. He chose Rosco Tough Frost to be placed over a bare tube head.

The light softly caresses Heather’s torso, making a long transition from the highlight across her abdomen to the neutral area on her side and then into a soft shadow.
A reflector kicks back just the right amount of illumination to further soften the shadows.
Set Decor
The stylist, Tracey Lee, who once owned a modeling agency that represented Heather, created the two backdrop panels with the leading scenic paint in the theatrical industry, Rosco’s Iddings Deep Colors. This casein-based paint requires very small quantities to create some very alive color. It’s the ultimate choice for the painters of awesome, award-winning scenery for Broadway.
All of it is held in place with Matthews support equipment, as we covered in Chapter 9, “Creative Support and Safety.”
Testing
This is not a shoot that you knock-out in seconds. It takes a great deal of testing.
First we shot images with stand-in to be sure that we had the lighting and model positioning optimized. after checking the test shots, we brought in Heather, after making tedious adjustments. Angling her face and body as well as the reflector made the shot work. The light had to shield her face to some degree, to provide a feeling that you are peeking into a private moment.
Positioning the light and talent cannot be stressed enough for a successful glamour shot.

Multiple Umbrellas
This is quite an involved shoot, even for us, utilizing four light sources. However, it is not difficult. It’s just three umbrellas, carefully focused, plus one light bouncing off the ceiling.
A total of 4,600 watt-seconds of very efficient power is in use. For some professional photographers, that’s not much power at all. For us, it’s unusually heavy, but was the minimum we needed to accomplish the task.
General Illumination
On a late winter’s afternoon, in the lobby of an auditorium, we staged a shoot that has the trappings of what could be businesspeople making connections With each other.
The lighting is a delicate balance. We skipped the look of natural illumination coming through the French doors and went for an evening feeling, where the main light source comes from the interior. This is obvious in the highlights to the right and the soft shadows closest to the doors. The three umbrellas blow in a great deal of light, in even distances from each other with the two downstage light sources at 1,500 watt-seconds each, and the back umbrella at 1,000 Ws and the final bounce light with just 600 Ws. This caused the light to diminish as the scene’s perspective retires into the background, punching out the downstage talent.
To light a large space with varied light intensities can require plenty of power. Each of the four light sources are slaved together.

Direction
The following illustration shows more than how we light a scene. It reveals how we work.
Janet is shooting with a long lens at a distance from the talent. This limits the depth of field to the downstage side. The optical compression assists in our attention being drawn to the foreground talent. Janet is too far away to direct.
After styling the models, Sherrie directs the talent. She’s closer to them and out of the view of the lens’s angle.
Following a great styling session, the models have a bond with the talent coordinator and respond well to her direction.
Tech Specs
Photographer/Illustrator
Janet Stoppee
Stylist/Talent Director
Sherrie Hagan
Camera
Nikon D2x - ISO: 100 · Shutter Speed: 1/250 Manual Mode
Lens
AF Zoom-Nikkor 80-400mm f/4.5-5.6D ED @ 130mm 35mm Focal Length: 195mm @ f/6.3
Lighting
1 - Novatron 1,500 Ws Digital Power Pack
2 - Novatron 1,000 Ws Digital Power Packs
1 - Novatron M600 MonoLight
3 - Novatron Bare Tube Flash Heads w/6.5″ reflectors
1 - Westcott 45″ Gold/White Umbrella
2 - Westcott 45″ Silver/White Umbrellas
Light Meter
Gossen Starlite
Support
1 - Gitzo Explorer Tripod
1 - Gitzo Off-Center Ball Head
1 - Matthews Baby Jr. Triple Riser Stand
1 - Matthews Baby Jr. Double Riser Stand
1 - Matthews 40″ C Stand w/Sliding Leg
1 - Matthews Preemie Baby Stand
Software
Adobe Bridge, Camera Raw, and Photoshop Corel Painter
Talent
Joe Spagnolo
Michelle Shea
Nicholas Parsons
Bob Lindholm

Multiple Light Banks
How do you shoot a great cocktail? Very, very carefully!
Two Soft Banks + reflector
We need three light sources to make all this come together.
The Chimera Daylite Jr Plus - Extra Small light bank has the advantage. Due to its nimble size, it’s more efficient. The Chimera 54″ × 72″ Super Pro Plus Silver bank becomes the fill light, while the little guy is the key.
That’s not enough. We need to toss in a reflector to bounce back additional fill light.
No one’s idle on our shoots. Tracey Lee, the stylist, and cocktail fashion master, with an ear and taste bud for the latest trends, plus experience with the age-old tradition of bartending, holds a 1?” Westcott Illuminator on the silver side to add dimension.
Styling and Lighting the Feeling
A cocktail is a cold delight. We pull no punches. We have no special effects. It’s all natural. It’s all the real deal.
Tracey didn’t grease the glass and spray on beads of condensation. She does all her food styling just the way it is consumed. (This means we have quite a happy time at the end of food shoots!) This method requires her to prep everything to be delivered on the set at the exact moment that it’s needed and requires us to prep and test everything. By the time the subject arrives, we have seconds to make the shot. Everything needs to be in place.
This chilled enjoyment cannot be lit warm. It needs an on-the-money white-balanced light to make those clean beaded reflections have a look of purity.
The only warm element in the shot is the garnish. Its contrast allows it to take center stage.
Light Source Roles
The biggest contribution that our key light provides is a highlight on the garnish. This defines specularity: a mirror of the light source. That specular gives those three little orbs their feeling of dimension.
The size of the fill light explodes a much-needed overall illumination from the left. The trick is to fill the space without over-illuminating the background. The dark marble must have less light in back than in the foreground for the cocktail to separate well. To some degree, the little reflector steals the fill light’s thunder. It picks up all the lighting resources to build a terrific back light.
A small key light provides the specular highlights while the larger fill light source handles the overall illumination. The little hand held reflector works as a backlight, popping out the glass’s dimensional qualities. The backlight pops out the backside of the glass, so it doesn’t look flat.
Tech Specs
Photographer
Brian Stoppee
Stylist
Tracey Lee
Illustrator
Janet Stoppee
Camera
Nikon D2x - ISO: 100 · Shutter Speed: 1/250 Manual Mode
Lens
AF Micro-Nikkor 60mm f/2.8D 35mm Focal Length: 90mm @ f/5.6
Lighting
1 - Novatron 1,000 Ws Digital Power Pack
1 - Novatron M600 MonoLight
1 - Novatron Bare Tube Flash Head
1- Chimera Daylite Jr Plus - Extra Small
1 - Chimera 54″ × 72″ Super Pro Plus - Silver
1 - Westcott 14″ Silver/White Illuminator
Light Meter
Gossen Starlite
Support
1 - Gitzo Explorer Tripod
1 - Gitzo Off-Center Ball Head
1 - Matthews Preemie Baby Stand
1 - Matthews mini Preemie Baby Stand
Software
Adobe Bridge, Camera Raw, and Photoshop Corel Painter

Assisting Natural Light
Please pardon our tongue-in-cheek expression of “assisting” the sunlight. However, on occasion, when the natural light cannot provide what’s needed, a little electronic flash has to come to the rescue.
Cautions on artificial Key Light
This can be like volunteering to climb up a very slippery slope. Using artificial light as a fill is easier. It complements the key light, softening shadows.
When artificial illumination becomes your key light, you can run into problems of the flash looking unnatural.
At the same time that you are creating highlights, you are also building shadows. More shadows can go in a direction that opposes what the natural illumination is doing elsewhere in the frame. This further points to an unnatural light source.
What the Light Says
As you design your light, consider what you want the image to say.
In this shot, we want the look of a hot summer’s day about to be enjoyed by a cool experience on a gently flowing river.
A great way to visually express heat is to bring out the highlights on flesh tones. This can be attractive on a male subject but make a less-than-flattering visual statement about a woman, especially when the female talent needs to appear joyful.
With this in mind, Ian is taking the heat. We have highlights on his forehead, cheek, nose, and ear. The highlights are on our female talent’s hair and back, providing her with an added dimensional quality.
Our camera positioning pops the couple out from the dark tones of the river behind them, so we focus our attention on Sherrie and Ian.
The Reverse Umbrella
We want a soft illumination. During the course of the day’s shoot, we’re going to be setting up and striking at various locations around this riverside estate.
Keeping the load light is an important consideration. Safety is another.
We chose to make our main light source umbrellas and provide as many variations as possible based on what fits.
By turning the umbrellas around and firing light through them, our light is not only softer but it also radiates over a large area. This ensures that our light is not focused in a tight area, appearing more unnatural.
Admittedly, this is not the most efficient use of our lighting output. However, it accomplishes our lighting needs.
Two photographers shoot simultaneously from different angles. Each photographer has one umbrella source, driven by a 1,500 watt-second Novatron power pack.
Properly weighting the light stands is even more essential when shooting outdoors
When using flash as your key light, take special precautions to keep the look as natural as possible. It could be best to flood an area with light as we did here by firing flash through a reversed umbrella. Take care to watch for shadows that are going in a direction other than the natural light’s flow. Go for just a little more flash intensity than the ambient light.
The above illustration shows two umbrellas, one for each photographer.
Tech Specs
Photographer
Janet Stoppee
Stylist
Sherrie Hagan
Illustrator
Janet Stoppee
Camera
Nikon D2x - ISO: 100 · Shutter Speed: 1/125 Manual Mode
Lens
AF Zoom-Nikkor 80-400mm f/4.5-5.6D ED @ 160mm 35mm Focal Length: 240mm @ f/6.3
Lighting
1 - Novatron 1,500 Ws Digital Power Pack
1 - Novatron Bare Tube Flash Head
1 - Westcott 60″ Optical White Satin Umbrella
Light Meter
Gossen Starlite
Support
1 - Gitzo Explorer Tripod
1 - Gitzo Off-Center Ball Head
1 - Matthews Baby Jr. Triple Riser Stand
1 - Matthews 25 lb. Water Repellant Sandbag
Software
Adobe Bridge, Camera Raw, and Photoshop Corel Painter
Talent
Sherrie Hagan
Ian Kline

Slaving Background Rooms
If you thrive on technical challenges, shooting multiple rooms with flash is your longawaited playground.
There are numerous elements to juggle, and With each solution, you create a new challenge that needs to be counterbalanced.
General Illumination
Flooding the room with light is the relatively easy part. All you need is a couple monster light banks, sufficient support, and plenty of flash power. 3,000 watt-seconds bathes the living room in soft, even illumination.
Ambient Light
The next challenge is extending the shutter speed sufficiently to pick up the glow of the lamps. This is another important juggling act.
Slaves
What’s hidden is part of the fun. We have two flash heads plugged into one 1,000 watt-second pack. They’re just blowing light into their spaces. When the soft banks fire, the back power pack’s slave eye is triggered.
Position lighting in your back rooms to add dimension to the space. This should build the viewer’s curiosity so that they wonder what is in the spaces that they cannot see. When shooting an architectural portfolio of a property, the viewers enjoy using your photos to connect the rooms, figuring out what’s where.

Tech Specs
Photographer
Brian Stoppee
Stylist
Tracey Lee
Illustrator
Janet Stoppee
Camera
Nikon D2x - ISO: 100 · Shutter Speed: 2 seconds Manual Mode
Lens
AF-S VR Zoom-Nikkor 24-120mm f/3.5-5.6G IF-ED @ 24mm 35mm Focal Length: 36mm @ f/14
y
2 - Novatron 1,500 Ws Digital Power Packs
1 - Novatron 1,000 Ws Digital Power Pack
4 - Novatron Bare Tube Flash Heads
1 - Novatron 6.5″ reflector
1 - Novatron 16″ Pan reflector
2 - Novatron Slave Triggers
2 - Chimera Novatron Bare Tube Quick Release Speed Rings
1 - Chimera 54″ × 72″ Super Pro Plus - Silver
1 - Westcott 54″ × 72″ Silver Soft Box
Light MeterLight Meter
Gossen Starlite
Support
1 - Gitzo Explorer Tripod
1 - Gitzo Off-Center Ball Head
1 - Matthews Baby Jr. Triple Riser Stand
1 - Matthews Baby Jr. Double Riser Stand
1 - Matthews Preemie Baby Stand
1 - Matthews Mini Preemie Baby Stand
Software
Adobe Bridge, Camera Raw, and Photoshop Corel Painter

Location Safety
We have said it before in this volume and we will say it again and again for the rest of our teaching careers: flash and water don’t mix. Whether there’s a little flash built into the top of your camera or you’re working with big power packs, you’re dealing with a great deal of voltage.
An accident can result in fatalities.
You must secure your light sources. All wiring needs to be arranged so that no one can trip over anything. Sandbag all your stands. A top-heavy lighting rig can easily wind up in the water with just a little wind power.
Working Against Nature
This was a great shoot that required plenty of planning. The window of opportunity was a matter of minutes.
We needed just the right ambient light at the end of the day, plus as little breeze as possible. With the added danger of an approaching thunderstorm, our window was closing.
The Rosco Fog Machine
This is where a fog machine makes it fun. We need just a tiny breeze to move the fog across the pool’s water. Too much wind has the fog sailing into the neighbor’s backyard, in a matter of seconds, long before the fabulously fit Jaime emerges from the water.
When the breeze is just right, an assistant fogs the pool to the right, and the talent slowly starts up the stairs, dripping wet.
Lighting
We wanted a sense of mystery to the image, so we lined the pool to the left with four large light banks.
This total sidelight approach keeps some of Jaime hidden, in partial shadow. More important it brings out the smooth contours of her well-toned physique.
It’s planned for her to walk into her mark, so that light captures the blue of her eye and there’s enough of a highlight on her lips to reveal a trace of a welcoming smile.
A stock image like this has many uses.
The rest of the light banks ensure that we light the fog in motion.
In Safety Conclusion
Just as we squeezed off the perfect shot, the sky opened up and the rain came in.
In seconds, we had shut down the power packs and disconnected their power cables.
The Novatron power packs self-discharge the energy in their capacitors when they are shut off. Some other brands require you to press the test button to do that.

Tech Specs
Photographer
Brian Stoppee
Stylist
Tracey Lee
Illustrator
Janet Stoppee
Camera
Nikon D2x - ISO: 100 · Shutter Speed: 1/40 Manual Mode
Lens
AF Zoom-Nikkor 80-400mm f/4.5-5.6D ED @ 80mm 35mm Focal Length: 120mm @ f/10
Lighting
2 - Novatron 1,500 Ws Digital Power Packs
2 - Novatron 1,000 Ws Digital Power Packs
4 - Novatron Bare Tube Heads
3 - Chimera Novatron Bare Tube Quick Release Speed Rings
1 - Westcott Novatron Bare Tube Adapter Ring
1 - Chimera 54″ × 72″ Super Pro Plus - Silver
1 - Chimera 54″ × 72″ Super Pro Plus - White
1 - Chimera Super Pro Plus Strip - White - Medium
1 - Westcott 54″ × 72″ Silver Soft Box
1 - Rosco 1700 Fog Machine
Light Meter
Gossen Starlite
Support
1 - Manfrotto Tripod with Quick Release Head
1 - Matthews Baby Jr. Triple Riser Stand
1 - Matthews Baby Jr. Double Riser Stand
1 - Matthews Preemie Baby Stand
1 - Matthews Mini Preemie Baby Stand
Software
Adobe Bridge, Camera Raw, and Photoshop Corel Painter
Talent
Jaime Etheridge
Mixed Lighting effects
A clever stylist comes with a bag of awesome tricks acquired through years of experience. Sometimes the photographer can feel like the second in command.
It’s all a matter of being a team player and allowing everyone to bring plenty to the table.
For this shoot, Robert Young is assisting Tracey Lee, our usual tabletop stylist. Together, they have a variety of setups in progress. Robert has taken over this one.
Backlight as Key
Tabletop photographers often make their backlight their key light. At first, that does not sound as if it makes any sense.
What we have been discussing so far is the power of reflected light.
Backlight adds dimension, even to a simple gift-wrapped box. If the backlight is the only light source, isn’t the foreground in darkness?
If you are reading this on a sunny day, with your back to the window, aren’t you backlit?
It’s a natural illumination.
The Reflector
Here’s where our reflector plays a key role. It’s taking the backlight, harnessing it, and filling in the foreground.
However, when it comes to shooting many great photographs of beer, so much of the story is in the head of the beer, and that’s the primary reason for going with the backlight. It brings out the texture of the beer’s head.
Flashlight?
Robert has gotten the idea that we add a second back light: a flashlight. No. That’s not a typo. He’s not considering a “flash light,” Robert wants us to drag the shutter while he waves a hand-held flashlight behind the beer.
Because our flashes are at 5,500 K and the flashlight is in the range of 2,500 K, it warms up the amber color of the beer.
The flash pops. The shutter remains open. Robert and the flash- light go to work. The shutter closes down, completing the shot. It all has to happen fast. It’s all about the team effort.
The Stylist’s Touch
Some beer photos look flat. We start with a frosty glass. Rather than wasting many glasses of raspberry wheat ale, Robert uses an iced tea spoon to stir the ale, rebuilding the head. The shoot starts and ends in minutes.
Make your backlight a key light when shooting products. Allow a reflector to fill in the front illumination. This is extremely effective when the subject is glassware. In addition to stirring the beer to build a head, the stylist shines a flashlight as a second backlight while we drag the shutter.

Tech Specs
Photographer
Brian Stoppee
Stylists
Tracey Lee
• Robert Young
Illustrator
Janet Stoppee
Camera
Nikon D2x - ISO: 100 · Shutter Speed: 1/50 Manual Mode
Lens
AF-S Zoom-Nikkor 28-70mm f/2.8 IF-ED @ 70mm 35mm Focal Length: 105mm @ f/5.6
Lighting
1 - Novatron 1,000 Ws Digital Power Pack
1 - Novatron Bare Tube Head
1 - Chimera Novatron Bare Tube Quick Release Speed Ring
1 - Chimera 24″ × 32″ Super Pro Shallow Plus Bank - Small
1 - Westcott 14″ Silver/White Illuminator
Light Meter
Gossen Starlite
Support
1 - Gitzo Explorer Tripod
1 - Gitzo Off-Center Ball Head
1 - Matthews Preemie Baby Stand
Software
Adobe Bridge, Camera Raw, and Photoshop Corel Painter

Bouncing the Big Space
In Chapter 12, “Wireless Battery Flash,” we spoke a great deal about the use of bounce light. The photographer who covers events must master bouncing light.
Bounced illumination can save the day for the photographer who has to light a big space.
Umbrellas for Key and Fill
It’s a thrill to shoot anywhere at the Lewis Ginter Botanical Gardens, in Richmond, Virginia. Every space is beautifully designed and appointed. The library is no exception. The arched ceiling is breath-taking.
We photographed Bob with a silver umbrella as a key light to the viewer’s left and a gold and white zebra umbrella to the right. It has a nice dimensional feeling. However, with no other illumination, the model would appear as if he were in a darkened cave.
Ceiling Bounce
Making use of the arched ceiling offers all of the general illumination that we could have hoped for. Because of its shape, any light that strikes it is going to scatter all over the place.
To take advantage of this, we placed a monolight on a tall stand and cranked it up into the arched area. Without a reflector on it, the light is dispersed over more than 180°. The head is behind Bob on the viewer’s left.
Because the light is so inefficient without a reflector, it supplements the light that the umbrellas provide, rather than overcoming it in competition for exposure. We have additionally measured the ambient illumination to utilize the natural window light.

Tech Specs
Photographer/Illustrator
Janet Stoppee
Stylist
Sherrie Hagan
Camera
Nikon D2x - ISO: 100 · Shutter Speed: 1/125 Manual Mode
Lens
AF Zoom-Nikkor 80-400mm f/4.5-5.6D ED @ 180mm 35mm Focal Length: 270mm @ f/5.6
Lighting
1 - Novatron 1,500 Ws Digital Power Pack
2 - Novatron Bare Tube Heads w/6.5″ reflectors
1 - Novatron M600 MonoLight 1 - Westcott 45″ Silver/Black Backing Umbrella
1 - Westcott 45″ Gold/White Umbrella
Light Meter
Gossen Starlite
Support
1 - Gitzo Explorer Tripod
1 - Gitzo Off-Center Ball Head
1 - Matthews Baby Jr. Triple Riser Stand
2 - Matthews 40″ C Stands w/Sliding Leg
Software
Adobe Bridge, Camera Raw, and Photoshop Corel Painter
Talent
Bob Lindholm

Create Window effects with Cookies
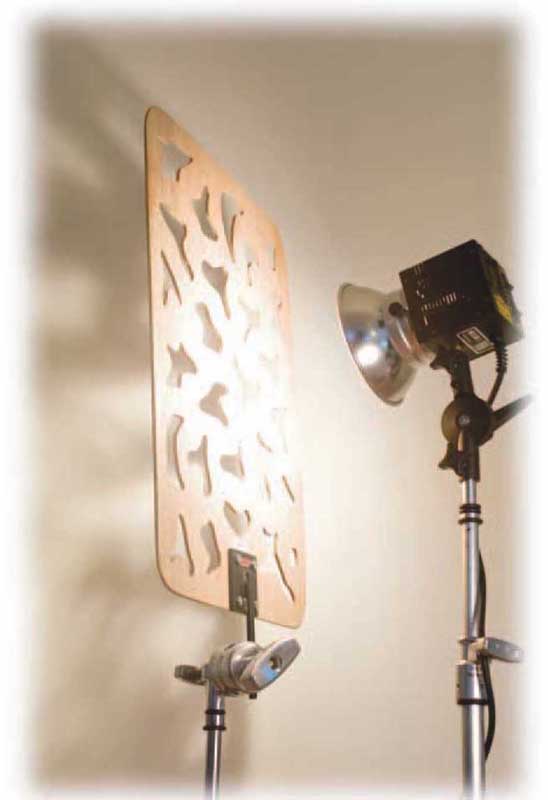
You can wait around all day for just the right dappled light to come through the window, or you can just create it yourself, twenty-four hours a day, by using a cookie!
Cucoloris
A “cucoloris” goes by many names. The most common is “cookie.”
A cookie is similar to a gobo, in the sense that it gets into the path of the light. However, the gobo is more commonly applied to light modifiers that are right there, at the lighting instrument, whereas the cucoloris is a much larger pattern that gets in the way of the light’s path, much further along on its journey to a surface.
Hard or Soft Cookies?
Commercially created hard cookies are usually made of a plywood material. Some folks spend a great deal of time cutting their own hard cookies from cardboard and discarding them when the project has been completed.
Soft cookies are sometimes produced from screening. One of these is more accurately known as a “cello cucoloris.”
The “hard” and “soft” terms refer to the edge that they produce. Because the cookie produces a natural shadow effect, it’s a matter of how much of an edge you want.
The Matthews Cucoloris
Both soft and hard cookies are included in Matthews Lighting Control Kits. They’re in either 18″ × 24″ or 24″ × 36″. Photographers find the smaller size to be more than sufficient for many projects.
The wood cucoloris is kept to a manageable weight with a luan plywood and a very durable metal grip that firmly attaches to the various Matthews clamps. The grip head permits easy tilting and rotation.
A cello cucoloris from Matthews is a screen material wrapped around an open-ended metal frame with a pattern on it, created from a clear plastic.
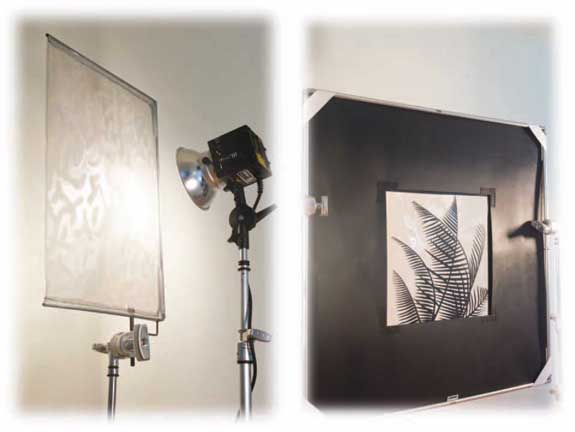
Chimera’s Window Pattern Kit
This kit offers popular ways for news crews to project an interesting pattern on the background of a space where an interview happens.
For photographers, it keeps them popular in neighborhoods where location shoots happen: assistants are not compelled to go out and tear off a few tree branches to make a background shadow on the wall. There’s no need to carry mini blinds to project light through, either. This system of plastic film patterns attaches onto a black frame with hook-and-loop tape.
The frame attaches to Chimera’s 42″ × 42″ panel frame.
The black frame provides 12″ all the way around the pattern. This is a perfect fit to be illuminated by the Chimera 24″ × 32″ Super Pro Shallow Plus Bank. The 42″ × 42″ panel frame prevents any light from spilling in unwanted places. Chimera has two pattern sets that include blinds, a leaf, palms, French doors, columns, a half dome, a domino, sun scratch, an open window, and split door, plus a clear pattern for logos or other things that you need to project.
As always with Chimera, the kit thankfully comes in its own rugged duffle bag.
To the left are Matthews hard and soft cookie products. On the right is Chimera’s interchangeable film-based solution.