Chapter 9
Creative Support and Safety

Okay. You buy the idea that a great light stand is all about safety. That’s an easy sell. But we expect you to believe that there’s something creative about a tripod?
You’d better believe it!
This whole chapter is devoted to clever things that you can do with support systems. The operative word is “system.” Once you begin to establish support that has interoperability, you’ll see all sorts of creative possibilities that you have previously missed. Getting a light or a widget to do this, that, or the other thing not only brings solutions to challenges, but also opens new ways to explore new photographic concepts.
Going without all the support systems that you need is like trying to complete the jigsaw puzzle without all the pieces. Not only do you not get the whole picture, but it tempts you to make compromises. Sometimes these improvisations lead to a less-than-safe setup.
A good support system makes for an extra-safe work environment. Great support not only prevents expensive equipment from being damaged, but also contributes to the continuing good health of involved personnel.
Working accident-free is a responsibility that you have to take seriously.
If your tripod and its head are not helping you find fast creative solutions, you need a new tripod.
Stand Requirements
Let’s help you establish a few ground rules as to what you must demand from a stand.
The Ultimate Lighting Stand
For starts, dream. Every veteran of lighting has that ultimate stand. Ours exists. We’re after versatility.
If we could have only one stand in the world, it would be the Matthews Magic Stand with it’s Runway Base. It goes through a metamorphosis of being just 54″ tall to becoming 150″ tall, to a portion of the stand converting to a boom. The legs on the runway base collapse, nested next to each other, or completely remove. Since the wheels lock or swivel, they track in a straight line. The stand’s top riser is a Magic Finger. (See page 311 for a lesson on what that’s all about.) Since it separates into two distinct segments, it’s even light enough to move around (though hardly a feather weight).
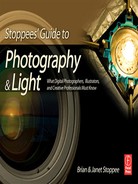
The Baby Stand
All the magic isn’t about being big. You need a tiny stand to get into little places. Sometimes you need to hide a light behind someone. The trick is that a little steel stand, as low as 20″ high needs to securely hold a lighting instrument that’s worth quite a few hundred dollars. So much is at stake to trust that kind of investment to some lousy support that could fall over and break and shatter the instrument. We use the durable little Matthews Mini Preemie Baby for this.
We also go way down low with a little stand that’s a propped-up stub on the ground. The Matthlink has a standard leg and a flexible one to get in tight places.
The All-Around Stands
You need a few stands to do some serious grunt work. They have to be able to cope with a great deal of stress, weight, and to hold their position. Many poor-quality stands tend to “drift” or “creep,” meaning that you have a tough time locking their position and they start to shrink, a little bit at a time. These stands are pushovers. The legs are not prepared to withstand both the weight of a large light bank and the force that winds exert upon them. They topple over or bend with time.
You need a stand that climbs to over 5’ for seated subjects. We use the Matthews Preemie Baby, the slightly larger version of the little backlight stand.
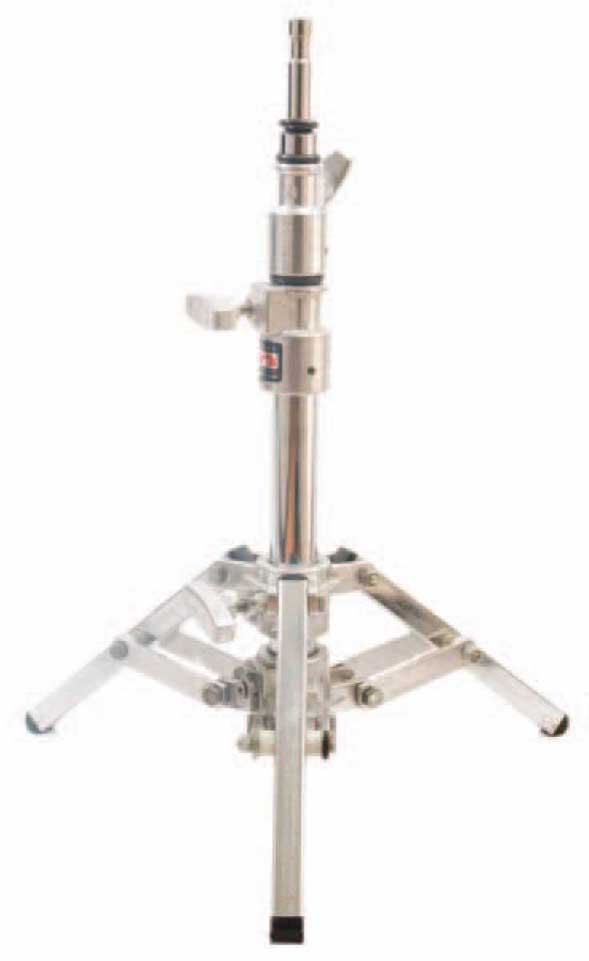
Rolling Stands
Once a setup is together, you always need to fine-tune it. If the equipment that it supports is quite formidable, picking it up off the ground and moving it is not an option.
Here, you need a stand that not only rolls but can support at least 80 pounds.
Each segment of a stand that adjusts up and down is known as a “riser.” Look for two or three of these to take you from around four or five feet to around eight to twelve feet. The casters need to securely lock down and quickly unlock.
We rely upon the Matthews Hollywood Baby Junior Stands.
The mighty Matthews Mini Preemie Baby stand gets some of the most use of all the stands that we own. If we were to pick up a few more stands, we would grab more of these. It’s super for backlights and reflectors. The Preemie Baby is the most durable little stand we have ever met. Its much taller “Baby” brothers and sisters are born of the same dependable stock.
Stands that roll are not a luxury. When big heavy gear is mounted on them, they are a must-have for making incremental adjustments effortlessly.

The Magic Stand wins our “Best of Show” award for the finest lighting stand in the business. It’s a do-it-all support that breaks down for easy transport.
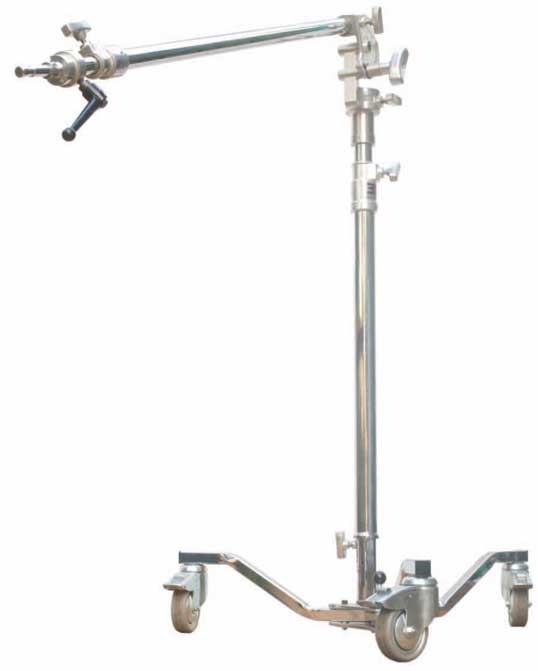
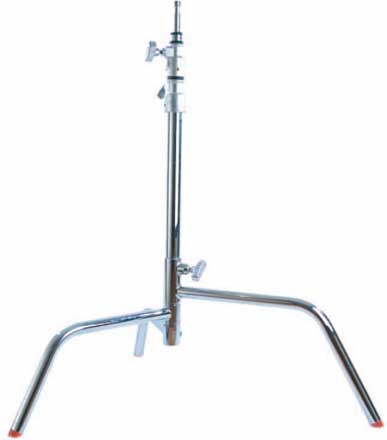
C Stands vs. Inclines
In 1974, the Matthews C-Stand started its rapid journey to becoming synonymous with Hollywood filmmaking. It didn’t take commercial photographers long to join in accepting this radically new approach to light stands as a must-have in their arsenal. Instead of folding up, it collapses flat, or the legs detach from the rest of the stand.
C-Stand is short for Century Stand. The name goes back to motion picture production, prior to artificial lighting. Stages would revolve to allow lighting with overhead illumination from the sun. Large reflectors were positioned to kick the sunlight onto the stage. The most popular reflector was called “century” because it was 100″ in size.
What we now call the Century Stand was originally built by grips and gaffers and was welded together and unable to fold or adjust.
Part of what makes them so beloved is that they adapt to inclines. While two legs remain on level ground, another leg rises up to fit on a stair step or box or inclining terrain. It basically adapts to its environment.
In chrome or black, the C-Stand is either highly visible or nonreflective.
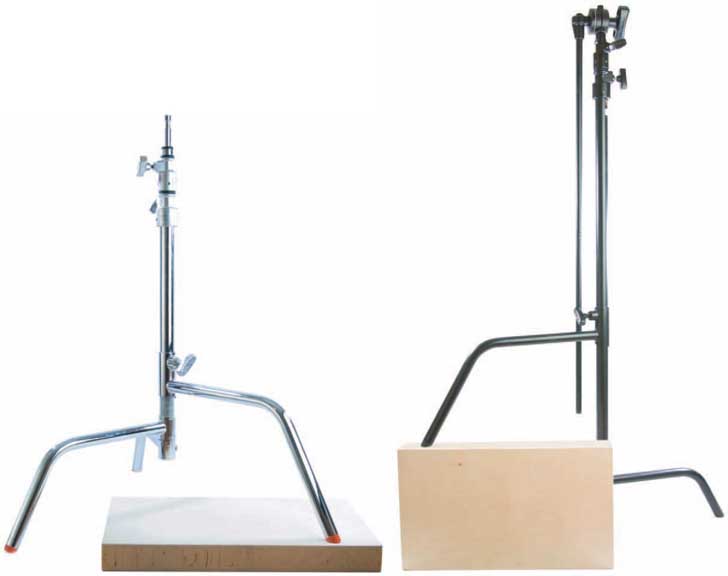
Crate and Riser Systems
Who would have guessed that a longstanding centerpiece of high-dollar image-making is an inexpensive plywood box?
The nine-ply Baltic birch crates, called Apple Boxes, are a central part of the C-Stand system. With all the right-sized holes and openings precisely in the needed positions, these 12″ tall boxes come in eight different sizes, performing all sorts of handy tasks.
How you use them is limited only to how technically creative your mind may be. Problem solvers love the Apple Box. It becomes something of a game as to the different ways to configure them with the rest of the Matthews gear.
When a photographer first introduced us to the Apple Box, we were certain that he had lost his mind for wanting to buy a plywood box that he could surely make himself, until we saw one. This product is so durable and precise that to attempt to make one yourself would cause people to think you either have had no image-making work to do in months or have lost your mind!

As with all things Matthews, the crates integrate with other Matthews equipment to form a greater system.
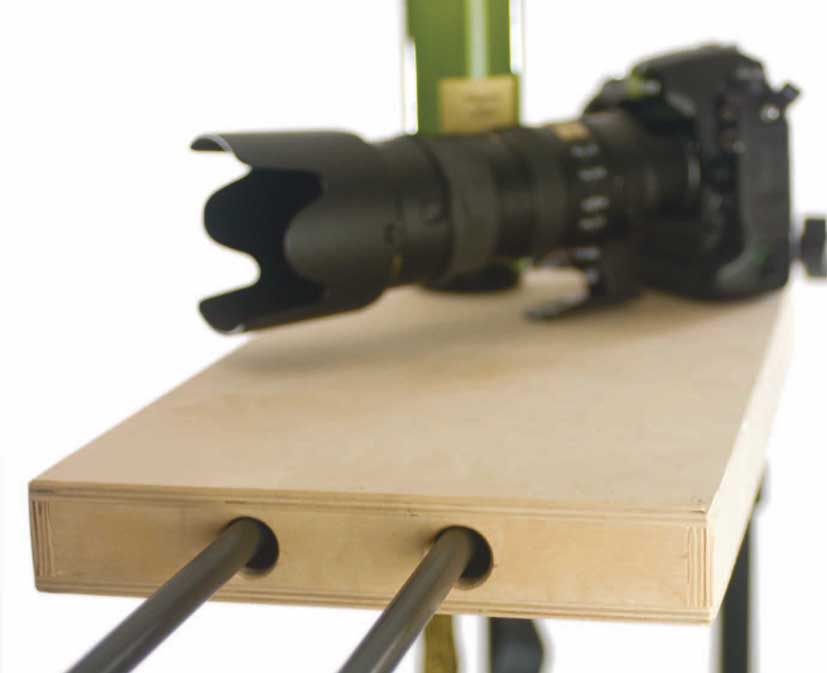
A good reason for the holes on either end of the crates is to allow them to interact with support arms. Here, two C-Stands and their support arms effortlessly hold up a crate, which is able to balance a camera, a bottle of wine, and much more.
Arm and Boom Solutions
The boom arm is essential in how we light a set. Though they have been part our support apparatus, for decades, without any accidents, every time we hang a light over a person, we check, double check, and check it again to be sure the entire rig is secure.
We have these horizontal supports that range from an arm that’s less than a couple of feet, in length, to a boom that extends to ten feet and weighs forty-one pounds.
Getting a lighting instrument in just the right place, yet, out of that camera’s view makes a shot. We try to mimic natural illumination, as best we can. It’s the look of our photographic style. Light comes from above. We just can’t get there with only the vertical support of a stand.
You have to get horizontal.
Starting Small
Arms are not always of industrial-strength proportions. We try to keep the scale of a setup, in mind.
The C-Stands that we feature, on pages 302 & 303 come with their own arms. Most of them are 40″. They’re also available at 20″. They’re quite rugged little arms with a Grip Head attached that lets us angle them at the right degree. If we can get the job done with them, it’s our first choice.
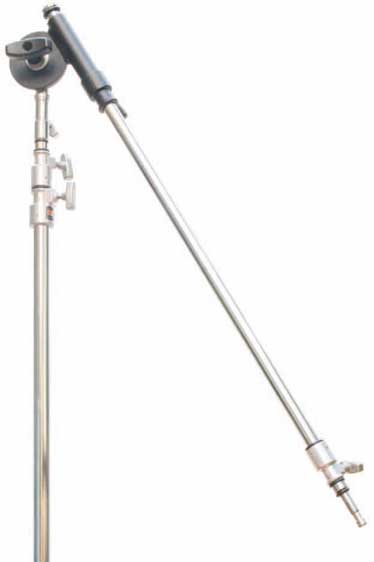
Sometimes we just need to come out a foot and a half to two feet from the lighting stand. All we need is an extendable arm. These are great in getting something to peek out over a set piece. It’s completely a horizontal adjustment. These need to be properly counterbalanced, for safety.
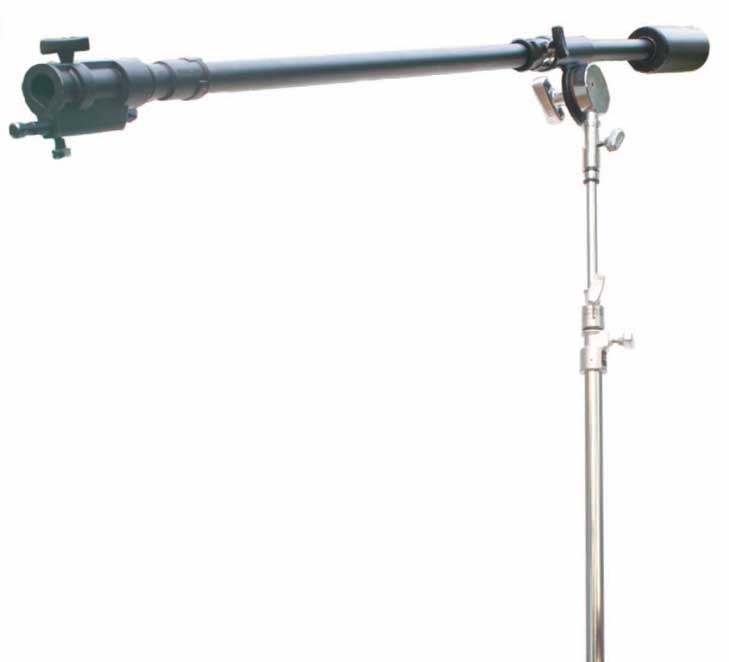
The Basic Boom
The arms are great for smaller needs, and often we’re doing more with arms than hanging lights. When we’re hanging light banks or getting a flash head with a snoot on it well into a set, we need a good boom.
If you don’t have a boom, you need one. Look for something that extends at least six feet and weighs ten to twelve pounds. It has to be super durable.
At least a foot of the boom is going to extend in the opposite direction of the lighting instrument to handle the always important counterweight.
We have seen so many booms fail over time. The locking mechanism at the point where we adjust the angle of the boom is usually the place that cannot take the stress.
Passing the Test
Try out a boom at the camera store. Prepare to hang something substantial on one end of the boom. Put something like a flash head in a light bank on the ground. Point the boom downward and adjust the head’s bracket so that the receiving end of the boom and the bracket easily couple. Now, raise the bank up off the ground after balancing the boom so that enough of it extends backwards and is evenly counterweighted. It should smoothly lift up off the ground. Does it look like a rugged support or is it bowing under the weight? Once you have raised it up, does it lock into position smoothly and evenly, or do you have to fight with it?
If the whole experience is a struggle, something’s wrong.
Lowering the Big Boom
Some projects are big. When we need to get a large Chimera bank out over someone, we need distance. Getting a big boom out there is the only way to go.
From the day we bought our first sports car, the criteria was that it had to be able to haul a bunch of photographic gear and still fit our luggage. If we can’t open the hatchback of our all-wheel-drive sports car and fit a boom in it, the boom’s bigger than we’ll ever need.
When fully collapsed, the Matthews Junior Boom (humorous name for something that has a 25 pound counter weight) is 68″.
Extending to 10’, it passes our size test.
Booms leave a great deal of weight hanging over people, places, and things. Be sure that they are properly balanced, weighted, and secured.
A makeshift boom is an acccident waiting to happen. Match the right tools to the right job.
Weights and Bags
Safety is always on our minds when it comes to support systems. Not only is good counterbalancing important, but in outdoor setups, you need to overcome the forces of wind. You can’t have equipment blowing over and breaking, or worse, hurting someone.
You can’t completely overcome some natural events, but you can properly set up and weight equipment to withstand some strong breezes. We always have our weather eyes open for shoot dates. Checking the hour-by-hour forecast for our specific location provides information on wind direction and speed. We’re ones to play it safe.
Erecting large diffusion frames for extended periods of time requires adjustment as the sun moves. These landlocked sailboats get to be in the neighborhood of 8’ × 8’. Their diffusion screens raise up to around eight to twelve feet off the ground. They can easily topple over if not weighted extensively. It’s the classic tale of man versus nature. When the winds are strong, man normally loses.
These bags are great for the traveling photographer. They come empty and you fill them, on site.

Smart Weights
There is no compromising when it comes to safety. We have seen photographers attempt to go down the homemade route with weights. Some are under the impression that you can save up your gallon milk jugs, bring them to the location, and fill them with water there, attaching them to light stands with bent coat hangers. That misguided solution provides around four pounds to secure what could easily become over a thousand dollars of equipment.
Safety is your responsibility. Secure all support systems as you set up. Leave nothing open to fall on others. Protect people and property at all times.

How Heavy?
We bring with us weights that start at five pounds and get up to seven times that.
Securing a diffusion frame and the two stands that support it can require at least one hundred pounds with light breezes. This depends on the wind’s direction and the frame’s size, plus how it’s positioned.
Boa Bags
Matthews has a cool little set of weights that they call “Boa Bags” (hanging above). They’re available in 5, 10, and 15 pounds. These bags are filled with steel shot and can be ordered with stainless steel filling, instead. Half of the weight is on either side of the bag and the center section has a soft gripping material that won’t mar a surface, but provides a bit of tooth so that the weight is less likely to slip off whatever you have hung it on.
We wrap these around the ends of smaller booms and arms. They also hang off small stands. We try to take care to evenly distribute weight. Smaller bags are at higher places with the big weights at the base. This keeps the setup from becoming top-heavy.
Big Bags
Sand bags are available with as much as fifty pounds of weight. We find that much weight to be a little heavy for some of our people to transport. Watching out for people’s health is always on our minds.
What’s in the bag is important. Bags can get moist when you’re caught striking a set and it starts to rain. All the Matthews sand bags are filled with sanitized sand to prevent algae from forming. Most of them are made with a water-resistant Cordura, but we have water-repellent weights, too.
The big bags have good strong straps on them, so that they can hang firmly off supports.
The Empty Bag
When traveling by air, it doesn’t make sense to ship twenty or thirty pounds of weights.
There’s a great solution. Matthews has Fly-A-Way bags and Matthbags that weigh a quarter- to a half-pound, respectively. Once you get to the location, fill zip-lock bags with whatever, toss it in the bag, and close up the Velcro or double zippers.
Safety is your responsibility. Secure all support systems as you set up. Leave nothing open to fall on others. Protect people and property at all times.
Headers and Drop Downs
Did you ever feel like that stand you used to love was just too small for your needs? How about the need to mount more than one light on a single stand? Does it make sense to erect two or three stands, side-by-side?
Well, you are not only 100% correct about all the above, but we have been there and thought that, too.

Others think that way, as well, because all those support products already exist.
We try to travel as light as possible. Time wasted transporting gear is money-making time lost. Once on location, the less square footage of floor space that we consume, the better it is for traffic to navigate around us. This is especially true in public places.
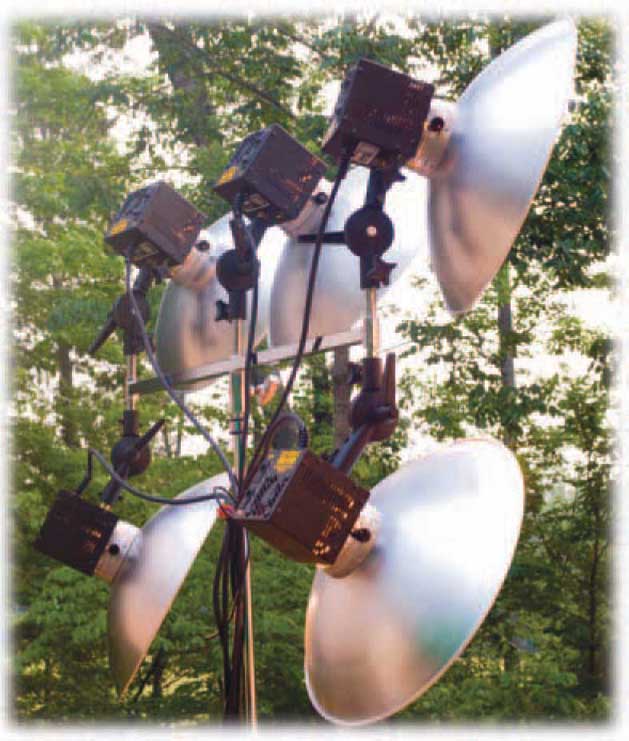
Double and Triple Headers
To flood an area with a ton of light, attach a triple header (pictured above and to the left) on a good sturdy light and mount up to five flash heads on the triple header (three on top and two on the bottom).
Check back to page 293 where we discuss Tough Rolux, to solidify the pool of light, reducing multiple shadows.
If you have five flash heads, driven by five power packs (or a combination of heads and monolights) you have a bunch of flash power. You also have quite an investment. Don’t let this rig become top heavy and topple over. Be sure to weight it well.
Drop Downs
The world’s tiniest boom has to be the Matthews Baby Drop Down. When you are shooting with a light bank on a boom and trying to get the bank to hang parallel to the ground, as the boom angles upward, the drop down straightens it out. A Cheater Adapter does this, too. This ability is important to some photographers when lighting with Lanterns and Pancakes. (Please see pages 288 & 289, for more.)
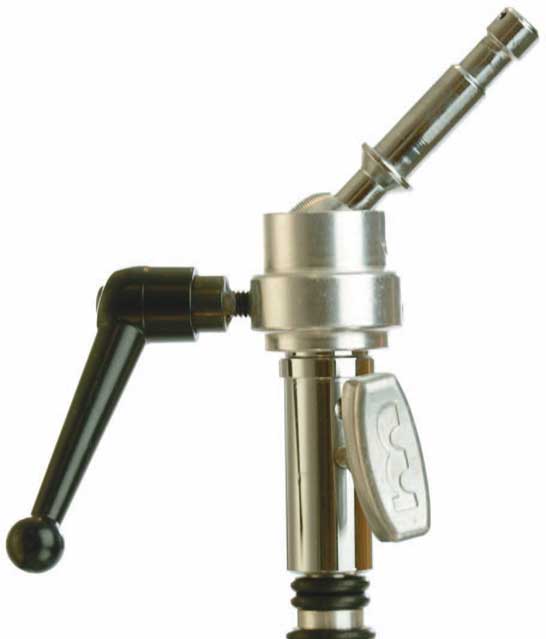
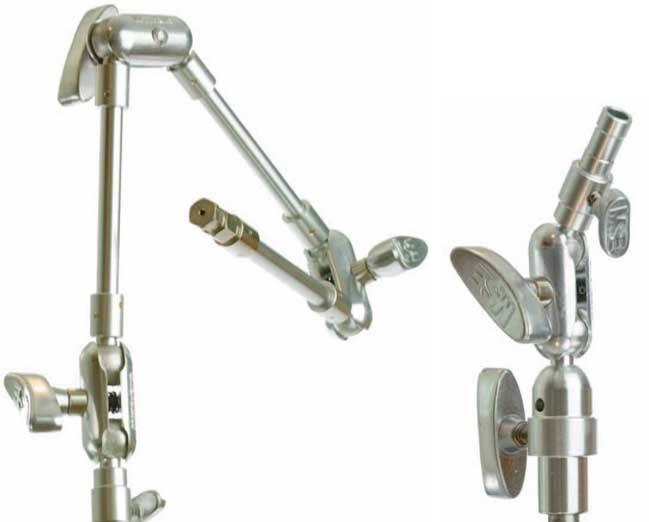
Magic Fingers
One of the coolest support accessories in the world is the Matthews Magic Finger. You almost want one for each of the serious stands and booms that you own.
It fully resolves the problem of what to do with a lighting instrument at the end of a support, when you need to tweak its position a few degrees over in this direction or a few degrees back in that direction.
The “finger” and its ball joint pivot from −15° to +90° and it rotates in its collar 360°. It’s a control with one locking handle.
Because so much is hanging on a finger, it’s machined from a solid piece of steel. At 2 pounds, it has to be one of the heaviest adapters in the business, but it’s designed to handle the tough tasks.
We’ve hung our largest light banks from these on long booms, and they have always held steady.
Grip Heads
There are a bunch of little support accessories that are standard equipment for many accomplished tabletop photographers. The people who shoot still-life photos need to light beautiful images. This requires a great deal of finesse to get the image just right.
These accessories are not limited to photographs where the subject doesn’t move. Accomplished shooters of people have also borrowed what are central components of any self-respecting feature film’s production gear.
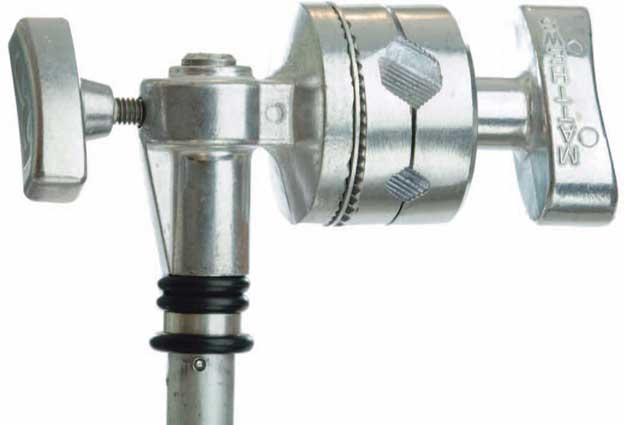
At the center of the system is the Matthews 2-1/2″ Grip Head, also known as a “Hollywood Head.”
It fits over a stand or slides over any 5/8″ shaft, such as the arms that we discuss on pages 306 & 307. It locks down firmly with the smaller knob, and doesn’t “slip” or “creep.”
The other side unlocks with the larger knob, so that the two plates freely spin over a full 360°. The further you undo the knob, the more the plates spread apart. Between the plate is a 5/8″ opening and a 3/8″ opening. Whatever is locked into those openings can spin 360°.
Today, 5/8″ studs are the standard of professional support equipment and the lighting instruments that go over them. It makes the top riser of a stand strong enough for the tasks that are demanded of it.
There was a time when 3/8″ was considered an acceptable stud size by some for light stands. Now, it’s a popular size for some smaller support equipment, like the MiniGrip Kit, which we look at on page 315.
The legendary Matthews Grip Head is a mainstay for anyone who needs to lock equipment into place and carefully rotate it over 360°. It’s included with the Chimera Frame kits.

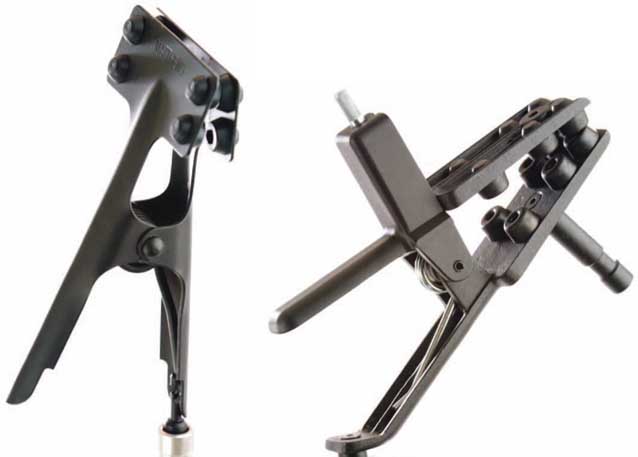
Mafers and Mathellinis
Another two sides of the Matthews clamping system are a series of jaw-like devices called Mafers (pronounced like “may for”) and Matthellinis.
Super Mafer Clamps
The underside of the Mafer fits over a light stand or various other support products. It has a special release pin that holds it in precise position until the small knob can be used to lock it down firmly.
As the large knob is twisted, the jaw begins to close down on whatever you have put in its path. Both sides of it have protective pads, which also provide a very firm gripping action.
Besides chrome, Super Mafers Clamps come in nonreflective black. There are also Double Super Mafers for two attachments on one clamp.
Matthellini Clamps
These industrial-strength clamps have a 5/8″ stud on top and a jaw that opens to 2″, 3″, or 6″ and adjusts to either the center or the end of the device. There’s also a Mini Matthollini, which is somewhat smaller in stature, for specialized tasks (see page 315). They have protective pads for a strong grip.
Check out the next two pages. That’s where this system starts to get fun.
Flexible Arms and Knuckle Heads
Here’s when the heads and clamps, on the previous two pages, are team players.
Hollywood Superflex Arm
The articulated arm is what makes the whole system super cool.
Each of the end segments have a serrated ball joint. The two middle segments have one on either side. Loosening any one of the three knobs permits two of the ball joints to move freely. Loosening all three knobs provides complete flexibility to all four segments.
The longer end segment terminates with something similar to a 5/8″ stud on a lighting stand, but is slightly larger. It snaps into place on other Matthews gear.
The shorter end has a hollow 5/8″ stud to accept accessories like the dots and fingers we discussed on page 267.
Working with System Components
This flex arm is strong. When locked down, it has quite a grip.
Couple it to a Mafer on the long-ended segment side and lock the Mafer to a light stand. It’ll support any of our flash heads without any drift. So attach a head on the other side and adjust the articulated arm to get it into a place where a stand or boom cannot go.
Move the segments around to get reflectors or diffusers in front of a lighting instrument.
Knuckle Heads
When just a little bit of flexibility is needed, try a Matthews Knuckle Head. The ball joints and knob work the same way as the Matthews Hollywood Superflex Arm.
One side of it receives a 5/8″ stud, so it fits right on top of a light stand or boom. The other end can firmly carry around fifteen pounds, so you can mount a flash head on it or insert any of the light modifiers that the Superflex Arm accepts.

MiniGrips
The Matthews MiniGrip Kit is another cool set of creative support tools in the system. The components of the kit, which comes in its own soft case, are similar to the Grip Heads and Matthellinis that we discussed on the previous two pages; they are just downsized as four MiniGrip Heads and two Mini Matthellinis, along with two 20″ arms.
One of the MiniGrip Heads can fit over a light stand or boom. Because they spin freely over 360° and can angle infinitely on an arm, there are zillions of support combinations.
The Mini Matthellinis can clamp onto all sorts of things, but when used in combination with the Road Rags, and Grip Kits, which we discussed on pages 264 & 265, the possibilities seem endless.
One arm fits into a MiniGrip Head so that the two arms form a very flexible single unit with longer reach than a Hollywood Superflex Arm, just with fewer segments.
The whole kit is great for tabletop work or rigging things to the interiors of confined spaces, such as cars.
It’s a great compliment to the wireless battery flash units that we discuss in Chapter 12, “Wireless Battery Flash,” as well.
Clamps, Pigeons, Ties, etc.
Matthews Studio Equipment has a huge array of gear. Some of it is specific to the film or video industry. We’re only discussing, in this volume, the goodies that are of greatest interest to photographers, we use ourselves, and hear other studios rave about.
Clamps
The Afflac Clamp mounts to the Superflex Arm or Knuckle Head, so that one of them has a very powerful spring jaw at the end of it. This makes a perfect holding device for a reflector card, filter, or diffuser. Between the protective rubber pads, it opens wider than an inch.
When an even bigger jaw is needed the Gaffer Grip can open to as wide as 3.75″ or it adjusts to less than 2″ betweven the 12 rubber pads. It has two 5/8″ studs for lighting instruments, so it’s possible to clamp this grip to a sturdy surface and attach a flash head, HMI, or daylight fluorescent.
Pigeons
Matthews has some heavy-duty plates that hold lighting equipment on walls, set pieces, or attach to one of the Apple Boxes that we discussed on pages 304 & 305.
Historically, these were known as “pigeons.” These plates used to be attached to the top of set walls so that small lighting fixtures could be attached. Hence they rested on top of the set pieces, like birds.
The plates can be nailed in place or secured with all-purpose screws and a battery-operated drill. They come with 3″, 6″ or 12″ studs, as well as a right angle.
These pigeons are also available with 5/8″ female receivers.
Pins
Another great use of a Grip Head, Matthellini, or Mafer is to attach a heavyduty pin. Then a lighting instrument can be added. These have a snap-in end. Most are straight, but there’s a right angle, as well.

Ties
There are all sorts of little things that need to be secured on a set. Loose wires get into the shot. Knotting them up becomes a pain to undo when it’s time to strike.
Toss a dozen Matth-Ties in one of your bags. Wrap one around some things. Push the rope’s end through the side opening. Pull it at 90° toward the center and it will hang on tight.
Hard to Find a Place for a Light?
There are those shoots when everything is perfectly planned but something goes terribly wrong and suddenly you need to reach for your emergency kit.
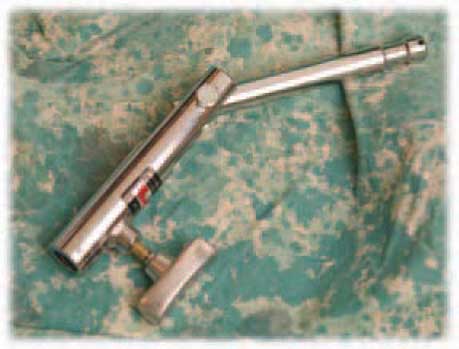
Include a putty knife in you emergency response bag? Yep. It’s not just any putty knife, though. The one you need has a 5/8″ stud on it. This gadget can slip under a window sill, behind a baseboard heater (one that’s off), under kitchen cabinetry, or any other place you can dream up.
Plate (a.k.a. “a pigeon”)
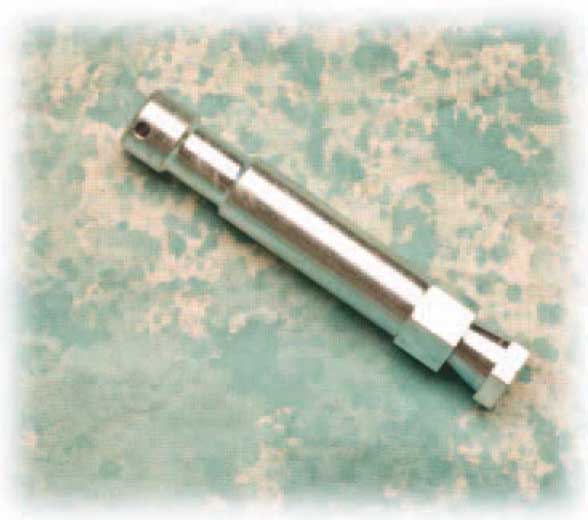
Pin
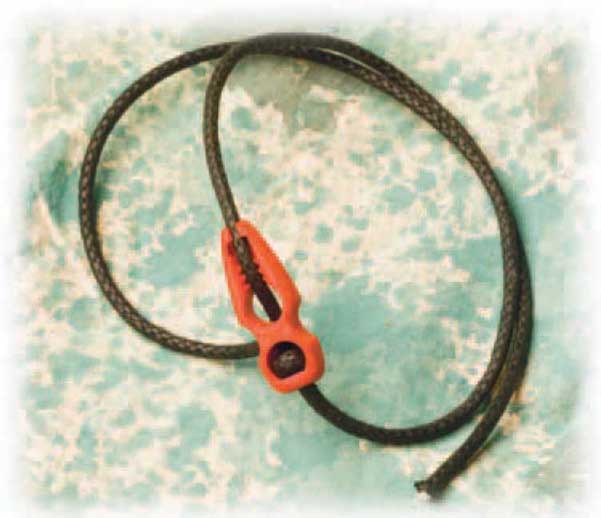
Ties

Putty Knife

The Right Tripod
There are a bunch of tripods out there, and many of them are poor excuses for camera support. They’re flimsy. The fittings have a limited lifespan. They’re just not acceptable for professional use.
Some think that the tripod slows you down. These folks feel that they’re more creative when they’re free.
We, on the other hand, do this for a living. There’s no excuse for coming back to the studio with photos that could have been good if it were not for the camera shake.
That’s lost money that cannot be recovered. With that in mind, great tripods are some of our favorite pieces of photographic equipment. They not only provide a stable platform for capturing images, but during the testing phase of setup, they allow the camera to remain stationary as we make shot after shot and compare what we have.
It also forces us to frame up shots, as we have discussed and planned, to see whether what we’re about to do is on the mark.
We have a few of tripods. Each one has a specific purpose.
Tripod + Head
Unlike the consumer tripods that are found in discount stores, professional tripods have two key elements: the lower tripod mechanics and the upper head, which should provide ample control over camera positioning.
If you don’t have a great tripod, already, here’s what you need to look for.
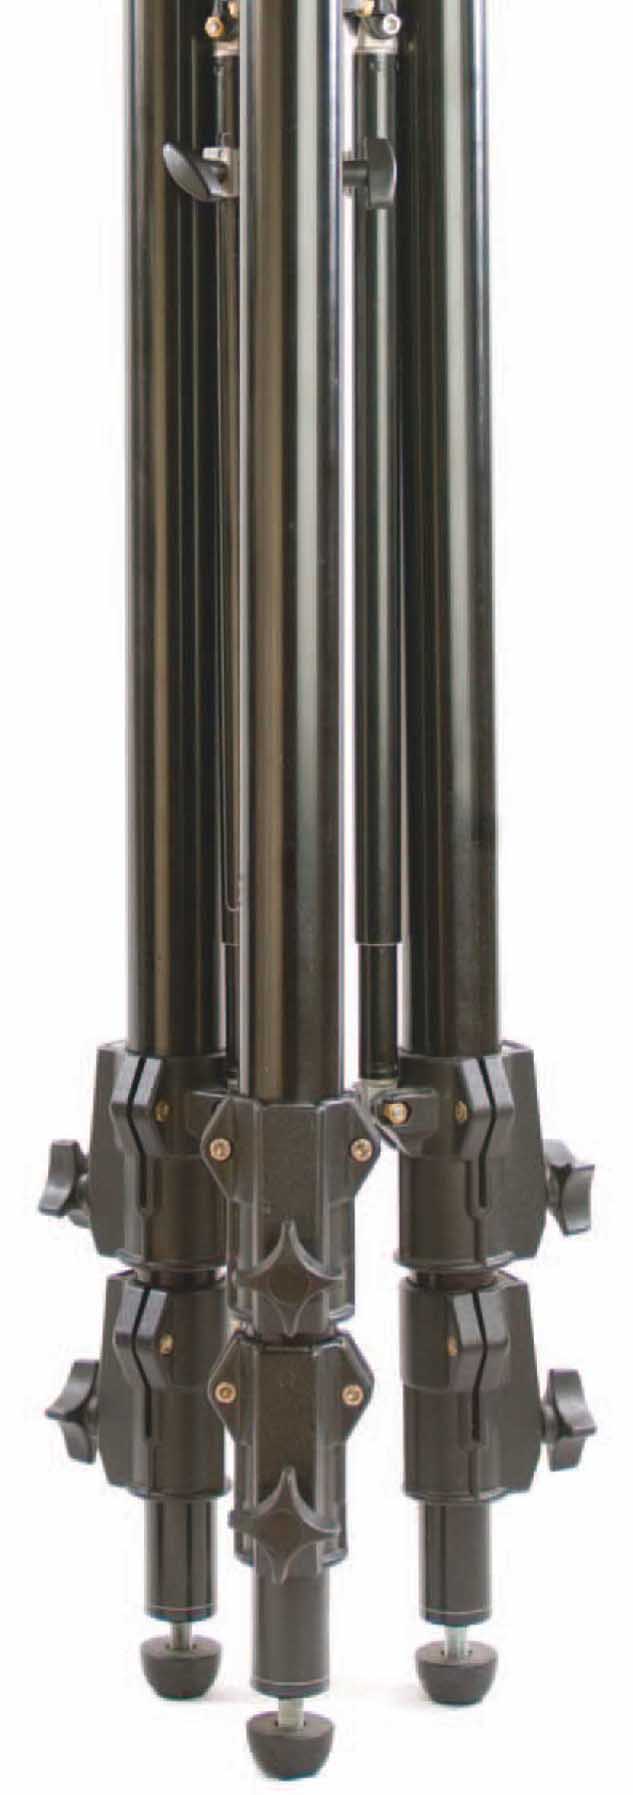
Feet
How you use your tripod indoors is different than what you do with it while in the natural elements of the outdoors. While shooting in a great indoor location, you
need feet that will be kind to the flooring. Outside, the feet need to help you dig into the surface for stability.
Some tripods accomplish the second task with adjustable feet. Gentle rubber feet roll back to reveal spikes. You can vary each foot based on where you are shooting. The downside is that you’re in trouble if you forget to cover the spike when you’re shooting on someone’s soft pine floor.
Another solution is a tripod with round pointed rubber feet that work somewhat universally in all situations.
Height Collapsed
How much space does your tripod need when collapsed? For a tripod that’s studio-bound, that’s not an issue. If you’re on the go, on and off jets, in rental cars, attempting to keep your traveling space to a minimum, the more compact your tripod becomes, the happier you will be.
Comparing the lightweight Gitzo Mountaineer tripod (left) to the formidable Manfrotto video tripod (right) has to be kept in the context of the strengths and purposes of each.
Working Height
You want the best of both worlds with tripod height. Once it’s open, you probably want all the working height that you can get. The taller you are, the more important this factor becomes. What’s the height of your eye level when you’re wearing cross-training shoes? It’s probably around an inch more than your height without shoes.

The base of your camera to the viewfinder is somewhere around 4 or 5″. A great head for a tripod is around another 5 or 6″. So from the tripod’s highest point to the viewfinder is around 10 to 12″.
Factor into that your eye being 6″ less than your physical height and your tripod minimally needs to be 16 to 18″ shorter than you, if you are to see through your viewfinder when you’re standing up.
Someone who is 6’ tall minimally needs a tripod height of 56″. If you’re 5’ tall, 44″ will do.
If you want a tripod that goes up so high that you have to stand on something to get the vantage point you need, factor that in.
How Low Can You Go?
Do you want to shoot close to the ground? Many tripods allow the legs to flare out at a pretty good distance.

Weight and Location
It doesn’t matter if you’re a body-builder; when you’re hauling a bunch of photographic gear all over creation, weight matters.
Construction
There are some great new materials that go into tripod construction. You can have durability and minimal weight.
Traditionally, tripods are built from aluminum tubing. Gitzo uses aluminum gravity casting rather than pressure methods for greater stability with a 30% lighter result for their Explorer line.
The most significant weight reduction comes from a radically different material, like carbon fibers. Gitzo’s structure of six crossed-fiber layers provides excellent rigidity plus minimized vibration in their Mountaineer line of tripods.

Legs and Braces
Another weight factor is design. Can a tripod offer significant stability without braces on its legs? The more construction that goes into a tripod, the more weight is added.
Our Gitzo tripods do not have braces. The monster Manfrotto tripod that we have does have braces. Do we notice any stability issues?
We’ve noticed none. However the Manfrotto does grow to over 9’-3″ with a Gitzo head, for a viewfinder height of more than nine and a half feet. So, the braces are obviously essential to its stable design.

Locking Legs
How a tripod’s legs lock determine both its longevity and ease of operation. When you’re shooting, it doesn’t come down to the minute, shots are made or lost in a matter of seconds. You need to work fast.
A twist lock system is fast and can be strong. There should be no play between the locked parts.
The more sections a tripod’s legs have, the longer it will take to raise completely.
The Center Column
Some like a center column that cranks. It can provide a beautifully smooth operation. However, does it slow the process?
Does the center column get in the way for lowering the tripod close to the ground? If so, does the whole thing remove?

Tilting Column Wisdom
You may need the center column of your tripod to do more than move up and down, in order to gain a little extra height.
Legs that angle independently are a good place to start. They allow you to do more than just adapt to the terrain. When each leg fully operates on it own, it becomes an important part of weight-balancing with the tripod.
You might want a center column that can go completely horizontal. From there, it’s helpful if it can rotate a full 360°. This allows you to shoot anything on the ground. It’s great for nature shots.
Next, if the column angles up and down, you can get in tight for macro photos.
Just like working with a boom, on a light stand you will gain the greatest stability in this case by pointing the tilted column over a leg.
If your tripod has a hook on the column, attach a Matthews Boa Bag to the end of it, in this sort of situation.

The Quick Release Ball Head
Many professional photographers prefer a ball and socket head. They think that it’s fast.
Quick Release
They even like a quick release head all the more. With a quick release, you attach a plate to the base of your camera. There’s no attaching the camera to the tripod by carefully turning the 1/4-20 screw until it’s tight. You slide the plate into place, and it locks there. When it’s time to remove the camera from the tripod, you press a release switch, and it comes off.
If sometimes you know you have to have the dependability of the tripod, but also have to leave those three legs behind and hand-hold, this is the answer for you.
Some photographers want the safety of a double quick release, so that the camera cannot be accidentally removed.
A quick release system has to provide a sense that the camera is firmly seated. If not, you think everything is in place, but as soon as you let the camera out of your firm grasp, it falls to the ground.
Ball Head Ergonomics
A great ball head has to be intuitive. Its calling card is that it offers a sense of freedom. There are fewer controls to mess with. One knob gives you pan control. You have to reach a point where you can back off the knob so that there’s just enough friction to prevent unwanted camera movement, but enough play to swing a little this way or that, over a 360° range.
The other knob that you need to get comfortable with is the ball’s friction control. Not enough friction is like having no tripod at all; you risk camera shake. Too much friction prevents you from getting that perfectly composed shot.
A great ball head has balance that adjusts seemingly by the tiniest degree.
Besides rotating 360°, an off-center ball head angles the camera over a 90° range. In combination with the rotation, a photographer can adjust the camera to the left or right. You can additionally switch the camera to the center and use the control to tilt up and down. Because the ball is so flexible it rapidly adapts to whatever you need.
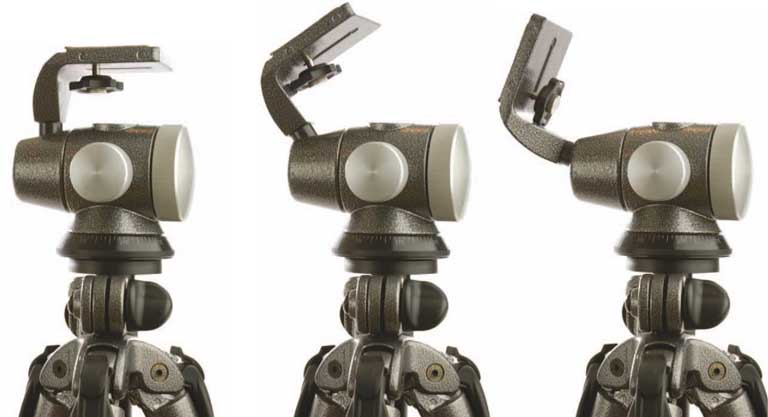
Off-Center Ball Head Control
In some ways, the ball head and the off-center ball head are very similar; in other ways they are very different.
The key similarity is that they provide a certain freedom. The controls are minimal and fast. Both encourage you to develop a relationship with the instrument to the point that you concentrate fully on the image-making. The adjustments are second nature.
Because the ball is set off to one side, if there is no panning to do, you set the friction of one knob just right and go to work.
Besides panning 360° horizontally, the offset ball flips 90° to go from a horizontal aspect ratio to a vertical one. Then, the camera is free to rotate 360° vertically, as well.
Photographers find a comfort zone with the ball to their right or to their left. The goal is to allow the friction level to put camera
stability out of your mind. At that point, one concern is erased, and you begin to become a better photographer.