Chapter 10
Daylight Fluorescent
Some photographers are deeply involved in a love affair with flash. Others are faithfully enamored with continuous light. The constant light sources are true what-you- see-is-what-you-get illumination. They make their suitors feel as if they are working with something akin to natural light. There’s something to be said for that comfort level.
Photographers once considered fluorescent to be the mutts of lighting. Between cool white and warm white and whatever other fluorescent color temperature there may be, it was an on-film disaster.
Today, daylight fluorescent is a new darling of the image-making industry.
It’s everywhere.
Daylight fluorescent is all over the broadcast news studios. The hot lights that once hung from their grids have been replaced with big banks of fluorescent tubes.
Even some feature film Directors of Photography (DP) have gotten into the craze.
The photographer need not feel left out of the trend. Westcott pioneered this method for the still shooter. Their Spiderlite has five 5,500 K lamps that need no color correction. They white-balance perfectly to daylight. To light a set with them indoors is to have only minor concerns for the exterior light’s color temperature.
It’s a cost-effective solution for getting started, too, especially in tabletop photography.
Bright Lights, Low Wattage
If you are looking for a low-cost means of getting into tabletop photographic lighting, you’ve found it.
We don’t advocate shooting without an incident light meter, but if you have a camera with a great through-the-lens metering system, as we discussed back on pages 90 & 91, you might be able to pull it off, until you’re able to invest in a great meter.
Great Quality of Light
We see no defects in the quality of illumination of daylight fluorescent, in a soft box. If anything, when we’re shooting with it, we feel as if we are cheating. It’s as easy as it claims to be. The results are world-class.
The Downside
It’s not an all-things-to-all-people lighting resource. Much like hot lights, the output’s not powerful enough for groups of people. We use a 135-watt Spiderlite. For better people- shooting possibilities, get the 226-watt TD5. There’s practically a full f-stop advantage with the extra output for any subject.
Simple Execution
Because still life is pretty much a depth of field-driven photography, you may be able to forget the shutter speed (as long as it’s not so slow that it creates “noise”) and base your exposure on the needed f-stop.
Try switching to aperture priority, as we explored on page 85, and let the shutter speed be determined by the camera. Again, this depends on an even illumination. High-key or low-key images could fool the meter, with some cameras.
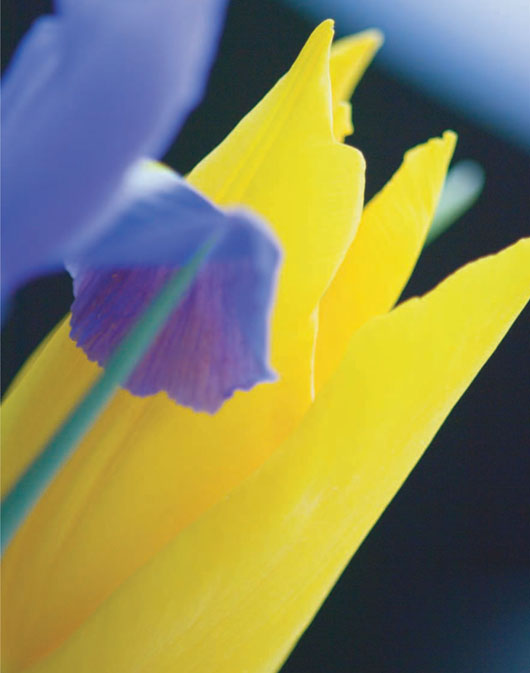
The image to the right is an excellent example of how, with only 135 watts of energy consumption, we are able to create all the illumination we need to do fantastic still life.
With the exception of the final image in this chapter, all were done with one Westcott Medium Soft Box, and one daylight fluorescent Spiderlite TD5.

Like the photo on the previous page, it benefits from a white surface’s reflections.

Tech Specs
Photographer
Brian Stoppee
Stylist
Tracey Lee
Illustrator/Art Director
Janet Stoppee
Camera
Nikon D2x - ISO: 100 · Shutter Speed: 1/50 Manual Mode
Lens
Micro-Nikkor 200mm f/4 IF 35mm Focal Length: 300mm @ f/5.6
Lighting
1 - Westcott Spiderlite 135 watt TD5
1 - Westcott 36’’ × 48’’ Silver Soft Box
1 - Westcott 30’’ Illuminator - White Diffusive/Reflective Panel
Light Meter
Gossen Starlite
Support
1 - Gitzo Explorer
1 - Gitzo Off Center Ball Head
1 - Matthews Preemie Baby Stand
Software
Adobe Bridge, Camera Raw, and Photoshop Corel Painter
The Funny-Shaped Lamps
In 1896 Thomas Edison invented the fluorescent light and eleven years later received a patent for it. He never put his invention into commercial production.
Fluorescent lamps are filled with a gas containing low-pressure mercury vapor and argon. They have a far greater lifespan than tungsten, consuming less energy than their hot-light competitors. A fluorescent lamp lasts ten to twenty times longer than incandescent lamps. It’s energy efficiency, compared to tungsten, which typically converts only 10% of its energy into visible light, whereas fluorescent creates useful light from around 22% of its energy.

A 15-watt fluorescent produces about as much light as a 60-watt incandescent.
The downside to fluorescent is that mercury vapor. After a lamp breaks and is cleaned up, the environment in which it was broken can still poison a child.
The invention of compact fluorescent light (CFL) has changed how the world consumes electricity. Leaving behind the blue-green or pink casts that gave fluorescent a bad reputation has been turned around by these household lamps that burn at a color temperature of 2,700-3,000 K, which is comparable to an incandescent bulb.
What works at home does not necessarily fly in the image-making workplace.
In the bad old days of fluorescent, when the tubes started up, they’d have a flicker to them. Flickering lights may not be perceivable to human vision, but it is to video. The fluorescent lamps used there are flicker-free.
Image-makers also demand 5,500 K, not a variable product or the color temperature that’s popular for your home.
The lamps in the Westcott Spiderlites are daylight, on the money.
Though the Spiderlite lamps should have a long life and the lighting instrument has its own cover, the CFL might break. If it does, dispose of it properly, and replace it with a genuine professional-quality lamp for an even, color-correct light.
Frequently turning a CFL on and off shortens its lifespan.
A Westcott Spiderlite is designed to be used in conjunction with their soft box products. The light it produces has a very broad spread, making it perfect for that application. So, if its efficiency were to be compared to something like a flash head, that would be difficult to do.
However, the tech specs to the right tell the story best. We tripod-mounted the macro lens that was giving us a 35mm film equivalent of a 300mm. To get the depth of field look we were after, f/5.6 was perfect. This gave us a shutter speed of 1/50 of a second.
In the previous section, we said that the Spiderlite, with fluorescent lamps, was not ideal for people photography. To clarify that, though, our light-source-to-subject distance is quite close here, at f/4.0, our shutter speed would be 1/100, and at f/2.8, we’d have a shutter speed of 1/200 of a second.
They’re within the range for some reliable people photography conditions.

Tech Specs
Photographer
Brian Stoppee
Stylist
Tracey Lee
Illustrator/Art Director
Janet Stoppee
Camera
Nikon D2x - ISO: 100 · Shutter Speed: 1/50 Manual Mode
Lens
Micro-Nikkor 200mm f/4 IF 35mm Focal Length: 300mm @ f/5.6
Lighting
1 - Westcott Spiderlite 135 watt TD5
1 - Westcott 36’’ × 48’’ Silver Soft Box
1 - Westcott 30’’ Illuminator - White Diffusive/Reflective Panel
Light Meter
Gossen Starlite
Support
1 - Gitzo Explorer
1 - Gitzo Off Center Ball Head
1 - Matthews Preemie Baby Stand
Software
Adobe Bridge, Camera Raw, and Photoshop Corel Painter
The Total System
Part of what makes the Westcott Spiderlite a dream to use is the simplicity.
Another plus is that there’s a big system that surrounds it. Though the Spiderlite is new, Westcott goes back to the late 1920s. It’s not like one of these new lighting companies that are here today and gone tomorrow, having products made out in who knows where.
Fluorescent does not dim. You control the light output of a Spiderlite TD5 with the three switches on the back. One is for the center 27-watt lamp, and the other two switches are for the top and bottom and left and right lamps of the same wattage each.
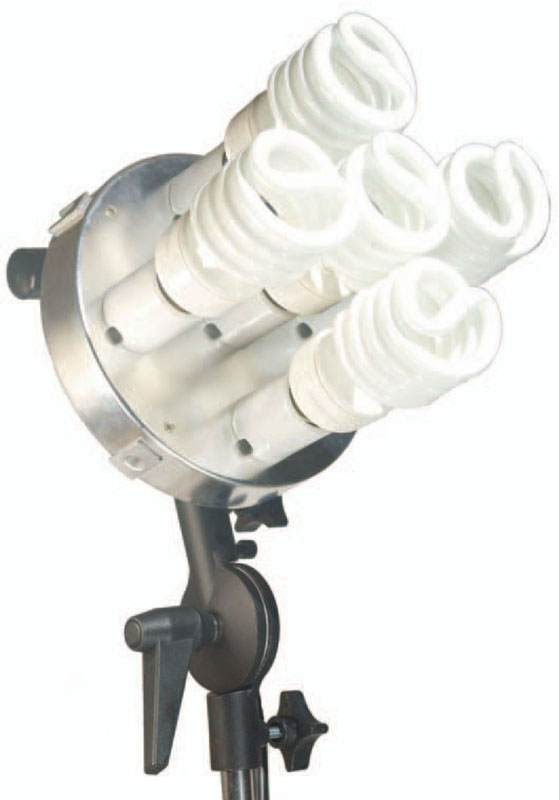
The TD5’s metal case has the four rod insertion points for a soft box, saving the expense of a speed ring. Its face is a reflective surface for maximum light efficiency. Use the handle to rotate the instrument from a vertical position to a horizontal one when a rectangular soft box is attached to it.
Novatron users will feel right at home with the tilter bracket. The base attaches to a light stand and the opposite side has room for an umbrella’s rod to be inserted. We love the handle on the bracket because it not only tilts the TD5 back and forth, but also lets you pull the handle away from the bracket. You can reposition the handle without affecting it being locked in position. This is great for accessing the tilter if it becomes blocked while a light modifier is in use.
Keep the compact fluorescent lamps burning for a long time, without breakage. Get the protective cover that straps to the back.
Use the three switches on the back of the Spiderlite to vary the intensity of the light output.
Please see the next two-page section for how it all comes together as a soft box.
Tech Specs
Photographer
Brian Stoppee
Stylist
Tracey Lee
Illustrator/Art Director
Janet Stoppee
Camera
Nikon D2x - ISO: 100 · Shutter Speed: 1/50 Manual Mode
Lens
Micro-Nikkor 200mm f/4 IF 35mm Focal Length: 300mm @ f/5.6
Lighting
1 - Westcott Spiderlite 135 watt TD5
1 - Westcott 36’’ × 48’’ Silver Soft Box
1 - Westcott 30’’ Illuminator - White Diffusive/Reflective Panel
Light Meter
Gossen Starlite
Support
1 - Gitzo Explorer
1 - Gitzo Off Center Ball Head
1 - Matthews Preemie Baby Stand
Software
Adobe Bridge, Camera Raw, and Photoshop Corel Painter
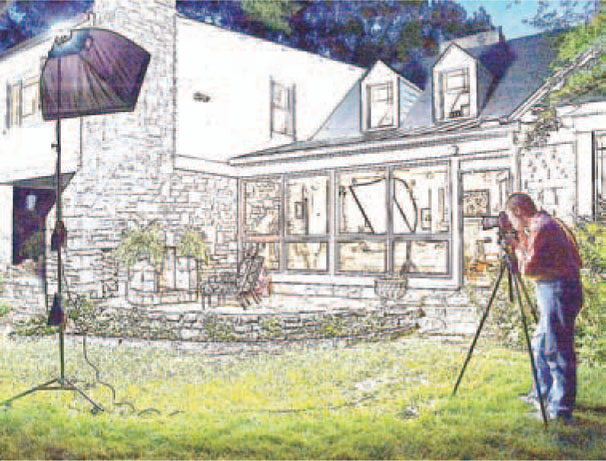
Soft Box Simplicity
As you can see from the illustration to the right, it’s easy to assemble a Westcott Soft Box, anywhere, in no time.
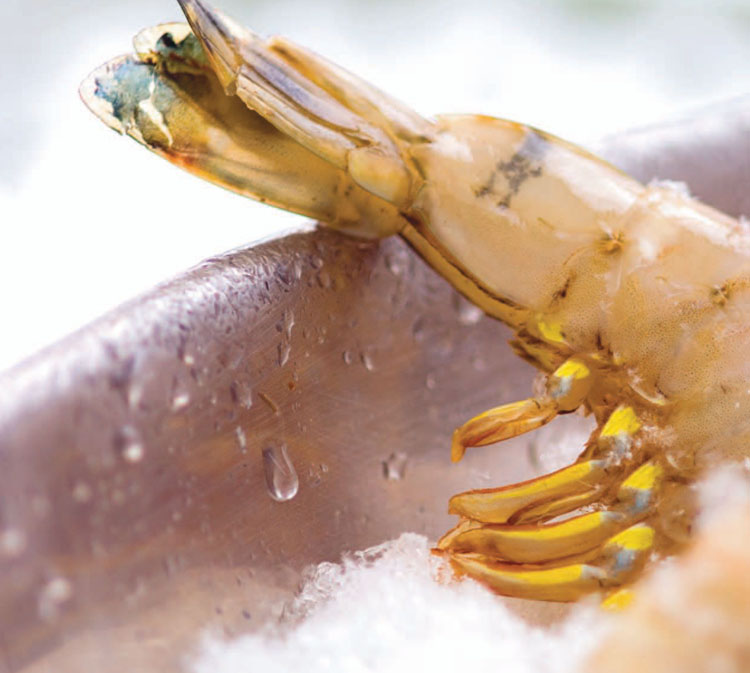
Here, we wanted to photograph shrimp, in snow, while the white stuff was still falling. In such conditions, the light is even but not dramatic. We needed a little kick.
Notice the reflection of the soft box on the rim of the metallic bowl and the highlights on the upper right side of the shrimp. The soft box built contrast and dimension. It makes the image snap.
Filmmakers take their daylight fluorescent lighting outdoors when they need some snap from the illumination, so we did the same.

It’s best to assemble the Westcott Soft Box while the Spiderlite TD5 is still wearing its protective cover, or remove the lamps and put them somewhere safe until you have built the soft box’s frame. Put the rods into the box’s sleeves first. Then attach the rods to the TD5. It works well if the box is facing down, on a clean floor surface, without the diffusion panels installed yet.

The rods of the Westcott Soft Box are quite flexible. We assembled it indoors, squeezed it through a doorway and placed it on a stand outside. We don’t advocate the use of lighting equipment outside while precipitation is falling. While we were shooting, the snow was tapering off, and the Westcott is water-resistant enough for the minor amount of snow to have no effect on the soft box.
Tech Specs
Photographer
Brian Stoppee
Stylist
Tracey Lee
Illustrator/Art Director
Janet Stoppee
Camera
Nikon D2x - ISO: 100 · Shutter Speed: 1/50 Manual Mode
Lens
Micro-Nikkor 200mm f/4 IF 35mm Focal Length: 300mm @ f/5.6
Lighting
1 - Westcott Spiderlite 135 watt TD5
1 - Westcott 36’’ × 48’’ Silver Soft Box
Light Meter
Gossen Starlite
Support
1 - Gitzo Explorer
1 - Gitzo Off Center Ball Head
1 - Matthews Preemie Baby Stand
Software
Adobe Bridge, Camera Raw, and Photoshop Corel Painter
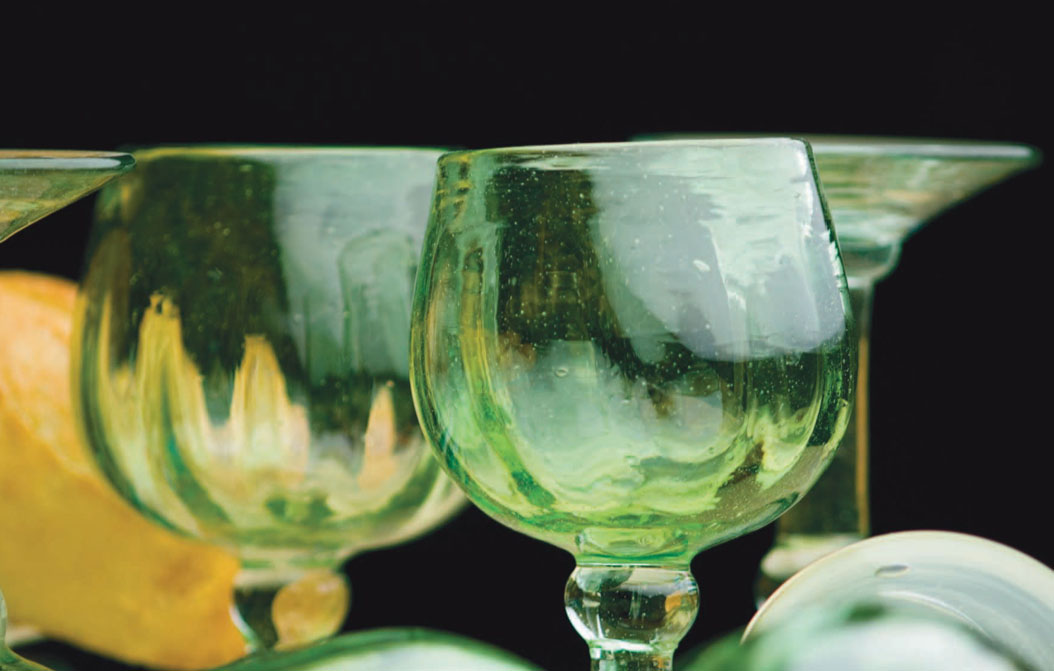
Create Reflections: A Quick Starter
If you are just getting started with daylight fluorescent as your first experience with artificial light, this section is a quick primer for you.
Let’s review how your light-source-to- subject distance affects the quality of the illumination. The closer you bring the light source to the subject, the more the light wraps around it.
A specular highlight is a mirrored reflection of the light source. In the image to the right, we see a reflection of the soft box on the neck of the wine bottle. We can tell from the size of the specular highlight that the 3?” × 4?” light source was just a few feet away.
We also see both the base of upside-down stemware as well as the reflection of the glass in the bottle.
If the light source were further away, the highlight would be smaller. If the soft box were just about on top of the thing, the highlight would be so large that it would be distracting and somewhat unnatural in appearance.
If our light source were larger, our specular highlight would be larger, too. However, the light would have had to fill a larger area, so it would have been less efficient. Our exposure would have been different.
We could change our exposure in three ways, if the light source were larger:
1. Increase the amount of time the shutter remains open. If the shutter remains open too long, there could be noise on the image.
2. Increase the sensitivity from ISO 100 to something higher. Again, this is a known culprit of unwanted noise, if the sensitivity goes too high.
3. Open the aperture wider. The result would be a more shallow depth of field.
Each of these solutions has a consequence.
A fourth answer is to bring the light source closer to the subject. That would alter the look of the highlight and change how the dark bottle separates from the background. As shot, it has its own mystique. There’s just an adequate amount of visual information in the photo to convey that it’s a wine bottle.
Another possible response would be to get more light into the box. There is no negative effect on increasing the light source’s power output (except that you have to buy it).
If you were working in a darkened studio, you could do a multiple exposure (providing that you do not bump the camera).
Put together a setup of your own. Develop a concept. Explore what you can do with the light. Examine each possibility. Evaluate the results. In Adobe Bridge, label your top five favorites. Show only the favorites. Ask yourself how the results could be better.

Tech Specs
Photographer
Brian Stoppee
Stylist
Tracey Lee
Illustrator/Art Director
Janet Stoppee
Camera
Nikon D2x - ISO: 100 · Shutter Speed: 1/50 Manual Mode
Lens
Micro-Nikkor 200mm f/4 IF 35mm Focal Length: 300mm @ f/5.6
Lighting
1 - Westcott Spiderlite 135 watt TD5
1 - Westcott 36’’ × 48’’ Silver Soft Box
1 - Westcott 30’’ Illuminator - White Diffusive/Reflective Panel
Light Meter
Gossen Starlite
Support
1 - Gitzo Explorer
1 - Gitzo Off Center Ball Head
1 - Matthews Preemie Baby Stand
Software
Adobe Bridge, Camera Raw, and Photoshop
Create Moonlight
Once again, we had to be like the motion picture people and take our daylight fluorescent instruments outdoors.
Another big plus to fluorescent is that as it uses so little energy, there are not big power needs on location. Sometimes when feature films are at remote locales, the only power source is a few electrical generators.
The power needs of a Westcott Spiderlite is so minimal that a little portable generator could keep a few of them going for a while.
For this shot, we wanted to balance three light sources with three different color temperatures. Part of the challenge was to also balance the exposure of those three sources.
If the fire burned too hot, it would wash out. If too much incandescent illumination spilled from the interior, we would lose the look of moonlight.
Our daylight fluorescent source was as close as it could get and still fully illuminate the entire shooting area.
At a 28mm focal length (42mm for 35mm), we had a generous depth of field, but f/8.0 proved to be just enough. These settings gave us a shutter speed of 1/1.3 of a second. That was already pushing the possibility of noise, so adjusting the sensitivity upward was not a viable option. We played with the intensity of the interior light and just stoked the fire.
This is a classic case of careful trial-and- error testing: knocking off a bracket this way, and another bracket that way, and getting it onto the computer screen as quickly as possible for cautious examination.
Balancing exposure and color temperature from multiple light sources is a juggling act. Excellent planning and sweating the details makes the shot.
When you examine a shot like this, check out the tiny details. Ask yourself things like, “Is the exposure time long enough for the candle flames to appear?” “Does the red wine in the goblets separate enough from the background and have sufficient illumination for the wine to not appear black?”
For a shot like this, the tiny details show that you have the technical expertise. Celebrate a great concept with equal technique.

Tech Specs
Photographer
Brian Stoppee
Stylist
Tracey Lee
Illustrator/Art Director
Janet Stoppee
Camera
Nikon D2x - ISO: 100 · Shutter Speed: 1/50 Manual Mode
Lens
Micro-Nikkor 200mm f/4 IF 35mm Focal Length: 300mm @ f/5.6
Lighting
1 - Westcott Spiderlite 135 watt TD5
1 - Westcott 36’’ × 48’’ Silver Soft Box
1 - Westcott 54′ × 72″ Silver Soft Box w/Tungsten
Light Meter
Gossen Starlite
Support
1 - Gitzo Explorer
1 - Gitzo Off Center Ball Head
1 - Matthews Baby Jr. Double Riser Stand
1 - Matthews Baby Jr. Triple Riser Stand
1 - Matthews Boa Bag - 15lb.
1 - Matthews 20lb. Saddle Bag
Software
Adobe Bridge, Camera Raw, and Photoshop Corel Painter