
When connecting to the data, there may be instances where we would want to connect only to a specific query rather than the entire data source, or use some specific filters before getting the data into Tableau. There could also be instances where we may want some calculation to be pre-computed before fetching it into Tableau. In all these situations, we can write a Custom SQL to fetch the data in Tableau. For using Custom SQL Query option in Tableau, we need to be familiar with writing SQL queries. Let's see how to use the Custom SQL option in Tableau.
We will use the Sample - Coffee Chain.mdb data or Sample - CoffeeChain (Use instead of MS Access).xlsx and we will continue working in the same workbook. We have already established a connection to the Sample - Coffee Chain.mdb Access file, or Sample - CoffeeChain (Use instead of MS Access).xlsx Excel file for our Mac users, for some of our previous recipes. However, for this recipe, we will make an altogether new connection by using the Custom SQL option. Let us see how that can be done.
- Let us create a new sheet and rename it
Custom SQL. - Click Ctrl+D to connect to data, select the Access option and then select the
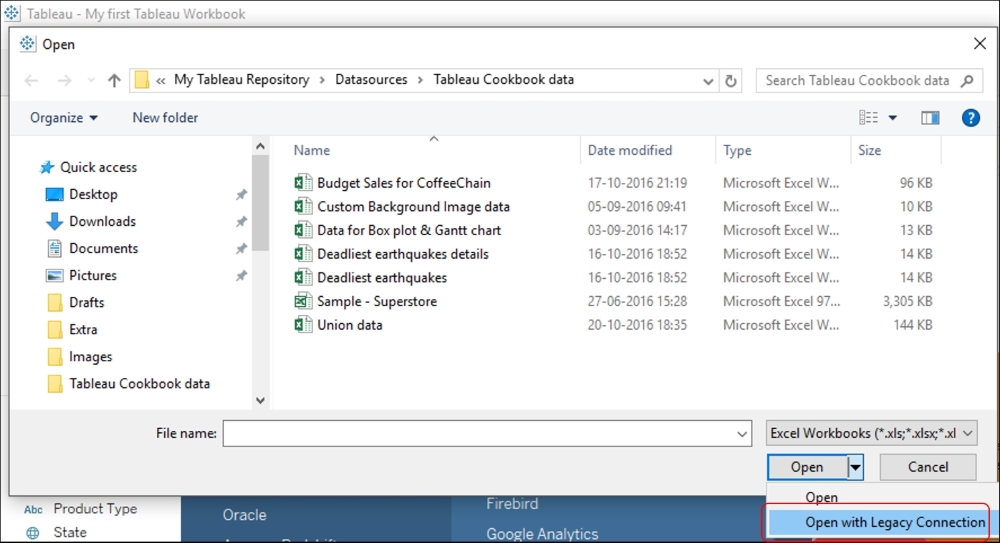
Sample - Coffee Chain.mdbfile fromDocumentsMy Tableau RepositoryDatasourcesTableau Cookbook data. Click on the Open button and we'll get to see the data connection window. For Mac users, this step will be modified to select the Excel option instead of Access. We will select theSample - CoffeeChain (Use instead of MS Access).xlsxExcel file. However, we will not click on the Open option directly. Instead, we'll click on the dropdown from the button which reads Open, and then select the option of Open with Legacy Connection. Refer to the following screenshot:
- Once we have connected to the relevant data source, double-click on the New Custom SQL option. Refer to the following screenshot:

- When we double-click on the New Custom SQL option, we will get the following view:

- The text box is where we will type our Custom SQL Query. Let's type a very simple SQL query which will fetch data only for Central region. Refer the following SQL query:
SELECT * FROM [CoffeeChain Query] where Market='Central'
- For Mac users, using Excel as a datasource, the preceding query will be updated as follows:
SELECT * FROM [CoffeeChain_Query$] where [Market]='Central'
- Let us OK to proceed and then click on the Custom SQL sheet tab. Now drag Market and drop it into the Rows shelf. Next, drag State and drop it after Market in the Rows shelf. Lastly, let us drag and drop Sales in the Columns shelf and our view will be as shown in the following screenshot:

- As a last step, let's convert this bar chart into a packed bubbles chart by selecting the packed bubbles option from the Show Me! option. After we get the packed bubbles chart, we'll quickly replace Market from the Color shelf with State field by dragging the Sales fields from the Dimensions pane. After we do that, we'll get the following view:

When working with Custom SQL, we need to remember that every database has slightly different SQL syntax and hence the Custom SQL written for one data source may not work with another. Further, for Excel and text file data sources, Custom SQL is available only when using the legacy connection or in workbooks that were created before Tableau Desktop 8.2. In order to use the Custom SQL for Excel in Tableau Desktop 8.3 and beyond we simply need to select the Microsoft Excel option under data sources and then open the desired Excel file using the legacy connection. Refer to the following screenshot:
Further, when working with Custom SQL, there's an option called Insert Parameter. This feature essentially helps us replace a constant value with a dynamic value in our Custom SQL Query. This can then be used to modify the connection on-the-fly by changing the values in the Parameter. For example, in our preceding recipe, we had hard coded the Custom SQL to fetch records only for the Central region. However, we can make this connection dynamic by replacing it with the following part which says Market = 'Central' to Market = [Region Parameter].
[Region Parameter] could be a parameter which is already part of the workbook or we can create it from scratch in the Custom SQL Query box itself. Refer to the following screenshot:

We can then use this parameter control to switch the Market and pull in the data for each Market of interest without having to edit or duplicate the connection. However, we need to remember that parameters can only replace literal values and not replace the expressions or identifiers such as table names.
Refer to the following link to learn more about Custom SQLQuery in Tableau:
http://onlinehelp.tableau.com/current/pro/desktop/en-us/customsql.html
Further, apart from giving us the flexibility to define our own input data by writing a Custom SQL Query, Tableau also allows us to use the Stored Procedures to define our data connection for certain databases such as SAP Sybase ASE, Microsoft SQL Server, or Teradata.