Make Edits to Your Photos
Basic adjustments of the kind I described in the previous chapter, Make Quick Photo Fixes, are often all you need to make your photos come to life. But sometimes you need to take total control over the situation.
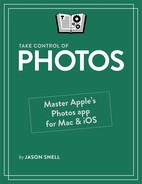
Select an image and press ⌘-Return (or if you’re viewing a single image, click the Edit button in the top right) to enter Edit mode, then click to switch to the Adjust ![]() tab. Along the right side you’ll see numerous tools you can use to make your images look their best (Figure 75).
tab. Along the right side you’ll see numerous tools you can use to make your images look their best (Figure 75).
If you’ll be editing in iOS, read this entire chapter to learn the lay of the land and then see Add Adjustments in iOS and Extensions for iOS for iOS-specific details.
Adjust Your Photos
Down the right side of the Photos window you’ll see 13 different adjustment controls. When you hover over them, you’ll see that many offer an Auto button to automatically apply basic adjustments, as well as an undo arrow ![]() . Click the disclosure triangle to the left of any item to see the controls that live underneath (Figure 76).
. Click the disclosure triangle to the left of any item to see the controls that live underneath (Figure 76).
Many, but not all, of the adjustment controls offer an interface where you drag a control across a horizontal bar. The center position generally means no effect is applied, while dragging to the right or left applies an effect positively or negatively. For example, as you slide the Color control to the right, your image will become increasingly saturated. If you slide it to the left, the color will gradually drain away.
Rely on Non-Destructive Editing
An important thing to understand about using Adjustments is that everything you do is non-destructive.
In macOS, every adjustment can be turned on and off at any time by clicking the checkmark ![]() icon. (A checkmark means the adjustment is on; a blank circle
icon. (A checkmark means the adjustment is on; a blank circle ![]() means it’s off.) You can do this even after you’ve “saved” your changes by clicking Done. Toggling adjustments on and off can be helpful in deciding if they really improve your image.
means it’s off.) You can do this even after you’ve “saved” your changes by clicking Done. Toggling adjustments on and off can be helpful in deciding if they really improve your image.
Fine-Tune Settings
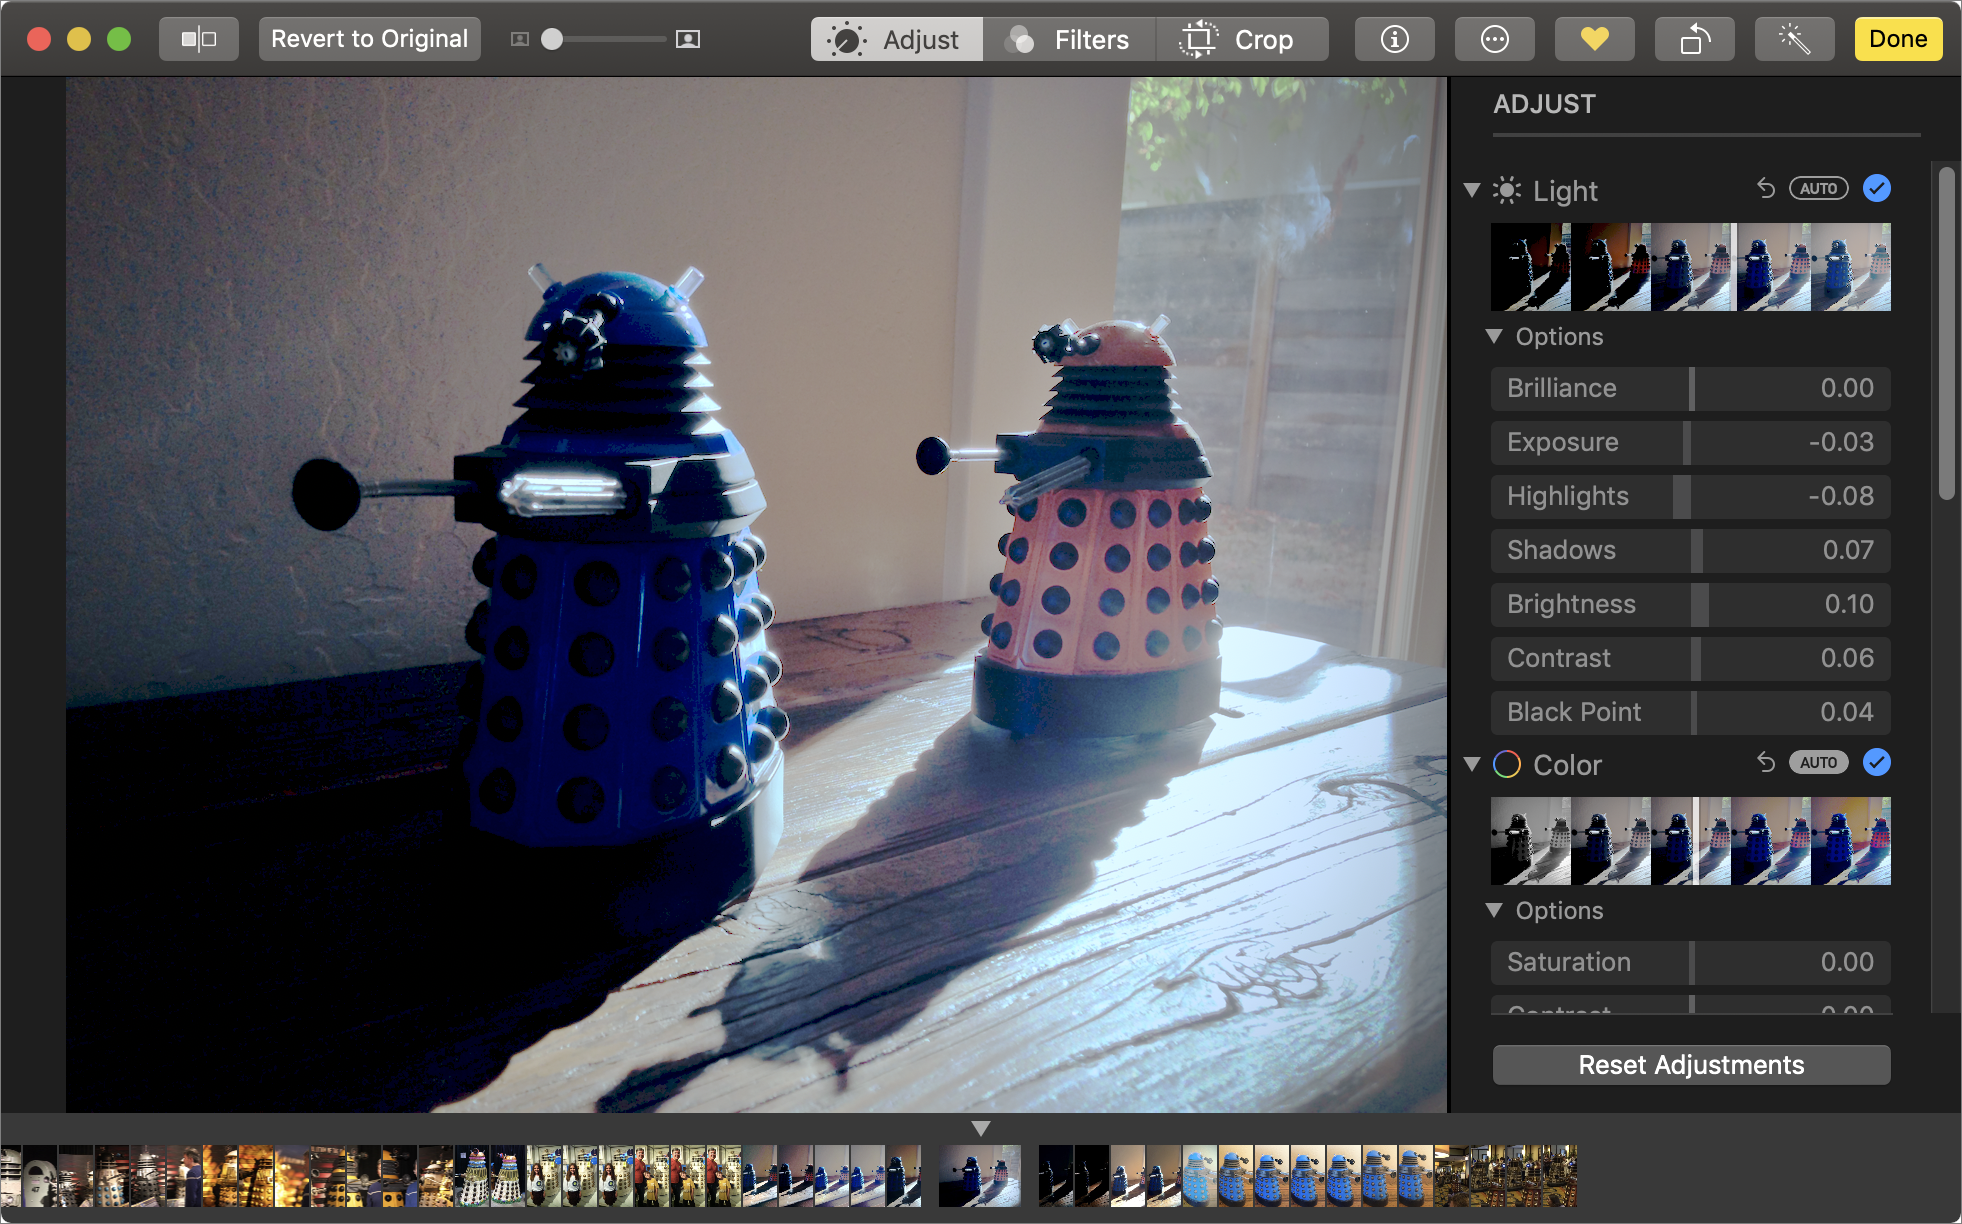
All adjustments also offer a basic level of control once you click the disclosure triangle ![]() , but many of them offer an additional Options area that you can click to reveal even more detailed controls (Figure 77).
, but many of them offer an additional Options area that you can click to reveal even more detailed controls (Figure 77).
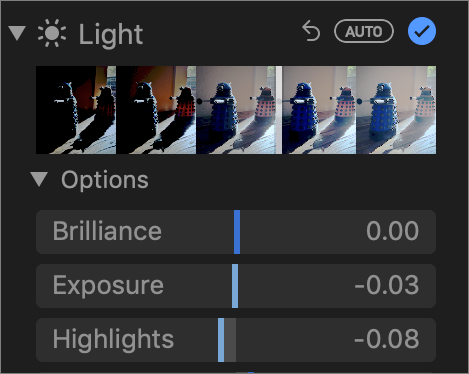
These controls are generally the individual components that make up the overall adjustment; for example, the simple Light adjustment is made up of seven separate components, each of which is individually adjustable.
To make a radical adjustment, hold down the Option key. The range of some controls will zoom out, providing you with more dynamic range to choose from.
Remove Blemishes and Dust
The retouching tool, accessible in the Adjust tab by clicking the disclosure triangle to the left of the Retouch ![]() section and then clicking the paint brush
section and then clicking the paint brush ![]() icon, is a simple brush tool that lets you remove dust, blemishes, and other unwanted junk from images (Figure 78).
icon, is a simple brush tool that lets you remove dust, blemishes, and other unwanted junk from images (Figure 78).

The slider, visible when you click the disclosure triangle, lets you set how big you want the brush to be. If you’re removing a dust speck or blemish, make the brush roughly the size of that item, then click it. (It helps to be zoomed in close when using this tool.)
If that doesn’t satisfy you, increase the brush size or click and drag across the item. Apple suggests dragging in a series of short strokes to blend an item into its surroundings.
If the brush makes bad assumptions about what you’re trying to do, you can override these by Option-clicking the texture or color you want the brush to emulate. Then click the item you want to eliminate.
Remove Color Casts
One of the adjustments I use the most is White Balance, which resets the color temperature that’s defined as “white” in a particular image. If you’re not a graphics or photography professional you might not realize that what our eyes perceive as white can actually be various wavelengths, from cold blue to warm orange to sickly yellow. Our eyes and brains adjust our mental color palette automatically—it’s why the world looks blue when you take off a pair of orange-tinted ski goggles—but our cameras aren’t always as good at it.
Fortunately, Photos can help. You can use the White Balance adjustment to select something you see in your image that’s white, neutral gray, or even a natural skin tone. Photos uses this as a cue to adjust the color temperature of the entire photo. This simple adjustment can provide a natural appearance to all sorts of images, such as a gross yellow image taken under fluorescent light, a shot of a glacier taken out of a blue-tinted airline window, or a scan of a yellowing photographic print from the ’70s.
To make the adjustment, click the eyedropper icon in the White Balance adjustment area. The best option is to choose Neutral Gray from the pop-up and then click on something that should be a neutral gray or white. In a pinch you can select the Skin Tone pop-up and try to balance on someone’s skin. Use the Temperature/Tint slider to directly adjust the color temperature of the image. If it doesn’t look right, keep clicking around and experimenting until you get a pleasing result.
Copy and Paste Adjustments
Let’s say you have a batch of images taken under similar conditions, and you work hard to create the perfect set of adjustments to make one of those images look great. How can you apply that work to all of those other images?
With the edited image open in the Edit pane, choose Image > Copy Adjustments (⌘-Shift-C).
You can’t apply these adjustments to a batch of photos at once, unfortunately. But once you copy one photo’s adjustments, you can rapidly spread those adjustments to other photos by using the arrow keys to move to the previous or next image and then typing the Image > Paste Adjustments command (⌘-Shift-V).
Add Adjustments in iOS
After tapping Edit in iOS, tap the Adjust ![]() icon to make edits using tools similar to the ones that are available in macOS. Unfortunately, the controls are much more limited on iOS, but there’s still quite a bit you can do to make your photos look better.
icon to make edits using tools similar to the ones that are available in macOS. Unfortunately, the controls are much more limited on iOS, but there’s still quite a bit you can do to make your photos look better.
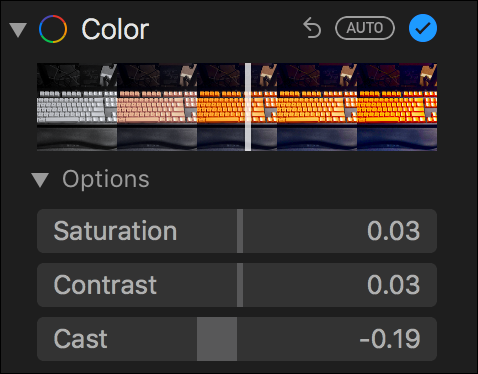
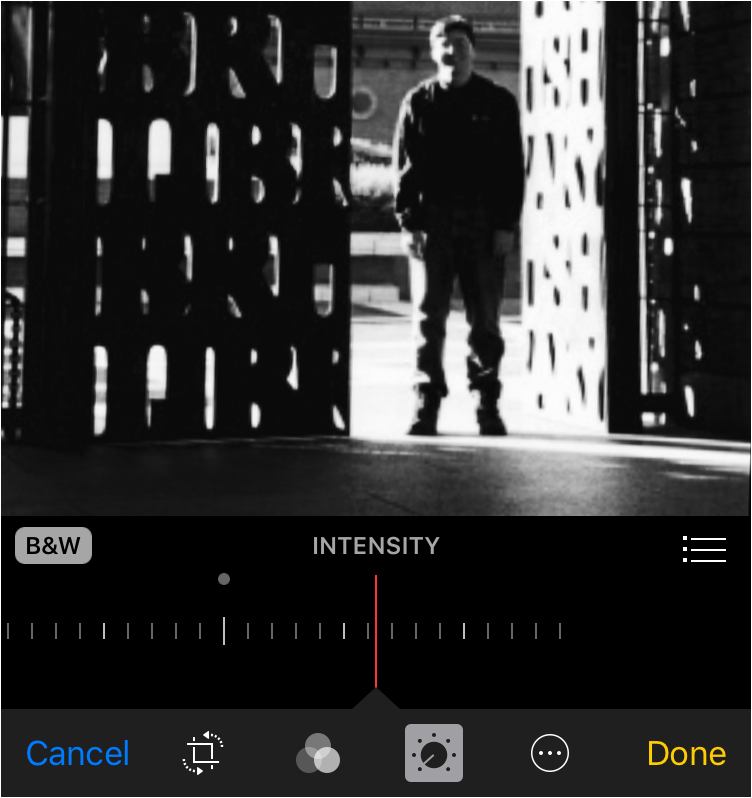
iOS adjustments are broken down into three subcategories: Light, Color, and B&W (black and white). When you tap a subcategory, you see a slider that makes a bunch of different adjustments to the photo as you slide your finger. For fine control over adjustments, tap the preferences ![]() icon to see the components that make up the larger adjustments, or swipe up to display the component controls one at a time.
icon to see the components that make up the larger adjustments, or swipe up to display the component controls one at a time.
Tap any component, and you get a slider to adjust the application of that component of your photo (Figure 79). Repeat this process until you’ve got the image you want to see, and then tap Done to save it. Tap cancel to discard any changes you’ve made.
Edit Live Photos
Newer iPhones and iPads (iPhone 6s and later, as well as iPad Pro and later) can capture video while you’re taking a still photo, using a feature called Live Photos. Live Photos appear to move as you look at them. You can use Photos to modify these videos, redefine the still image used to represent them, and even crop and enhance.
Live Photo editing controls appear just below the bottom of the photo in the Adjust tab. To turn off a Live Photo entirely (in other words, to make it just a “regular” photo), click the Live Photo icon ![]() . To turn off sound when the Live Photo plays, click the audio
. To turn off sound when the Live Photo plays, click the audio ![]() icon.
icon.
Adjust How a Live Photo Plays
When you play a Live Photo, the video plays (with sound) and then stops. But you can change that via the menu at the right side of the Live Photo editing bar:
Live: This is the default setting.
Loop: The video will play from the beginning to the end, then restart from the beginning, forever.
Bounce: The video will play from beginning to end, then reverse and play from end to beginning, forever.
Long Exposure: The video plays normally, but the Live Photo’s still image is replaced by one that’s taken the frames of the video and calculated what it would look like as a still photo with the shutter left open for a long time. Try it with a waterfall. (Figure 80)

Set a New Key Photo
Sometimes a Live Photo’s video is great, but the still frame representing it—called the Key Photo—is ugly. Pick a different frame of video to be the Key Photo by dragging the small rectangle in the middle of the Live Photo editing area to a new location, then clicking Make Key Photo. The new image will be lower quality than the original photographic still, but if the original was bad, that’s probably just as well!
Edit Outside of Photos for macOS
As you’ve seen, Photos offers a wide range of editing tools. But sometimes what you really want is to edit your photo in an external app that has special features or is one you’re comfortable using. Photos offers two different methods for editing images in other apps.
Edit in an External App
On macOS High Sierra and Mojave, you can edit photos directly in an external app such as Photoshop. To do this, choose Image > Edit With and pick the relevant app from the list, which can include apps such as Adobe Photoshop CC, Acorn, Pixelmator, or Affinity Photo, if you have them installed. When you save the photo and close the external editor, you’ll see the image updated within Photos.
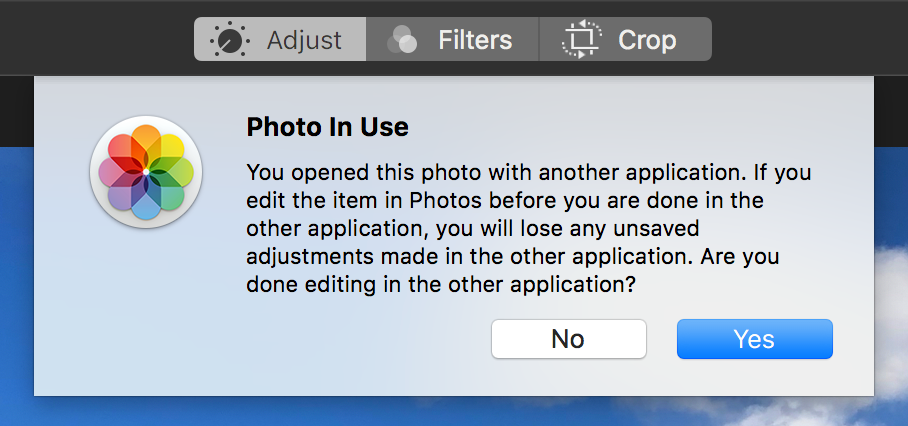
If you try to edit a photo that’s been edited in an external app, Photos will warn you first (Figure 82). If you want, you can edit that photo in Photos after you’ve edited it in the external editor. The key thing to remember is that once a file is saved by the external editor, those edits are burned in—you can’t turn them on and off. You can always revert back to your original image, but you can’t pull out any intermediate steps.
Edit Using an Extension
Extensions are mini-applications from the Mac App Store that can run inside of Photos. To edit with an extension, select an image, click the Edit button, click the Extensions ![]() icon in the toolbar, and then choose an option from the menu.
icon in the toolbar, and then choose an option from the menu.
Apple offers one extension, Markup, for all users. If you’ve ever wanted to draw on your photos in order to explain them, Markup will make you happy. Click the App Store item to browse other available Photos extensions. There are many cool options. For example, I like Skylum’s Tonality for working with black and white images (Figure 83).

Unlike Photos’ built-in editing tools, you can’t turn the edits you make using extensions on and off. When you begin to make an edit in an extension, Photos uses your image in its current state, and when you click Save Changes to exit, Photos saves the result.